


5
Hängen Sie jetzt im unteren Teil des Rades die
orange Öse (7) in den grauen Haken (8). Dies
geht am einfachsten wenn Sie die orange Kette
aus der Ratsche ziehen.
On the lower part of the tyre hook the orange
eyelet (7) of the side chain to the orange hook
(8). This will result easier if you pull out the
orange tensioning chain from the tensioning
device.
Sulla parte inferiore del pneumatico agganciare
l´asola arancione (7) della catena laterale al
gancio grigio (8). L´operazione risulterà più
facile se estrarrete la catena arancione dal
dispositivo di tensionamento.
Accrochez maintenant la boucle orange (7)
dans le crochet gris (8) se trouvant dans la
partie inférieure du pneu. Cela est facilité si
vous sortez la chaîne orange de l´arrêtoir.
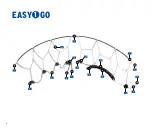
Spannen Sie nun Ihre Kette, indem Sie die
orange Kette durch die Ratsche ziehen
und hängen Sie die Öse (9) in den Haken
ein (10).
You can now tighten the chain by pulling
the orange tensioning chain through the
tensioning device and hooking the eyelet
(9) to the hook (10).
Mettete in tensione la catena tirando
la catena arancione dal dispositivo di
tensionamento e agganciate l´asola (9) al
gancio (10).
Désormais tendez votre chaîne en tirant
la chaîne orange á travers l´arrêtoir et ac-
crocher la boucle (9) dans le crochet (10).
Achten Sie darauf, dass Ihre Kette
gleichmäßig an der äußeren Reifenflan-
ke sitzt. Ihre Kette spannt sich während
der Fahrt automatisch nach.
Make sure the chain is well centred on
the tyre. The chain will tension automa-
tically while driving.
Prestate attenzione che la catena sia
ben centrata sul pneumatico. La catena
si tensionerà automaticamente durante
la marcia.
Verifiez que votre chaîne se soit placée
régulièrement sur le flanc exterieur.
Votre chaîne se retendra automatique-
ment pendant votre parcours.
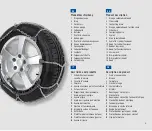
Je nach Reifen / Felgen Kombination oder
Reifenzustand haben Sie die Möglichkeit die
Passfähigkeit Ihrer Kette zu verbessern indem
Sie die Endglieder der grauen Seitenkette vari-
abel in den orangen Haken (4) hängen können.
Die Bildausschnitte zeigen Einhängebeispiele.
You can adapt your chain to the different tyre
size or tyre condition bz hooking the orange
coloured hook (4) to anyone of the free grey
coloured chain links of the tensioning chain as
illustrated in the picture.
É possibile adattare la catena seconda della
misura del pneumatico e del suo stato d´usura
agganciando il gancio arancione (4) nelle ma-
glie libere di colore grigio della catena laterale
come illustrato nella figura.
Selon la combination pneu, leur état, les
jantes, vous avez la possibilité d´optimiser
le réglage de votre chaîne en accrochant
de facon variable les maillons de la chaîne
grise dans le crochet orange (4). Les images
montrent des examples de réglage.
DE
EN
IT
FR
MONTAGE • FITTING • MONTAGGIO • MONTAGE
5
6
7
8


