Copyright © 2015 Ruckus Wireless, Inc.
Page 3 of 4
Published 24 July 2015, Part Number 800-70972-001 Rev A
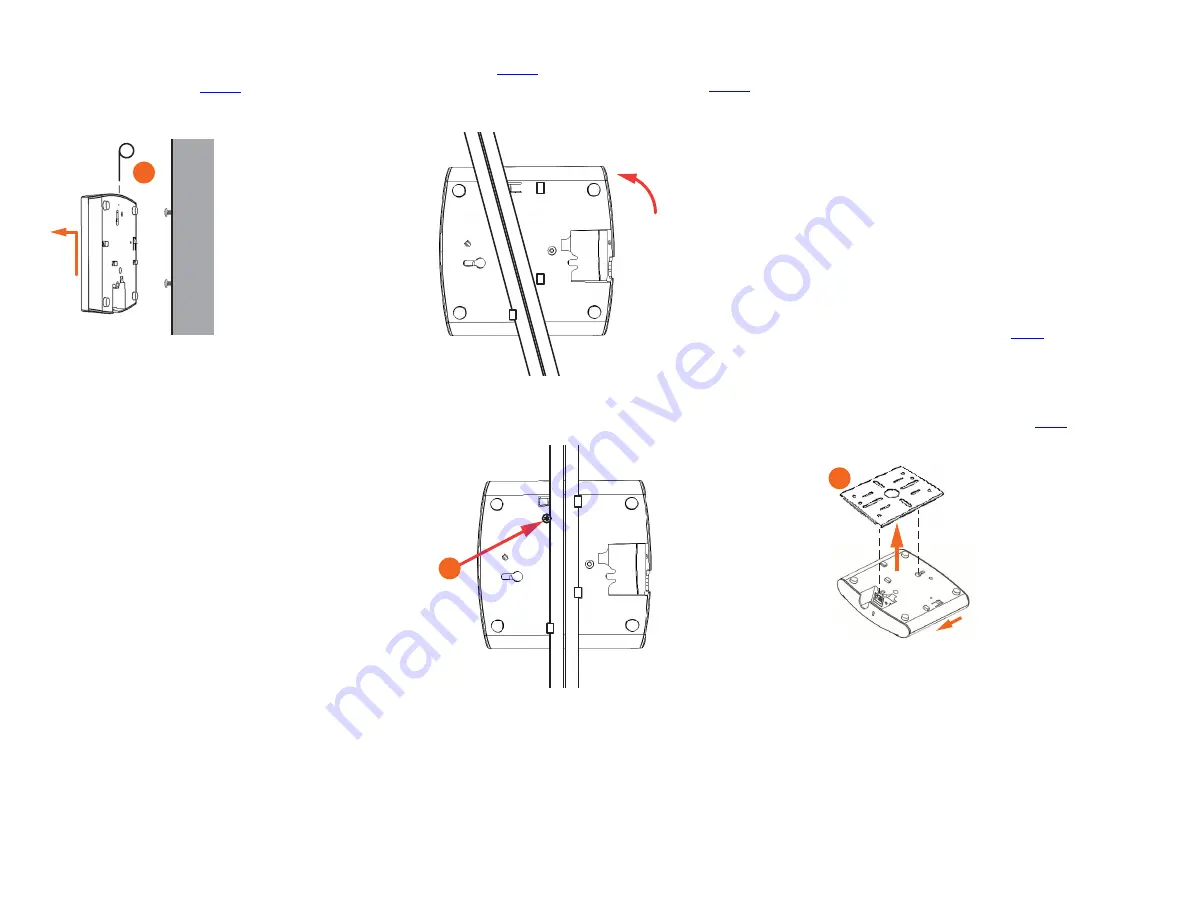
Removing the AP from Flat-Surface Mounting
Screws
A
To remove the AP from the factory-supplied mounting screws, gently
press the unit removal pin (A in
end of the AP to release the bracket locking tab in the upper keyhole.
Figure 4. Removing the AP from the screw heads
B
Push the AP up and pull it away from the mounting screw heads.
Mounting the AP on a Drop-Ceiling T-Bar
A
Orient the AP so that the T-bar is positioned between the T-bar clips
as shown in
, then rotate the AP until the third T-bar clip
catches the T-bar and the latch locks the T-bar in place (
Figure 5. Initial position
Figure 6. Final position
B
(OPTIONAL, for added security.) Using a Torx T8 screwdriver, insert the
locking screw (A) into the hole near the latch to lock the AP in place.
Removing the AP from a Drop-Ceiling T-Bar
•
To remove the AP, first remove the security screw, then depress the
latch while rotating the AP so that the T-bar clips disengage the T-bar.
Mounting the AP on a Flat Surface or Pole Using the
Optional Secure Mounting Bracket
The customer-ordered Ruckus Wireless secure mounting bracket kit
(ordering part number 902-0120-0000) includes a metal mounting bracket
and provides greater security when attaching the AP to flat surfaces (walls
and ceilings) and to poles.
•
If you are mounting the AP on a flat surface, then you will also need an
electric drill with a 4.75mm (3/16”) drill bit, and the four No. 6 zinc
plated screws and plastic wall anchors included with the kit.
•
If you are mounting the AP on a truss or pole, then you will also need
the two customer-supplied stainless steel pipe clamps.
Continue with the following:
A
If you are mounting the AP on a flat surface, then use the secure
mounting bracket as a template to mark the locations for four drill
holes on the mounting surface. There are four screw holes available on
the secure mounting bracket.
Fasten the bracket to the flat surface using four mounting screws and
plastic wall anchors and continue with
B
If you are mounting the AP on a pipe or pole, then feed the two
customer-supplied stainless steel clamps through the slots on the
secure mounting bracket. Use common hand tools to tighten the
clamps around the pipe or pole.
After the bracket is attached, continue with
.
Figure 7. Attaching the AP to the secure mounting bracket
C
Insert the two studs on the secure mounting bracket (A) into the
keyholes on the bottom of the AP.
D
Slide the AP toward the Ethernet port until the locking tab in the upper
AP keyhole locks the AP onto the top mounting bracket stud.
A
A
A


