background image

Ruckus ICX 7650 Switch Hardware Installation Guide

31

Part Number: 53-1005301-01

Mounting the Device

Connecting devices in a stack

DRAFT: BROCADE CONFIDENTIAL

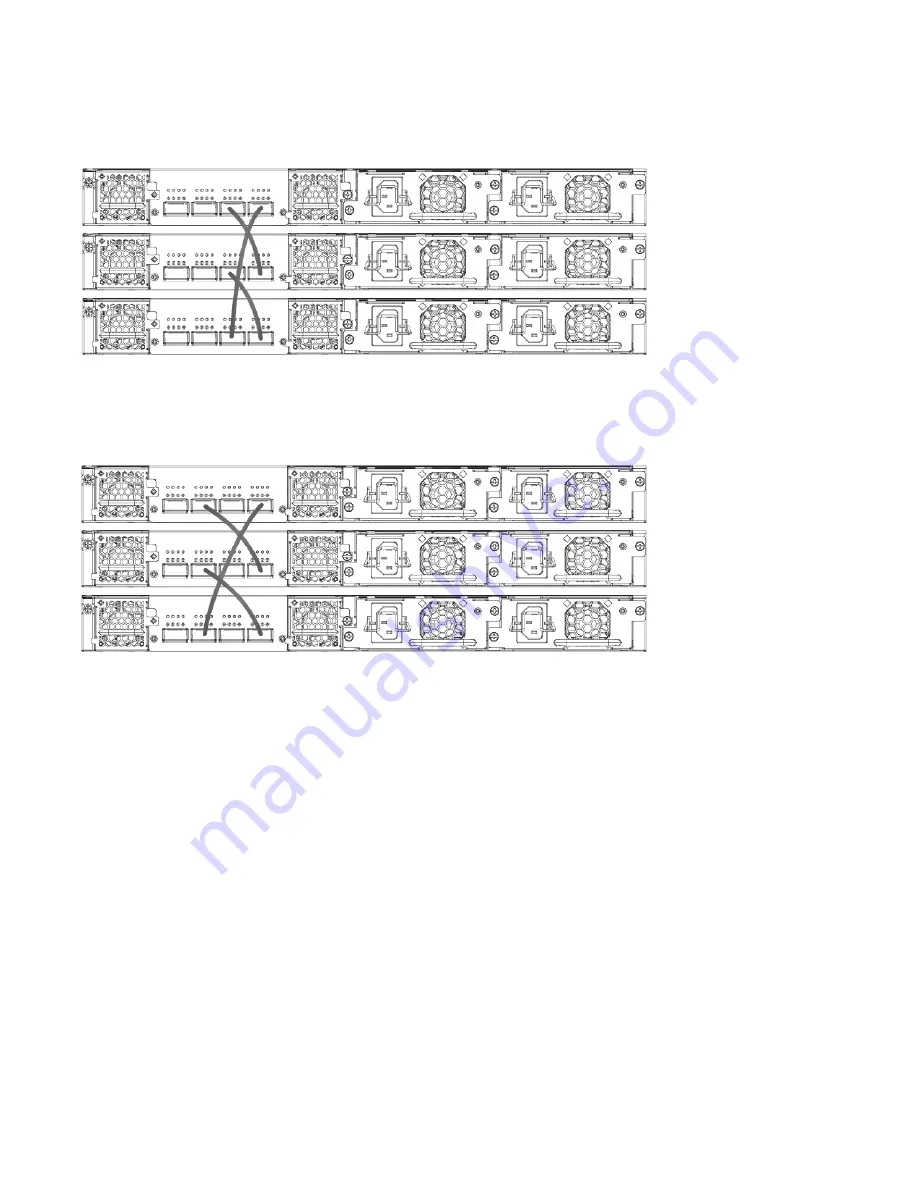
FIGURE 25

100 GbE ring stacking topology

Figure 26

 shows a supported 40 GbE ring stacking topology using 40 GbE and 40/100 GbE stacking ports.

FIGURE 26

40 GbE ring stacking topology

NOTE

For more information about stacking, refer to the 

Ruckus FastIron Stacking Configuration Guide

.

Summary of Contents for ICX 7650

Page 1: ...Part Number 53 1005301 01 Publication Date 21 December 2017 Ruckus ICX 7650 Switch Hardware Installation Guide HARDWARE INSTALLATION GUIDE...

Page 2: ...e This informational document describes features that may not be currently available Contact a Brocade sales office for information on feature and product availability Export of technical data contain...

Page 3: ...ew Hardware features 3 Port side views of the Ruckus ICX 7650 switches 3 Nonport side view of the Ruckus ICX 7650 switch 5 Device management options 6 Preparing for Installation Safety precautions 7 G...

Page 4: ...Cables Precautions specific to transceivers and cables 35 Cleaning the fiber optic connectors 35 Managing cables 36 Installing a fiber optic transceiver 36 Replacing a fiber optic transceiver 37 Remo...

Page 5: ...7650 Specifications System specifications 69 Ethernet 69 LEDs 70 Other 70 Weight and physical dimensions 70 Environmental requirements 71 Power supply specifications per PSU 71 Power consumption typic...

Page 6: ...vi Ruckus ICX 7650 Switch Hardware Installation Guide Part Number 53 1005301 01 DRAFT BROCADE CONFIDENTIAL...

Page 7: ...yntax conventions Bold and italic text identify command syntax components Delimiters and operators define groupings of parameters and their logical relationships TABLE 1 Text conventions Convention De...

Page 8: ...user account Other technical documentation content is available without logging into the Ruckus Support Portal White papers data sheets and other product documentation are available at https www rucku...

Page 9: ...round Go to the Open a Case section Priority 2 P2 High Network or service is impacted but not down Business impact may be high Workaround may be available Go to the Open a Case section Priority 3 P3 M...

Page 10: ...RAFT BROCADE CONFIDENTIAL Using these resources will help you to resolve some issues and will provide TAC with additional data from your troubleshooting analysis if you still require assistance throug...

Page 11: ...ted OS RPS15 E 250W AC power supply with nonport side exhaust airflow 08 0 70 Yes RPS15 I 250W AC power supply with nonport side intake airflow 08 0 70 Yes RPS16 E 1000W AC power supply with nonport s...

Page 12: ...2 Ruckus ICX 7650 Switch Hardware Installation Guide Part Number 53 1005301 01 About This Document Supported hardware and software DRAFT BROCADE CONFIDENTIAL...

Page 13: ...s and 1000 W AC for PoE switches ICX 7650 48ZP copper ports support PoE PoE High PoE and PoH ICX 7650 48P copper ports support PoE PoE High PoE and PoH ICX 7650 48F SFP ports support 100 MbE or 1 GbE...

Page 14: ...lash drive 2 Mini USB console port 3 Status mode button 4 Status mode LEDs 5 System LEDs 6 RJ 45 console port 7 Management port RJ 45 8 Reset button 9 10 100 1000Base T RJ 45 ports 1 24 supporting PoE...

Page 15: ...ch Figure 4 shows the rear view of the Ruckus ICX 7650 switch FIGURE 4 Rear view of the Ruckus ICX 7650 1 USB port for flash drive 2 Mini USB console port 3 Status mode button 4 Status mode LEDs 5 Sys...

Page 16: ...atically performs power on self test POST each time it is turned on You can manage the switch using any of the management options listed in the following table TABLE 1 Management options for the switc...

Page 17: ...in Power precautions DANGER Be careful not to accidently insert your fingers into the fan tray while removing it from the chassis The fan may still be spinning at a high speed CAUTION Changes or modif...

Page 18: ...C 122 F CAUTION Risk of explosion if battery is replaced by an incorrect type Dispose of used batteries according to the manufacturer s instructions DANGER For safety reasons the ESD wrist strap shou...

Page 19: ...ver current protection To determine the possibility of overloading the supply circuits add the ampere amp ratings of all devices installed on the same circuit as the device Compare this total with the...

Page 20: ...to determine the correct configuration The ambient air temperature does not exceed 50 C 122 F while the switch is operating with front to back airflow or 45 C 113 F while the switch is operating with...

Page 21: ...cables The following list provides some recommendations for cable management NOTE You should not use tie wraps with fiber optic cables because they are easily overtightened and can damage the optical...

Page 22: ...CLI Establishing a first time serial connection on page 33 7 Assign a password for additional access security No default password is assigned to the CLI Ruckus FastIron Command Reference 8 Before atta...

Page 23: ...4 post universal rack mount kit can be ordered from your switch retailer to support up to a 30 inch deep rack The 4 post rack mount kit includes mid mount and rear mount brackets In a 2 post Telco rac...

Page 24: ...to Providing power to the device 4 If installing multiple devices attach the adhesive feet to each device Place each device squarely on top of the one below Installing the device in a rack NOTE You ne...

Page 25: ...17 Two post rack mount installation The Ruckus ICX 7650 can be installed in a two post rack in various mounting positions as shown in Figure 6 FIGURE 6 Two post rack mounting positions NOTE Use the f...

Page 26: ...7650 3 Position the device in the rack providing temporary support under the switch until the rail kit is secured to the rack 4 Attach the front right bracket to the rail rack using two 10 32 x 5 8 i...

Page 27: ...and may not depict the device you are installing into the rack Installation requirements Review the installation and facility requirements for your product before mounting the device Refer to the hard...

Page 28: ...he following tasks to install the device in a four post rack 1 Attaching the front brackets on page 19 2 Attaching the extension brackets to the device on page 19 3 Installing the device in the rack o...

Page 29: ...32 x 5 16 in screws to a torque of 15 in lb 17 cm kg FIGURE 10 Attaching the front brackets Attaching the extension brackets to the device Complete the following steps to attach the extension brackets...

Page 30: ...rack as shown in Figure 12 providing temporary support under the device until the rail kit is secured to the rack 2 Attach the right front bracket to the right front rack post using two 10 32 x 5 8 in...

Page 31: ...t for the depth of your rack 1 Select the proper length rear bracket for your rack depth 2 Slide the right rear bracket onto the right extension as shown in Figure 13 The short rear brackets are shown...

Page 32: ...ps to attach the rear brackets to the rack posts 1 Attach the right rear bracket to the right rear rack post using two 10 32 x 5 8 in panhead screws and two retainer nuts as shown in Figure 15 Use the...

Page 33: ...instructions are the same for a 1 5U or 2U device The illustrations in the rack installation procedures are for reference only and may not show the actual device Complete the following tasks to instal...

Page 34: ...in the bracket and then into the holes on the side of the device Use the upper and lower screw holes leaving the center holes empty 3 Repeat Step 1 and Step 2 to attach the left rear bracket to the le...

Page 35: ...the following steps to install the device in the rack 1 Position the device in the rack as shown in Figure 18 providing temporary support under the device until the rail kit is secured to the rack 2...

Page 36: ...the correct bracket for the depth of your rack 1 Select the proper length rear bracket for your rack depth 2 Slide the right rear bracket onto the right extension as shown in Figure 19 The short rear...

Page 37: ...9 Attaching the rear brackets to the extensions at the front of the device FIGURE 20 Attaching the medium or long rear brackets to the extensions Attaching the rear brackets to the front rack posts Co...

Page 38: ...screws to a torque of 25 in lb 29 cm kg FIGURE 21 Attaching the rear brackets to the front rack posts Connecting devices in a stack The Ruckus ICX 7650 can operate as a standalone device or as a membe...

Page 39: ...FastIron Stacking Configuration Guide Stacking cables Use QSFP QSFP28 direct attached copper stacking cables or QSFP QSFP28 optics with fiber cables to connect the Ruckus ICX 7650 devices in a stack T...

Page 40: ...Configuration Guide for more information on secure setup discovery Figure 24 shows a supported 40 GbE linear stacking topology using 40 GbE and 40 100 GbE stacking ports FIGURE 24 40 GbE linear stack...

Page 41: ...in a stack DRAFT BROCADE CONFIDENTIAL FIGURE 25 100 GbE ring stacking topology Figure 26 shows a supported 40 GbE ring stacking topology using 40 GbE and 40 100 GbE stacking ports FIGURE 26 40 GbE rin...

Page 42: ...32 Ruckus ICX 7650 Switch Hardware Installation Guide Part Number 53 1005301 01 Mounting the Device Connecting devices in a stack DRAFT BROCADE CONFIDENTIAL...

Page 43: ...s are green The power supply LEDs display amber until power on self test POST is complete and then change to green The switch usually requires several minutes to boot and complete POST NOTE To turn th...

Page 44: ...r the following string at the prompt tip dev ttyb 9600 If ttyb is already in use use ttya instead and enter the following string at the prompt tip dev ttya 9600 Establishing an Ethernet connection The...

Page 45: ...educing the optic launch power To clean the fiber cable connectors Ruckus recommends using a fiber optic reel type cleaner When not using a fiber optic transceiver connector make sure to keep the prot...

Page 46: ...used for troubleshooting Support will not be provided if there is an issue with a third party transceiver NOTE Ruckus branded removable media devices are recommended for proper operation of the device...

Page 47: ...de the transceiver into the port until you feel it click into place then close the bail Transceivers are keyed to prevent incorrect insertion NOTE Each fiber optic transceiver has a 10 pad gold plated...

Page 48: ...eiver in the slot Connecting network devices Ruckus devices support connections to other vendors routers switches and hubs as well other Ruckus devices Connectors For port pinouts refer to Serial port...

Page 49: ...bling a fiber optic transceiver Use the following steps to cable a fiber optic transceiver 1 Remove the protective covering from the fiber optic port connectors and store the covering for future use 2...

Page 50: ...40 Ruckus ICX 7650 Switch Hardware Installation Guide Part Number 53 1005301 01 Installing Transceivers and Cables Connecting network devices DRAFT BROCADE CONFIDENTIAL...

Page 51: ...panel Two management port status LEDs green for speed and link activity Two power supply unit PSU bicolor status LEDs green and amber labeled PWR and PWR2 One SYS system bicolor status LED green and a...

Page 52: ...24 High PoE PoH is limited to ports 25 48 The Ruckus ICX 7650 48P has the following LEDs on the front panel Two management port status LEDs green for speed and link activity Two power supply unit PSU...

Page 53: ...GbE module LEDs Four 40 GbE QSFP port bicolor status LEDs green for 1x40 GbE and amber for 4x10 GbE which indicate 1x40 GbE or 4x10 GbE mode of operation 1x100 GbE module LEDs Four 100 GbE QSFP28 port...

Page 54: ...fic activity SPD port LEDs indicate the link speed ID port LEDs indicate the stack unit ID when the switch is in stacking mode or the PE ID when in SPX mode USB indicates files are being copied to a U...

Page 55: ...er supply LEDs One bicolor status LED green and amber on each installed power supply Fan tray LEDs One bicolor status LED green and amber on each installed fan tray Figure 31 shows the LEDs on the rea...

Page 56: ...mode automatically selects USB mode when a USB auto copy starts The following table describes the USB status mode LED for a file copy to or from a USB drive LED patterns The following tables describe...

Page 57: ...ating in standalone mode No action required Blinking green Device is initializing No action required Steady green Stacking mode is enabled and the switch is the stack master No action required Steady...

Page 58: ...ed Steady green Link is up with no traffic No action required Blinking green Link is up and packets are being transmitted or received No action required Steady amber Packet errors have been detected o...

Page 59: ...g transmitted or received No action required Steady amber Link is up in 1 GbE mode No action required Blinking amber There is 1 GbE traffic and packets are being transmitted or received No action requ...

Page 60: ...stic testing runs at link speeds of 1 Gbps 10 Gbps 40 Gbps or 100 Gbps depending on the speed of the link being tested and the type of port The Ruckus device is engineered for reliability and requires...

Page 61: ...Ruckus ICX 7650 Switch Hardware Installation Guide 51 Part Number 53 1005301 01 Monitoring the Device Diagnostic tests and monitoring DRAFT BROCADE CONFIDENTIAL show environment temp...

Page 62: ...52 Ruckus ICX 7650 Switch Hardware Installation Guide Part Number 53 1005301 01 Monitoring the Device Diagnostic tests and monitoring DRAFT BROCADE CONFIDENTIAL...

Page 63: ...upply and second fan slot are unused you must cover them with filler panels NOTE Ruckus recommends that the Ruckus ICX 7650 switch operates with two power supplies and two fan trays installed If a pow...

Page 64: ...nt power supply cannot guarantee the device is protected by backup power The redundant power supply will not have enough power to sustain the failed primary power supply In this case the device can go...

Page 65: ...ew power supply with the same airflow direction as the power supply being replaced is required to replace a power supply Replacing a power supply When installing or replacing a power supply unit keep...

Page 66: ...ation 4 Remove the power supply from the anti static shielded bag 5 Holding the power supply level guide it into the carrier rails on each side and gently push it all the way into the slot ensuring th...

Page 67: ...at least 6 American Wire Gauge AWG The 6 AWG wire and grounding lug should be crimped together using a proper tool 4 Attach the 6 AWG stranded copper wire to the grounding terminal on the Ruckus ICX 7...

Page 68: ...58 Ruckus ICX 7650 Switch Hardware Installation Guide Part Number 53 1005301 01 Power Supplies Grounding the Ruckus ICX 7650 switch DRAFT BROCADE CONFIDENTIAL...

Page 69: ...slots are unused you must cover them with filler panels NOTE Ruckus recommends that the Ruckus ICX 7650 switch operates with two power supplies and five fan assemblies installed If a power supply or f...

Page 70: ...from the chassis The fan may still be spinning at a high speed CAUTION Disassembling any part of the power supply and fan assembly voids the warranty and regulatory certifications There are no user s...

Page 71: ...airflow direction of the fan assembly must match that of the installed fan assemblies All must be either exhaust or intake Inserting a new fan assembly Use the following steps to install a fan assemb...

Page 72: ...assembly does not slide in easily ensure that it is correctly oriented before continuing 5 Holding the fan assembly level guide it into the carrier rails on each side and gently push it all the way in...

Page 73: ...er to the Ruckus Optics Family Data Sheet ICX7600 1X100GQ A 1 port 100 GbE QSFP28 expansion module The expansion module supports 40 GbE and 100 GbE optics refer to the Ruckus Optics Family Data Sheet...

Page 74: ...ule A 1 Phillips screwdriver 1 ICX7600 4X10GF module 2 ICX7600 2X40GQ module 3 ICX7600 1X100GQ module 4 Expansion module power LED CAUTION Disassembling any part of the expansion module voids the warr...

Page 75: ...rew on the filler panel b Remove the filler panel 4 Before opening the package that contains the new expansion module touch the bag to the switch casing to discharge any potential static electricity I...

Page 76: ...no module command to remove the current Module 2 configuration ICX7650 48ZP Router config stack un 1 ICX7650 48ZP Router config unit 1 no module 2 ICX7650 48ZP Router show module Module Status Ports...

Page 77: ...4 3 1 3 1 3 3 2 3 2 2 3 1 Standby u2 protocols ready can failover Current stack management MAC is 609c 9f52 6353 The example shows a configuration mismatch on stack unit 3 2 Use one of the following...

Page 78: ...3 ICX7650 2X100G 2 port 200G Module OK 2 609c 9f52 3318 U4 M1 ICX7650 48ZP POE 48 port Management Module OK 48 609c 9f52 2743 U4 M2 ICX7600 2X40GQ 2 port 80G Module OK 2 609c 9f52 2774 U4 M3 ICX7650 2...

Page 79: ...7650 non bundled switches expansion modules need to be ordered separately System component Description Enclosure Stackable up to 12 switches per stack chassis mountable in a standard 2 or 4 post rack...

Page 80: ...units DIAG diagnostics SYS system status MSTR stacking configuration CLD cloud management UPDATE software update STAT SPD ID USB PoE status mode Ports LEDs indicate port status or switch ID based on t...

Page 81: ...0 4 grms random 5 500 Hz 2 4 G sine 1 1 grms random 5 500 Hz Airflow Nominal 10 25 cfm Maximum 54 72 cfm N A Heat dissipation 5 NOTE Refer to Power consumption typical configuration on page 71 and Po...

Page 82: ...C 1 PSU 11853 08 W 6324 71 BTU hr 1763 55 W 6019 14 BTU hr 2 x 1000 W AC 2 PSUs required for PoE loading ICX 7650 48P 998 W 3406 BTU hr 958 W 3270 BTU hr 1 x 1000 W AC 1 PSU 1809 W 6174 BTU hr 1769 W...

Page 83: ...8F 100 GbE 2 slot 3 QSFP28 stacking ports 40 100 Gbps compatible with optical transceivers or direct attached copper cable 40 GbE 2 slot 3 QSFP stacking ports 40 Gbps compatible with optical transceiv...

Page 84: ...03 Canada Class A AS NZ 55032 Australia New Zealand Class A VCCI Japan Class A EN 300 386 CNS 13438 BSMI Taiwan Class A KN 32 South Korea Class A KN 35 South Korea Class A TCVN 7189 TCVN 7317 Vietnam...

Page 85: ...hazardous substance in electrical and electronic equipment EU RoHS 2012 19 EU Waste electrical and electronic equipment EU WEEE 94 62 EC packaging and packaging waste EU 2006 66 EC batteries and accu...

Page 86: ...76 Ruckus ICX 7650 Switch Hardware Installation Guide Part Number 53 1005301 01 Ruckus ICX 7650 Specifications Regulatory compliance environmental DRAFT BROCADE CONFIDENTIAL...

Page 87: ...communications Operation of this equipment in a residential area is likely to cause harmful interference in which case the user will be required to correct the interference at his own expense NOTE Cha...

Page 88: ...r Interference by Information Technology Equipment VCCI If this equipment is used in a domestic environment radio disturbance may arise When such trouble occurs the user may be required to take correc...

Page 89: ...1005301 01 Regulatory Statements China DRAFT BROCADE CONFIDENTIAL China English translation of above statement This is a Class A product In a domestic environment this product may cause radio interfer...

Page 90: ...y Statements BSMI statement Taiwan DRAFT BROCADE CONFIDENTIAL BSMI statement Taiwan English translation of above statement Warning This is a class A product In a domestic environment this product may...

Page 91: ...uv es par la partie responsable d en valuer la conformit sont susceptibles d annuler le droit de l utilisateur utiliser cet quipement PRECAUCI N Si se realizan cambios o modificaciones en este disposi...

Page 92: ...r instalada Los dispositivos de alimentaci n y las bandejas del ventilador est n etiquetadas claramente con una flecha verde y una E o con una flecha naranja y una I CAUTION To protect the serial port...

Page 93: ...nto en un entorno en el que la temperatura ambiente de operaci n pueda exceder los 50 C 122 F CAUTION Risk of explosion if battery is replaced by an incorrect type Dispose of used batteries according...

Page 94: ...ar el chasis y otros dispositivos electr nicos A fin de impedir que se produzcan da os conserve los dispositivos susceptibles de da arse con la electricidad est tica dentro de los paquetes protectore...

Page 95: ...riques la terre PRECAUCI N Antes de conectar un cable en cualquier puerto aseg rese de descargar la tensi n acumulada en el cable tocando la superficie de conexi n a tierra con los contactos el ctrico...

Page 96: ...k f r die Unterbringung des Ger ts auf angemessene Weise gesichert ist so dass das Gestell oder der Schrank nicht wackeln oder umfallen kann MISE EN GARDE V rifiez que le b ti ou le support abritant l...

Page 97: ...io cualificado DANGER Make sure that the power source circuits are properly grounded then use the power cord supplied with the device to connect it to the power source GEFAHR Stellen Sie sicher dass d...

Page 98: ...el erforderlich ist wenn das mit dem Ger t gelieferte Kabel nicht passt m ssen Sie sicherstellen dass Sie ein Stromkabel mit dem Siegel einer Sicherheitsbeh rde verwenden die f r die Zertifizierung vo...

Page 99: ...e lighter devices above GEFAHR Montieren Sie die Ger te im Gestell so tief wie m glich Platzieren Sie das schwerste Ger t ganz unten w hrend leichtere Ger te je nach Gewicht je schwerer desto tiefer d...

Page 100: ...rkapitel I sowie IEC 825 und EN60825 erf llen Optische Produkte die diese Normen nicht erf llen k nnen Strahlen aussenden die f r das menschliche Auge gef hrlich sind DANGER Utilisez uniquement des me...

Reviews: