14
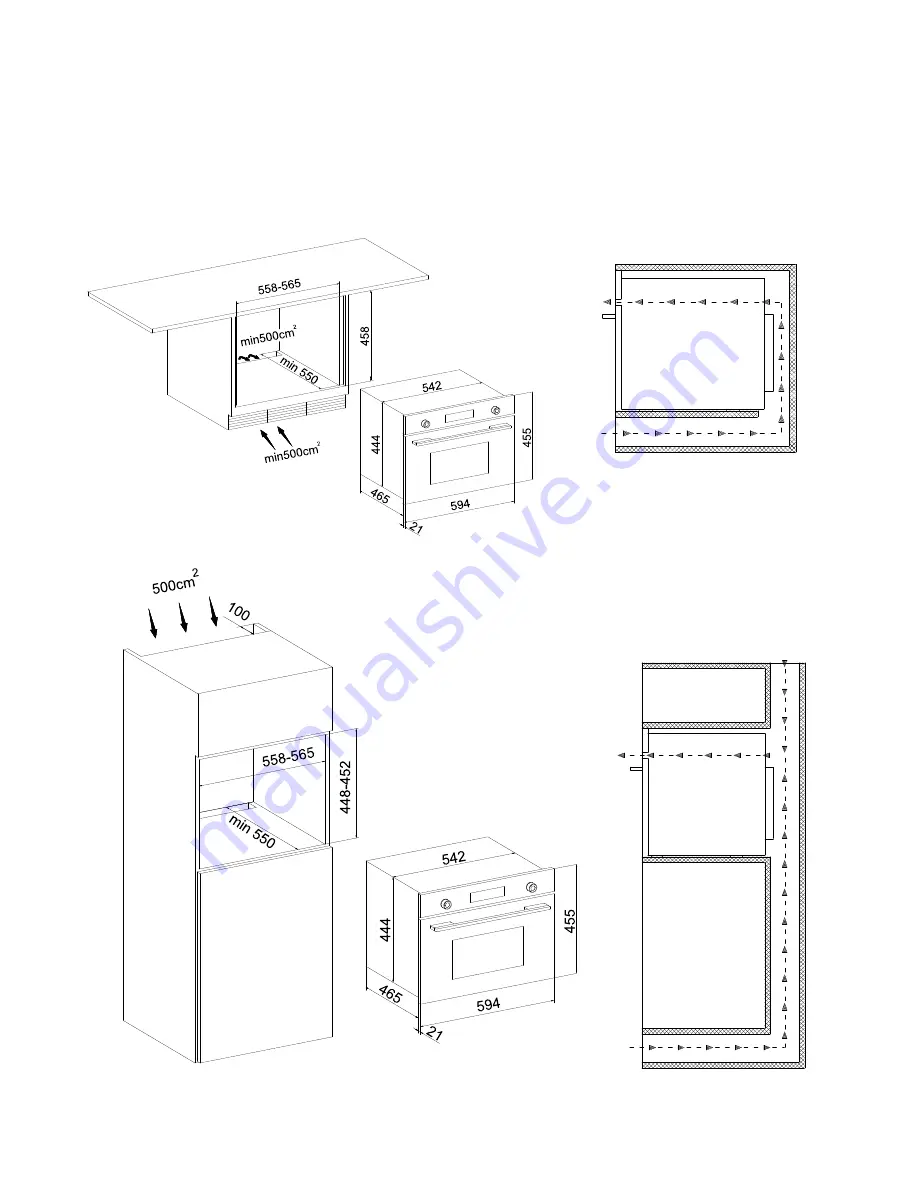
12.3 Positioning the Microwave Oven
If we put the Microwave Oven into cabinet, the material cabinet should be insulated, and the clearance between
the edge of the cabinet and the Microwave Oven should be over 100 mm for ventilation.
Page 1: ...t between the oven front panel and the door or allow soil or cleaner residue to accumulate on sealing surfaces 3 Do not operate the oven if it is damaged It is particularly important that the oven doo...
Page 2: ...2 PRECAUTIONS FOR USE 2 3 SAFETY PRECAUTIONS 3 4 GET TO KNOW YOUR OVEN 4 5 BEFORE INSTALLATION 5 6 DESCRIPTION OF FRONT PANEL CONTROLS 5 7 USING THE OVEN 5 8 FUNCTIONS 5 9 RECOMMENDED BAKING MENU 8 1...
Page 3: ...as well Never use this appliance for heating rooms Never leave packaging residues unattended in home Separate the various packaging materials on type and consign them to the nearest separate disposal...
Page 4: ...on that involves the removal of a cover which gives protection against exposure to microwave energy WARNING Liquids and other foods must not be heated in sealed containers since they are liable to exp...
Page 5: ...have been given supervision or instruction concerning use of the appliance in a safe way and understand the hazards involved Children shall not play with the appliance Cleaning and user maintenance sh...
Page 6: ...bsidiary functions indication Functions description Microwave Grill Grill microwave Defrost by time Defrost by weight Pizza Clock Child Lock Working time Delay time Mark of weight Microwave conditions...
Page 7: ...ss PT1 to set the duration Press PT2 to start cooking Press PT1 again to reset cooking power and cooking time The microwave Grill are ideal for cooking quickly and browning foods after cooking Further...
Page 8: ...5 BREAD 100 800 2 25 19 20 10 20 8 8 Defrost by time After selecting Defrost function indicators light up press PT1 to adjust the cooking time press PT1 again to adjust the duration after the setting...
Page 9: ...function OFF BLOC When DSP1 and DSP2 show ON BLOC press PT2 to confirm to activate child lock And the symbol will appear on DSP4 Under child lock function the appliance will display bloc for three sec...
Page 10: ...rease or decrease the power levels Cooking with microwave 1 The greater the amount of food the longer the cooking time Keep in mind that Double the quantity double the time Half the quantity half the...
Page 11: ...food into containers that are suitable for microwave use 11 The liquid resulting from defrosting principally that from poultry should be discarded In no event should such liquids be allowed to come i...
Page 12: ...F COOKING TIME AND TURN FROZEN HAMBURGERS 3 UNITS 18 20 SPARE RIB APPROX 3 CM THICK 400 25 30 AFTER HALF OF COOKING TIME BASTE AND TURN TOAST 4 UNITS 3 2 3 WATCH TOASTING TOASTED SANDWICHES 2 UNITS 5...
Page 13: ...ch of the oven s power circuit Warning Never use a jet of steam for cleaning the inside of the oven Warning The microwave oven should be cleaned regularly with all food remains being removed The surfa...
Page 14: ...ries after each use If they are very dirty soak them first of all and then use a brush and sponge The accessories can be washed in a dish washing machine Make sure that the turntable plate and the res...
Page 15: ...ing the Microwave Oven If we put the Microwave Oven into cabinet the material cabinet should be insulated and the clearance between the edge of the cabinet and the Microwave Oven should be over 100 mm...
Page 16: ...15 There are 4 screws on the inner side of the oven door frame Note Do not take the door handle as force bearing point during the installation and removal...
Page 17: ...and front panel of the cavity Strange noise happens when oven is in operation Check if metal objects inside the oven arced or not Check if vessel touches inner wall of oven by accident Check if bakin...
Page 18: ...17...