background image

Schnellstart  |  Erstellen eigener Presets

DE-18

Manual  |  TouchMonitor 7“/9“ Serien allgemein

Erstellen eigener Presets

Presets enthalten die Einstellungen für Ihren Work-Flow. Sie können Audio-Gruppen erstellen, die auf bestimmte Eingänge zugreifen und ei-
nes oder mehrere Instrumente mit dieser Zuordnung enthalten. Ebenso können Sie Non-Audio-Gruppen erzeugen, die von Audio-Eingangssi-
gnalen unabhängige Instrumente enthalten, z. B. Uhren, Hardware-Statusinformationen oder ein Globales Tastenfeld. 

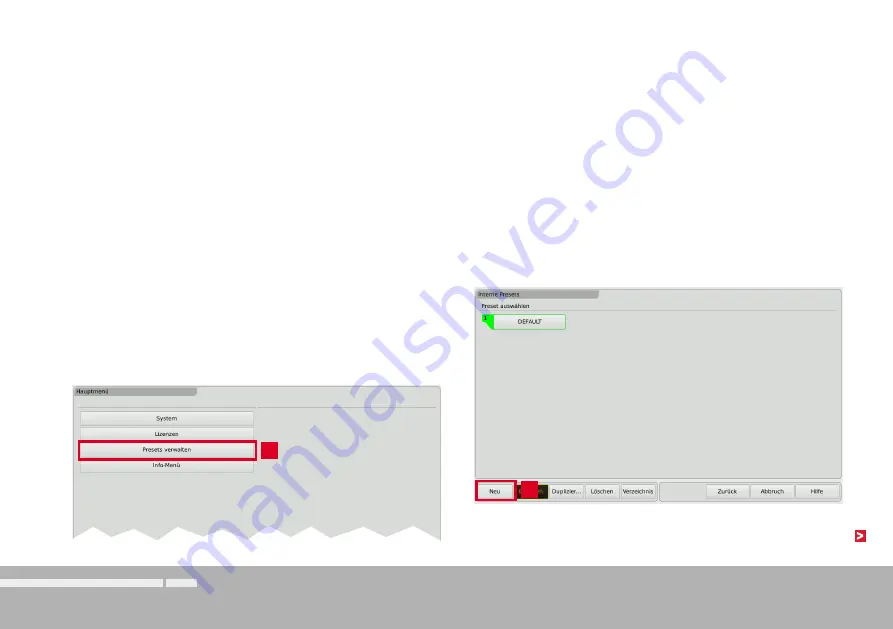
Gehen Sie wie folgt vor, wenn Sie ein neues Preset erstellen möchten:

4.  Berühren Sie die Taste 

Neu

. Ein Preset mit einem editierbaren 

vorgegebenen Namen wird erstellt (siehe Abbildung unter 5., be-
rühren Sie die Taste 

Preset-Name

 zur Änderung).

3.

4.

1.  Falls nicht sichtbar, berühren Sie eine freie Stelle des Bildschirms 

zur Anzeige der Steuerleiste.

2.  Berühren Sie die Taste 

Menü 

im rechten Bereich der Steuerleiste. 

Sie gelangen ins Menü-System, das 

Hauptmenü

 wird angezeigt.

3.  Berühren Sie die Taste 

Presets verwalten

. Sie gelangen ins  

Menü 

Interne Presets

.

Summary of Contents for TMR7-Mount

Page 1: ...TMR7 Radio TMR7 Mount Software Version 8 03 and higher 01 2020 Quick Start Guide EN...

Page 2: ...ce is certi ed to be CE conform and RoHS compliant A detailed RoHS declaration of conformity about TouchMonitor TMR7 Radio and TMR7 Mount can be found in the appendix Quick Start Guide for RTW TouchMo...

Page 3: ...is symbol points your attention to speci c characteristics that are no malfunctions Important Safety Instructions Read these instructions Study carefully and understand all safety and operating instru...

Page 4: ...e is da mage to the unit have it inspected by quali ed service personnel Do not use this apparatus near water Do not operate in wet damp conditions Do not operate in explosive atmosphere Do not operat...

Page 5: ...ll over Before connecting any devices to the unit make sure that the power supply is disconnected Protect the power cord from being walked on or pinched particu larly at plugs convenience receptacles...

Page 6: ...we encourage you to recycle this product in an appropriate system that will ensure that most of the materials are reused or recycled appropriately Battery Recycling This product contains a lithium man...

Page 7: ...You Begin 8 Introduction 8 Scope of Delivery 10 Installation 11 Connection 12 Pin Assignment 13 Getting Started 15 System Start up 15 Adapt the TouchMonitor to your Audio System 16 Create Your Own Pre...

Page 8: ...or TMR7 Radio resp TMR7 Mount Loudness true peak PPM audio vectorscope moving coil instruments RTA chart and correlation The TMR7 Radio and TMR7 Mount 4 channel solution featuring 7 touchscreen and th...

Page 9: ...are per fectly adjusted to radio broadcast requirements and easily integrates into any studio environments The four audio inputs provided by the two AES3 XLR ports are exibly con gurable for mono ster...

Page 10: ...uments in cluded in the software package are also listed TouchMonitor TMR7 Radio TMR7 Mount Table top unit TMR7S PPM TP 2 x AES3 In 2 x AES3 Out with Audio Interface with Software Moving Coil Vectorsc...

Page 11: ...other ports and interfaces are connected with the appropriate standard connection cables ATTENTION Please read before installing Before installing the unit please study the safety instructions and the...

Page 12: ...t Connection TouchMonitor TMR7 Radio TMR7 Mount GP IO RJ 12 AES3 In 1 XLR F LAN RJ 45 USB A 2 0 Full Speed 4 pin locking low voltage connector External USB mouse Wacom graphics tablet 24 V DC 1 A 1 AE...

Page 13: ...ing an external 24 V DC power supply AES3 Out 1 AES3 Out 2 transformer bal 3 pin XLR M Pin Function 1 Shield chassis 2 hot 3 cold AES3 In 1 AES3 In 2 transformer bal 3 pin XLR F Pin Function 1 Shield...

Page 14: ...O RJ 12 6P6C socket External control of functions de ned in the Global Keyboard menu The inputs de ned as active low have to be switched against 0 V Pin 1 Pin Function 1 GND 0 V 2 6 Function acc to de...

Page 15: ...nung Nach dem Anlegen der Stromversorgung startet der TouchMonitor direkt sein Betriebssystem Nach kurzer Zeit erscheint die Haupt Bildschirmseite das Ger t ist betriebsbereit Wir nehmen an dass Sie I...

Page 16: ...des Bildschirms zur Anzeige der Steuerleiste 1 2 3 2 Ber hren Sie die Taste Men im rechten Bereich der Steuerleiste Sie gelangen ins Men System das Hauptmen wird angezeigt 4 Ber hren Sie falls erforde...

Page 17: ...en H lfte des Men s Die Anzahl der verf gbaren Sync Referenz Quellen ist abh n gig vom Ger te Typ und von Umfang und Art der installierten Audio Schnittstellen 7 Ber hren Sie die Taste Uhr falls Sie d...

Page 18: ...lten z B Uhren Hardware Statusinformationen oder ein Globales Tastenfeld Gehen Sie wie folgt vor wenn Sie ein neues Preset erstellen m chten 4 Ber hren Sie die Taste Neu Ein Preset mit einem editierba...

Page 19: ...m Ger te Typ und von den aktivierten Software Lizenzen 5 Ber hren Sie die Taste Audio neu zur Erstellung der ersten Audio Gruppe 5 6 Die Taste Dom ne ist markiert W hlen Sie die Dom ne der ein gesetzt...

Page 20: ...n Instrumente Die Auswahl erscheint als Piktogramm im Feld Instrumente 10 11 Das Men Preset zeigt nun die gerade erstellte Audio Grup pe mit einem kleinen farbigen Dreieck in der linken oberen Ecke Im...

Page 21: ...m Normalbetrieb sehen m chten m ssen hier positioniert werden 13 Ber hren Sie ein Piktogramm Es wird in der linken oberen Ecke der Bildschirm Gra k platziert 14 Benutzen Sie die Tasten Position und Gr...

Page 22: ...ayout Ihren Anforderungen entspricht Sie k nnen Instrumente auch drehen ber hren Sie die Taste Speichern unten im rechten Bereich der Steuerleiste 17 Sie gelangen zur ck in den Normalbetrieb Auf dem B...

Page 23: ...der gew nschten Funktion f r einige Sekunden angezeigt Gehen Sie wie folgt vor wenn Sie die Funktionen eines Instrumentes nutzen m chten 1 Ber hren Sie die Fl che des Instruments auf dem Bildschirm Es...

Page 24: ...er Name des aktiven Presets in der rechten unteren Ecke des Bildschirms 3 Das gew hlte Preset wird geladen Das Ger t kehrt automatisch in den Normalbetrieb zur ck und zeigt das neu gew hlte Preset 1 B...

Page 25: ...he Function Description Instruments options of the manual stored on the USB ash drive Delivered Presets TouchMonitor TMR7 Radio and TMR7 Mount come with ve prede ned presets on the delivered USB ash d...

Page 26: ...R7 Mount DEFAULT Input AES3 1 Program Meter Scale Dig60 0 60 dB 60 to 0 dBFS Instruments Program Meter PPM mode Correlator NOTE This preset is xed to secure basic display functio nality It can t be ed...

Page 27: ...reo 1 Input AES3 1 Loudness ATSC A 85 Program Meter Scale TP60 3 60 dB 60 to 3 dBTP Instruments Program Meter TruePeak mode Vectorscope RTA Loudness Chart with I bargraph horizon tal bars TP S course...

Page 28: ...Instruments Correlator Program Meter TruePeak mode Vectorscope Loudness Sum M S I Loud ness Num M S I LRA TPmax Mmax Smax Group Stereo 2 Input AES3 2 Loudness EBU R128 Program Meter Scale TP60 3 60 dB...

Page 29: ...nput AES3 1 Loudness EBU R128 Program Meter Scale TP60 3 60 dB 60 to 3 dBTP Instruments Program Meter TruePeak mode Vectorscope Loudness Sum S Loudness Num I LRA Loudness Chart with I bargraph and cou...

Page 30: ...U VSC Group Stereo 1 Input AES3 1 Loudness EBU R128 Program Meter Scale TP60 3 60 dB 60 to 3 dBTP Instruments Program Meter TruePeak mode Vectorscope Correlator Loudness Sum M S I Loudness Num M S I L...

Page 31: ...1 Input AES3 1 Loudness ATSC A 85 Program Meter Scale VU digital Instruments Moving Coil VU modes Stereo Horizontal Vectorscope Loudness Chart with I bargraph and course over time including tolerance...

Page 32: ...c cessary because you only will nd options and licences that were pro vided for your model and were already available at the release date of the software version installed on the unit Software updates...

Page 33: ...d insert it to one of the USB ports on TouchMonitor s rear panel 8 When the update is nished the TouchMonitor reboots auto matically 9 Touch the Menu key in the right section of the control bar then t...

Page 34: ...2 7 kg without power supply Operating temperature in the range from 5 to 40 C Functions Operating using a nger touch screen mouse or tablet Instruments can be freely scaled and randomly positioned Mul...

Page 35: ...1LSB Full Scale 2LSB 0 1 dBFS 0 5 dBFS 1 dBFS 2 dBFS 3 dBFS PPM Over attack time 1 to 15 samples PPM Over word width 16 to 24 Bit selectable True Peak Over threshold 1 0 dBTP 2 0 dBTP 3 0 dBTP 4 0 dB...

Page 36: ...FS switchable Relative Gate 10 0 LU switchable Level adjustment for the summation 0 0 dB adjustable between 3 and 3 dB in steps of 0 5 dB Depending on the used loudness standard not all of the listed...

Page 37: ...ast Slow Peak 10 ms Moving Coil Instrument Type PPM L R PPM M S VU Loudness PPM Loudness L R M S or I selectable PPM Ch arrangement Dual Dual M S horizontal Dual M S vertical Stereo hori zontal Stereo...

Page 38: ...r M S I only Invalid M S I only Chart Graph Adoption of the corresponding colors of the Timeline Bars additional selectable colors for Tolerance Indicator and Rela tive Gate Time Range Selectable time...

Page 39: ...end of the Directive 2004 108 EG and the Directive 2006 95 EG Compliance was demonstrated to the following speci cations as listed in the of cial Journal of the European Communities EMC 2004 108 EG EN...

Page 40: ...riction of the use of certain hazardous substances in electrical and electronic equipment of the European Parliament and Council from June 8th 2011 Tested and documented by the following companies RTW...

Page 41: ...an email to support rtw com This offer is valid to anyone in receipt of this information 8 No Warranty GPL Cologne November 20th 2019 Depending on the model the start screen of the TouchMonitor conta...

Page 42: ...RTW GmbH Co KG Am Wassermann 25 50829 K ln Germany Phone 49 221 70 913 0 Fax 49 221 70 913 32 Internet www rtw com E Mail rtw rtw com...

Reviews: