

It’s Under Control
®
T1-B+
Wireless Controller
Programming the T1-B+
The T1-B+ remote control is programmed using RTI’s Integration Designer
®
software. Authorized RTI dealers can download Integration Designer
®
software
from the www.rticorp.com dealer section.
A PC running Windows XP or higher, with a USB port is required. The required
USB A to Mini B cable is included with the RTI IR-PRO dealer kit.
Note:
The T1-B+ will not operate while connected to a PC’s USB port. Make sure
you disconnect it from the computer to transmit commands. In addition, the
T1-B+ will not be able to sync with a computer’s USB port while it is transmitting
a command or running a macro.
THE SOURCE BUTTONS
The eight source buttons at the top of the T1-B+ keypad may be programmed
to run commands or macros in the same way that the other buttons can. In
addition, they may be used to select the active source page. If programmed
as a “source” button, the rest of the buttons on the keypad will switch to the
programming associated with that page. A red LED is illuminated more brightly
behind the source button to indicate the active page.
Installing Keycap Labels
The T1-B+ includes sheets of keycaps that include labelling for sources and
functions.
To install the keycap labels:
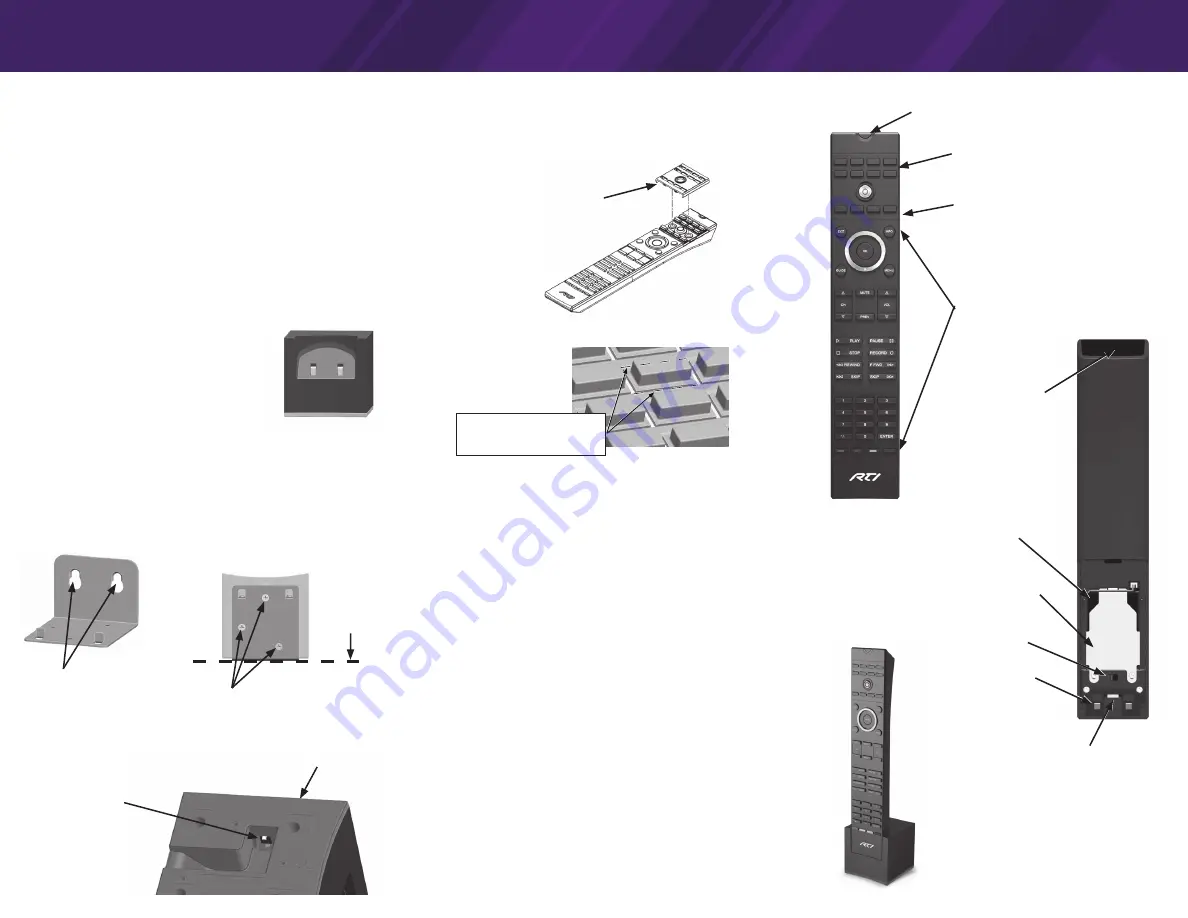
1. Start by removing the bezel from the T1-B+ by gently prying up on the bezel
which is held on by magnets.
Powering On/Off the T1-B+
A power on/off switch is located under the battery access door (See diagram at
right).
POWER ON/OFF T1-B+:
1. Remove the battery door from the rear of the remote by applying downward
pressure on battery door near battery door seam (pressing down near seam
“unlocks” the door latch) and slide the door off.
2. Turn Power On/Off Switch.
3. Slide the battery door onto the remote until it snaps into place.
Charging the T1-B+ Battery
WHEN TO CHARGE THE T1-B+:
The T1-B+ uses a Lithium-ion rechargeable battery which does not exhibit a
memory effect from being charged too often and may be placed into the dock
when not in use. A fully discharged battery will take approximately 2-4 hours to
completely re-charge.
• If the T1-B+ battery capacity is reduced to approximately one hour of
remaining run-time, the Status LED will illuminate red while the unit is
powered-up.
THE T1-B+ DOCKING STATION:
The T1-B+ Docking Station can be placed on a flat
surface such as a shelf or table, or it can be mounted
to a wall using the included mounting bracket.
• The docking station LED illuminates red to indicate a
charge in progress.
• The LED will illuminate blue when the battery in
the T1-B+ is fully charged or does not need to be
charged, unless the backlight dip switch located on
the bottom of the docking station is set to the “off”
position.
POWERING THE T1-B+ DOCKING STATION:
1. Locate and install the appropriate wall outlet plug on to the power supply.
2. Insert the mini-plug end of the power supply cable into the port located on
the underside of the docking station.
3. Plug the power supply cable into a wall outlet.
Front
Status LED
Source (8) Keypad Buttons,
Keycaps Provided
General Purpose (4) Keypad
Buttons, Keycaps Provided
Predefined
Keypad
Buttons
Back
Docking
Station
Contacts
On/Off Switch
IR Transmission
Window
USB Programming Port
Metal Battery
Retainer Clip
Battery
Docking Station Front
T1-B+ in
Docking Station
DOCKING STATION WALL MOUNT BRACKET
Screws Attach
Wall Bracket to Dock
Wall Mount Holes
Wall Mount Bracket
(Bottom View - With Dock Mounted)
Wall
Surface
Wall Mount Bracket
(Front View)
DOCKING STATION BACKLIGHT ON/OFF ADJUSTMENT
Docking Station Bottom
Docking Station Backlight
On/Off Switch
T1-B+ Keycap
Bezel
2. Using a pair of scissors, individually cut-out the keycaps that will be used.
3. After the keycap is cut out, align it on an empty keycap button.
4. Press down firmly on the keycap until it is firmly seated.
5. When finished applying keycaps, replace the bezel on the T1-B+.
Note:
the keycaps can be permanently secured by using an adhesive that bonds
to silicon rubber. The following instant adhesive glue works well and is readily
available:
Silicon Adhesive:
Loctite PRISM® 401 (p/n 40104)
U.S. Resellers:
Contact East: # 173-606
McMaster-Carr: # 74765A63
Grainger: # 3KE58
Follow these steps to apply the Loctite #401 adhesive:
1. Apply a thin layer of the adhesive to the entire top surface of the desired
keycap button.
2. Press the desired keycap over the button.
3. Press down firmly on the keycap for 15 seconds.
Repeat these steps for each keycap on the T1-B+.
Cut along the channels
that are the closest to the
keycap walls.


