background image


158

REAC applications and settings


REAC applications and settings


You can split the outputs assigned to REAC A output by connecting 
a REAC splitter between the REAC A master and slave.

To the SPLIT/BACKUP port, you can either connect the split REAC 
device directly, or connect a REAC splitter to distribute the REAC A 
output to multiple split REAC devices.


Possible uses include using the REAC A port splits for 
distribution in the stage area, and SPLIT/BACKUP port for 
distribution in the FOH (Front Of House) area.


REAC B port


The REAC B port belongs to the REAC B system, which is separate 
from the REAC A port and SPLIT/BACKUP port. The REAC B port 
always operates as the master REAC.


REAC B port output


The forty channels from the output patchbay are output to the REAC 
B port.


fig.ReacBOuts.eps


If you connect a REAC splitter to the M-380’s REAC B port and 
split REAC B, the signals received by the split REAC devices 
will be the forty channels of output from the M-380’s output 
patchbay to REAC B.

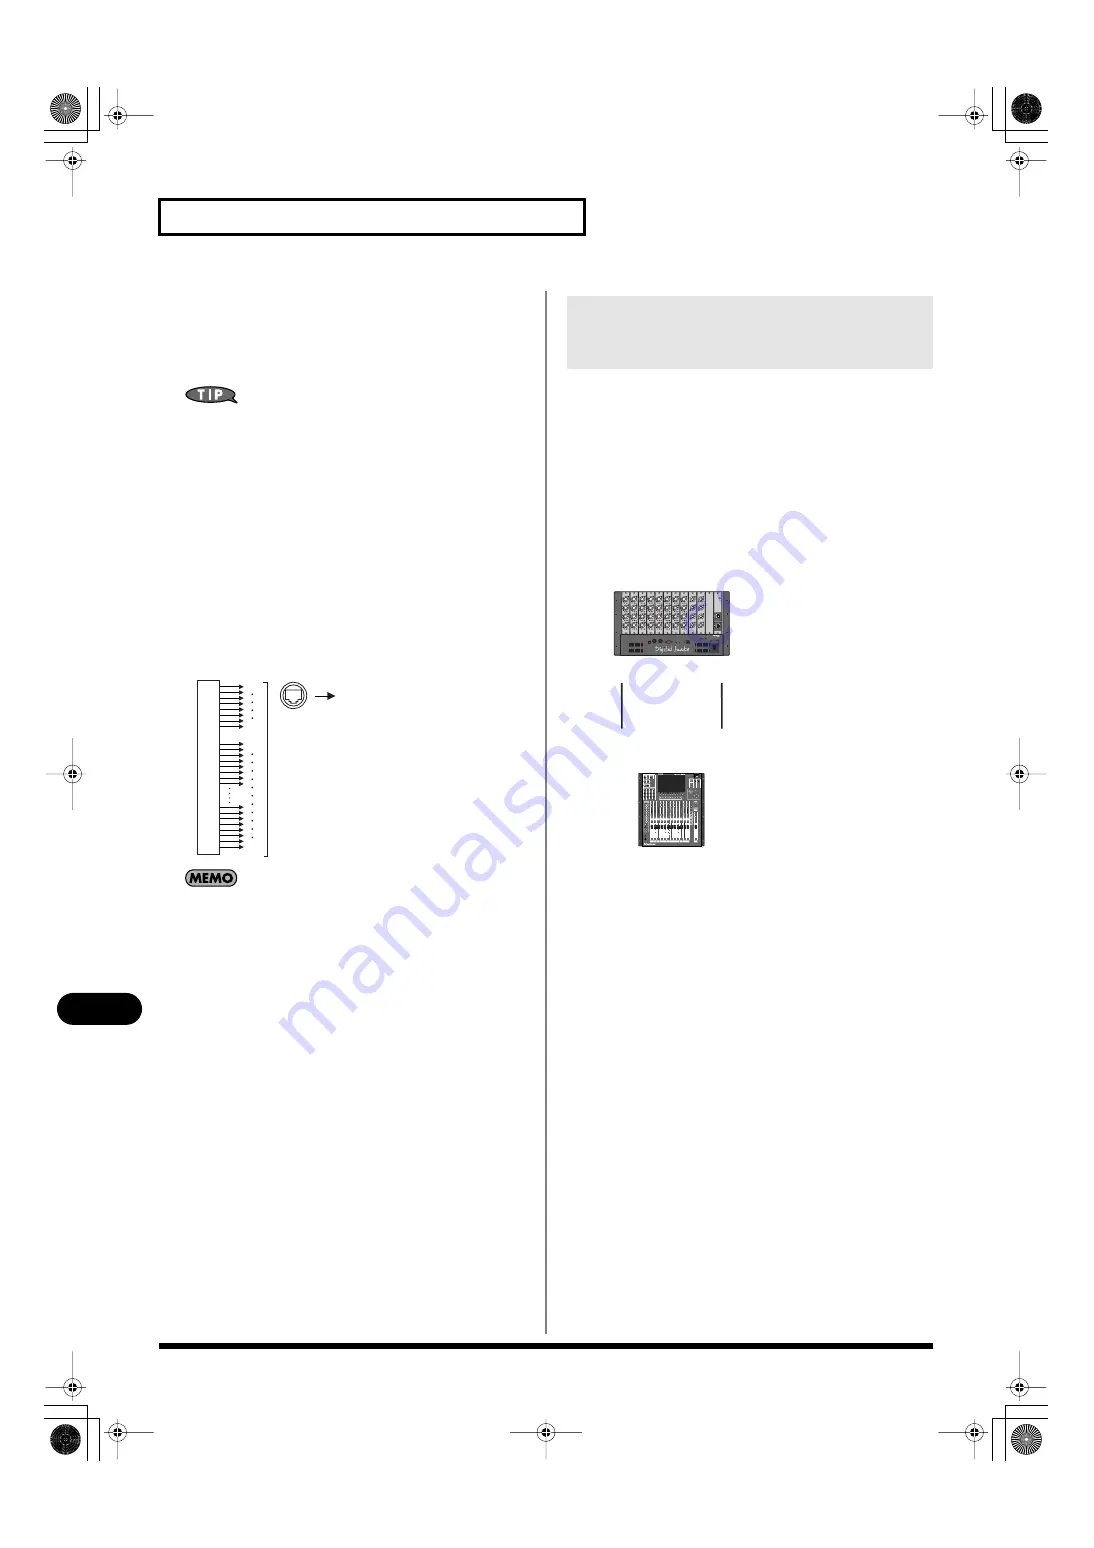
To create a redundant REAC connection between the M-380 and an 
S-4000S, set the M-380’s REAC setting to BACKUP (p. 162). Connect 
the M-380’s REAC A port to the S-4000S’ MAIN REAC port, and 
connect the SPLIT/BACKUP port to the S-4000S’ BACKUP REAC 
port. With these connections, even if the REAC A port –– MAIN 
REAC port cable should be broken, the connection will 
automatically be switched to the SPLIT/BACKUP port–BACKUP 
REAC port cable, and the audio will continue nearly without 
interruption.


fig.ReacS4000S.eps

REAC B OUT

1

9

40

8

OUTPUT

40ch

PATCHBAY


Redundant REAC connections using 

the REAC A port and SPLIT/

BACKUP port (Backup Connection)

MASTER

S-4000S

BACKUP

SPLIT

MAIN

REAC A

SLAVE

/BACKUP

M-380_e1.book 158 ページ 2010年6月30日 水曜日 午前10時31分

Summary of Contents for M-380

Page 1: ...carefully read the sections entitled IMPORTANT SAFETY INSTRUCTIONS p 2 USING THE UNIT SAFELY p 3 5 and IMPORTANT NOTES p 6 7 These sections provide important information concerning the proper operation of the unit Additionally in order to feel assured that you have gained a good grasp of every feature provided by your new unit Owner s manual should be read in its entirety The manual should be save...

Page 2: ...WN LIVE For the U K CAUTION Danger of explosion if battery is incorrectly replaced Replace only with same or equivalent type WARNING To reduce the risk of fire or electric shock do not expose this apparatus to rain or moisture This product complies with the requirements of EMCD 2004 108 EC and LVD 2006 95 EC For EU Countries For EU Countries Apparatus containing Lithium batteries ADVARSEL Lithiumb...

Page 3: ...and headphones or speakers may be capable of producing sound levels that could cause permanent hearing loss Do not operate for a long period of time at a high volume level or at a level that is uncomfortable If you experience any hearing loss or ringing in the ears you should immediately stop using the unit and consult an audiologist 011 Do not allow any objects e g flammable material coins pins o...

Page 4: ...ery to excessive heat such as sunshine fire or the like 101a The unit should be located so that its location or position does not interfere with its proper venti lation 102b Always grasp only the plug on the power supply cord when plugging into or unplugging from an outlet or this unit 103a At regular intervals you should unplug the power plug and clean it by using a dry cloth to wipe all dust and...

Page 5: ...amage if you mistakenly supply phantom power to dynamic microphones audio playback devices or other devices that don t require such power Be sure to check the specifica tions of any microphone you intend to use by referring to the manual that came with it This instrument s phantom power 48V DC 14mA Max M 380_e1 book 5 ページ 2010年6月30日 水曜日 午前10時31分 ...

Page 6: ...when receiving or initi ating a call or while conversing Should you experience such problems you should relocate such wireless devices so they are at a greater distance from this unit or switch them off 354a Do not expose the unit to direct sunlight place it near devices that radiate heat leave it inside an enclosed vehicle or otherwise subject it to temperature extremes Excessive heat can deform ...

Page 7: ...he M 380 s center of gravity is located toward the rear of the unit When transporting the M 380 grasp it firmly and be careful not to let it fall xxx If the display becomes extremely dim it is possible that the display backlight has malfunctioned If this occurs you must contact your dealer or a Roland service center xxx Due to the nature of the display there may be screen pixels that remain lit or...

Page 8: ... distribution sale lease perfor mance or broadcast of copyrighted material musical works visual works broadcasts live performances etc belonging to a third party in part or in whole without the permission of the copyright owner is forbidden by law 853 Do not use this unit for purposes that could infringe on a copyright held by a third party We assume no responsi bility whatsoever with regard to an...

Page 9: ...9 IMPORTANT NOTES M 380_e1 book 9 ページ 2010年6月30日 水曜日 午前10時31分 ...

Page 10: ...color label 51 Copying channel settings to another channel 52 Using the channel library 53 Assigning channels to DCA groups and MUTE groups 54 AUX channel and MAIN L R channel operations 55 About AUX channels and the MAIN L R channels 55 Operations using the CHANNEL EDIT section 56 Operations in the CHANNEL DISPLAY screen 58 Stereo linking AUX channels 62 Specifying a channel name and color label ...

Page 11: ...Effect input output settings 100 Editing effect parameters 102 About the 31 band GEQ 104 Inserting a 31 band GEQ 105 Editing the 31 band GEQ parameters 106 Inserting an external effects device 111 About inserting an external effects device 111 Inserting an external effects device into a channel 112 DCA groups 114 About DCA groups 114 DCA group settings 114 Assigning a channel to a DCA group 115 Sp...

Page 12: ...y recorder 141 Using the USB memory recorder 141 User settings 146 About user settings 146 Creating and editing user settings 146 Limiting the range of possible operations 151 Editing the user preferences 152 Using the user buttons 154 Editing other user preferences 155 REAC applications and settings 157 REAC applications 157 REAC connection examples 159 REAC settings 162 Remote 165 Remote functio...

Page 13: ...ing 193 Assigning sources to groups Source Assign settings 196 Checking and adjusting the musician s mix Group Mix 198 Copying M 48 settings 200 M 48 memory operations 201 Using the M 48 library 203 Saving loading USB memory 205 Appendix 208 User button functions 208 Error message list 209 Troubleshooting 210 Pin configuration diagrams 212 Requirements for switching hubs 212 Main specifications 21...

Page 14: ...e of this system It uses a proprietary protocol based on Ethernet technology and allows 40 channels of digital audio to be sent via a single Cat5e Ethernet cable REAC can do the following Send 40 channels of digital audio Send audio up to 100 meters on one Cat5e cable A switching hub or the S OPT option can be used to extend the cable Use a switching hub to easily split the signal The transmission...

Page 15: ...f the others must be set to Slave In this system the M 380 is normally set to be the master FOH setting while the input output units are set to be slaves For a more detailed description of connections refer to REAC applications p 157 Cat5e Ethernet cables up to 100 meters long are supported If you need a longer connection we recommend that you use the optional S OPT fig connect REAC eps Input outp...

Page 16: ...the ferrite core to the M 380 s REAC port When the M 380 is shipped from the factory REAC caps are attached to the REAC ports In order to use REAC port you ll need to remove the REAC cap Take care not to lose the REAC caps you remove When using an Ethernet cable with standard RJ45 plugs fit the included REAC connector covers on the REAC ports as shown Remove the REAC connector cover if you re usin...

Page 17: ... to ensure that the M 380 s front and rear panels remain unobstructed When installing the unit on a rack detach the rubber feet from the bottom of the unit Use due caution when mounting the M 380 in a rack or other enclosure so you don t get your fingers wedged or pinched Connect one end of the supplied AC power cord to a grounded AC outlet and the other end to the AC INPUT connector to provide po...

Page 18: ...rd included with the unit to connect the AC inlet of the input output unit to an electrical outlet 6 Turn on the power of the equipment connected to the audio outputs of the M 380 and your input output units This unit is equipped with a protection circuit A brief interval a few seconds after power up is required before the unit will operate normally 1 Mute the outputs using F6 MUTE ALL OUT in the ...

Page 19: ...the data in step 1 p 174 Le M 380 est équipé d une pile au lithium qui fait fonctionner l horloge et préserve les réglages du mélangeur Si la pile est faible l horloge et la restauration des réglages du mélangeur ne fonctionnent pas correctement Si un message contextuel recommandant de remplacer la pile s affiche lorsque l appareil est mis sous tension il faut la remplacer comme suit Remplacement ...

Page 20: ... Carefully insert the USB memory all the way in until it is firmly in place USB memory used with the USB Memory Recorder must support USB 2 0 Hi speed The USB memory connector is fitted with a USB memory cover When using USB memory open the USB memory cover When not using USB memory keep the USB memory cover closed battery panel1 eps About USB memory About the USB memory cover M 380_e1 book 20 ページ...

Page 21: ...21 Introduction Introduction M 380_e1 book 21 ページ 2010年6月30日 水曜日 午前10時31分 ...

Page 22: ... 27 8 METER button p 27 9 USER section p 27 10 USB MEMORY RECORDER section p 27 11 SETUP section p 28 12 Screen controller section p 28 13 TALKBACK OSC section p 28 14 MONITOR section p 29 15 GROUP section p 29 16 SCENE MEMORY section p 29 17 USB MEMORY connector p 29 18 PHONES jack p 29 19 PHONES LEVEL knob p 29 1 1 2 2 3 3 4 4 6 6 7 7 8 8 9 9 10 10 11 11 12 12 13 13 14 14 15 15 16 16 18 18 19 19...

Page 23: ...channel The button will be lit if mute is active E Faders These adjust the signal level of each channel In SENDS ON FADER mode these adjust the send level from the channels to AUX fig LayerSectGuide eps This section lets you select the channel layer that will be assigned to the fader module section The button of the currently assigned channel layer will be lit A USER layer button This switches the...

Page 24: ...user layer 1 to the fader module section fig MainFaderModGuide eps A SEL button This button selects the MAIN channel so that it can be controlled from the CHANNEL EDIT section or in the screen It will light if the MAIN channel is selected By repeatedly pressing SEL you can alternately select the MAIN L or MAIN R channels B SOLO button This button turns solo on off for the MAIN L R channels It will...

Page 25: ...d pressing DISP F COMP area fig ChEdtComp eps In this area you can operate the compressor that is provided on CH1 CH48 and the limiter that is provided on AUX1 AUX16 MAIN L R and MAIN C DISP button This accesses a popup where you can make detailed settings This will access the COMPRESSOR popup for CH1 CH48 or the LIMITER popup for AUX1 AUX16 MAIN L R MAIN C The button will light red while the popu...

Page 26: ...Aux eps In this area you can adjust the send level from CH1 CH48 or the MAIN L R channel to the AUX buses 1 16 buttons These buttons select the AUX bus that will be the target of the SEND LEVEL knob or the faders in SENDS ON FADER mode DISP button This button accesses the AUX SENDS popup where you can make detailed settings It will light red while the popup is shown If an AUX channel is selected o...

Page 27: ...band GEQ and external insert paths It will light red while this screen is shown fig MeterBtn eps This button accesses the METER screen where you can view the meters It will light red while this screen is shown fig UserSectGuide eps A DISP button This button accesses the USER screen where you can change or edit the user settings It will light red while the screen is shown If you hold down SHIFT and...

Page 28: ...HELP popup This button will light red while the popup is shown For more about using HELP refer to the Help function p 180 D Cursor buttons These buttons move the cursor up down left right in the screen E EXIT button If you press this button while another screen is shown you will return to the HOME screen If you press this button while a popup is shown the popup will close F ENTER button Use this b...

Page 29: ... will light red while the screen is shown fig SceneMemSectGuide eps DISP button This button accesses the SCENE screen where you can manage the scene list and make scene settings It will light red while the screen is shown Holding down SHIFT and pressing DISP displays the SCENE QUICKVIEW popup p 128 fig USBMemoryGuide eps You can connect USB memory to this connector Before you disconnect USB memory...

Page 30: ... RS 232C MIDI select switch p 32 7 RS 232C connector p 32 8 DIGITAL OUT jacks p 32 9 TALKBACK MIC IN jack p 32 10 STEREO IN jacks p 32 11 POWER switch p 32 12 Grounding terminal p 33 13 AC INPUT connector power cord clamp p 33 14 Cord hook p 33 15 Cooling vent p 33 16 Theft prevention lock p 33 17 BATTERY slot p 33 3 4 6 7 9 10 17 1 2 8 5 15 15 15 14 11 13 12 16 M 380_e1 book 30 ページ 2010年6月30日 水曜日...

Page 31: ...bles These connectors support Cat5e Ethernet cables up to 100 meters long If you need a longer connection we recommend that you use the optional S OPT SPLIT BACKUP port This is used as a backup connection for the REAC A port or for split connection You can also use it for multitrack recording on a PC in which you ve installed the REAC driver For details on backup connections and split connections ...

Page 32: ...nt digital audio signal Two types of jacks are provided coaxial and optical The same digital audio signal is output from both jacks By default MONITOR L R is patched to these jacks fig TbInJackGuide eps This is a balanced XLR 3 31 female input jack for connecting a talkback mic Make connections after first checking the wiring diagrams of other equipment you intend to connect fig XLRJackInput eps f...

Page 33: ...he Information page fig ACInletGuide eps Connect the included power cord to the AC INPUT connector Use the power cord clamp to prevent the power cord from being accidentally disconnected For details on attaching the power cord clamp refer to Attaching the power cord clamp p 17 Do not connect any power cord to the M 380 other than the included one You can use this power cord hook to prevent the pow...

Page 34: ...ppear Use the controllers of the CHANNEL EDIT section to edit the values fig ScrChDisp eps You can make adjustments in finer increments by holding down SHIFT while you operate the CHANNEL EDIT section s knobs or the value dial If you want to edit channel parameters that are not shown in the CHANNEL DISPLAY screen you can press the DISP button in each area of the CHANNEL EDIT section to access a po...

Page 35: ...ome screen press the button that turned red when you pressed it to access a screen Buttons that access a popup are excepted A user setting lets you choose either the CHANNEL DISPLAY screen or the METER screen as the Home screen For details on how to choose the Home screen refer to Editing other user preferences p 155 Accessing a screen Home screen CHANNEL DISPLAY screen AUX SENDS popup SCENE scree...

Page 36: ...etting indication This shows the current user settings E Scene indication This shows the number and name of the currently selected scene 2 MAIN level indication fig ScrMainMeter eps This shows the output level of the MAIN L R channels 3 Main display area fig ScrMainArea eps Most screen operations are performed in this area The name of the current screen is shown in the screen name indication of th...

Page 37: ...the song name and time information Popup indication These are popups that are shown overlaid on the main display area They provide a cursor and function buttons for performing operations in the screen fig Popups eps While a popup is displayed cursor and function button operations are valid only for the popup fig FuncBtnGuide eps The function buttons are assigned to the main display area of the scr...

Page 38: ... BtnAllClr eps These buttons assist you in operating check buttons Pressing the ALL button will select all applicable check buttons Pressing the CLR button will clear all applicable check buttons fig Cursor eps Knobs in the screen can be operated by the knobs of the CHANNEL EDIT section or by the value dial To use the value dial move the cursor to the desired knob You can make more detailed settin...

Page 39: ...hanges the character at the cursor loca tion F1 INSERT Inserts a space at the cursor location The text at the right of the cursor location will move to the right F2 A a Changes the letter at the cursor location between uppercase and lowercase If the character is not an English letter it will be changed to the letter A F3 NUM Converts the character at the cursor loca tion to the numeral 0 F4 DELETE...

Page 40: ...e LIBRARY STORE popup will appear 6 Editing name in name editing field For details on operations in the NAME EDIT popup refer to Editing a name p 39 7 Press F8 STORE fig ScrLibStoreConf eps A message will ask you to confirm the library store operation 8 Press F8 STORE to execute the library store operation and close the popup Alternatively press F7 CANCEL to cancel the library store operation You ...

Page 41: ... a name p 39 5 Press F8 OK to finalize the edited name and close the NAME EDIT popup Alternatively press F7 CANCEL to discard your edits and close the NAME EDIT popup CONFIRMATION message fig Confirm eps This message asks you to confirm an operation CAUTION message fig Caution eps This message cautions you that a problem has occurred during operation ERROR message fig Error eps This message will a...

Page 42: ...Q Four band EQ This is a four band EQ with LO LO MID HI MID and HI frequency bands MUTE This mutes the channel The signal sent to the MAIN L R bus the AUX buses and the direct out will be muted FADER This adjusts the send level to the MAIN L R bus PAN This adjusts the left right panning of the audio signal sent to the MAIN L R bus MAIN SW Main switch This turns the send to the MAIN L R bus on off ...

Page 43: ...of parameters and the color of knobs in the CHANNEL EDIT DISPLAY screen is close to that of the CHANNEL EDIT section making it easy to check the values 1 In the CHANNEL EDIT section press CH DISP The CHANNEL DISPLAY screen will appear fig ScrChDisp eps Use the PREAMP area of the CHANNEL EDIT section to adjust the preamp gain fig ChEdtPreamp eps 1 Use the GAIN dial to adjust the preamp gain Operati...

Page 44: ...detailed settings for the compressor For details refer to Compressor operations p 78 Use the EQUALIZER area of the CHANNEL EDIT section to operate the EQ fig ChEdtEQ eps 1 Press ON to turn the four band EQ on off 2 Use the GAIN knobs to adjust the gain of each frequency band 3 Use the FREQ knobs to adjust the center frequency of each band 4 Use the Q knobs to adjust the Q of the LO MID and HI MID ...

Page 45: ...an turn the corresponding send switch on off by holding down SHIFT and pressing AUX SELECT 1 16 Using the top panel faders SENDS ON FADER 1 Press AUX SELECT 1 16 to select the send destination AUX bus 2 Press SENDS ON FADER so it is blinking 3 Use the top panel faders to adjust the amount sent from each input channel to the selected AUX bus fig FaderAll eps By pressing DISP you can access the AUX ...

Page 46: ...t off will maintain the normal phase d GAIN knob This adjusts the preamp gain in the range of 65 dBu 10 dBu if PAD is on a range of 45 dBu 10 dBu e OL Overload indicator This will light red when the output of the preamp exceeds the OVER Lev setting specified in the METER SETUP popup p 96 The preamp gain is not a continuous control it is digital with stepped control This is normal In certain situat...

Page 47: ... operations p 73 5 Compressor fig ScrChComp eps a COMP button This turns the compressor on off b THRE Threshold knob This adjusts the threshold level of the compressor in the range of 40 0 dB 0 0 dB c IN meter This shows the input level of the compressor For stereo linked channels two meters L and R will be shown d GR meter This shows the amount of gain reduction for the compressor e OL Overload i...

Page 48: ... 0 kHz h GAIN knob LO LO MID HI MID HI These adjust the gain of the LO LO MID HI MID and HI bands in the range of 15 0 dB 15 0 dB For detailed settings for the four band EQ refer to Four band EQ operations p 84 8 Direct out point fig ScrChDirGuide eps You can choose one of the following as the position from which the channel s signal is taken as the direct out signal 8 AUX sends fig ScrChSends eps...

Page 49: ... dB 10 0 dB You can make settings in finer increments by operating the value dial while you hold down SHIFT b S button This turns SOLO on off for the channel c M button This turns MUTE on off for the channel d MAIN button This turns the MAIN send on off e Channel meter This indicates the signal level of the channel For a stereo linked channel two meters L and R are shown The level detection point ...

Page 50: ...linked so that their parameters will have the same settings This is convenient when you re dealing with stereo sources 1 Access the CHANNEL DISPLAY screen for the channel that you want to stereo link fig ScrChDisp eps 2 Press F1 LINK A confirmation message will appear asking you to confirm the stereo link operation The function buttons have the following operations 3 Press F7 LINK L R or F8 LINK L...

Page 51: ...meEdit eps 2 Move the cursor to the name edit field and edit the channel name Use the cursor left right buttons to move the cursor location Use the value dial to change the character at the cursor location 3 Press F8 CLOSE to close the popup 1 Access the NAME EDIT popup for the desired channel fig ScrChNameEdit eps Specifying a channel name and color label Accessing the NAME EDIT popup A C B F1 Re...

Page 52: ...uide eps A Copy source channel This indicates the copy source channel B Copy parameter select buttons Here you can select the parameters that will be copied You can select the following parameters When the LCR SYSTEM is on C Copy destination channel select buttons Here you can select the copy destination channel s The function buttons have the following operations 3 Move the cursor to the desired ...

Page 53: ...f the library data C Recall parameter select buttons Use these to select the parameters that will be recalled You can select the following parameters When the LCR SYSTEM is on Noise may occur when you execute a library preview or recall but this is not a malfunction The function buttons have the following operations Available only for the User library Using the channel library Accessing the CHANNE...

Page 54: ...s have the following operations 1 Access the GROUP ASSIGN popup for the desired channel fig ScrChGroupAssign eps 2 Verify that the target channel is correct 3 Move the cursor to the desired DCA group select button and press ENTER to select it 4 Press F8 CLOSE to close the popup For details on DCA groups refer to DCA groups p 114 1 Access the GROUP ASSIGN popup for the desired channel fig ScrChGrou...

Page 55: ...This adjusts the send to AUX MAIN SEND AUX1 AUX16 only This adjusts the send to MAIN L R MATRIX SEND Adjust the send to MATRIX1 MATRIX8 About AUX channels and the MAIN L R channels MAIN LR LR SOLO AUX 1 2 16 LR LR 1 2 16 MAIN SOLO AUX PAN EXT FX INSERT 4BAND EQ ATT POST ATT PRE EQ PRE FADER PRE EQ POST FADER PRE FADER POST FADER OUTPUT LEVEL FX INSERT MUTE FADER BAL GEQ INSERT SW TO AUX 1 3 7 MAIN...

Page 56: ...el by touching its fader The CHANNEL DISPLAY screen shows the parameter values that you can operate in the CHANNEL EDIT section The arrangement of the parameters and the color of the knobs in the CHANNEL DISPLAY screen is similar to the layout of the CHANNEL EDIT section making it easy for you to check the values 1 In the CHANNEL EDIT section press CH DISP The CHANNEL DISPLAY screen will appear fi...

Page 57: ...ations p 84 You can make fine adjustments by holding down SHIFT while you operate the knob This operation is performed in the PAN area of the CHANNEL EDIT section This is valid for the MAIN L R channels and for stereo linked AUX channels fig ChEdtPan eps 1 Use the PAN knob to adjust the balance You can make fine adjustments by holding down SHIFT while you operate the knob This operation is perform...

Page 58: ...ISPLAY screen fig ScrChMainGuide eps fig ScrChAuxGuide eps 1 Attenuator fig ScrMtxATTGuide eps a ATT knob This adjusts the channel s input level in the range of 48 dB 0 dB 6 dB steps b OL Overload indicator This will light red when the output of the attenuator exceeds the OVER Lev setting specified in the METER SETUP popup p 96 Sending the audio signal to a MATRIX bus For the MAIN L R channel use ...

Page 59: ...r details refer to Inserting a 31 band GEQ p 105 c FX INS If FX1 FX4 is inserted this shows the number of the inserted FX If the number is shown in white the inserted effect is enabled If it is shown in gray the inserted effect is bypassed The character L or R may be added to the FX INS number This has the following significance By moving the cursor to FX INS and pressing ENTER you can access the ...

Page 60: ...MATRIX in the range of Inf dB 10 0 dB The color of the level bar indicates the send point or status of the send switch as follows MATRIX pan slider fig ScrMtxSendField2 eps If the send destination is a stereo linked pair of MATRIX channels this slider adjusts the left right position in the range of L63 R63 This is shown for the odd numbered MATRIX send For detailed MATRIX send settings refer to MA...

Page 61: ...knob This adjusts the send level to MAIN L R in the range of Inf dB 10 0 dB d MAIN send point These select the point from which the signal is sent to MAIN L R The selected item corresponds to the send point as follows If this is set to POST FADER muting the AUX channel will also mute the send to the MAIN L R channel If this is set to PRE EQ or PRE FADER muting the AUX channel will not affect the s...

Page 62: ...red AUX channels so that their parameters will have the same settings This is convenient when you want stereo output 1 Access the CHANNEL DISPLAY screen for the AUX channel that you want to stereo link 2 Press F1 LINK A confirmation message will appear asking you to confirm the stereo link operation The function buttons have the following operations 3 Press F7 LINK L R or F8 LINK L R the AUX chann...

Page 63: ...up fig ScrChCopyOutGuide eps A Copy source channel This indicates the copy source channel B Copy parameter select buttons Here you can select the parameters that will be copied You can select the following parameters C Copy destination channel select buttons Here you can select the copy destination channel s The function buttons have the following operations 3 Move the cursor to the desired copy p...

Page 64: ...ons Available only for the User library For details on library operations refer to Library operations p 39 When you store an AUX channel in the User library the AUX sends will be stored with the default values When you store the MAIN L R channel in the User library the MAIN send will be stored with the default value Output channels can be assigned to DCA groups and MUTE groups Assignments to DCA g...

Page 65: ...7 COPY MAIN MIX A confirmation message will ask you to confirm the Copy operation 3 Press F8 OK to copy the send amount from each input channel to MAIN If you press F7 CANCEL the Copy operation will be cancelled In the case of stereo linked AUX channels the pan from each input channel to MAIN will also be copied Copying the MAIN mix AUX channels only M 380_e1 book 65 ページ 2010年6月30日 水曜日 午前10時31分 ...

Page 66: ...FX1 FX4 FADER This adjusts the output level BALANCE This adjusts the left right balance for stereo linked MATRIX MUTE This mutes the output of the channel GEQ INSERT This port allows you to insert a 31 band GEQ About MATRIX channels MATRIX 1 8 OUT OUTPUT PATCHBAY PRE FADER POST FADER OUTPUT LEVEL FADER EXT FX INSERT ATT POST ATT FX INSERT GEQ INSERT BAL MUTE TO MONITOR SELECT TO REC SELECT TO SOLO...

Page 67: ... operate channels Before you can do this you will need to set the user preference p 155 so that the AUX MTX Layer select button will select 4Auxes 8Matrices If a MATRIX channel is selected pressing the CHANNEL EDIT section CH DISP button will access the CHANNEL DISPLAY screen for the MATRIX channel You can use the CHANNEL EDIT section to operate the following parameters of a MATRIX channel ATT Bal...

Page 68: ...fine adjustments by holding down SHIFT while you operate the knob You can t use SENDS ON FADER to adjust the send amount from AUX channels to an MATRIX bus The parameters of the MATRIX channels can be operated in the CHANNEL DISPLAY screen fig ScrChDispMtxGuide eps 1 Attenuator fig ScrMtxATTGuide eps a ATT knob This adjusts the channel s input level in the range of 48 dB 0 dB 6 dB steps b OL Overl...

Page 69: ...ificance By moving the cursor to FX INS and pressing ENTER you can access the FX 1 4 tab of the EFFECTS screen Inserting an effect into a channel is done in the EFFECTS screen For details refer to Effect input output settings p 100 Up to four effects can be inserted in a channel In this case they are inserted in series in order of the FX number 3 FROM AUX send fig ScrFromAux eps These adjust the s...

Page 70: ...e channel selection and send level will be the same for FROM CH A and FROM CH B The position at which the signal is taken from CH1 CH48 is the same as the direct out send position This setting is made in the CHANNEL DISPLAY screen for CH1 CH48 p 48 6 Balance fig ScrChBal eps This adjusts the left right output balance sent from stereo linked MATRIX channels in the range of L63 R63 7 Group fig ScrCh...

Page 71: ...he MATRIX channels will be stereo linked Stereo link will link the following parameters Attenuator parameters Fader parameters The FROM AUX and FROM MAIN L R send levels and send switches The FROM CH A B channel selections send levels send switches and send pans F1 LINK Turns channel link on off F2 NAME EDIT Accesses the NAME EDIT popup where you can specify the chan nel name p 51 F5 GROUP ASSIGN ...

Page 72: ...form this operation 1 Access the CHANNEL DISPLAY screen for the desired copy source MATRIX channel fig ScrChDispMtx eps 2 Press F7 COPY MIX to access the COPY MATRIX MIX popup fig ScrMtxCopyGuide eps A Copy source channel indication This indicates the copy source MATRIX channel B Copy destination channel select button This selects the copy destination MATRIX channel In the COPY MATRIX MIX popup th...

Page 73: ...g ExpCurve eps A ducking applies a user adjustable level of attenuation RANGE to input signals that are higher than the threshold level fig GateDuck eps Gate expander operations are performed in the GATE EXPANDER popup Gate expander operations INPUT LEVEL TIME OUTPUT LEVEL LEVEL THRESHOLD THRESHOLD RANGE RANGE ATTACK HOLD RELEASE INPUT SIGNAL OUTPUT SIGNAL INPUT LEVEL TIME OUTPUT LEVEL LEVEL THRES...

Page 74: ...ols for the CHANNEL EDIT section The FREQ and GAIN knobs for EQ LO and HI are disabled at this time The parameters that you can manipulate using the EQ area controls vary according to the state of the TYPE select buttons as shown below GATE EXPANDER DUCKING In the GATE EXPANDER popup the function buttons perform the following operations GATE EXPANDER popup GATE Gate EXPANDER Expander DUCKING Ducki...

Page 75: ...threshold level can be adjusted between steep HARD and gentle SOFT9 d ATTACK knob This adjusts the ATTACK time in a range of 0 0 ms 800 0 ms This is the time from when the input signal exceeds the threshold level until the expander effect disappears e RELEASE knob This adjusts the RELEASE time in a range of 0 ms 8000 ms This is the time from when the input signal falls below the threshold level un...

Page 76: ... in signal In the KEY IN SELECT popup the function buttons perform the following operations 2 Use F1 CH 1 24 or F2 CH 25 48 to view the desired key in signal select buttons 3 Move the cursor to the desired key in signal select button and press ENTER to select it 4 Press F8 CLOSE to close the popup If you want the channel itself to be its own key in signal press F6 SELCT SELF 1 Access the GATE EXPA...

Page 77: ... linking for a channel when the GATE REMAIN indication is 0 and this would cause the number of gate expander units to exceed 24 the gate expander for that channel will be turned off In the GATE EXPANDER OVERVIEW popup the function buttons perform the following operations You can recall gate expander settings from the library or store the current gate expander settings in the library The GATE EXP L...

Page 78: ... shown F1 PRESET Displays the recall only PRESET li brary F2 USER Displays the USER library which lets you recall or store data F3 PREVIEW Previews auditions the library data that is selected in the list F4 RECALL Recalls the library data that is select ed in the list F5 STORE Stores settings to the library data that is selected in the list F6 LOCK Locks the library data that is selected in the li...

Page 79: ...dB This adjusts the output level of the compressor If AUTO GAIN is on the GAIN will have an effective range of 40 0 dB 6 0 dB If the GAIN value is outside the effective range the value will be shown in red When the COMPRESSOR popup is displayed the compressor can be adjusted using the EQ area controls for the CHANNEL EDIT section The FREQ and GAIN knobs for EQ LO and HI are disabled at this time T...

Page 80: ... popup the function buttons perform the following operations 2 Press F1 CH 1 24 or F2 CH 25 48 to view the desired key in signal select buttons 3 Move the cursor to the desired key in signal select button and press ENTER to select it 4 Press F8 CLOSE to close the popup If you want to use the channel itself as its own key in signal press F6 SELECT SELF 1 Access the COMPRESSOR popup fig PopComp eps ...

Page 81: ...mpressor library operations 1 Access the COMPRESSOR popup 2 Press F4 LIBRARY to access the COMP LIBRARY popup fig PopCompLibGuide eps A Channel indication This indicates the channel to which the COMP LIBRARY popup applies B Library data list This is a list of the library data In the COMP LIBRARY popup the function buttons perform the following operations Available only for the User library For det...

Page 82: ...limiter For stereo linked channels two meters L and R are shown 5 THRESH knob This adjusts the threshold level in a range of 40 0 dB 0 0 dB 6 KNEE knob This adjusts the KNEE in a range of HARD to SOFT1 SOFT9 ten steps The way in which the limiter applies to the region near the threshold level can be adjusted between steep HARD and gradual SOFT9 7 ATTACK knob This adjusts the ATTACK time in a range...

Page 83: ...ilable only for the User library For details on library operations refer to Library operations p 39 Knob Parameter EQ LO MID Q Blink Threshold level FREQ Blink ATTACK time GAIN Blink RELEASE time EQ HI MID Q Unlit Disabled FREQ Blink KNEE GAIN Unlit Disabled Button Function F1 LIMITER ON Turns the limiter on off F4 LIBRARY Accesses the LIMITER LIBRARY popup F5 PEAK CLEAR Clears the level meter s p...

Page 84: ...t which the overload indicator will light For details refer to Editing the meter settings p 96 B Filter type selection buttons These buttons select one of the following filter types fig FilterCurve eps C Q knob This adjusts the filter s Q in a range of 0 36 16 Higher values produce a sharper curve D FREQ knob This adjusts the frequency in a range of 20 Hz 20 0 kHz Four band EQ operations Accessing...

Page 85: ...Higher values produce a sharper curve L FREQ knob LO This adjusts the center frequency of the LO band in a range of 20 Hz 1 00 kHz M FREQ knob LO MID N FREQ knob HI MID These adjust the center frequency of the LO MID and HI MID bands in a range of 20 Hz 20 0 kHz O FREQ knob HI This adjusts the center frequency of the HI band in a range of 1 00 kHz 20 0 kHz P GAIN knob LO Q GAIN knob LO MID R GAIN ...

Page 86: ...when you preview or recall a library item but this is not a malfunction When you store the EQ settings of the MAIN L R channels or an AUX channel into the User library the default filter values will be stored 1 Access the EQUALIZER popup fig PopEQ eps 2 Press F6 FLAT fig ScrEQFlatConf eps A confirmation message will ask you to confirm the operation 3 Press F8 FLAT the gain of the LO LO MID HI MID ...

Page 87: ... adjust the sends from the CH to AUX The AUX send area is structured as follows fig PopAuxSendFieldGuide eps A AUX number and name This indicates the AUX channel number and name B Send level bar This adjusts the send level to AUX in a range of Inf dB 10 0 dB AUX send operations MAIN AUX SENDS CH1 CH48 LR LR SOLO AUX 1 2 16 LR LR 1 2 16 MAIN SOLO AUX 4BAND EQ PRE EQ PRE FADER PRE EQ POST FADER PRE ...

Page 88: ... 48 to select an input channel 2 In the CHANNEL EDIT section s AUX SENDS area press DISP to access the AUX SENDS popup fig ScrAuxSends eps 3 Press F6 ALL CH POINTS to access the ALL CH SEND POINTS popup fig ScrSendPoints eps A Send point select buttons 1 16 These buttons select the send point for AUX1 AUX16 from the following choices 4 Use the send point select buttons to select the desired send p...

Page 89: ...ATRIX send fig PopMtxSendField2Guide eps a MATRIX pan slider This adjusts the left right panning of the signal send to the stereo linked MATRIX channels in a range of L63 R63 E Send point select buttons These select the point from which the AUX or MAIN signal is sent to MATRIX from the following choices In the MATRIX SENDS popup the function buttons perform the following operations MATRIX send ope...

Page 90: ...utput patchbay this indicates the channel that is patched to the physical output at the cursor location B Device indication This indicates the input output unit that is connected to the REAC port currently selected by the function buttons or indicates the M 380 itself C Patchbay grid This grid lets you make patchbay settings fig ScrPatGridGuide eps a Channel indication This indicates the channel n...

Page 91: ...hange Press F8 ASSIGN to change the input patching If you press F7 CANCEL the input patching change will be cancelled If the PATCHBAY CHANGE item in the CONFIRMATION section of User Preference p 155 is unselected no confirmation message will appear in step 4 A maximum of 40 input jacks each can be handled for the REAC A port and the REAC B port respectively Color Level Black Below 48 dB Green Betw...

Page 92: ...intersection of the desired channel and jack and press ENTER fig ScrPatchOutChgConf eps If a channel is already patched to the output port a message will ask you to confirm the output patching change Press F8 ASSIGN to change the output patching If you press F7 CANCEL the output patching change will be cancelled If the PATCHBAY CHANGE item in the CONFIRMATION section of User Preference p 155 is un...

Page 93: ...rations Available only for the User library For details on library operations refer to Library operations p 39 Using the output patchbay library If you attempt to patch to a CONSOLE OUT that an EXT FX is using a caution message such as the following will appear fig ScrOutPatchExtFx eps Press F8 DISABLE to disable the corresponding EXT FX and continue with the patching change If you press F7 CANCEL...

Page 94: ... The panel layer indication is not shown if the USER layer is selected 6 Cursor This indicates the currently selected channel You can use the value dial to adjust the fader of the channel at the cursor location When you press SEL to change the selected channel the cursor in the screen will move When you move the cursor in the screen the SEL indication of the top panel will likewise move If the CHA...

Page 95: ...ormal if this is off 4 Preamp gain knob This adjusts the preamp gain for the input jack patched to the channel in a range of 65 dBu 10 dBu or a range of 45 dBu 10 dBu if PAD is on The preamp gain is not a continuous control it is digital with stepped control This is normal In certain situations artifact noise may occur when changing preamp gain This is normal 5 G meter CH1 CH48 C meter CH1 CH48 L ...

Page 96: ...D button This turns the meter s peak hold function on off E HOLD TIME knob This sets the duration that the meter s peak hold or OVER indication will stay lit in a range of 1 sec 4 sec or CONTINUE Meter peak hold is enabled only when the PEAK HOLD button is on If CONTINUE is selected the indication will remain until you execute the PEAK CLEAR operation by pressing a function button in the METER scr...

Page 97: ...ink status of a channel move the cursor to the name of the desired channel and press F5 LINK to turn link on off In the NAME LIST tab the function buttons perform the following tasks 1 This is unavailable if the cursor is at MAIN L MAIN R DCA1 8 or MUTE1 8 2 This is unavailable if the cursor is at DCA1 8 or MUTE1 8 AVG value Explanation OFF Averaging will not be performed NRM Averages evenly by th...

Page 98: ...n combination with an input channel as the FX return The FX 1 4 tab of the EFFECTS screen is used to perform effect operations Accessing the EFFECTS screen F1 FX 1 4 Accesses the FX 1 4 tab p 99 F2 GEQ 1 4 Accesses the GEQ 1 4 tab p 104 F3 EXT FX 1 4 Accesses the EXT FX 1 4 tab p 112 F4 EXT FX 5 8 Accesses the EXT FX 5 8 tab p 112 About effects IN LEVEL OUT LEVEL EFFECT 31 BAND GEQ 31 BAND GEQ FX ...

Page 99: ...ereo output type effect These effects can be inserted into a stereo channel or used in a send return configuration with stereo linked AUX channels 5 OUT meters These indicate the output level from the effect 6 LR LINK button This links the parameters of the effect between the L and R sides The following effect types support LR LINK Dual GEQ DELAY x2 P SHIFTER x2 CH STRIP x2 SDE 3000 x2 SPH 323 x2 ...

Page 100: ...the function buttons perform the following operations 1 Access the EFFECTS screen and display the FX 1 4 tab fig ScrFXOutSelBtn eps 2 Move the cursor to the FX DESTINATION SELECT popup button L or R of the desired effect and press ENTER The FX DESTINATION SELECT popup will appear fig ScrFXOutSelGuide eps A Applicable effect indication This indicates the effect to which the FX DESTINATION SELECT po...

Page 101: ...e of FX3 Specifying the effect return channel 1 Access the EFFECTS screen and press F1 FX 1 4 to display the FX 1 4 tab 2 Move the cursor to the FX DESTINATION SELECT popup button L for FX3 and press ENTER The FX DESTINATION SELECT popup will appear 3 Press F2 CH 25 48 to access the CH 25 48 tab fig ScrFXOutSel2 eps 4 Move the cursor to the CH41 output destination select button and press ENTER to ...

Page 102: ... from a USER button p 154 1 Access the FX EDIT popup for the desired effect fig ScrFxEdit eps 2 Use F1 F6 to switch between tabs to view the parameters you want to edit 3 Move the cursor to the desired parameter and use the value dial to change the value 4 Press F8 CLOSE to close the popup The effect library is used to select the effect type You can recall effect settings from the library and stor...

Page 103: ... BPM in a range of 5 0 300 0 B SLAVE TO MIDI CLOCK select button If this is selected the tempo will synchronize to MIDI clock messages received from the M 380 s rear panel MIDI connector or USB connector In this case you won t be able to use the TEMPO knob or the tap tempo function using F1 TAP or a user button You can assign TAP TEMPO as a function for a user button p 154 This allows you to use U...

Page 104: ...will be bypassed and the input signal will be output without modification 7 LINK button This links adjacent odd numbered and even numbered GEQ processors If they are linked the GEQ settings will be identical When you activate LINK the odd numbered unit s settings will be applied to the even numbered processor The function buttons specific to the GEQ 1 4 tab have the following operations About the ...

Page 105: ...s perform the following operations This section describes the procedure for inserting linked GEQ1 and GEQ2 into the MAIN L R channels 1 Access the EFFECTS screen and press F2 GEQ 1 4 to display the GEQ 1 4 tab fig ScrGEQRack eps 2 Move the cursor to the LINK button located at the right of GEQ1 and GEQ2 and press ENTER to turn the button on 3 Move the cursor to the GEQ INSERT SELECT popup button fo...

Page 106: ...itching bypass on or off from a USER button p 154 11 GEQ faders For each frequency band these adjust the amount of boost or cut in a range of 15 0 dB 15 0 dB The value of the fader you operate is shown in the sub display area Noise may occur when you operate the GEQ faders but this is not a malfunction 12 EQ MODE select buttons Here you can select either 31 band GEQ or 8 band parametric EQ 13 EQ A...

Page 107: ...r fig ScrGEQEdit_PEQ_Graph eps If the analyzer is hidden the EQ graph s vertical axis will be shown larger 1 Access the EFFECTS screen and press F2 GEQ1 4 to access the GEQ 1 4 tabs fig ScrGEQRack eps 2 Press F5 EDIT GEQ1 F8 EDIT GEQ4 depending on the GEQ you want to use fig ScrGEQEdit eps The GEQ EDIT popup will appear You can also make the setting for accessing the popup from a USER button p 154...

Page 108: ...verify the frequency band that you ll be operating If a fader s position is anything other than 0 dB the corresponding MUTE will blink When you press the blinking MUTE the fader will be reset to the 0 dB position 1 Access the desired GEQ EDIT popup fig ScrGEQEdit eps 2 Use the EQ MODE select button to select 8 BAND PEQ fig ScrChgEQ_Conf eps A confirmation message will ask you to confirm the operat...

Page 109: ...et of GEQ LIBRARY operations ig ScrGEQEdit eps 2 Press F5 LIBRARY The GEQ LIBRARY popup will appear fig ScrGEQLibGuide eps A Applicable GEQ indication This indicates the effect to which the GEQ LIBRARY popup applies B Library data list This is a list of the library data In the GEQ LIBRARY popup the function buttons perform the following operations Available only for the User library Using the anal...

Page 110: ...rations p 39 The GEQ library is shared by GEQ1 GEQ4 and by the DUAL GEQ of FX1 FX4 GEQ1 GEQ4 will not recall the delay parameter of the DUAL GEQ When you store GEQ1 GEQ4 into the User library the delay parameter of DUAL GEQ will be stored with the default value M 380_e1 book 110 ページ 2010年6月30日 水曜日 午前10時31分 ...

Page 111: ...X1 CONSOLE OUT 1 CONSOLE IN 1 EXT FX2 CONSOLE OUT 2 CONSOLE IN 2 EXT FX3 CONSOLE OUT 3 CONSOLE IN 3 EXT FX4 CONSOLE OUT 4 CONSOLE IN 4 EXT FX5 CONSOLE OUT 5 CONSOLE IN 5 EXT FX6 CONSOLE OUT 6 CONSOLE IN 6 EXT FX7 CONSOLE OUT 7 CONSOLE IN 7 EXT FX8 CONSOLE OUT 8 CONSOLE IN 8 SEND LEVEL RETURN LEVEL EXT FX 1 8 EXT INSERT IN EXT INSERT OUT To CH 1 EXT FX INSERT IN To CH 48 EXT FX INSERT IN CH 1 EXT F...

Page 112: ...UT jack is fixed at a nominal output level of 4 dBu The Send Lev knob adjusts the output level in the digital domain 5 OUT meter This indicates the level of the signal being output to the external effect 6 ReturnLev knob This adjusts the input level from the external effect in a range of Inf dB 6 0 dB When you re using it for insertion of an external effects device the CONSOLE IN jack s nominal in...

Page 113: ... your external effects device to CONSOLE IN1 and CONSOLE OUT1 fig ExtFxConnect eps If you connect your external effects device while the EXT FX ENABLE button is off the input and output may loop If the EXT FX insert destination is already specified when you connect your external effects device noise may be heard in the channel 4 Move the cursor to the EXT FX INSERT SELECT popup button for EXT FX1 ...

Page 114: ...UP screen the function buttons perform the following operations The functions of the fader modules when F6 DCA1 8 ON FADER is switched on are as described below When you access the DCA GROUP ASSIGN popup the F6 DCA1 8 ON FADER function will be temporarily disabled About DCA groups Faders assigned to DCA DCA Fader 3dB offset to each channel 3dB DCA group settings Accessing the DCA GROUP screen F6 D...

Page 115: ...ove the cursor to the desired channel select button and press ENTER to select it 4 Press F8 CLOSE to close the popup When the DCA GROUP ASSIGN popup is displayed you can press a top panel SEL to turn on off the corresponding channel s assignment to the DCA group You can specify a name and color label for each DCA group A name of up to six characters can be specified and you can choose one of eight...

Page 116: ...6 MTX to access the AUX13 16 MTX layer fig LayerBtn eps 2 Use the faders of fader module 5 DCA1 12 DCA8 to adjust the level of the DCA groups 3 By pressing SOLO you can operate the solo settings of all channels belonging to the corresponding DCA group 4 By pressing MUTE you can operate the mute settings of all channels belonging to the corresponding DCA group Using the panel to control DCA groups ...

Page 117: ... CHANNEL DISPLAY screen to assign a channel to a mute group For details refer to Assigning channels to DCA groups and MUTE groups p 54 1 In the GROUP section press MUTE to access the MUTE GROUP screen fig ScrMUTEGroup eps 2 Move the cursor to the MUTE group button of the desired mute group and press F8 ASSIGN The MUTE GROUP ASSIGN popup will appear fig ScrMUTEGroupAssignGuide eps A Target mute gro...

Page 118: ... be specified and you can choose one of eight colors as the color label The NAME EDIT popup is used to edit the name and select a color label For details on name editing refer to Specifying a channel name and color label p 51 1 Access the MUTE GROUP screen fig ScrMUTEGroup eps 2 Move the cursor to the MUTE group button of the desired mute group and press F7 NAME EDIT fig ScrChNameEdit eps The NAME...

Page 119: ...hout routing the signal through a bus Talkback and oscillator operations are performed in the Talkback Oscillator section fig TalkbackOscSectGuide eps A MIC LEVEL knob This adjusts the preamp gain of the TALKBACK MIC input B DISP button This accesses the TALKBACK OSCILLATOR screen where you can make talkback settings and oscillator settings C TALKBACK button This turns talkback on off It will be l...

Page 120: ...Inf dB 10 0 dB D Talkback output destination select buttons These buttons select the buses to which the talkback signal will be sent In the TALKBACK tab the function buttons perform the following operations 4 In the talkback oscillator section use the MIC LEVEL knob to adjust the input gain of the mic If you ve connected a mic that requires 48V phantom power use the on screen 48V button to turn on...

Page 121: ...ange of 20 Hz 20 kHz E Oscillator output destination select buttons These buttons select the buses to which the oscillator will be sent In the OSC tab the function buttons perform the following operations 4 Use the oscillator type select buttons to select the type of signal you want to generate 5 Use the oscillator output destination select buttons to select the bus to which the oscillator will be...

Page 122: ...itor Solo operations fig MonitorSectGuide eps A LEVEL knob This adjusts the monitor output level in a range of Inf dB 10 0 dB B DISP button This accesses the MONITOR screen where you can make monitor and solo settings C SOLO CLEAR button This turns off the solo settings of all channels It will blink if any channels are currently being soloed About monitoring Operations in the MONITOR section LR SO...

Page 123: ...ll return to its previous setting In the MONITOR screen the function buttons perform the following operations 1 In the top panel MONITOR section press DISP fig ScrMonitor eps The MONITOR screen will appear 2 Use the monitor source select buttons to select the desired monitor source The monitor signal will be output from the output jacks to which MONITOR OUT L R are patched and from the PHONES jack...

Page 124: ...t the solo level 6 Use the MONITOR section s LEVEL knob or the PHONES LEVEL knob to adjust the monitor output level Using Solo If the solo mode is ADD ON soloing will be controlled so that input channels output channels AUX channels MATRIX channels and MAIN L R channels and DCA groups are not soloed at the same time If the Solo mode is ADD ON the selection will be controlled so that the solo signa...

Page 125: ... song selection of the USB memory recorder fig ScrTBSceneDispGuide eps Basic information about the scene is shown in the top display area 1 Scene number This indicates the number of the currently selected scene If the number is blinking a number other than the current scene number is selected The current mixer parameters are referred to as the current scene The scene number that was most recently ...

Page 126: ...ne is locked or if the Recall Filter is turned on this area will indicate LOCK or FILT respectively RECALL PARAME TERS A check mark is shown for parameters that will be recalled as specified by the Recall Fil ter settings M 48 Indicates the memory number that the M 48 recalls Item Explanation IN Input patchbay settings OUT Output patchbay settings PRE Preamp settings gain 48V phantom power pad CH ...

Page 127: ...e 1 In the SCENE MEMORY section press DISP fig ScrSceneList eps The SCENE screen will appear 2 In the scene list select the desired scene and press F4 PARAM EDIT The RECALL PARAMETER EDIT popup will appear fig ScrRecallParam_Guide eps A Scene indication This indicates the scene that will be the object of the RECALL PARAMETER EDIT popup B M 48 MEMORY fig ScrM48MemRecall_Guide eps RECALL button Add ...

Page 128: ...r accessing the popup from a USER button p 154 BUS AUX channel MAIN L R channel MAIN C channel and MATRIX chan nel settings EFFECTS Effect 31 band GEQ and external ef fect insertion settings DCA MUTE GROUP DCA group and MUTE group settings Recorder USB memory recorder settings Talkback OSC Talkback and oscillator settings Button Operation F1 RECALL FILTER Turns the recall filter on off F7 CANCEL C...

Page 129: ... name p 39 You can t edit the name of a scene that is locked Editing the scene list Accessing the SCENE LIST EDIT popup A Button Function Reference page F1 NAME EDIT Accesses the NAME EDIT popup where you can edit the scene name p 129 F2 COPY Copies the scene select ed in the scene list p 130 F3 CUT Cuts removes the scene selected in the scene list p 130 F4 PASTE Pastes the copied or cut scene to ...

Page 130: ... If you press F7 CANCEL the operation will be canceled If a scene exists at scene number 299 you won t be able to use F5 INSERT to insert a scene You can t paste to a scene that s locked 1 Access the SCENE LIST EDIT popup fig ScrSceneListMove eps 2 From the scene list select the scene that you want to cut and press F3 CUT A message will ask you to confirm Cut operation Press F8 CUT to carry out th...

Page 131: ...TE groups that you want to include in the scope of recall and de select the DCA MUTE groups that you don t want to be recalled 4 OTHER parameter recall scope buttons Use these to specify other parameters that will be included in the scope of recall Select the parameters that you want to include in the scope of recall and de select the parameters that you don t want to be recalled In the GLOBAL SCO...

Page 132: ... M 380 The current memory of each M 48 unit will be stored to the specified memory number except for M 48 units whose MEMORY SAFE function p 189 is on Scenes stored by this operation are set so that when they are recalled the memories of the M 48 units will also be recalled For details refer to Synchronizing M 48 recall operations p 133 1 In the SCENE MEMORY section press DISP The SCENE screen wil...

Page 133: ... 48 MEMORY LIST popup the function buttons perform the following tasks For each scene memory you can specify whether M 48 memories will be recalled and also specify the memory number that the M 48 units will recall When you recall the scene that contains this setting each M 48 will recall its memory except for M 48 units whose MEMORY SAFE function p 189 is on 1 Access the RECALL PARAMETER EDIT pop...

Page 134: ...IRECT OUT POINT TO MAIRIX 1 8 TO OUTPUT PATCHBAY PAN Up to 24 GATE EXP units are available Up to 24 COMP units are available GATE EXP FILTER MAIN LR LR SOLO AUX 1 2 C 16 MAIN SOLO AUX LR LR 1 2 C 16 PRE EQ MUTE BAL SW SEND SW SEND LIMITER PRE EQ OUTPUT LEVEL MUTE FADER BAL SEND MAIN SEND SOLO SOLO TO REC SELECT MATRIX SEND 1 8 SWSEND PAN SWSEND SW SEND SW SEND PAN LR SW MAIN SW CENTER C SW LCR PRE...

Page 135: ...d completely For this reason a confirmation message like the following will appear when you recall a scene memory whose LCR SYSTEM setting differs fig ScrLCRRecallConf eps Press F8 RECALL to execute the recall Pressing F7 CANCEL will cancel the recall operation The LCR SYSTEM setting is made in the SYSTEM screen fig ScrSystem_LCR_Guide eps 1 LCR SYSTEM button This button turns the LCR SYSTEM on of...

Page 136: ...peration and close the popup 5 Press F8 CHANGE The AUX you selected in step 3 will be changed to MAIN C and the LCR SYSTEM will turn on If you press F7 CANCEL the operation will be cancelled and you will return to the LCR SETUP popup 1 Make sure that the MAIN level indication shows three MAIN meters L C and R If the MAIN level indication shows only the two meters L and R then the LCR SYSTEM is tur...

Page 137: ... L and R then LCR SYSTEM is already turned off The following steps are not necessary 2 In the SETUP section press SYSTEM to access the SYSTEM screen fig ScrSystem_LCR_On eps 3 Move the cursor to the LCR SYSTEM button and press ENTER fig ScrLCRSysConf3 eps A confirmation message will ask you to confirm the operation 4 Press F8 TURN OFF to turn the LCR SYSTEM off If you press F7 CANCEL the operation...

Page 138: ...is function utilizes fader touch sensitivity the SYSTEM screen s fader touch sensitivity setting must be set appropriately for this to work You ll use the CHANNEL DISPLAY screen to send signals from CH1 48 and AUX1 16 to MAIN L R and MAIN C fig ScrChDispGuide eps 1 LCR button This button specifies how signals are sent from the channel to MAIN L R and MAIN C The MAIN button appears at the position ...

Page 139: ...will be sent to MAIN C 100 When PAN is set to C the signal will be sent only to MAIN C L C PAN LEVEL R to LEFT to RIGHT Center 0 L C PAN LEVEL R to LEFT t o RIGHT to C E N T E R Center 50 L C PAN LEVEL R t o L E F T t o R I G H T t o CENTE R Center 100 Parameter changes when the LCR SYSTEM is on Screen Popup Location added AUX MAIN COPY Copy destination channel select but ton FX INSERT SOURCE SELE...

Page 140: ...of the LCR SYSTEM setting are shown with a blank name of AUX SEND indication fig invalidSend eps Sends to the AUX used by the LCR SYSTEM as MAIN C are indicated as MAIN C and cannot be operated FROM AUX send indication in MATRIX fig FromMainC eps The send from the AUX used by the LCR SYSTEM as MAIN C to the MATRIX is indicated as C This can be used as a send from MAIN C to a MATRIX Output patchbay...

Page 141: ...ps The USB memory recorder plays WAV files located in the RSS M 400 SONGS folder of USB memory in the order of their name A Song list This area shows the WAV files in the SONGS folder The WAV file currently being recorded or the WAV file selected for playback will be underlined To select songs in the song list use F1 and F2 of the USB MEMORY RECORDER section You can also make the setting for makin...

Page 142: ...nce eps Play one song fig RptIconRpt eps Repeat one song fig RptIconAllOnce eps Play to the last song fig RptIconAllRpt eps Repeat all songs F PLAY meter This indicates the playback level of the USB memory recorder G RECORDER DESTINATION SELECT popup buttons These buttons access the RECORDER DESTINATION SELECT popup where you can select the output destination for the USB memory recorder The curren...

Page 143: ...y default the output of the USB memory recorder are specified as follows The RECORDER DESTINATION SELECT popup is used to specify the output 1 In the USB MEMORY RECORDER section press DISP fig ScrRecorderPlay eps The RECORDER screen will appear 2 Move the cursor to the L channel of the RECORDER DESTINATION SELECT popup button and press ENTER The RECORDER DESTINATION SELECT popup will appear fig Sc...

Page 144: ...AV file You can also make the settings for assigning the functions of F3 and F4 REC to USER buttons p 154 4 To stop recording press F3 1 In the USB MEMORY RECORDER section press DISP fig ScrRecorderPlay eps The RECORDER screen will appear 2 Press F1 or F2 to select a WAV file The selected WAV file is shown in the sub display area 3 Press F3 The selected WAV file will play The sub display area show...

Page 145: ...CEL your edits will be discarded and the popup will close For details on name editing refer to Editing a name p 39 1 Access the RECORDER screen fig ScrRecorderPlay eps 2 From the song list select the WAV file that you want to delete 3 Press F6 DELETE SONG fig ScrDelWavConf eps A message will ask you to confirm that you want to delete the WAV file 4 Press F8 DELETE to delete the WAV file you select...

Page 146: ...ER These are user settings that an ADMIN user creates on USB memory A name of up to eight characters can be assigned The user level is specified by an ADMIN user A password can be specified Any user can make their own user preference settings Do not disconnect the USB memory or switch off the M 380 s power while data is being saved to USB memory Doing so may destroy the data saved in USB memory On...

Page 147: ...h the set tings were last changed STATUS If a password has been specified the indica tion PASSWORD appears here In the case of a user who has ADMIN privileges ADMIN is indicated F1 CHANGE USER Switches to the user set tings selected in the list p 147 F2 CREATE USER Creates a new user in USB memory p 148 F3 SAVE CURRENT Saves the user settings temporarily held in inter nal memory to USB mem ory p 1...

Page 148: ...ileges User preferences will be the default condition Switching to user settings in USB memory is performed as follows The user settings in USB memory are copied to internal memory Operation will switch to the user settings that were copied to internal memory This means that the current user settings will become the user settings in internal memory fig UserLogin eps This allows user settings to be...

Page 149: ... the old data press F8 REPLACE If you press F7 CANCEL saving to USB memory will be cancelled Here s how to delete user settings from USB memory You can delete user settings if the current user setting has ADMIN privileges 1 In the USER section press DISP fig ScrUser eps The USER screen will appear 2 From the USB memory user list select the user that you want to delete 3 Press F4 DELETE USER fig Sc...

Page 150: ...sor and use the value dial to change the character at the cursor position The characters at other than the cursor position are displayed as C CONFIRM field This field is used to confirm the entry in the PASSWORD field Enter the same password as you did in the PASSWORD field If the contents entered in the PASSWORD field and the CONFIRM field do not match the following error message will appear fig ...

Page 151: ...e parameters that the user will be able to operate for the channels selected by the channel access permission buttons The parameters that are selected here will be operable OTHER tab fig ScrUserAccessOthGuide eps E Other parameter access permission buttons These buttons select other parameters that the user will be able to operate The parameters that are selected here will be operable The TALKBACK...

Page 152: ... USER screen will appear 2 From the user list select the desired user 3 Press F6 USER PREF The USER PREFERENCE popup will appear 4 Press the button from F1 LAYER 1 2 through F3 LAYER 5 6 that matches the user layer whose settings you want to make displaying the LAYER tab ig ScrUserFaderGuide eps A Applicable user indication This indicates the user settings to which the USER PREFERENCE popup applie...

Page 153: ...e USER layer button in the LAYER section p 23 The USER layer button flashes and the USER layer mode is activated 2 Press the layer button that corresponds to the user layer you want to switch to The selected layer button flashes The layer buttons correspond to the user layers as shown below 3 Press the USER layer button The USER layer mode is switched off F1 LAYER 1 2 Accesses the LAYER 1 2 tab F2...

Page 154: ... The USER BUTTON ASSIGN popup will appear A Applicable user button This indicates the user button to which the USER BUTTON ASSIGN popup applies B FUNCTION list You can select a function from this list C PARAMETER 1 and 2 lists Here you can select the parameters of the function you ve selected in the FUNCTION list 6 In the FUNCTION list select the desired function 7 Next use the PARAMETER 1 list an...

Page 155: ... indicated below This does not recall the MEMORY of the M 48 connected to the M 380 H DCA SEL select buttons This selects the operation that pressing SEL performs when DCA1 through 8 has been called up to the top panel s fader module section p 23 The selection items are as indicated below Editing other user preferences SCENE LIB STORE Scene or library store operations SCENE LIB RECALL Scene or lib...

Page 156: ...ess F7 CANCEL the changes will be cancelled and the USER PREFERENCE popup will close F1 LAYER 1 2 Accesses the LAYER 1 2 tab F2 LAYER 3 4 Accesses the LAYER 3 4 tab F3 LAYER 5 6 Accesses the LAYER 5 6 tab F4 BUTTON 1 8 Accesses the BUTTON 1 8 tab F5 BUTTON 9 16 Accesses the BUTTON 9 16 tab F6 OTHER Accesses the OTHER tab F7 CANCEL Cancels the changes and closes the popup F8 OK Confirms the changes...

Page 157: ...s the REAC A port or create a redundant REAC connection between the M 380 and an S 4000S p 158 If you connect an input output unit to these ports please observe the following points You cannot connect multiple master REAC devices or multiple slave REAC devices to a single REAC system For example you cannot connect a slave REAC device to both the REAC A port and the SPLIT BACKUP port When receiving...

Page 158: ... REAC B port fig ReacBOuts eps If you connect a REAC splitter to the M 380 s REAC B port and split REAC B the signals received by the split REAC devices will be the forty channels of output from the M 380 s output patchbay to REAC B To create a redundant REAC connection between the M 380 and an S 4000S set the M 380 s REAC setting to BACKUP p 162 Connect the M 380 s REAC A port to the S 4000S MAIN...

Page 159: ...REAC connection examples FOH console setup REAC A INPUT 1 8 FOH console REAC A OUTPUT 1 8 REAC A INPUT 9 24 S 1608 A INPUT 1 16 REAC A INPUT 25 40 S 1608 B INPUT 1 16 FOH CONSOLE REAC SPLITTER REAC SPLITTER SLAVE S 1608 A SLAVE S 1608 B To Monitor Broadcast Console By using the S 1608 and S 4000S 3208 as input output units you ll be able to receive forty eight channels of input from the stage In t...

Page 160: ...REAC B will be the master The FOH console s SPLIT BACKUP port is connected to the broadcast console s REAC A port split The input output unit connected to REAC B port and the rear panel CONSOLE OUTPUT jacks are used as the outputs of the broadcast console The broadcast console s REAC A will receive the following signals You can connect an S 4000S S 1608 or S 0816 to the REAC A port as input output...

Page 161: ... can be connected as a split REAC device allowing the FOH console s REAC A port split or the SPLIT BACKUP port output to be output as analog audio signals SO DA4 or in AES EBU format SO AES4 fig REACAES EBU_2 eps In this case the S 4000S will output the following signals Backup connections with the S 4000S REAC INPUT 1 8 M 380 REAC A OUTPUT 1 8 REAC INPUT 9 40 S 4000S INPUT 1 32 when you use S 400...

Page 162: ...e desired application B Setup indication This area shows the content of the REAC SETUP select buttons at cursor location and the types of connections 4 Move the cursor to the REAC SETUP select buttons select the desired application and press ENTER You can choose from the following applications For details on example connections for various applications refer to REAC connection examples p 159 Recor...

Page 163: ...uts and outputs and the following information are shown B List of displayed information This lists the information that can be viewed for the device connected to REAC A or REAC B If the S 4000S is connected you ll be able to view the modules that are installed in SLOT1 SLOT10 4 Note the information for the connected REAC device in the device indication and the list of displayed information In some...

Page 164: ...2 Press F2 REAC CONFIG fig ScrSysReacConf1 eps The REAC CONFIG popup will appear 3 Press F4 SPLIT to access the SPLIT tab fig ScrSysReacConfSpGuide eps A SPLIT output indication This area shows the signals that are being output to the SPLIT BACKUP port 4 In the SPLIT output indication area verify the outputs for the SPLIT BACKUP port Checking the output to the SPLIT BACKUP port A M 380_e1 book 164...

Page 165: ... s to be connected to the M 380 using USB Download the USB MIDI driver from the Roland website below http www rolandsystemsgroup net The M 380 can be remotely controlled from M 380RCS via its rear panel USB connector M 380RCS is application software that runs on Microsoft Windows XP or Microsoft Windows Vista It allows you to edit M 380 project files and to remotely control the M 380 You can obtai...

Page 166: ... THRU select buttons These select the function of the rear panel MIDI OUT THRU connectors If you select THRU the settings of the SEND buttons will have no effect 4 In the MIDI RS 232C select indication verify the status of the rear panel MIDI RS 232C select switch 5 Move the cursor to the Dev ID knob and specify the device ID 6 Move the cursor to the RECEIVE select buttons for each item that you w...

Page 167: ...CHANNEL SELECT popup where you can select the channel that corresponds to each source b MaxLev knob This specifies the level when the source level is at the maximum 100 in a range of Inf dB 10 0 dB c MinLev knob This specifies the level when the source level is at the minimum 0 in a range of Inf dB 10 0 dB 4 Move the cursor to the Dev ID knob and specify the device ID 5 Move the cursor to the V LI...

Page 168: ... 380 in a range of 1 32 This setting is common to the MIDI tab the USB MIDI tab and the V LINK tab B RECEIVE select buttons These buttons select the items that USB MIDI will receive C SEND select buttons These buttons select the items that USB MIDI will transmit 4 Move the cursor to the Dev ID knob and specify the device ID 5 Move the cursor to the RECEIVE select buttons for each item that you wan...

Page 169: ...tch off the M 380 s power before you change the setting of the MIDI RS 232C select switch B RS 232C rate select buttons These buttons specify the RS 232C communication speed Choose the setting that matches the speed setting on your computer Make sure to switch OFF the M 380 s power before operating the MIDI RS 232C select switch 4 In the MIDI RS 232C select indication verify the status of the rear...

Page 170: ...UP popup button This indicates the AUX that is used by the LCR SYSTEM as MAIN C Move the cursor here and press ENTER to access the LCR SETUP popup For more information about the LCR SYSTEM button and the LCR SETUP popup button refer to p 135 2 View the system information in the INFORMATION area The INFORMATION area shows the following items If the Battery indication shows OK the internal lithium b...

Page 171: ... brightness 3 Move the cursor to the DISPLAY knob and use the value dial to adjust the brightness of the display Higher values produce greater brightness To adjust the touch sensitivity of the faders use the FADER TOUCH SENS field of the SYSTEM screen 1 Access the SYSTEM screen fig ScrSysTouchGuide eps A SENS knob This adjusts the touch sensitivity of the faders 2 Move the cursor to the SENS knob ...

Page 172: ... the settings 5 When you press F8 INIT the section you selected in step 3 will be initialized If you press F7 CANCEL the operation will be cancelled Initializing the mixer settings MIXER PARAMETER The mixer parameters will be initialized SYSTEM SETTING The system settings will be initialized SCENE MEMORY The scene memory will be erased ALL LIBRARY All user libraries will be initialized USER PREFER...

Page 173: ... edit field to edit the name of the project files For details on name editing refer to Editing a name p 39 Saving and loading mixer settings LOAD SAVE popup MIXER PARAMETER Mixer parameters SYSTEM SETTING System settings SCENE MEMORY Scene memories IN PATCH LIBRARY Input patchbay library OUT PATCH LIBRARY Output patchbay library CH LIBRARY Channel library AUX MAIN LIBRARY AUX MAIN library GATE LIB...

Page 174: ...t to load 5 Press F1 LOAD fig ScrLoadConf eps A message will ask you to confirm that you want to load the mixer settings 6 Press F8 LOAD to execute the Load a now processing message will indicate the progress of the operation When loading is completed the progress indication will close If you press F7 CANCEL the operation will be cancelled Do not disconnect the USB memory or switch off the M 380 s...

Page 175: ...o carry out the delete operation If you press F7 CANCEL the operation will be cancelled Use the DATE TIME popup of the SYSTEM screen to set the date and time 1 In the SETUP section press SYSTEM fig ScrSystem eps The SYSTEM screen will appear 2 Press F5 DATE TIME The DATE TIME popup will appear fig ScrSysDateTimeGuide eps A HOUR knob This specifies the current hour in a range of 0 23 B MINUTE knob ...

Page 176: ...his area shows information about the USB memory The following information is shown B File list This area shows the files in the USB memory If you move the cursor to a folder and press ENTER you ll move to the level below that folder If you move the cursor to and press ENTER you ll move to the level above the current folder In the USB MEMORY popup the function buttons perform the following operatio...

Page 177: ...will appear 4 Use the name edit field to edit the name For details on name editing refer to Editing a name p 39 5 Press F8 OK to create the folder and close the popup Pressing F7 CANCEL will cancel the operation and close the popup 1 Access the USB MEMORY popup fig ScrSysUSBMem eps 2 In the file list move the cursor to the desired file or folder 3 Press F3 NAME EDIT fig ScrNameEdit eps The NAME ED...

Page 178: ...you to confirm the Delete operation Press F8 DELETE to carry out the Delete operation If you press F7 CANCEL the operation will be cancelled Here s how to test your USB memory s reading and writing speed to verify whether it can be used by the USB memory recorder for playback and recording 1 Access the USB MEMORY popup 2 Press F7 SPEED TEST A now processing message will appear and the USB memory w...

Page 179: ...sswd eps If a password has been specified for the current user settings the ENTER PASSWORD popup will appear Enter the user password and press F8 OK If you press F7 CANCEL the operation will be cancelled fig ScrSysLockCons eps The console will be locked 1 When the console is locked press ENTER fig ScrSysLockCons eps fig ScrUserPasswd eps If a password has been specified for the current user settin...

Page 180: ...own cursor buttons or the value dial to scroll the display Press F8 CLOSE to close the HELP popup By holding down HELP and pressing a top panel button you can access the Help content related to that button You can use the following buttons as Help shortcuts EFFECTS METER SYSTEM PATCHBAY GROUP section DCA GROUP section MUTE COMP section DISP GATE section DISP EQ section DISP AUX SENDS section DISP ...

Page 181: ...e power until the initialization is completed 4 Turn off the power If you ve forgotten the ADMIN password you can use the following procedure to clear the ADMIN password If you want to reset the password you can do so after this procedure as described in Changing the password of user settings p 150 1 In the SETUP section hold down SYSTEM and turn the power on The M 380 will start up in SYSTEM CONF...

Page 182: ...to specify You can specify the following four points 10 dB all the way up 0 dB 20 dB Inf dB all the way down We recommend that you adjust all of the above four points for each fader that has drifted out of calibration 6 Press the function button that corresponds to the location at which you set the fader A message will ask you to confirm the fader position you specified fig FaderCalibrationConfirm...

Page 183: ...nd functions If the relationship of Inf dB 20 dB 0 dB 10 dB is not maintained the setting will be ignored when you press F8 SET 8 Press F8 CLOSE The FADER CALIBRATION popup will close 9 Turn off the power M 380_e1 book 183 ページ 2010年6月30日 水曜日 午前10時31分 ...

Page 184: ...EVERB SEND and 3 BAND EQ can be adjusted for each group created by the source assignment settings The group mix can also be viewed and edited from the M 380 or PC p 198 fig M48_OutDgm eps The M 48 provides two sets of output PHONES and LINE OUT 1 PHONES REVERB AMBIENT MIC and AUX IN are mixed into the MAIN bus then BASS TREBLE and LIMITER are applied to the mix which is then output from these port...

Page 185: ...uted via the S 4000D You can connect up to four S 4000D units serially and support up to twenty four M 48 units The mixing engineer can make settings for each M 48 unit from the M 380 If an M 48 unit is connected to the M 380 s REAC A port or SPLIT BACKUP port it will not be possible to set or manage the M 48 from the M 380 Here are some examples of connecting M 48 units to an M 380 that is being ...

Page 186: ...n M 48 MEMORY popup p 201 Using the M 48 library Editing screen M 48 LIBRARY popup p 203 Saving loading USB memory Editing screen M 48 LOAD SAVE popup p 205 Synchronizing scene memories with M 48 memories Editing screen SCENE screen p 125 The M 48 s settings are stored in each M 48 unit itself The M 380 can load and manage the settings of each connected M 48 unit There are two ways to store the M ...

Page 187: ... M 48 MANAGER popup to view a list of the M 48 units connected to the M 380 s REAC B port 1 In the MONITOR section press DISP to access the MONITOR screen fig ScrMonitor2 eps 2 Press F8 M 48 MANAGER The M 48 MANAGER popup will appear fig ScrM48Manager_Guide eps A Number of M 48 units This indicates the number of M 48 units that are connected to the M 380 s REAC B port B M 48 list This lists the M ...

Page 188: ...em Explanation Function of ENTER NO Indicates the order in the list Accesses the AR RANGE UNIT pop up UNIT NAME Indicates the unit name Accesses the NAME EDIT popup MEMORY NO Indicates the current memory number Accesses the M 48 MEMORY popup MEMORY SAFE If this is checked MEMORY SAFE is ac tivated recall store operations from the M 380 will be prohib ited Check uncheck MUTE If this is checked the ...

Page 189: ... as well as the order in the M 48 list 1 Access the M 48 MANAGER popup p 187 fig ScrM48Manager eps 2 In the M 48 list move the cursor to the MUTE field of the desired M 48 and press ENTER to add a check mark The PHONES and LINE OUT outputs of the checked M 48 unit s will be muted If any of the M 48 units in the M 48 list have been muted the M 48 MANAGER popup s F1 MUTE CLEAR indication will be on ...

Page 190: ...ange of Inf dB 20 0 dB If no index markings are shown for a knob this means that no source has been assigned to that group In the M 48 SETUP popup the function buttons perform the following tasks You can assign a USER button to access this popup p 154 5 View the settings of the target M 48 unit You can use F1 PREV UNIT or F2 NEXT UNIT to move to a different unit Making settings for an M 48 unit Ac...

Page 191: ...e line out Note that the level of the output from Line Out will change significantly if you switch the LPF from a setting of 80Hz or 120Hz to OFF Be sure to exercise due caution so that the signal sent to the equipment connected to Line Out or to your ears is not at an excessively high level The LPF is a 12 dB octave filter that passes the region below the specified frequency G LINE OUT MODE selec...

Page 192: ...following values 1 Access the desired M 48 SETUP popup p 187 fig ScrM48Setup eps 2 In the GROUP MIX VOLUME area move the cursor to the desired group name and press ENTER fig ScrM48GrpName eps The NAME EDIT popup will appear 3 Use the name edit field to edit the name 4 Press F8 OK to finalize the edited name and close the popup Pressing F7 CANCEL will cancel the operation and close the popup Return...

Page 193: ... This adjusts the monitor level in a range of Inf dB 10 0 dB If you turn F6 MONITOR on the M 380 s monitor output will output the mix of sources 1 40 The setting of the ATT knob only affects monitoring on the M 380 It does not affect the setting of the M 48 Meter This indicates the monitor output level 3 Source name indication This indicates the name of the source The source name is used as the M ...

Page 194: ... 1 Access the desired M 48 SOURCE LEV PAN popup p 194 fig ScrM48SrcLev1 eps 2 Move the cursor to the faders and pan knobs of sources 1 40 and use the value dial to edit the values 3 If you want to hear the mix of sources 1 40 via the M 380 s monitor output turn F6 MONITOR on Button Operation See page F1 SOURCE LAYOUT Switches to the SOURCE LAY OUT tab F2 M 380 LAYOUT Switches to the M 380 LAYOUT t...

Page 195: ...to MAIN or to an AUX to the level of the corresponding source 1 Access the desired M 48 SOURCE LEV PAN popup p 194 fig ScrM48SrcLev1 eps 2 Press F3 COPY MIX LEVEL fig ScrM48CopyMix_Guide eps The COPY MIX LEVEL popup will appear A Mix level select buttons These select the mix from which the levels will copied AUX1 AUX16 or MAIN L R If you select MAIN L R the sends from AUX to MAIN will also be incl...

Page 196: ... lets you assign sources to groups Knobs 1 16 fig ScrM48AsgnGrid_Guide eps Source indication This indicates the number and name of each source Group indication This indicates the number and name of each group Knob Assignment symbol This symbol is shown at the intersection of each currently assigned source and group To change an assignment move the cursor to the location where the desired source an...

Page 197: ...ssage will ask you to confirm the operation 3 Press F8 CLEAR the source assignments will be cleared and the popup will close Pressing F7 CANCEL will cancel the operation Setting the source assignments In some cases you may want to set a source level up even though it is not assigned to a group knob for a particular M 48 1 For talkback communication The mixing engineer can have talkback as one of t...

Page 198: ... setting is a relative adjustment to the pan specified by the source level pan settings In some cases the M 48 s source pan may reach the maximum or minimum value before this value reaches the maximum or minimum value H VOLUME knob This adjusts the group s volume in a range of Inf dB 20 0 dB This volume setting is a relative adjustment to the level specified by the source level pan settings In som...

Page 199: ...s F8 RESET the group mix will be reset to the default settings This operation will not change the group names Pressing F7 CANCEL will cancel the operation The parameters of each group will be set to the following values Button Operation See pag e F1 LAYER 1 8 Switches the group layer F2 LAYER 9 16 F3 EDIT EQ Turning this on will switch to the EQ setting display F5 REVERB ON Turns the reverb on off...

Page 200: ...n use F1 MARK ALL or F2 CLEAR MARKS to assign or clear check marks for all DEST fields in the copy destination list 5 Use the copy parameter select buttons to select the parameters that you want to copy 6 Press F5 PASTE fig ScrM48Copy_Conf eps A confirmation message will ask you to confirm the copy operation 7 Press F8 PASTE The copy will be executed and a message indicating the processing status ...

Page 201: ...he target M 48 unit The current memory number is shown in green The list shows the following items This is not shown in the ALL UNITS tab In the M 48 MEMORY popup the function buttons perform the following tasks 1 Not shown in the ALL UNITS tab 2 Not available if F7 MEMORY SAFE is on M 48 memory operations Accessing the M 48 MEMORY popup Item Explanation NO Indicates the memory number NAME Indicat...

Page 202: ...ed to the memory you selected in step 2 and the popup will close Pressing F7 CANCEL will cancel the operation 1 Access the M 48 MEMORY popup p 201 fig ScrM48Memory eps 2 Select the desired memory in the memory list If the ALL UNITS tab is shown all M 48 units will be affected by this operation except for units whose MEMORY SAFE function is turned on 3 Press F4 RECALL fig ScrM48MemRecall_Conf eps A...

Page 203: ... 48 LIBRARY popup will apply B Library list This lists the library items for the target M 48 The following items are shown in the list C Recall parameter select buttons These buttons select the parameters that will be recalled from the library Parameters with a check mark will be recalled In the M 48 LIBRARY popup the function buttons perform the following tasks Cannot be used if the selected libr...

Page 204: ...nce CONFIRMATION select button SCENE LIB STORE is unchecked s 1 Access the M 48 LIBRARY popup p 203 fig ScrM48Library eps 2 In the library list select the library item that you want to recall 3 Use the recall parameter select buttons to select the parameters that you want to recall 4 Press F4 RECALL fig ScrM48LibRecall_Conf eps A confirmation message will ask you to confirm the recall operation In...

Page 205: ...8 LOAD SAVE popup will appear fig ScrM48LoaSave_Guide eps A Target unit list This list shows the M 48 units to which the load or save operation will apply The list shows the following items B Project file list This lists the M 48 project files that have been saved to USB memory You can specify the save destination folder for the project file or specify the project file that you want to load In the...

Page 206: ...the number in the list unit name 5 Edit the name in the name edit field and press F8 SAVE fig ScrM48Save_Conf eps A confirmation message will ask you to confirm the save operation The amount of time required for the save procedure to be carried out will vary depending on the number of M 48 units you ve selected in step 2 Pressing F7 CANCEL will cancel the operation 6 When you press F8 SAVE a messa...

Page 207: ...otal amount of time required for loading will depend on the number of M 48 units you selected in step 3 Pressing F7 CANCEL will cancel the operation 5 Press F8 LOAD the load operation will be executed and a message will indicate the processing status When loading is finished the Completed message will appear Press F8 OK to close the message Do not disconnect the USB memory or switch off the M 380 ...

Page 208: ...screen is displayed Accesses the FX EDIT popup p 102 EDIT GEQ GEQ1 GEQ4 Lit when the specified screen is displayed Accesses the GEQ EDIT popup p 106 TAP TEMPO Blinks in time with the tempo Setting the tempo P 103 MUTE GROUP 1 8 ON lit OFF unlit Turns the specified mute group on off METER PEAK CLEAR Lit while held Clears the meter peak hold and Over indications CHANGE METER POINT INPUT CH AUX MAIN ...

Page 209: ...232C MIDI RS 232C Rx Error Buffer Full Too much data is being received via MIDI RS 232C Passwords do not match The two passwords you entered to change the user password do not match REAC x Error Fan Stop The cooling fan of the input output unit connected to REAC x has stopped REAC x Error Temp High The temperature of the input output unit connected to REAC x has become abnormally high REAC x Error...

Page 210: ...ll not be possible to input from REAC and noise may be heard In this case first check the connections between the M 380 and the input output units Make sure that the input output units are connected to the correct REAC port Make sure that the REAC mode of the input output units is correct After changing the REAC mode of an input output unit you must cycle the power to that input output unit Then i...

Page 211: ...rom USB memory You switched off the power or disconnected the USB memory while writing or reading USB memory Settings don t change when you recall a scene The recall is being filtered by the RECALL PARAMETER and GLOBAL SCOPE settings The REAC A port REAC B port and SPLIT BACKUP port provide a REAC indicator that shows the REAC communications status The following table shows the meaning of the REAC...

Page 212: ...u Fast Ethernet Full duplex communication simultaneous bidirectional communication must be supported Caution when using a switching hub The network propagation time between REAC devices is approximately 375 microseconds but if the signal passes through a switching hub there will be approximately 200 microseconds of delay for each unit Up to four switching hubs can be connected in series Connect RE...

Page 213: ... 4 dBu 20 Hz to 20 kHz Dynamic Range CONSOLE OUTPUT jacks 1 to 8 110 dB typ Sample Rate 48 0 kHz or 44 1 kHz Input Connector CONSOLE INPUT Pad ON Input gain 4 dBu Crosstalk 1 kHz CONSOLE INPUT jacks 1 to 8 80dB Pad ON Input gain 10 dBu typ CONSOLE OUTPUT jacks 1 to 8 100 dB typ Sample Rate 48 0 kHz or 44 1 kHz Nominal Input Level Variable CONSOLE INPUT jacks 1 to 8 65 to 10 dBu Pad OFF or 45 to 10...

Page 214: ... to 8 Sample Rate 48 0 kHz or 44 1 kHz Equivalent Input Noise Level E I N 126 dBu Main Fader Unity Channel faders Unity only one CONSOLE IN channel Preamp gain Max Output Connector CONSOLE OUTPUT jacks 1 to 8 Sample Rate 48 0 kHz or 44 1 kHz Network Latency 2 8 mS typ 1 Total System Latency of audio signal from S 1608 inputs to outputs via M 380 s REAC ports A or B Sample Rate 48 0 kHz Effects No ...

Page 215: ...ersonal Mixer M 48 REAC Splitter Power Distributor S 4000D REAC Optical Converter S OPT 100 m Cat5e Cable with Neutrik R EtherCon R Plug SC W100S 100 m 20 m Cat5e Cable with Neutrik R EtherCon R Plug SC W20F 20 m 100 m Cat5e Cable with Neutrik R EtherCon R Plug and reel W100S R 100 m 0dBu 0 775Vrms In the interest of product improvement the specifications and or appearance of this unit are subject...

Page 216: ...Appendix Appendix Dimensions 231 3 430 231 3 15 532 8 550 9 5 8 1 3 78 3 220 6 5 6 3 8 177 8 101 6 177 8 37 8 482 532 8 465 Dimensions are shown in millimetres M 380_e1 book 216 ページ 2010年6月30日 水曜日 午前10時31分 ...

Page 217: ...REQ DAMP FREQ Frequency at which the low frequency region of the reverb sound begins to be attenuated Value 20 Hz 2 00 kHz HI FREQ DAMP GAIN High frequency attenuation of the reverb sound Value 36 0 0 0 dB HI FREQ DAMP FREQ Frequency at which the high frequency region of the reverb sound begins to be attenuated Value 200 Hz 20 00 kHz HI CUT FREQ Frequency at which the high frequency region of the ...

Page 218: ...r frequency of the Hi band 1 Value 20 Hz 20 00 kHz HI Q Steepness of the frequency response curve at the Hi band center frequency 1 Value 0 36 16 00 S 1 Depending on the Type setting of each band there are certain combinations for which the Freq Gain and Q values will have no effect as listed below PEAK Peaking Creates a hill or valley in the region of FREQ Freq Valid Gain Valid Q Valid LSV Low Sh...

Page 219: ...ly reflections are sounds that have reflected one to several times from the walls or other surfaces of the room Reverberation is sound that has reflected many times before reaching the listener How sound and time are related fig RevExp02 eps The reflected sounds reach the listener in the following order The pre delay is the time from when the direct sound is heard until the reverb arrives The reve...

Page 220: ...d band 1 Value 15 0 15 0 dB LO MID FREQ Center frequency of the Lo Mid band 1 Value 20 Hz 20 00 kHz LO MID Q Steepness of the frequency response curve at the Lo Mid band center frequency 1 Value 0 36 16 00 HI MID TYPE Filter type for the Hi Mid band 1 Value PEAK LSV HSV LPF1 HPF1 LPF2 HPF2 BPF BEF THRU HI MID GAIN Gain of the Hi Mid band 1 Value 15 0 15 0 dB HI MID FREQ Center frequency of the Hi ...

Page 221: ...req Valid Gain Q Valid BEF Band Eliminate Filter Removes the frequency region around FREQ Freq Valid Gain Q Valid THRU Thru Passes all frequency regions Freq Gain Q GATE GT SW GATE switch Turns the gate on off Value OFF ON GT MODE Gate mode Value GATE Sound lower than the THRESHOLD level will be attenuated by the amount specified by RANGE DUCK Sound that exceeds the THRESHOLD level will be attenua...

Page 222: ... delay Value msec Meter Feet Frame 24 25 29 97 30 Note TIME Time between the original sound and when the delay is heard Value 0 0 1350 ms FB Feedback Amount of delayed sound returned to the input of the delay The feedback level specifies the amount of sound that is returned Increasing this setting will increase the number of delay repetitions Value 0 100 LO FREQ DAMP GAIN Low frequency attenuation...

Page 223: ...attenuated Value 20 Hz 2 00 kHz HI FREQ DAMP GAIN High frequency attenuation of the delay sound Value 36 0 0 0 dB HI FREQ DAMP FREQ Frequency at which the high frequency region of the delay sound begins to be attenuated Value 200 Hz 20 00 kHz WET Wet Level Level of the delay sound Value INF 6 0 dB DRY Dry Level Level of the original sound Value INF 6 0 dB fig AlgoMTPDly eps This is a mono in stere...

Page 224: ...LATION PHASE Phase difference between modulation L and R Value 180 180 deg L TIME Time from the original sound until the left channel delay is heard Value 0 0 1000 ms R TIME Time from the original sound until the right channel delay is heard Value 0 0 1100 ms FB Feedback Amount of delayed sound returned to the input of the delay The feedback level specifies the amount of sound that is returned Inc...

Page 225: ...h Value 0 100 PreDly Pre delay Time until the chorus sound is output Value 0 100 ms XMIX Cross mix Mix amount for the opposite side chorus Value 100 100 DIR SW Direct switch Turns the unprocessed sound on off Value OFF ON EFF SW Effect switch Turns the effect sound on off Value OFF ON fig AlgoStFlang eps This is a stereo in stereo out flanger It lets you apply flanging without impairing the positi...

Page 226: ...ser sound that is returned to the input of the phaser Value 100 100 XFB Cross feedback Amount of phaser sound that is returned to the opposite side input of the phaser Value 100 100 LEVEL Phaser level Value 0 100 MODE Type of phaser Value 4STAGE 8STAGE DIR SW Direct switch Turns the unprocessed sound on off Value OFF ON EFF SW Effect switch Turns the effect sound on off Value OFF ON St PHASER Ster...

Page 227: ...arse setting to specify the approximate pitch and make fine adjustments using Fine WET Wet Level Level of the pitch shifted sound Value INF 6 0 dB DRY Dry Level Level of the original sound Value INF 6 0 dB fig AlgoDualChStrip eps This is a dual mono channel strip It provides gate compressor enhancer de esser EQ and delay GATE A B GATE SW GATE switch Turns the gate on off Value OFF ON MODE Gate mod...

Page 228: ...egion is excessive it will be moderated The ENHANCER sensitivity and ENHANCER mix level are not used SENS Enhancer sensitivity Enhancer sensitivity Value 0 100 FREQ Frequency Frequency above which is handled as the high frequency region Value 200 Hz 20 0 kHz MIX Enhancer mix Enhancer mix level Value 0 0 12 0 dB THRE De esser threshold Threshold level for the de esser Value 36 0 0 0 dB EQ A B EQ SW...

Page 229: ...ow FREQ Freq Valid Gain Valid Q HSV High Shelving Boosts cuts the region above FREQ Freq Valid Gain Valid Q LPF1 Low Pass Filter 1 Passes the frequency region below FREQ Freq Valid Gain Q HPF1 High Pass Filter 1 Passes the frequency region above FREQ Freq Valid Gain Q LPF2 Low Pass Filter 2 A sharper response curve than LPF1 Freq Valid Gain Q Valid HPF2 High Pass Filter 2 A sharper response curve ...

Page 230: ... WET Wet Level Level of the delay sound Value INF 6 0 dB DRY Dry Level Level of the original sound Value INF 6 0 dB fig AlgoDualGEQ eps This is a dual mono 31 band GEQ A delay is provided after the GEQ GEQ A B ATT Attenuator Attenuator for the GEQ Value 42 0 15 0 dB 20 Hz Gain 20 kHz Gain Gain of each band Value 15 0 15 0 dB Delay A B DELAY UNIT Specifies the units for delay Value msec Meter Feet ...

Page 231: ...Wet Level Level of the delay sound Value INF 6 0 dB DRY Dry Level Level of the original sound Value INF 6 0 dB fig ScrSRV2000 eps This is a mono in stereo out reverb that models the Roland SRV 2000 MIDI digital reverb It provides two modes REVERB mode in which it operates as a conventional reverb and NON LNR non linear mode in which the reverb sound is cut off according to the gate time setting MI...

Page 232: ... 9 0 MID FREQUENCY Center frequency for the MID EQ Value 0 25 9 99 kHz MID BOOST CUT Amount of boost cut for the MID EQ Value 24 12 dB LOW FREQUENCY Cutoff frequency for the LO EQ Value 0 04 1 00 kHz LOW BOOST CUT Amount of boost cut for the LO EQ Value 24 12 dB FURTHER REV DENSITY Reverb Density Density of the reverb sound only in REVERB mode Value 0 9 ATK GAIN Attack Gain Attack gain for the ear...

Page 233: ...x2 Sw Time x 2 Switch Value OFF TIME range 0 1500 ms when EXP A B 1 00 Frequency response 10 Hz 17 kHz 0 5 dB 3 dB ON TIME range 0 3000 ms when EXP A B 1 00 Frequency response 10 Hz 8 kHz 0 5 dB 3 dB DELAY PHASE Sw Delay Phase Switch Reverse normal phase for the delay sound useful in conjunction with modulation Value OFF ON FEEDBACK PHASE Sw Feedback Phase Switch Reverse normal phase for the delay...

Page 234: ...Volume Volume of the tape echo sound Value 0 100 BASS Low frequency tone of the tape echo sound Value 0 100 TREBLE High frequency tone of the tape echo sound Value 0 100 TAPE PAN HEAD SHORT Panning of the short playback head Value L63 C R63 PAN HEAD MIDDLE Panning of the middle playback head Value L63 C R63 PAN HEAD LONG Panning of the long playback head Value L63 C R63 TAPE DIST Tape Distortion A...

Page 235: ...000 eps This is a phase shifter that models the Roland SPH 323 Phase Shifter The original was mono in mono out but this modeling is a dual mono design with two units in parallel The MOD LINK Sw allows you to use this as a stereo in stereo out effect CENTER FREQ Center Frequency Center frequency at which the phaser effect is applied Value 0 100 RESONANCE Boosts the region around the center frequenc...

Page 236: ...became standard equipment in many recording studios DIMENSION MODE Specifies how the chorus changes Value OFF 1 2 3 4 1 4 2 4 3 4 1 4 2 4 and 3 4 can be selected by pressing F1 1 4 F2 2 4 or F3 3 4 respectively INPUT MODE Input signal stereo mono setting Value MONO STEREO EFFECT Sw Effect Switch Specifies whether the effect sound will be output Value OFF ON DIRECT Sw Direct Switch Specifies whethe...

Page 237: ...roup 114 DCA1 8 on fader 114 Delay 222 Delay unit 222 DELAY x2 222 DIGITAL DELAY SDE 3000 232 DIGITAL OUT jacks 32 DIGITAL REVERB SRV 2000 231 DIMENSION D SDD 320 236 Direct out point 42 48 DISP button AUX SENDS area 26 DISP button COMP area 25 DISP button EQUALIZER area 26 DISP button GATE area 25 DISP button MONITOR section 29 DISP button TALKBACK OSC section 28 DISP button USB MEMORY RECORDER s...

Page 238: ...ch 42 MATRIX 66 MATRIX send 55 58 60 89 Memory safe 189 Meter 23 94 METER button 27 Metering 94 MIC LEVEL knob 28 MIDI 165 166 MIDI connectors 32 Modulation 225 Monitor 122 Monitor console setup 160 MONITOR section 29 Multi Tap Delay 223 Mute 42 55 66 189 MUTE button 23 29 Mute group 117 N Notch 84 O OL Overload 46 48 58 59 68 84 ON button EQUALIZER area 26 ON button FILTER area 25 ON OFF buttons ...

Page 239: ...ting 193 SPACE ECHO RE 201 234 SPH 323 x2 235 SPLIT BACKUP port 31 157 164 SRV 2000 231 St CHORUS 225 St FLANGER 225 St PHASER 226 St REVERB 217 Stereo Chorus 225 Stereo Flanger 225 STEREO FLANGER SBF 325 235 STEREO IN jacks 32 Stereo Phaser 226 Stereo Reverb 217 Stereo linking 50 62 71 Sub display area 37 SYSTEM button 28 System config mode 181 182 System Version 170 T Talkback 119 120 TALKBACK b...

Page 240: ...ARY popup 77 GATE EXPANDER OVERVIEW popup 76 GATE EXPANDER popup 74 GEQ EDIT popup 106 GEQ INSERT SELECT popup 105 GEQ LIBRARY popup 109 GLOBAL SCOPE popup 131 GROUP ASSIGN popup 54 H HELP CONTENTS popup 180 HELP popup 180 I INITIALIZE popup 172 INPUT PATCHBAY LIBRARY popup 92 K KEY IN SELECT popup 76 80 L LCR SETUP popup 136 LIBRARY popup 39 LIBRARY STORE popup 40 LIMITER LIBRARY popup 83 LIMITER...

Page 241: ...b 168 REMOTE popup V LINK tab 167 S SAVE CURRENT USER popup 149 SCENE LIST EDIT popup 129 SCENE screen 125 SCENE STORE popup 126 SYSTEM CONFIG screen 181 SYSTEM screen 170 172 T TALKBACK OSCILLATOR screen 120 121 TEMPO popup 103 U USB MEMORY popup 176 USER BUTTON ASSIGN popup 154 USER FADER ASSIGN popup 153 USER LEVEL popup 151 USER PREFERENCE popup 152 154 155 USER screen 147 V V LINK SOURCE CHAN...

Page 242: ...USA Model Name Type of Equipment Responsible Party Address Telephone M 380 Digital Mixer Roland Systems Group U S 425 Sequoia Drive Suite 114 Bellingham WA 98226 360 594 4282 M 380_e1 book 242 ページ 2010年6月30日 水曜日 午前10時31分 ...

Page 243: ...AUX 16 GEQ INSERT OUT MATRIX 1 GEQ INSERT OUT MATRIX 8 GEQ INSERT OUT MAIN L GEQ INSERT OUT GEQ INPUT SELECT GEQ OUTPUT SELECT CH 1 EXT FX INSERT OUT CH 48 EXT FX INSERT OUT AUX 1 EXT FX INSERT OUT AUX 16 EXT FX INSERT OUT MATRIX 1 EXT FX INSERT OUT MATRIX 8 EXT FX INSERT OUT MAIN L EXT FX INSERT OUT MAIN R EXT FX INSERT OUT MAIN C EXT FX INSERT OUT EXT INSERT OUT EXT INSERT IN To CH 1 EXT FX INSE...

Page 244: ...ERT OUT MATRIX 1 EXT FX INSERT OUT MATRIX 8 EXT FX INSERT OUT MAIN L EXT FX INSERT OUT MAIN R EXT FX INSERT OUT To CH 1 EXT FX INSERT IN To CH 48 EXT FX INSERT IN To AUX 1 EXT FX INSERT IN To AUX 16 EXT FX INSERT IN To MATRIX 1 EXT FX INSERT IN To MATRIX 8 EXT FX INSERT IN To MAIN L EXT FX INSERT IN To MAIN R EXT FX INSERT IN Total 32 channel REAC A INPUT REAC B INPUT MAIN L R POST ATT PRE FADER P...

Page 245: ...WN LIVE For the U K CAUTION Danger of explosion if battery is incorrectly replaced Replace only with same or equivalent type WARNING To reduce the risk of fire or electric shock do not expose this apparatus to rain or moisture This product complies with the requirements of EMCD 2004 108 EC and LVD 2006 95 EC For EU Countries For EU Countries Apparatus containing Lithium batteries ADVARSEL Lithiumb...

Page 246: ...carefully read the sections entitled IMPORTANT SAFETY INSTRUCTIONS p 2 USING THE UNIT SAFELY p 3 5 and IMPORTANT NOTES p 6 7 These sections provide important information concerning the proper operation of the unit Additionally in order to feel assured that you have gained a good grasp of every feature provided by your new unit Owner s manual should be read in its entirety The manual should be save...

Reviews: