


Trouble Shooting Guide
Emergencies
Possible cause
Prevention/ Solution
Troubleshooting: Problem
Possible cause
Prevention/ Solution
Gas leaking from cracked/cut/
burned hose
Grease fire or continuous
excessive flames above cooking
surface
Too much grease buildup in burner area
Turn off LP Tank. Leave lid open to allow
flames to die down. After cooling, clean
food particles and excess grease from
inside firebox area, grease cup/pan/tray,
and other surfaces
Burner will not light using ignitor
Burner will not light using ignitor
Gas issues
1. Trying to light wrong burner
2. Burner not engaged with control valve
3. Obstruction in burner
4. No gas flow
5. Vapor lock at coupling nut to LP tank
6. Coupling nut and LP tank valve not fully
connected.
Electrical issues:
1. Electrode cracked or broken;” sparks at
crack.”
2. Electrode tip not in proper position
3. Wire and/or electrode covered with
cooking residue.
4. Wires are loose or disconnected
5. Wires are shorting (sparking) between
igitor and electrode.
6. Push button sticks at bottom sparking
between ignitor and electrode
1. Replace electrode.
2. Tip of electrode should be pointing
toward port hole in burner. The distance
should be 1/8” to 3/16”. Adjust if
necessary.
3. Clean wire and or electrode with
rubbing alcohol and clean swab.
4. Reconnect wires or replace electrode/
wire assembly.
5. Replace ignitor wire
6. Replace ignitor
7. Inspect wire insulation and proper
connection. Replace wires if insulation
is broken.
1. See instructions on control panel and
section in the Use and Care.
2. Make sure valve are positioned inside
of burner tubes.
3. Ensure burner tubes are not obstructed
with spider webs or other matted, see
cleaning section of use and care
4. Make sure LP tank is not empty. If LP
tank is not empty, refer to “sudden drop
in gas flow.
5. Turn off knobs and disconnect coupling
nut from LP tank. Reconnect and retry.
6. Turn the coupling nut approximately
one-half to three-quarters
Damaged hose
Turn off gas at LP tank, if hoes is cut or
cracked, replace hose.See LP tank lead
test and connection regulator to the LP
Gas leaking from LP tank
Mechanical failure due to resting or
mishandling
Turn off LP tank valve
Failure or tank valve from mishandling or
mechanical failure
Turn off LP tank valve. Return LP tank to
gas supplier
Improper installation, untight connection ,
failure of rubber seal
Turn off LP tank valve, remove regulator
from cylinder and visually inspect rubber
seal for damage, see LP tank test and
connection regulator to the LP tank
Turn off control knobs and LP tank valve.
After fire is out and grill is cold, remove
burner and inspect for spider nests or rust.
see natural hazard and cleaning the
burner assembly pages.
Fire in burner tube section of burner due
to partial blockage
Gas leaking from LP tank valve
Gas leaking between LP tank
and regulator connection
Fire coming through control
panel
21
Summary of Contents for SG6002
Page 1: ...www royalgourmetcorp com hotline service royalgourmetusa com Model SG6002 ...
Page 3: ...or hot hotline at serious 2 ...
Page 4: ...36 36 AT ALL TIMES 3 ...
Page 5: ...3 2 4 5 6 7 9 8 10 11 15 21 22 28 27 29 30 31 23 32 12 19 17 18 20 13 14 24 25 26 16 4 ...
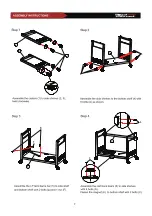
Page 8: ...A 4 A B 2 3 1 5 B F C E A 6 7 ...
Page 9: ...A 7 D 8 9 10 11 G 12 ...
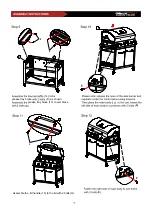
Page 11: ...13 14 15 16 10 B 17 18 B 19 20 B B B B 18 17 B 20 B 19 5 B 5 B ...
Page 12: ...17 18 19 20 11 B H C 21 22 2 1 4 5 23 C 3 8 B and 8 washers H 21 22 23 ...
Page 14: ...25 26 27 13 31 32 31 Put the B battery into the igniter 32 not included ...
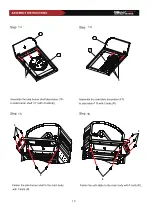
Page 16: ...15 ...
Page 17: ...metrics cleaning products Production of bubbles indicates a gas leak 16 ...
Page 18: ...er at all times regulator regulator 17 ...
Page 19: ...18 ...
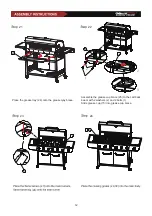
Page 21: ...20 ...
Page 24: ...Direct Heat GRILLING RECIPES 23 ...
Page 26: ...service royalgourmetusa com Corp prior to obtain SG6002 25 ...


