


IMPORTANT:
Drop 3 drops of oil into the stapler air inlet
BEFORE fi rst use. See page 2.
Please read the safety, operation and maintenance
instructions
BEFORE
using the Air Stapler.
Safety, Operation & Maintenance Instructions
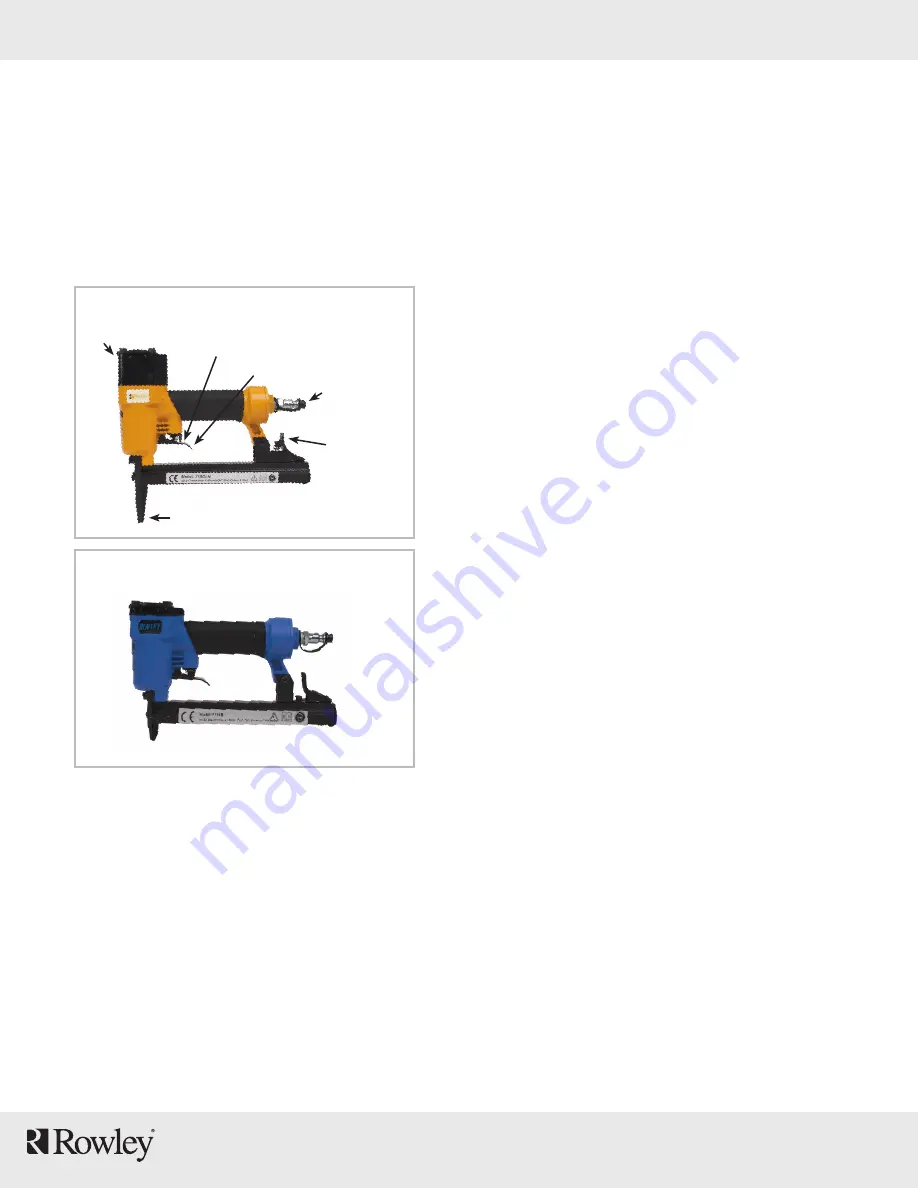
Long & Short Nose Upholstery Air Stapler (NSG10 & NS11)
Upholstery Air Stapler (NSG10):
Short Nose Upholstery Air Stapler (NS11):
Fig. 1
Nose (Staple Discharge Area)
Trigger Safety
Trigger
Air Inlet
Magazine
Cover Latch
Fig. 2
SPECIFICATIONS:
- Operating air pressure range: 70 ~ 100 psi.
- Fastener type: 22 gauge fi ne wire 71 series staples.
- Fastener leg length range: ¼" to ⅝"
-
NSG10
and
NS11
staplers use the same fasteners
Rowley Company sells
(SKU# NS32/E, NS33/E,
NS34/E, NS35/E).
- House fi tting: ¼" NPT Milton
- Magazine capacity: 160 staples
APPLICATIONS:
- For upholstery: cornice boards, head boards, sofas,
chairs, ottomans, upholstered walls, etc.
- For Window treatment: covering dust boards,
mounting soft treatments to dust boards, etc.
IMPORTANT:
This manual contains safety warnings, operation, maintenance,
parts lists and diagrams. Keep the manual in a safe place for future
reference. The instructions will help you maximize the service life of
your stapler.
Safety Instructions:
1. Do not use oxygen, flammable gas, or any other type of gas as a
power source. Use regulated and filtered compressed air only.
2. Do not use gasoline or any other flammable liquid to clean the tool.
3. Do not exceed the maximum operation air pressure of 100 psi.
4. Always disconnect the tool from the air supply before loading
staples, clearing a jam or servicing.
5. Always disconnect the tool from the air supply when not in
operation. Never leave tool unattended while connected to air
supply.
6. Do not carry tool by hose or move tool by pulling hose. Keep
hose away from heat, oil, solvents and any sharp edges. Replace
any damaged, weak or worn hoses.
7. Do not use tool as a hammer. Do not drop, drag or throw tool. If
tool is dropped, discontinue use and carefully examine for any bent,
cracked or broken parts. Listen for air leaks. Do not use tool until the
damage is repaired.
8. Always wear safety glasses and ear protection when using tool.
9. When connecting tool to air supply, only use a coupling that will
release all air pressure from the tool when disconnected.
10. Do not point the tool at yourself or at any person. Always
assume that the tool is loaded and powered. Never engage in
horseplay.
11. Keep hands, or any body parts away from the stapler nose area
when the tool is connected to the compressed air.
12. Do not drive a staple on top of another staple.
13. Turn the trigger safety so the stapler will not fire accidentally
when connecting or disconnecting tool to compressed air.
14. Always keep firm footing when using tool.
15. Do not modify or disable trigger safety.
16. Do not modify any part of tool.
17. Keep tool out of reach of children.
1
Air Exhaust


