background image

5

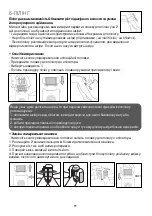
B-With the shaver head (according to model) :

• Operating instructions :

- Remove the epilator head by pressing the ejection button.

- Fit the shaver head (13)
onto the appliance.
- Select speed 2.
- After use, stop the
appliance.
- Remove the shaver head by
pressing the ejection button.

Shave against the lie of the hair, slowly and without pressing, with the shaver
perpendicular to your skin.

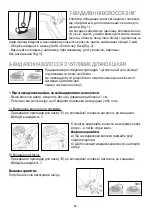
9-TO TRIM AND EVEN OUT HAIR IN THE BIKINI AREA 
(according to model)

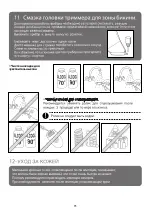
Put the bikini line trimmer head in place (20). Your bikini line trimmer head is equipped
with 3 combs to lift long hairs for cutting by the blade.
Choose the desired comb before switching the appliance on (a).

IMPORTANT
For your first use, we advise you to use the comb for the longest cutting length.

- If you want a hair length of approximately 9 mm, use the largest comb.
- If you want a hair length of approximately 3 mm, use the smallest comb.
- If you want a hair length of approximately 6 mm, use the medium-sized comb.

Slide the comb into the two grooves on the trimmer head (a), then
select speed 2.
Hold the appliance upright so that you can see the appliance name,
and move it slowly against the hair.

• For a neat bikini outline

If you want a closer shave, use the bikini line trimmer head without
the comb :
Stop the appliance by pressing 0 and unplug it. 
Push to remove the comb (b).
Then switch on the machine by selecting speed 1 or 2.
Hold the appliance upright and move it slowly against the hair.

IMPORTANT For greater effectiveness, pull hair outward with the other hand to
make it stand out. This will give you a more precise shave with little irritation.

a

b

Summary of Contents for EP5344D0

Page 1: ...enta com EN DEPILATOR RU UK PL DEPILATOR CS DEPIL TOR SL DEPILATOR SK DEPIL TOR HU EPIL TOR BG A RO DEPILATOR SR DEPIL TOR HR DEPILATOR BS DEPILATOR ET EPILAATOR LV EPILATORU LT EPILIATORIU 1800123805...

Page 2: ...7 2 4 3 8 9 12 18 5 19 a b 15 16 14 17 15 13 10 11 6 1...

Page 3: ...re that they do not play with the appliance Stop using your appliance and contact an Authorised Service Centre if your appliance has fallen it does not work correctly The appliance must be unplugged b...

Page 4: ...void in the case of improper usage 3 PREPARATION OFTHE SKIN Your skin must be clean and dry Do not apply either cream or hydrating milk before depilation If you previously used a razor for depilation...

Page 5: ...epilator 1 Place your 2 thumbs between the white parts of the roll you wish to change 2 Spread the roll open until it splits 3 Turn the axis of the roll in order to remove it 4 Insert the new band by...

Page 6: ...area thoroughly to ensure any trace of deodorant or perspiration are removed 1 Armpit epilation Fit the armpit accessory 11 onto the epilator head and push in until you hear a click Select speed 1 Fir...

Page 7: ...the comb for the longest cutting length If you want a hair length of approximately 9 mm use the largest comb If you want a hair length of approximately 3 mm use the smallest comb If you want a hair l...

Page 8: ...ttons and pull upwards You will remove the protective hood 18 from the blade block 17 Carefully remove the hairs by blowing on and around the micro grid 14 Never use the small brush for cleaning the m...

Page 9: ...EAD accoding to model To keep your appliance working effectively the blades should be oiled regularly notably after washing in water using the lubricant supplied or if you have none with the type of o...

Page 10: ...his reason it is preferable to use your depilator in the evening If necessary apply calming cream after depilation 13 ENVIRONNEMENT PROTECTION FIRST Your appliance contains valuable materials which ca...

Page 11: ...9 RU 1 2 3 4 5 6 7 2 c opoc 8 9 EM2A2 10 11 12 13 14 15 16 17 18 19 a b 3 6 9...

Page 12: ...10...

Page 13: ...1 2 2 3 11 2 1 1 2...

Page 14: ...fig 1 0 5 soft fast fig 2 fig 3 12 1 11 1 CLIC b CLIC...

Page 15: ...B 13 2 13 2 12 1 a b 2 CLIC...

Page 16: ...14 1 2 1...

Page 17: ...15...

Page 18: ...e SEB Chemin du Petit Bois Les 4 M BP 172 69134 Ecully Cedex France 4 17269134 119180 14 2 213 32 32 FR MO04 02114 17 06 2011 16 06 2014 52161 2 8 2005 51318 14 1 2006 4 51318 14 2 2006 5 7 51317 3 2...

Page 19: ...1 2 0 35 i i N EM 2A2 i i i i i i i i i i i 17 UK 1 2 i i 3 4 i 5 i i 6 i i 7 2 i i 8 i 9 EM2A2 10 11 i i i i i 12 13 i i 14 i 15 16 i 17 18 19 i i i i i i i a i b i i i i 3 6 9...

Page 20: ...18 i i i i i i i i i i i i i i i i i i i i i i i i i i i i i i i i i i i i i i i i i i i i i i i i i i i i i i i 3 i i i i i i i i i i i i i i i i i i i i i i i i i i i i i i i i 4 5 2 1 1 2...

Page 21: ...i i i i i i i i i i 2 i i i i i i i i i i i i i i i i i i i i i i i i i i i i i i i i i i i i 1 i i i i i i i i i i i i i 1 i i i 2 i i i i i 3 i i i i i i i i i i i i i 1 2 2 3 4 i i i i i i 19 b CLI...

Page 22: ...20 7 fig 1 0 5 soft fast fig 2 fig 3 8 i i i i i i i i i i i i i i i i i i i i 1 i i 1 i 11 i i i i 1 i i i i i 2 i i i i i i i 12 i i i i 1 i i i i 2 CLIC CLIC...

Page 23: ...21 B i i i i i i i 13 2 i i i i i i i i 9 i i i i i i i i i i 20 i i i 3 i i i i i i i i i i 9 i i 3 i 6 i i a i i i i 1 2 i i i i i i i i i i i i i i 0 i i i i i i i b 1 2 i i i i i i i a b...

Page 24: ...22 10 i i 1 i i i i i 2 i i i i i i i 3 i i i i i i i 5 10 4 i i i i i i i i 18 18 17 14 i i i i 14 i 18 17 i i i i i i i i i i 18 17 i i i 1 2 1...

Page 25: ...23 i i i i i i i i i i i i i i i i i 5 10 i i i i i i i 11 i i i i i i i i i i i i i i i i i i i i i i i i i i i i 12 i i i i i i i i i i i...

Reviews: