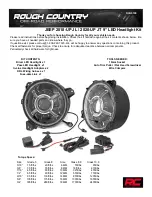
rough country RCH5100 Installation Instructions Download Page 3

9.


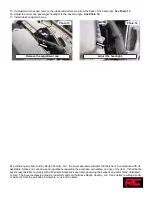
Identify the new passenger side head light. Align the tab and connect the plug to the DRL wiring harness. 

See Photo 

7. 


10.


Locate the headlight in

-

line adaptor and connect the head light plug to the adaptor and then the OE harness to the 

adaptor. 

See Photo 8. 


11.


Tuck the wires out of harms way and install the headlight using the OE hardware. Tighten using a 10mm socket. 

See 

Photo 9. 


12.


Route the DRL wire across the vehicle to the drivers side out of harms way and repeat the headlight installation on 
the drivers side of the vehicle. Check all connections to insure proper function of the lights 

See Photo 10. 


13.


Install the grille by pressing in the clips at the bottom of the grille, then install the (6) clips in the top of the grille. 

See 

Photo 11. 


14.


Check the height and the alignment of the lights. Perform this in a dark room with the front of the vehicle facing 25 
feet away from a wall or flat surface with the lights on the low setting. 

See Photo 12


Photo 7


Photo 8


Photo 9 


Photo 10


Photo 11


Photo 12


Connect the DRL plug to the headlight. 


Connect the adaptor and headlight.


Install the headlight. 


Install the opposite headlight. 


Install the grille. 


Check the height and alignment of lights.


Summary of Contents for RCH5100

Page 1: ...hardware for tightness KIT CONTENTS Driver LED Headlight x1 Pass LED Headlight x1 In Line Headlight Adapters x2 DRL Wiring harness x1 Fuse able Link x1 TOOLS NEEDED 10mm Socket Auto Trim Puller Flat Head Screwdriver Wire Crimpers Torque Specs Size Grade 5 Grade 8 Size Class 8 8 Class 10 9 5 16 15 ft lbs 20ft lbs 6MM 5ft lbs 9ft lbs 3 8 30 ft lbs 35ft lbs 8MM 18ft lbs 23ft lbs 7 16 45 ft lbs 60ft l...

Page 2: ...id Using the fuse box cover as a guide locate fuse in location F52 in the center right of the fuse box Remove fuse F52 20 amp fuse cigarette lighter See Photo 5 7 Install the removed fuse into the new fuse able link Then plug into the fuse box making sure the link is fully pressed into the fuse box See Photo 6 8 Connect the positive wire of the DRL wiring harness to the fuse able link and crimp Gr...

Page 3: ...ion on the drivers side of the vehicle Check all connections to insure proper function of the lights See Photo 10 13 Install the grille by pressing in the clips at the bottom of the grille then install the 6 clips in the top of the grille See Photo 11 14 Check the height and the alignment of the lights Perform this in a dark room with the front of the vehicle facing 25 feet away from a wall or fla...

Page 4: ...rning the sales of any items listed illustrated or sold The buyer expressly agrees to indemnify and hold harmless Rough Country LLC for all claims resulting directly or indirectly from the purchase ownership or use of the items 15 If adjustment is needed remove the rubber adjustment cap from the back of the head light See Photo 13 16 Adjust the driver and passenger headlight to the desired angle S...

Reviews: