background image

Smart Positioner 

YT-3700 / 3750 

                                                                            Product Manual 


Ver. 1.03 

36 


Adjustments 

6.1 

Limit Switch Adjustment


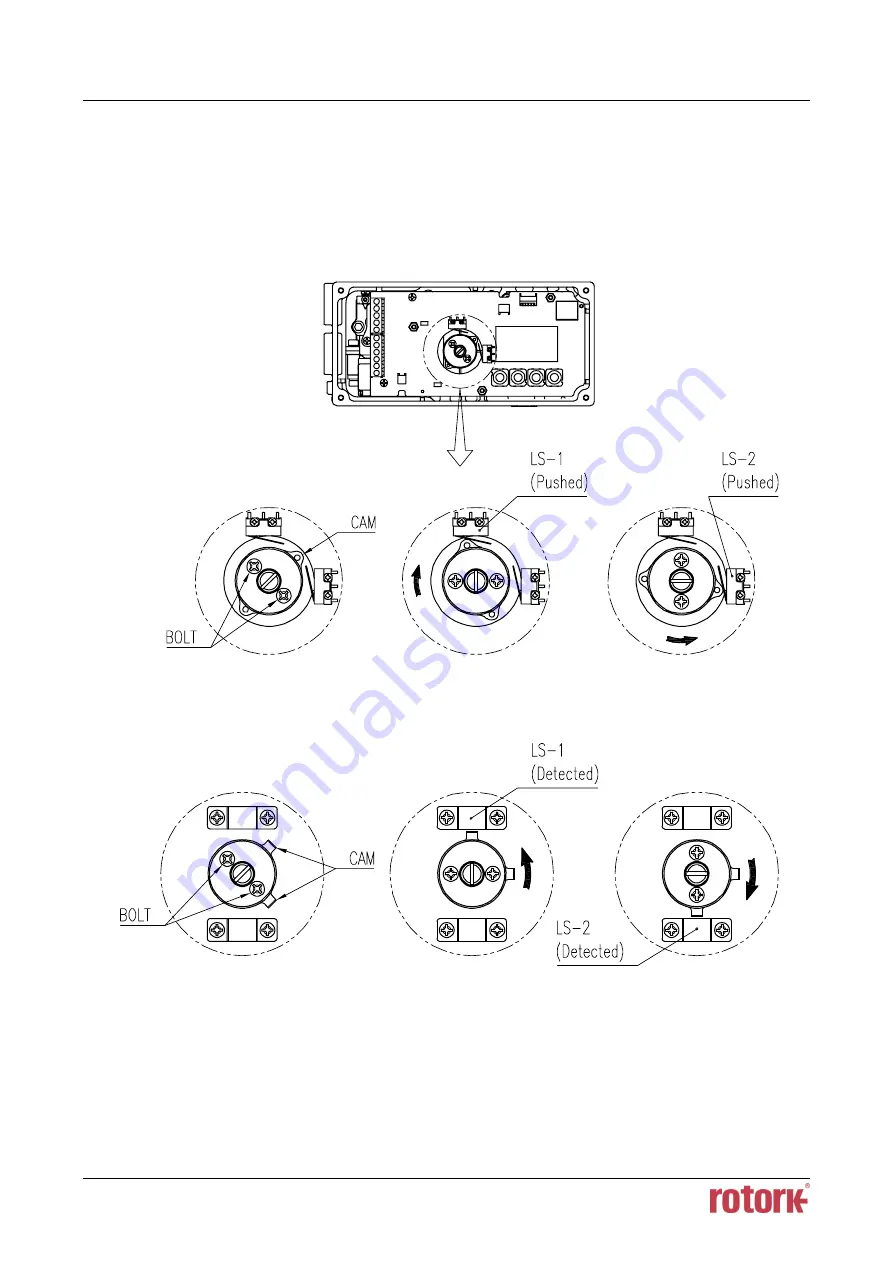
YT-3700  /  3750  can  have  limit  switch  option.  If  user  wants  to  adjust  the  sensing  position,  please 
loosen bolts and adjust cam.     


Fig. 6-1:    Mechanical Type 


Fig. 6-2:    Proximity Type 

Summary of Contents for YT-3700

Page 1: ...SMART POSITIONER PRODUCT MANUAL YT 3700 3750 YT 3700 YT 3750 Rotork YTC Limited VERSION 1 03...

Page 2: ...0 3 Installation 21 3 1 Safety 21 3 2 Tools for installation 21 3 3 Linear positioner Installation 22 3 3 1 Linear positioner Installation of Standard lever type 22 3 3 2 Safety 22 3 3 3 Standard leve...

Page 3: ...n 2 AUTO 2 50 8 6 4 Travel Zero TVL ZERO and Travel end TVL ENd 51 8 7 Manual Operation MAN OPER 52 8 7 1 Manual Operation by Set position MAN SP 52 8 7 2 Manual Operation by MV MAN MV 53 8 8 Control...

Page 4: ...ce Configuration dEV CFG 76 8 11 1 Action Setting ACT 76 8 11 2 Linear Interpolation ITP oFF on 77 8 11 3 Lock of Parameters Write Protect W UNLOCK LOCK 77 8 11 4 Actual Position View Mode View Mode V...

Page 5: ...ot be duplicated or reproduced for any purpose without prior approval from Rotork YTC Limited Gimpo si South Korea In case of any other problems that are not stated in this manual please make immediat...

Page 6: ...5mm2 should be used Wiring in these applications shall utilize appropriate methods for Class I Division 2 Zone 2 Substitution of components may impair intrinsic safety Substitution of components may i...

Page 7: ...atly reduce operating costs in large scale plants It is compatible with most of controllers Orifices can be installed even in the field to minimize the hunting occurrence and optimize operating condit...

Page 8: ...serial number YEAR MONTH Indicates manufactured year and month INTRINSIC SAFETY NONINCENDIVE Indicates intrinsic safety explosion proof grade AMBIENT TEMP Indicates the allowable ambient temperature...

Page 9: ...Smart Positioner YT 3700 3750 Product Manual Ver 1 03 9 Fig L 2 YT 3700 Intrinsic safety type ATEX IECEx KCs NEPSI Fig L 3 YT 3700 Intrinsic safety type FM CSA Fig L 4 YT 3700 Non explosion proof TRCU...

Page 10: ...Smart Positioner YT 3700 3750 Product Manual Ver 1 03 10 Fig L 5 YT 3700 Intrinsic safety type TRCU Fig L 6 YT 3700 Intrinsic safety type INMETRO Fig L 7 YT 3750 Non explosion proof...

Page 11: ...art Positioner YT 3700 3750 Product Manual Ver 1 03 11 Fig L 8 YT 3750 Intrinsic safety type ATEX IECEx KCs NEPSI Fig L 9 YT 3750 Intrinsic safety type FM CSA Fig L 10 YT 3750 Intrinsic safety type TR...

Page 12: ...Smart Positioner YT 3700 3750 Product Manual Ver 1 03 12 Fig L 11 YT 3750 Intrinsic safety type INMETRO...

Page 13: ...c safety for TRCU 4 Lever Type Linear 0 1 2 10 40 mm Standard type 20 100 mm Standard type 90 150 mm Standard type Rotary 5 Namur 5 Conduit Air Connection Type 1 2 3 4 5 G 1 2 Rc 1 4 G 1 2 1 4 NPT YT...

Page 14: ...s I Zone 0 AEx ia IIC T5 T6 Ex ia IIC T5 T6 Ga Ex tb IIIC T100 T85 Db Operating Temperature Standard Type 30 85 22 185 except TRCU explosion proof Low Temp Type 40 85 40 185 Arctic Temp Type 55 85 67...

Page 15: ...fication of Digital In Digital out 1 Digital In Control voltage 0 5V DC Logical switching state 0 11 28V DC Logical switching state 1 Current Max 4mA 2 Digital Out Supply voltage 5 28V DC Current 1mA...

Page 16: ...Gb II 2D Ex ia IIIC T100 T85 Db IP6X Certification No EPS 19 ATEX 1 145 X Ambient temperature 40 60 T5 40 40 T6 IECEx Type Intrinsic safety Rating Ex II 2G Ex ia IIC T5 T6 Gb Ex II 2D Ex ia IIIC T100...

Page 17: ...0 to 40 T6 INMETRO Brazil Pending Type Intrinsic safety Rating Ex ia IIC T5 T6 Gb Ex ia IIIC T100 T85 Db IP66 Certification No DNV XX XXXX X Ambient temperature 40 60 T5 40 40 T6 SIL2 in a redundant s...

Page 18: ...Ver 1 03 18 2 8 Parts and Assembly Fig 2 1 Exploded view of standard type positioner 1 Base Cover 7 Base body 2 PCB Cover 8 Pilot Block 3 Main PCB 9 Auto Manual Switch 4 Torque Motor 10 Feedback Lever...

Page 19: ...xploded view of limit switch type positioner 1 Base Cover 8 Potentiometer 2 PCB Cover 9 Base body 3 Main PCB limit switch type 10 Pilot Block 4 Torque Motor 11 Auto Manual Switch 5 Cam assembly 12 Fee...

Page 20: ...Smart Positioner YT 3700 3750 Product Manual Ver 1 03 20 2 9 Product Dimension 2 9 1 YT 3700 Fig 2 3 YT 3700L Fig 2 4 YT 3700R LS 2 9 2 YT 3750 Fig 2 5 YT 3750L Fig 2 6 YT 3750R LS...

Page 21: ...is no remaining pressure in the actuator The positioner has a vent cover to exhaust internal air and drain internal condensation water When installing the positioner make sure the vent cover must be...

Page 22: ...ring washer fastening feedback lever to a main shaft Bracket bolts and washers for positioner or sensor not supplied with the positioner Connection bar not supplied with the positioner 3 3 2 Safety Pr...

Page 23: ...ctuator 2 Attach the positioner with the bracket to the actuator yoke DO NOT TIGHTEN THE BRACKET COMPLETELY 3 Connect connection bar to the actuator clamp The hole gap on the feedback lever is 6 5mm s...

Page 24: ...ring as shown below right figure the connection bar or the lever spring will be worn out quickly because of excessive strong tension Fig 3 5 Proper way to insert connection bar between feedback lever...

Page 25: ...oke 45mm Fig 3 7 Feedback lever and location of the connection bar 8 After installing the positioner operate the valve from 0 to 100 stroke by using direct air to the actuator On both 0 and 100 the fe...

Page 26: ...oceeding with the installation ensure following components are available 3 4 1 YT 3700R 3750R Components Positioner Rotary bracket set 2 pieces 4 pcs x wrench headed bolts M6 x 1P x 10L For the positi...

Page 27: ...bracket is designed to fit onto the actuator with 20mm 30mm and 50mm stem height H according to VDI VDE 3845 standard Please refer to below table how to adjust the height of the bracket Actuator stem...

Page 28: ...ngle acting actuator it is easy to check 0 point by supplying no pressure to the actuator For double acting actuator check actuator stem s rotation direction clockwise or counter clockwise by supplyin...

Page 29: ...lower than ambient temperature Avoid from dusty air Use 5 micron or smaller filter Avoid oil Comply with ISO 8573 1 or ISA 7 0 01 Supply pressure range is 0 14 0 7 MPa 1 4 7 bar Set air filter regulat...

Page 30: ...nected with supply port of actuator when using spring return actuator of single acting type Fig 4 1 Single acting linear actuator Fig 4 2 Single acting rotary actuator 4 4 2 Double acting actuator Dou...

Page 31: ...PTM options must be supplied with 9 28V DC separately For mechanical limit switch option separate 12 30V DC must be supplied For Proximity limit switch option separate 8 2V DC must be supplied DO NOT...

Page 32: ...s The input output terminals of the basic model are connected to an external system as shown below Refer to the table below for the signal name and function of each terminal Fig 5 1 Terminal Overview...

Page 33: ...OUT Analog output signal D G IN Digital input signal A digital input that performs a specific function The 0 5 V input is defined as Low level and the 10 28 V input is defined as High level D G IN Di...

Page 34: ...Limit Switch 1 2 LS 1 Normal open signal for Limit Switch 1 The contact of the Limit Switch 1 is closed when the valve passes through the preset position 3 LS 1 Normal close signal for Limit Switch 1...

Page 35: ...tch 1 2 LS 1 Normal open signal for Limit Switch 1 The contact of the Limit Switch 1 is closed when the valve passes through the preset position 3 LS 1 No connection Not used 1 LS 2 Common terminal fo...

Page 36: ...uct Manual Ver 1 03 36 6 Adjustments 6 1 Limit Switch Adjustment YT 3700 3750 can have limit switch option If user wants to adjust the sensing position please loosen bolts and adjust cam Fig 6 1 Mecha...

Page 37: ...e will be transferred to actuator through outport by positioner control On the other hand if the switch is turned counter clockwise toward M it is loosened then the supply pressure will be directly su...

Page 38: ...d when the actuator s volume is too small In order to prevent hunting orifice can be used 6 3 1 Plate type Orifice Installment By installing the plate type orifice the flow rate of the supply pressure...

Page 39: ...03 3750 When purchasing option sub PCBs separately 4 Bolts and 2 supports are supplied together with sub PCB 7 1 Installation steps 1 Mount 2ea of sub PCB support on sub PCB with 2ea of bolt 2 Open ba...

Page 40: ...Option PCB on Main PCBs JP1 jumper must be removed when HART option included sub PCB is being mounted 5 After PTM sub PCB is installed newly values of PTM ZERO and PTM ENd must be calibrated for corr...

Page 41: ...the Valve and Actuator 8 2 LCD display and buttons 8 2 1 LCD display and symbols Fig 8 1 NE107 Symbols Description Symbols Description Failure Degree in Celsius Functional Check Degree in Fahrenheit...

Page 42: ...Used to navigate to each menu at the same level or to increase the value of the selected parameter DOWN Used to navigate to each menu at the same level in reverse order of UP button or to decrease the...

Page 43: ...ss for more than 3 seconds in Run Mode to go to Configuration Operation Run Mode Monitor ESC Configuration and Operation RUN AP Actual Position CALIb Calibration RUN TP Target Position MAN OPER Manual...

Page 44: ...ition RUN IV Integral Output Value Accumulated integral output value RUN MV Manipulator Value Digital input value applied to I P converter RUN TEMP Temperature Internal temperature of positioner in C...

Page 45: ...ER Manual Operation by Set Position MAN SP Manual Operation by Manipulator Value MAN MV Control Parameters CTL PARM Dead Band dEAdbANd 0 1 10 0 0 3 Proportional Gain Upward KP UP 0 1 50 0 1 Proportion...

Page 46: ...C Lo HI HI Output Configuration OUT CFG Position Transmitter Direction PTM NORM REVS NORM Position Transmitter Zero PTM ZERO 0 100 00 Position Transmitter End PTM ENd 0 100 00 HART Feedback Direction...

Page 47: ...0 85 30 10sec 5 0 oFF oFF oFF oFF on Reset Alarm Status RST ALRM View Event Log EVT LOG RECORD 0 19 1 View PST Result Record PST RSLT RECORD 0 11 1 PST Configuration PST CFG INTERVAL START PO TOL TARG...

Page 48: ...TEMP HI 57 85 Sellecting by temp option Temperature Lo Limit TEMP LO 57 85 Sellecting by temp option Deviation Time dV TIME 0 300 sec 60 sec Deviation Deadband dV db 0 10 5 Travel Hi Limit Alarm Enab...

Page 49: ...mately 2 3 minutes to complete the automatic calibration which may vary depending on the size of the actuator There are two types of Auto Calibrations as shown below so that you select and use them as...

Page 50: ...ted positioner have changed slightly 3 seconds Press UP or DOWN button if the above is not displayed Press UP or DOWN button if the above is not displayed Push any button 8 6 3 Auto Calibration 2 AUTO...

Page 51: ...auto calibration Once you enter the TRAVEL ZERO or TRAVE END setting press the UP DOWN button to change the zero point or endpoint of the valve and then press the ENTER button to save it The saved po...

Page 52: ...s suspended or when no trouble is raised with the operation of Control Valve as the execution of Manual Mode may interfere with the currently operating process 8 7 1 Manual Operation by Set position M...

Page 53: ...ed by the UP and DOWN buttons based on the currently entered I P input value which moves the stem of the valve up and down Once out of the menu by ESC the positioner is controlled again by an input si...

Page 54: ...d UP and reverse D parameter Kd dN 5 Auto Dead band Mode AUTO db 6 Performance Mode PER 8 8 1 Dead Band dEAdbANd Deadband indicates the size of the allowable deviation that is set near the target posi...

Page 55: ...rove stability but make it slower to reach a target position 3 seconds Press UP or DOWN button if the above is not displayed Press UP or DOWN button if the above is not displayed UP DOWN ESC 3 times 8...

Page 56: ...akes the valve hunting easier and a smaller value can lead to poor linearity or dynamic properties 3 seconds Press UP or DOWN button if the above is not displayed Press UP or DOWN button if the above...

Page 57: ...Stable Normal and Fast that allow you to select the required responsiveness The gains settings are accomplished from low response to fast response in the order of Stable Normal and Fast 3 seconds Pres...

Page 58: ...RAMP UP and Target Position Ramp Down Rate RAMP dN 11 Digital Input Function dIF 12 Digital Input Logic dI LOGIC 8 9 1 Signal Direction SIG NORM REVS This function changes the action type of the valv...

Page 59: ...3 times 4 20mA Control Initial condition 4 12mA Control 8 9 3 Custom Split Range Zero CST ZERO It is used to set the current corresponding to the zeropoint when the valve position of 0 to 100 is cont...

Page 60: ...econds Press UP or DOWN button if the above is not displayed Press UP or DOWN button if the above is not displayed UP DOWN ESC 3 times This function is activated by saving the Split Range Mode SPLIT o...

Page 61: ...5 and P4 20mA 100 User can change all 5 points or only change partially and exit the menu by pressing ESC button 3 seconds Press UP or DOWN button if the above is not displayed Press UP or DOWN button...

Page 62: ...below can be made through the settings of P1 to P20 User can change all 21 points or only change partially and exit the menu by pressing ESC button 3 seconds Press UP or DOWN button if the above is no...

Page 63: ...e position and 20 mA is 100 of valve position and the Tight Shut Open value is set to any position less than 100 e g 95 then the valve stroke will be 100 immediately when the input signal is over the...

Page 64: ...of valve position and 20 mA is 100 of valve position and the Tight Shut Close value is set to any position larger than 0 e g 5 then the valve stroke will be 0 immediately when the input signal goes be...

Page 65: ...too sensitive to rapid changes in flow or pressure The unit of setting is sec If you want to move 100 of the stroke for about 5 seconds set it to 20 sec The rising and falling speed can be set indepe...

Page 66: ...er 1 03 66 3 seconds Press UP or DOWN button if the above is not displayed Press UP or DOWN button if the above is not displayed UP DOWN ESC DOWN Adjust RAMP UP Time RAMP UP Time Finish UP DOWN ESC 3...

Page 67: ...Start Partial Stroke Test Partial stroke Test Stop PSTO Stop Partial Stroke Test in progress 3 seconds Press UP or DOWN button if the above is not displayed Press UP or DOWN button if the above is no...

Page 68: ...bACKCAL oFF on 5 Digital Output Function dOF oFF on 6 Digital Output Logic dO LOGIC 7 Analog Output Function AOF oFF on 8 Analog Output Logic AO LOGIC 8 10 1 Position Transmitter Direction PTM NORM R...

Page 69: ...back and ENd adjusts the end point of the transmitter 20mA feedback This is used when the analog output signal needs to be feedbacked differently than the actual position of the valve or to be adjuste...

Page 70: ...A UP DOWN ESC 3 times Adjusting end point The actuator moves to end point Fit the feedback signal to 20mA 8 10 3 HART Feedback Direction HT NORM REVS The feedback signal from the HART communication ou...

Page 71: ...o actual input current For example if the flow characteristic mode is set from LIN to EQ when an input current value of 8 mA 25 is applied the target position is changed to 6 25 and RUN AP is displaye...

Page 72: ...eds the Travel High Limit towards the 100 position Travel Low Limit TVLL When the valve position is lower than Travel Low Limit towards the 0 position Deviation Timeout DVTO When actual deviation grea...

Page 73: ...l factory setting is HI which means that when 11 28 V DC voltage is applied the output current will be in the range of 2 2 to 14 mA flowing through the output port A resistor is built into the electro...

Page 74: ...it Travel High Limit TVLH When the valve position exceeds the Travel High Limit towards the 100 position Travel Low Limit TVLL When the valve position is lower than Travel Low Limit towards the 0 posi...

Page 75: ...nt of less than 3 6 mA is sourced from the analog output port when the initial factory setting is low Lo with an external voltage source applied to the analog output When the analog output logic is se...

Page 76: ...8 11 1 Action Setting ACT Reverse Action REVS or Direct Action dIR are automatically set by performing AUTO 2 within the Auto Calibration function However this function is used when the user requires...

Page 77: ...rotary positioner is used The below settings is a process manually changing the ITP on condition ITP oFF condition 3 seconds Press UP or DOWN button if the above is not displayed Press UP or DOWN butt...

Page 78: ...or DOWN button if the above is not displayed Press UP or DOWN button if the above is not displayed UP DOWN ESC 3 times 8 11 5 Polling address setting POL AddR This function is used to set the address...

Page 79: ...on for approximately 3 seconds enables ON OFF setting mode and then setting it to ON resets all parameters Keep in mind that all parameters are initialized when ON is finally selected Pay attention wh...

Page 80: ...e detected the message SEt NVMW is displayed 3 seconds Press UP or DOWN button if the above is not displayed Press UP or DOWN button if the above is not displayed automatically ESC Check the content o...

Page 81: ...o that the corresponding NE107 symbol is displayed when a preset alarm occurs This setting can be reassigned to the one of NE107 signals depending on the operator s decision As shown in the table belo...

Page 82: ...l Drive Signal Disable Out of Specificaion No I Value High Limit Disable Out of Specification No I Value Low Limit Disable Out of Specification No Travel Cutoff High Limit Disable Out of Specification...

Page 83: ...als as required Reassignment of NE107 signals to process alarms shall be made using HART communication The table below shows the type of the process status or alarm and its abbreviations See 8 14 Stat...

Page 84: ...is indicated as GOOd NE107 symbol and abbreviation for alarm NE107 symbols Abbreviation Function None dS GOOD Good dS FAIL Failure dS FUNC Functional Check dS OUTS Out of Specification dS MNTR Mainten...

Page 85: ...igh Limit PSNH Position Sensor Low Limit PSNL Critical NVM Fail NVMF Non Critical NVM Fail NVMW Abnormal Drive Signal AbdS Not Calibrated NCAL Auto Calibration Fail CALF Communication Error Limit COMM...

Page 86: ...The total valve travel accumulated whenever Travel Accumulator Deadband is exceeded Operating Count OPER CNT Total number of input change applied to I P converter Fully Open Count FOP CNT The accumul...

Page 87: ...TEMP HI Alarm is triggered if the internal temperature exceeds TEMP HI The initial factory setting is 85 Temperature Low Limit TEMP LO Alarm is triggered if the internal temperature is lower than TEMP...

Page 88: ...s below the Temperature High Limit However if the Partial Stroke Test fails or Auto Calibration fails use this function to release the alarm Below is an alarm list that can be released using the RST A...

Page 89: ...d Alarm Codes for an abbreviation and description of the event details 3 seconds Press UP or DOWN button if the above is not displayed Press UP or DOWN button if the above is not displayed UP DOWN ESC...

Page 90: ...eration are also shown Response time represents the time to reach the target position from the PST start and deadtime indicates the time from the start of the PST command to the moment the valve start...

Page 91: ...Initial factory setting is 5 sec PST Limit Time LIMT TM sec PST Failure alarm is triggered as Limit Time Over LTO when target position is not reached within LIMI TM after starting PST Initial factory...

Page 92: ...if the above is not displayed UP DOWN ESC 4 times 8 12 10 Run PST PST NOW PST NOW is used to perform Partial Stroke Test promptly in accordance with the conditions set in 8 12 9 3 seconds Press UP or...

Page 93: ...ON the Partial Stroke Test is executed regularly under the conditions set in 5 7 9 above For example PST is performed every 365 days when PST Interval is set to 365 days The initial factory setting i...

Page 94: ...roduct Manual Ver 1 03 94 8 13 Position information INFO The diverse Positioner information is provided in the INFO Mode 3 seconds DOWN Press UP or DOWN button if the above is not displayed DOWN DOWN...

Page 95: ...indicates days used Interval to store time is one minute 3 12 FULL OP Upward Full Stroke Time FULL OP This value is stored automatically after executing AUTO 2 calibration and indicates the time in se...

Page 96: ...eated replace the electronics board by contacting the manufacturer or manufacturer s representative 7 NVMW Non Critical NVM Defect 8 CYCC Cycle Count Limit It is active if the accumulated cycle counte...

Page 97: ...if there is a problem with I P converter If it is repeated replace the electronics board by contacting the manufacturer or manufacturer s representative 21 IVLH Integral Value Hi Limit It is active i...

Page 98: ...he digital input port has changed its status 39 DO0S Digital Output Status It is active when the digital output port has changed its status 40 DIGF Diagnostics Failure It indicates that the diagnosis...

Page 99: ...Smart Positioner YT 3700 3750 Product Manual Ver 1 03 99 9 Main Software Map...

Page 100: ...rk YTC Limited Address 81 Hwanggeum ro 89 Beon gil Yangchon eup Gimpo si Gyeonggi do South Korea Postal code 10048 Tel 82 31 986 8545 Fax 82 70 4170 4927 Email ytc sales rotork com Homepage http www y...

Reviews: