102
GB
6
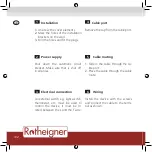
Wiring
Install the device with the screws
and connect the cable to the termi-
nal as shown.
1
Installation
1.
Unscrew the cover elements.
2.
Mark the holes of the installation
brackets on the wall.
3.
Drill the holes and fit the plugs.
4
Cable port
Remove the cap from the cable port.
5
Cable routing
1.
Slide in the cable through the ca-
ble port.
2.
Place the cable through the cable
route.
2
Power supply
Shut down the automatic circuit
breaker. Make sure that is shut off
in all poles.
3
Electrical connection
An external switch e.g. light switch,
thermostat, etc. must be used to
control the device, it must be lo-
cated between the L and the T wire.

