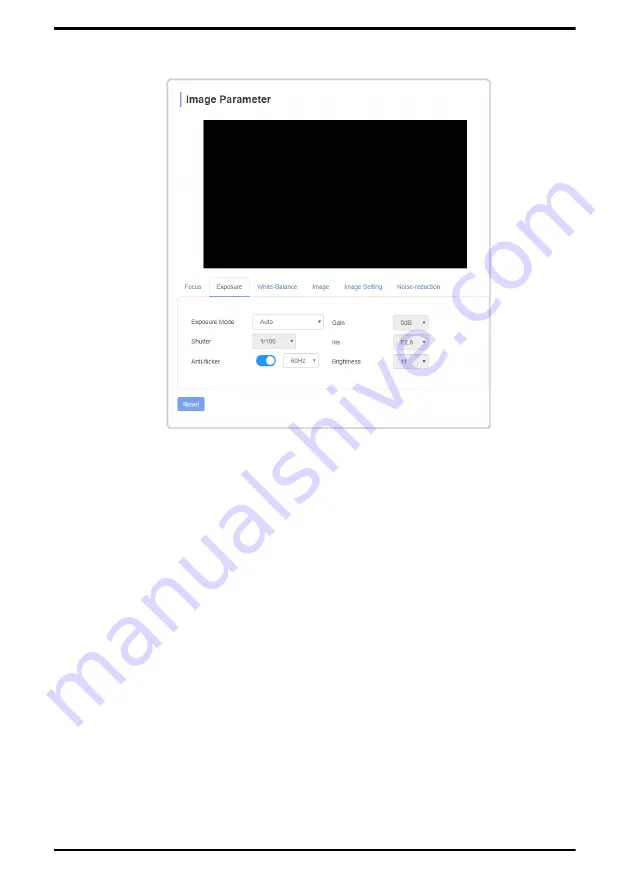
Ross PIVOTCam-SE User Manual Download Page 31

Exposure

Exposure Mode

 — select the exposure mode (Auto, Manual, Iris

Priority, Shutter Priority, Brightness Priority) you want the camera to

operate in.

Shutter

 — select the shutter speed you want to use. The 

Exposure

Mode

 must be set to 

Manual

 or 

Shutter Priority

 to set the shutter

speed.

Anti-flicker

 — turn anti-flicker on and select the frequency (50Hz

or 60Hz).

Gain

 — adjust the gain (30-0dB). The 

Exposure Mode

 must be set

to 

Manual

 to adjust the gain.

Iris

 — adjust the iris. The 

Exposure Mode

 must be set to 

Manual

or 

Iris Priority

 to adjust the iris.

Brightness

 — adjust the brightness (0-27). The 

Exposure Mode

must be set to 

Manual

 or 

Brightness Priority

 to adjust the

brightness.

PIVOTCam-SE User Manual — Web Interface • 

31

Summary of Contents for PIVOTCam-SE

Page 1: ...PIVOTCam SE User Manual...

Page 2: ...oss rossvideo com Ross Video Code of Ethics Any company is the sum total of the people that make things happen At Ross our employees are a special group Our employees truly care about doing a great jo...

Page 3: ...es of crisis If there s no one to authorize the required action in times of company or customer crisis do what you know in your heart is right You may rent helicopters if necessary PIVOTCam SE User Ma...

Page 4: ...countries VideoLAN VLC VLC media player and x264 are trademarks of the videoLAN registered non profit organization Important Regulatory and Safety Notices to Service Personnel Before using this produ...

Page 5: ...s The safety and operating instructions should be retained for future reference 3 Heed Warnings All warnings on the product and the operating instructions should be adhered to 4 Follow Instructions Al...

Page 6: ...mechanism and internal cables CAUTION Do NOT move or rotate the lens barrel by hand Doing so may damage the rotary mechanism as well as the rotation limiters Warranty and Repair Policy Ross Video Limi...

Page 7: ...sh the need for the extraction of natural resources Ross Video encourages you to use the appropriate take back systems These systems will reuse or recycle most of the materials from your end of life e...

Page 8: ...standard time technical support personnel are available by telephone Outside of normal business hours and on weekends a direct emergency technical support phone line is available If the technical sup...

Page 9: ...mote Control 19 On screen Menu System 21 System 21 Exposure 21 Image 22 Quality 23 PTZ 23 Format 24 IP 24 Reset 24 INFO 25 Web Interface 26 To Log Into the Web Interface 26 Preview 27 PTZ Control 27 P...

Page 10: ...Troubleshooting 40 Specifications 41 Ports 43 RS232 VISCA IN OUT 43 x Contents PIVOTCam SE User Manual...

Page 11: ...s are missing or damaged contact Ross Video Technical Support Item Qty PIVOTCam SE Camera 1 Power Supply 1 Power Cord 1 Serial Control Cable male 8 pin miniDIN to female DB9 1 Remote Control 1 User Gu...

Page 12: ...is the main video output of the camera GENLOCK BNC for external reference input LAN RJ45 for standard ethernet connection DC12V 12V DC power from external brick Use only the external power supply pro...

Page 13: ...t port LAN or the serial port RS232 IN Power and video cabling are the same regardless of the control method used From Reference IN RS232 OUT HD SDI GENLOCK LAN DC12V To Switcher Video In BNC Mains Po...

Page 14: ...Hz 1080p 24Hz 1080p 24Hz Cabling for Control via Ethernet Port Each network device requires a unique IP address Use the IP portion of the on screen menu to assign the camera a unique IP address For mo...

Page 15: ...o OVER IP Cabling for Control via Serial Port You can either connect directly to a device that can control the camera via serial VISCA or add a serial to ethernet converter to connect to a device that...

Page 16: ...The settings of the DIP switches is broken up into three pairs Each pair of switches are used together to set the functionality and are not affected by the other two pairs Table 2 DIP Switch Function...

Page 17: ...cription ON OFF Working Mode default OFF ON n a ON ON n a Note By default DIP switches SW1 5 should be set to ON and SW6 set to OFF Note DIP switches 3 and 4 are not used at this time PIVOTCam SE User...

Page 18: ...r other game controller to DashBoard A USB controller enables you to perform pan tilt zoom movements with a joystick and select a different camera at the push of a button DashBoard which includes the...

Page 19: ...ly you can press LEARN and then press a number button to store a preset To recall a preset press and release its number button LEARN Used with the LIMIT L LIMIT R and LMT CLR buttons to set and clear...

Page 20: ...LIMIT R to set the right limit LMT CLR Clears both pan limits Press LEARN and then press LMT CLR to clear the limits SCAN This button is not used at this time BLC OFF Turns off backlight compensation...

Page 21: ...he menu system You are prompted to save your settings when you exit the menu system System Item Settings PROTOCOL VISCA fixed ADDRESS applies only for control via serial port 1 to 7 BAUD RATE applies...

Page 22: ...de only GAIN 0bB to 30dB in 2dB increments EBRIGHT bright exposure mode only 000 to 027 BRIGHT auto iris or shutter exposure modes only 000 to 015 WD Mode wide dynamic range ON turns on WD mode and en...

Page 23: ...lt speed at higher zoom levels OFF pan tilt speed not affected by zoom level MOUNT M mount mode OFF camera is mounted right side up ON camera is mounted upside down and pan tilt controls are reversed...

Page 24: ...ock Network Mask for camera GW Gateway for camera MAIN Main Stream format 1920 1080 3840 2160 BITRATE main Main Stream bit rate SUB Sub Stream format 1280 720 1024 576 640 360 BITRATE sub Sub Stream b...

Page 25: ...IP address is 192 168 1 188 INFO Item Settings IR ADDR infrared control address of camera FOCUS focus mode CLIENT client protocol MODEL NO model number ARM VER ARM firmware version MD VER motor driver...

Page 26: ...is selected in the upper right corner of the page To Log Into the Web Interface The web interface requires a user name and password Important The web interface uses Adobe Flash Player for the video p...

Page 27: ...eset the focus and zoom settings Focus increase or decrease focus Zoom increase or decrease the zoom level Focus Mode set the focus mode to manual or automatic The Focus Mode is set to Manual when you...

Page 28: ...t to use 2 Store the current camera preset to the selected register 3 Delete the camera preset stored in the selected register 4 Recall the camera preset from the selected register Settings The Settin...

Page 29: ...rate for the main and sub streams Framerate select a frame rate for the main and sub streams Bitrate Control select a Constant Bit Rate CBR or a Variable Bit Rate VBR for the main and sub streams I F...

Page 30: ...alue 4 Click Play Image Parameters The Image Parameter page allows you to adjust the various image settings on the camera These parameters are broken down into a number of sub pages Tip The Reset butt...

Page 31: ...ty to set the shutter speed Anti flicker turn anti flicker on and select the frequency 50Hz or 60Hz Gain adjust the gain 30 0dB The Exposure Mode must be set to Manual to adjust the gain Iris adjust t...

Page 32: ...e mode Auto Sodium Fluorescent Indoor Outdoor One Push Auto Tracking or set the mode to Manual to be able to adjust the Red Gain and Blue Gain Red Gain manually adjust the red gain Blue Gain manually...

Page 33: ...the image vertically Backlight Compensation turn backlight compensation on or off Gamma select the gamma level 0 4 Wide Dynamic Range turn wide dynamic range WDR on or off Select the WDR level you wa...

Page 34: ...djust the brightness of the image 0 15 Sharpness adjust the sharpness of the image 0 15 Contrast adjust the contrast of the image 0 15 Saturation adjust the saturation of the image 0 15 34 Web Interfa...

Page 35: ...ngs The RTP Multicast Setting tab consists of settings for features that are currently under development and are not supported Ethernet The Ethernet tab allows you to set confirm and set the ethernet...

Page 36: ...new settings and then power cycle the camera CAM Firmware Upgrade The Firmware Upgrade page enables you to upgrade the CAM component of the firmware on the camera There are additional upgradeable firm...

Page 37: ...file name starts with 3_PIVOTSE_CAM and ends in a bin extension as in the following example 3_PIVOTSE_CAM_V305_20191129 bin 3 Click Open 4 Click Upgrade 5 Follow any prompts to upgrade the camera Tip...

Page 38: ...dress using the remote control or navigate to the default IP address 192 168 1 188 Reboot click this button to reboot the camera Account The Account Setting page allows you to change the account name...

Page 39: ...ick Ok to set the new account name and password Note If you forget the new account name and or password please contact Ross Video Technical Support for assistance PIVOTCam SE User Manual Web Interface...

Page 40: ...ting Grinding noise near limits The camera may have lost position reference Either power cycle the camera or use the PT Reset function to reset the pan tilt positioning 40 Troubleshooting PIVOTCam SE...

Page 41: ...le Lens 23 Optical Zoom 2 Lossless Digital Zoom Pan 170 Rotation Angle Tilt 30 to 90 upside down mounting supported Pan 0 1 to 120 s Rotation Speed Tilt 0 1 to 80 s Remote Control first 10 presets but...

Page 42: ...17mm 8 7in 6 8in 4 6in Net Weight 1 25kg 2 8lb Notes 1 When powered by PoE the camera may require more power than the PoE standard provides by default We recommend that you run the camera from a PoE c...

Page 43: ...Ports RS232 VISCA IN OUT Table 3 RS232 Port Pinouts Pin Signal 1 DTR 2 DSR 3 TXD 4 GND 5 RXD 6 A 7 IR OUT 8 B PIVOTCam SE User Manual Ports 43...

Reviews: