


24 • Configuration
DSS-8224 User Guide (v6.0)
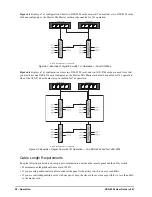
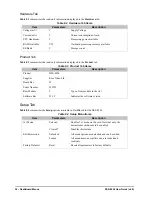
• 7x1 switch
• Dual 2x1 switch with input selection for each output
• Dual 2x1 switch with tracking, where Output 2 tracks Output 1
When in
Dual 2x1 Mode
, there is an option in DashBoard to enable an Auto Change Over (ACO) Mode. This
option is disabled in the 4x1 or 4x2 Modes. The card-edge controls, the panel input, GPI input, and remote
control panel are all disabled when ACO Mode is enabled. For more information, refer to the section “
Configuring the Operating Mode
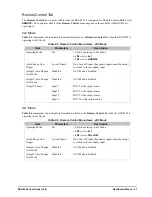
Use
JP4
to specify the operation mode of the DSS-8224, and
JP9
to specify the control mode for Output 2.
JP10
is
used when operating in 2x1 mode to specify the two inputs available on Output 2.
To configure the operating mode of the DSS-8224
1. Set
JP4
as follows:
•
4x1
— Select this option to enable the DSS-8224 to operate as a 4x1 switch with four inputs selectable on
each output.
•
2x1
— Select this option to enable the DSS-8224 to operate as a 2x1 switch with two inputs selectable.
Ensure to configure
JP10
as required.
2. Set
JP9
as follows:
•
NORMAL
— Select this option to control Output 2 independently by the control module or GPI on BNC 8.
This is the default setting.
•
FOLLOW
— Select this option to configure Output 2 settings to follow Output 1. Switching Output 1 will
also switch Output 2.
3. If
JP4
is set to
2x1
, set
JP10
as follows:
•
INPUT 1&2
— SDI input 1 and 2 are available on Output 2. This is the default setting.
•
INPUT 3&4
— SDI input 3 and 4 are available on Output 2.
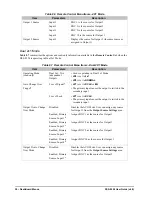
Configuring SW1 and SW2
SW1
and
SW2
select the next input on Output 1 and Output 2 respectively.
To configure the behavior of SW1 and SW2
1. Set
JP3
to
PANEL
.
2. Set
JP1
to
MASTER
.
3. Configure the behavior of
SW1
by setting
JP4
as follows:
•
4x1
— Select this option to have
SW1
cycle through inputs 1 through 4.
•
2x1
— Select this option to have
SW1
cycle between inputs 1 and 2.
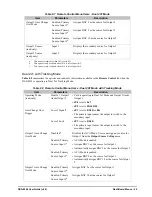
4. Configure the behavior of
SW2
as follows:
a. Set
JP9
to
NORMAL
.
b. Set
JP4
as follows:
›
4x1
— Select this option to have
SW2
cycle through inputs 1 through 4.
›
2x1
— Select this option to have
SW2
cycle based on the
JP10
settings.
5. If
JP4
is set to
2x1
, set
JP10
as follows:
›
INPUT 1&2
— Select this option to have
SW2
cycle through inputs 1 and 2 only.
›
INPUT 3&4
— Select this option to have
SW2
through inputs 3 and 4 only.
Summary of Contents for OpenGear DSS-8224
Page 1: ...DSS 8224 User Guide ...
Page 6: ......
Page 14: ...14 Before You Begin DSS 8224 User Guide v6 0 ...
Page 18: ...18 Hardware Overview DSS 8224 User Guide v6 0 ...
Page 22: ...22 Physical Installation DSS 8224 User Guide v6 0 ...
Page 34: ...34 Software Upgrades DSS 8224 User Guide v6 0 ...
Page 42: ...42 DashBoard Menus DSS 8224 User Guide v6 0 ...
Page 44: ...44 Technical Specifications DSS 8224 User Guide v6 0 ...


