Rosewill METEOR XR Series Quick User Manual Download Page 7

5

Gaming Case

Quick User Guide

METEOR XR Series

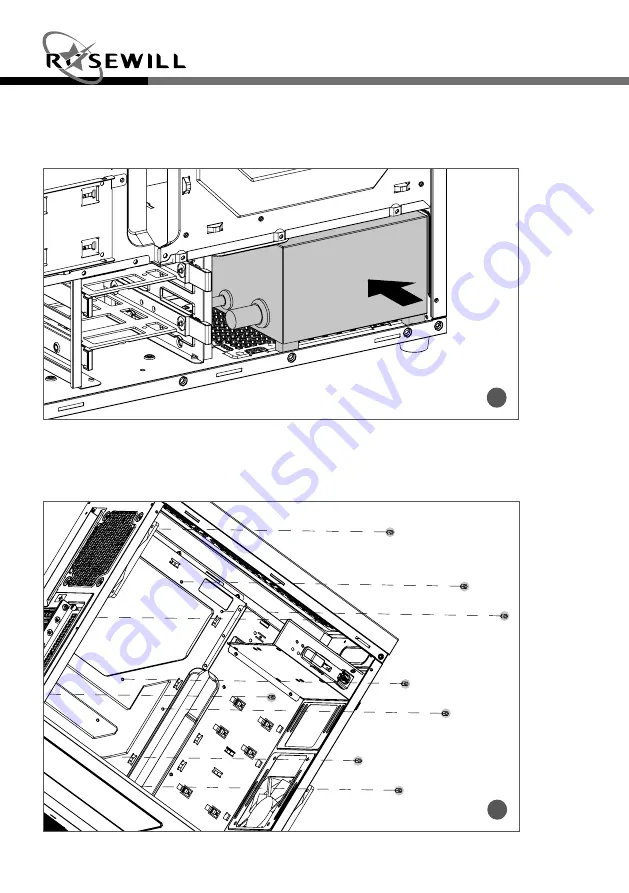
2. Install the Power Supply

2-1 Seat the power supply unit (PSU) in the bottom-rear of the case and secure with Screw-A 

(Figure 2).

2

3. Install the Motherboard

3-1. Place the motherboard standoffs based on the form factor (Figure 3a).

3a

Summary of Contents for METEOR XR Series

Page 1: ...Quick User Guide Gaming Case Series...

Page 2: ......

Page 3: ...1 Product Overview Product Diagram 02 Side I O Pin out 02 Side I O Diagram 03 Top I O Diagram 03 Accessory Kit 03 Installation Guide 1 Open the Unit 04 2 Install the Power Supply 05 3 Install the Mot...

Page 4: ...R Series Product Overview Product Diagram Components vary by country Top Dust Filter 120 mm Fan Left Side Panel Right Side Panel Botton Dust Filter 120 mm Fan Front Panel Side I O Pin out USB 3 0 CONN...

Page 5: ...I O Diagram USB 3 0 Power Button Reset Button USB 3 0 SPK MIC Accessory Kit Image Part Name Oty Function Component Screw A 4 PSU Screw B 10 Motherboard Screw C 8 2 5 SSD Standoff 10 Motherboard Nut Se...

Page 6: ...Gaming Case Quick User Guide 4 METEOR XR Series Installation Guide 1 Open the Unit 1 1 Remove the thumbscrews and take off panel R and L Figure 1 1...

Page 7: ...XR Series 2 Install the Power Supply 2 1 Seat the power supply unit PSU in the bottom rear of the case and secure with Screw A Figure 2 2 3 Install the Motherboard 3 1 Place the motherboard standoffs...

Page 8: ...Gaming Case Quick User Guide 6 METEOR XR Series 4 Install the Add on Card 4 1 Unscrew to remove the slot cover Figure 4a 3 2 Secure the motherboard down with Screw B Figure 3b 4a 3b...

Page 9: ...7 Gaming Case Quick User Guide METEOR XR Series 4 2 Install the add on card and secure with screws Figure 4b 4b 5 Install an External 5 25 Device 5 1 Remove the front panel Figure 5a 5a...

Page 10: ...Gaming Case Quick User Guide 8 METEOR XR Series 5 2 Remove the slot cover Figure 5b 5c 5b 5 3 Put back the front panel and insert the 5 25 drive Figure 5c...

Page 11: ...ke out the 3 5 HDD tray unscrew to remove the 2 5 SSD tray from the chassis Figure 6a 6b 6 3 Install the trays back into the cage onto the chassis Figure 6f 6g 6 2 Install the 3 5 HDD on the tool less...

Page 12: ...on The METEOR XR provides ample space for adding additional cooling fans Please refer to the Specifications Table for options 8 2 Liquid cooling Radiator Installation The METEOR XR gives you the optio...

Page 13: ...Case Quick User Guide METEOR XR Series Instruction of installing 240 280 mm water cooling radiator on top a Remove the top dust filter b Secure the radiator with screws and put the dust filter back Fi...

Page 14: ...ITX With Side Panel Window Yes Tempered glass side window Expansion External 5 25 Drive Bays 1 Internal 3 5 Drive Bays 2 0 Internal 2 5 Drive Bays 2 4 Expansion Slots 7 Front Ports Front Ports 2 x US...

Page 15: ......

Page 16: ...al Support Information techsupport rosewill com 1 800 575 9885 Thank you for purchasing a quality Rosewill product Please register your product at www rosewill com for complete warranty information an...

Reviews: