background image

UN7000 7” Widescreen Universal Monitor

Page 5

RC-1029A

MOBILE AV REMOTE CONTROL

0

REP

SCAN

SAVE

7

4

8

5

MUTE

DISP

BAND

VOL

9

6

MEMORY

CH/DISC/SET

POWER

1

2

3

MENU

MODE

Operating Guide

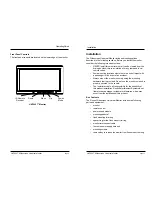
Remote Control

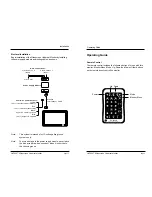
The remote control includes the following buttons for use with this
monitor: Monitor Menu, Mode, Up, Down, and Power. Other buttons
on the remote do not control the monitor.

Power

Up Down

Monitor Menu

Mode

Operating Guide

UN7000 7” Widescreen Universal Monitor

Page 12

Electrical Installation

Begin installation of the Widescreen Universal Monitor by installing
the power supply module and routing cables, as shown.

Interconnect  Cable

Red:

12V(+) switched (accessory)

Blue:

12V(+) output, 1A capable

Video  Out

Video  source  2
      (Input)

Yellow:

12V(+) constant power (battery)

Four-wire power harness:

Video  source  1
      (Input)

Power Supply Module

Black:

negative chassis ground

Monitor

RCA connections:

Note:

This system is intended for 12-volt negative-ground

systems only.

Note:

To avoid damage to the power supply module, never leave

the blue wire bare when unused or when it is shorted to

the chassis ground.

Installation

Summary of Contents for UN7000

Page 1: ...ROSEN UN7000 7 Universal Headrest Monitor Owner s Manual and Installation Guide Rosen Entertainment Systems 1120 California Avenue Corona CA 92881 909 898 9808 www rosenentertainment com 9000514...

Page 2: ......

Page 3: ...tions with uneven curved surfaces such as upholstery Be sure there is enough space for both the trim ring and for any excess interconnect cable 3 Ensure that the interconnect cable will reach from the...

Page 4: ...ways mount the monitor securely using the mounting hardware that is provided Do not use the monitor unless it is properly secured to the vehicle Avoid touching the LCD screen except when cleaning it w...

Page 5: ...sal Monitor Page 12 Electrical Installation Begin installation of the Widescreen Universal Monitor by installing the power supply module and routing cables as shown Interconnect Cable Red 12V switched...

Page 6: ...is a risk of impact with a passenger in the event of an accident Always mount the monitor securely using the mounting hardware that is provided Do not use the monitor unless it is properly secured to...

Page 7: ...active input AV2 appears briefly when AV2 is the active input 3 Press or to toggle between NTSC or PAL 4 Press POWER on the monitor or MODE on the remote control to toggle between AV1 and AV2 5 Press...

Page 8: ...ow points to Color Brightness or Tint 3 Press the and buttons to adjust the setting The setting will be displayed on the screen as shown There are 64 steps of adjustment The default setting is 32 on a...

Reviews: