background image

OPERATION 

RackView Widescreen 19" Manual 

8


RackView Operation 


Power-On Procedure 


Power on the RackView (see power switch on back panel)  


Power on the KVM Switch or other connected product 


Power on the CPU 


Video Input Select Button 


The RackView remembers the last valid video input selection, so if the CPU input has changed, the user 

needs to re-select the video input. 


Locate the “Video Input Select” button on the OSD display control panel     


Push the Video Input Select button to toggle between VGA and DVI Input 


Select the appropriate Video Input format (VGA or DVI) 


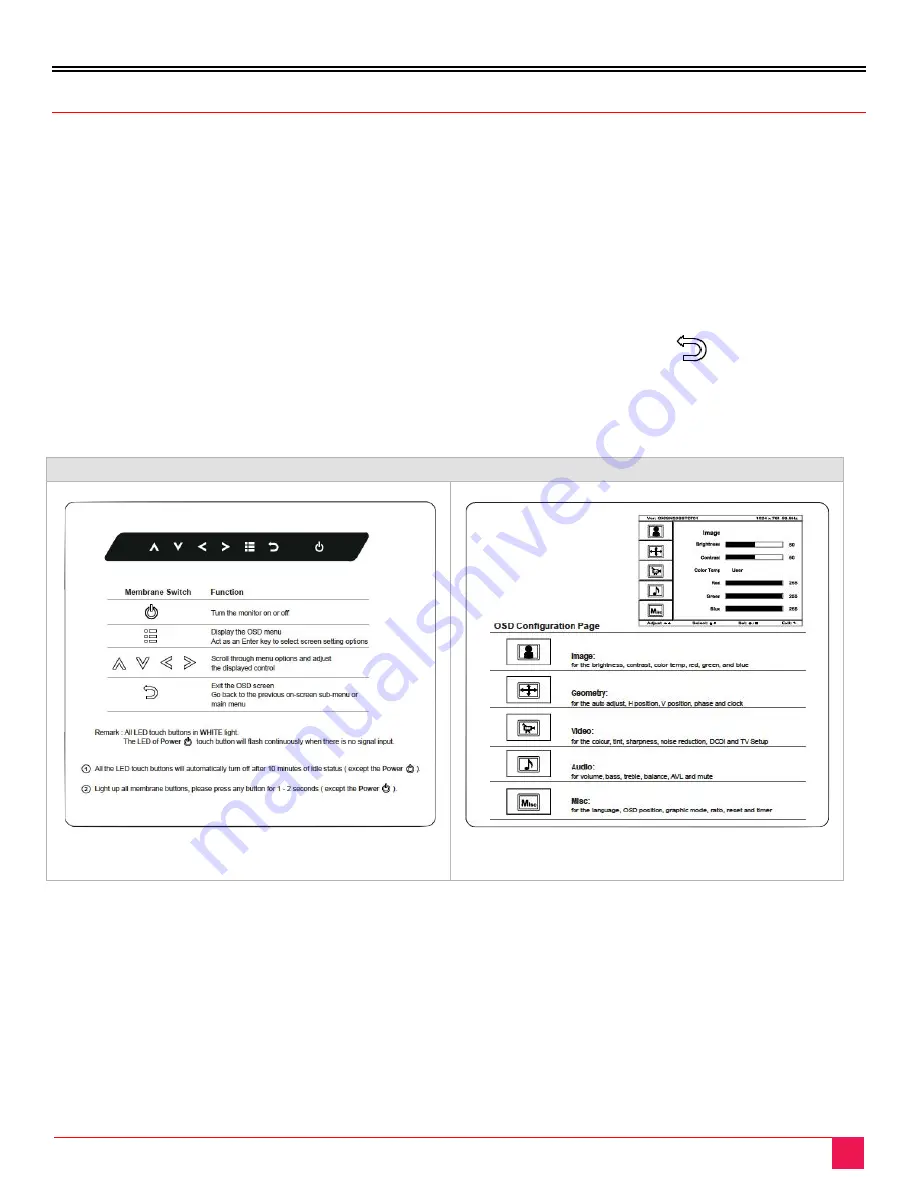
OSD Selection  

OSD Selection Panel 


Figure 7. OSD menu selection 


Summary of Contents for Rackview LCD Panel Mount 19"

Page 1: ...RackView Widescreen 19 Sliding KVM Drawer 1440 x 900 Installation and Operation Manual 10707 Stancliff Road Houston Texas 77099 Phone 281 933 7673 techsupport rose com ...

Page 2: ...or damage in transit to prepay shipping charges to the warranty service location and to use the original shipping container or its equivalent You must call for a return authorization number first Under no circumstances will a unit be accepted without a return authorization number Contact an authorized repair center or Rose Electronics for further information ALL EXPRESS AND IMPLIED WARRANTIES FOR ...

Page 3: ...nvironment This equipment generates uses and can radiate radio frequency energy and if not installed and used in accordance with the instruction manual may cause harmful interference to radio communications Operation of this equipment in a residential area is likely to cause harmful interference in which case the user will be required to correct the interference at their own expense This equipment...

Page 4: ...10 Maintenance and Repair 11 Technical Support 11 Figures Figure 1 RackView product layout key features 3 Figure 2 RackView rear panel connector layout 3 Figure 3 RackView installation procedure 4 Figure 4 RackView console drawer operation 5 Figure 5 RackView cable connectivity 6 Figure 6 RackView device interface cables 7 Figure 7 OSD menu selection 8 Figure 8 RackView OSD configuration and setti...

Page 5: ...on 15 Table 4 DVI D and VGA video formats 17 Table 5 3G HD SD SDI video formats 17 Table 6 RackView DC power options 18 Appendices Appendix A Specifications 12 Appendix B Part Numbers 13 Appendix C RackView Dimensions 14 Appendix D RackView with Integrated KVM Switch 15 Appendix E RackView Video Options 16 Appendix F RackView DC Power Options 18 ...

Page 6: ...he 19 LCD monitor supports 1440 900 video resolution with both VGA and DVI video interfaces available The keyboard tray includes a 2 button touchpad mouse and either a PS2 or USB connector is available for keyboard and mouse operation via an external interface cable There are several options available with the RackView including the integration of a VGA USB or DVI USB KVM switch for PC Server mana...

Page 7: ...bles are usually ordered separately If the package contents are not correct contact Rose Electronics or your reseller so the problem can be quickly resolved RackView Options Integrated KVM switch DVI USB Audio 12 port or VGA USB 8 or 16 port HDMI replaces the DVI interface S Video BNC 3G HD SD SDI video Front USB 2 0 port for device access available with the KVM Hub switch option only Trackball mo...

Page 8: ...iew product layout key features RackView Rear Panel Connector Layout The RackView rear panel includes an HD15 KVM and DVI D connector as standard The HD15 KVM connector supports VGA video and also the keyboard mouse interface This diagram shows the approximate positioning of the DVI D and KVM connectors on the rear panel Figure 2 RackView rear panel connector layout ...

Page 9: ...and Right rear mounting slides into the RackView Console Drawer Step 2 Measure the depth of the front and rear rack rails Align each rear mounting slide to a suitable length depth Step 3 Complete the Installation Fix the RackView Console Drawer into the Rack A set of mounting accessories is provided Figure 3 RackView installation procedure ...

Page 10: ...eration of the RackView Widescreen 19 inch Step 1 Hold the handle and slide out the RackView drawer Step 2 Flip up the LCD to a suitable viewing angle Step 3 Operate the RackView Console Drawer Figure 4 RackView console drawer operation ...

Page 11: ...r is hot pluggable but components of connected devices such as the servers and KVM switch may not be hot pluggable Plugging and unplugging cables while servers and KVM switch are powered on may cause irreversible damage to the servers KVM and LCD console drawer Before attempting to connect anything to the RackView we suggest turning off the power to all devices Apply power to connected devices onl...

Page 12: ...umber K1 VGA USB K2 VGA PS2 K3 DVI USB Figure 6 RackView device interface cables The RackView can support 5 different video interfaces VGA DVI D and the optional HDMI S Video BNC and 3G SDI HDMI S Video BNC and SDI cables are available from Rose Electronics Troubleshooting If the RackView KVM Drawer fails to synchronize correctly with the attached product PC Switch Extender and the monitor display...

Page 13: ...nput Select Button The RackView remembers the last valid video input selection so if the CPU input has changed the user needs to re select the video input Locate the Video Input Select button on the OSD display control panel Push the Video Input Select button to toggle between VGA and DVI Input Select the appropriate Video Input format VGA or DVI OSD Selection OSD Selection Panel Figure 7 OSD menu...

Page 14: ...iness and distortion Clock Adjust the clock value Phase Adjust the phase value H Position Align the screen image left or right V Position Align the screen image up or down Audio Audio mode Movie Voice Normal Music mode to choose Volume Adjust the volume of sound Bass Set the value of bass sound Treble Set the value of treble sound Balance Set the balance value of treble and bass sound Analog TV au...

Page 15: ...ly power cords power adapter and connection cables designed for this Unit Keep objects that might damage this Unit and liquids that may spill clear from this Unit Liquids and foreign objects might come in contact with voltage points that could create a risk of fire or electrical shock Do not use liquid or aerosol cleaners to clean this Unit Always unplug this Unit from the power source before clea...

Page 16: ... container or equivalent insured and shipped to Rose Electronics Attn RA __________ 10707 Stancliff Road Houston Texas 77099 USA Technical Support If you are experiencing problems or need assistance installing your product consult the appropriate section of this manual If however you require additional information or assistance please contact the Rose Electronics Technical Support Department at Ph...

Page 17: ...og 0 7Vp p S Video and BNC NTSC and PAL Sync Type VGA Separate Composite and Sync On Green Plug Play DDC DVI and VGA VESA EDID 1 3 Connectors and Controls Console Ports standard model one cable included 1 x DVI D 1 x KVM for VGA video keyboard and mouse signals Power 1 x IEC power connector Display power switch 1 x Display power off switch on the front panel USB2 0 1 x USB2 0 port on the front pan...

Page 18: ...B KVM Switch 16 x VGA USB 6ft cables RV1 CAKVT19 WS KVM108CMH K1 RackView Widescreen 19 with 8 port VGA USB KVM Switch 8 x VGA USB 6ft cables with a 2 port USB2 0 Hub RV1 CAKVT19 WS KVM116CMH K1 RackView Widescreen 19 with 16 port VGA USB KVM Switch 16 x VGA USB 6ft cables with a 2 port USB2 0 Hub Additional CPU cables for KVM Switch CAB CMBVMUAC006 CPU Cable 6ft 2 0m cable Combo HD15 to VGA USB C...

Page 19: ...ight varies with options such as KVM switch KVM combo cables HDMI S Video SD and DC power as below The rack depth for the 19 model changes to 17 4 x 20 9 x 1 73 inch 441 6 x 530 x 44mm Package Size and Weight with Internal KVM Switch Model with KVM Switch Product Dimension W D H approx Packing Dimension W D H approx Net Weight Gross Weight RV1 CAKVT19 WS Kn with internal KVM Switch 441 6 x 580 x 4...

Page 20: ...ew and the Switch are connected internally All that is required is to connect the CPU combo cables VGA USB or DVI USB from the rear panel of the switch to the host PC Servers The RackView can then be used to select and operate the attached PC s Servers Power consumption with KVM integration Screen ON 55W Power Saving 34W KVM Switch Models Rear Panel View KVM 108CMB 8 port KVM Switch VGA USB Cascad...

Page 21: ...from 18 1 inches to 20 86 inches 460mm to 530mm Figure 11 RackView with the HDMI video option Figure 12 RackView with the S Video BNC video option RackView Video Option with 3G HD SD SDI Video Interface The RackView 3G HD SD SDI video option is an ideal solution for the broadcast grade video and Widescreen CCTV market The optional SDI input module can support up to 1080p 60Hz and comes with the fu...

Page 22: ...gnal Resolution Refresh Rate Signal Input 3G SDI In BNC x 1 0 8Vp p 75 ohm 3G SDI Out BNC x 1 Active through equalized relocked Standard Compliance Video SMPTE 425M 274M 296M 125M ITU R BT 656 Audio SMPTE 299M 272M C Compatible Video Format 3G SDI 1080p 60 50Hz 4 2 2 1080p 30 25 24Hz 4 4 4 1080i 60 50Hz 4 4 4 720p 60 50Hz 4 4 4 HD SDI 1080p 30 25 24Hz 4 2 2 1080i 60 50Hz 4 2 2 720p 60 50Hz 4 2 2 S...

Page 23: ...specified in the table below Select the DC voltage required then add the voltage to the RackView part number as nnnDC For example adding 48VDC to a RackView 19 would result in RV1 CAKVT19 WS Kn 48DC part number Figure 14 RackView with a DC power connector fitted Table 6 RackView DC power options The DC power option excludes the AC power adapter and power cord ...

Page 24: ...E COM sales rose com 800 333 9343 Rose Electronics 10707 Stancliff Road Houston Texas 77099 Rose USA 281 933 7673 Rose Europe 49 0 2454 969442 Rose Asia 65 6324 2322 Rose Australia 61 0 421 247083 WWW ROSE COM ...

Reviews: