background image


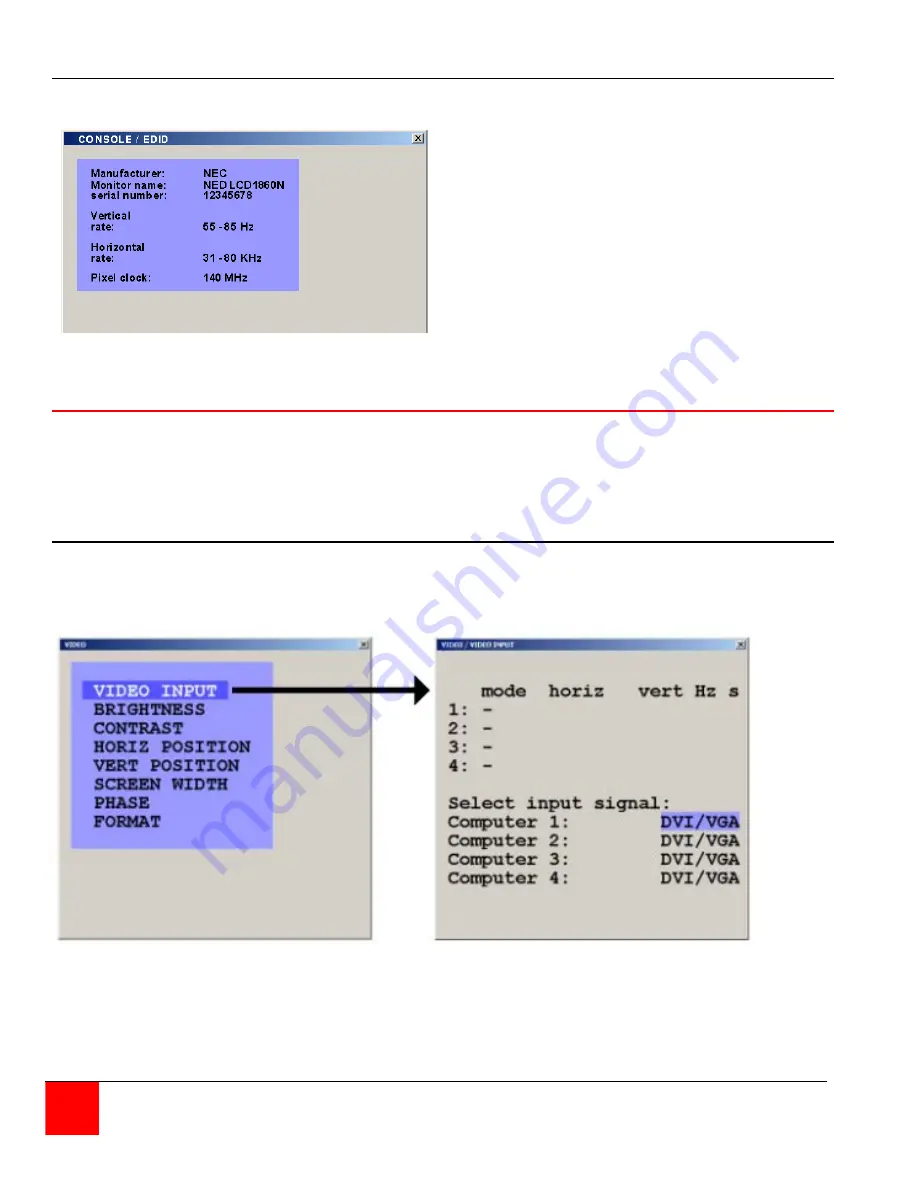
Console / EDID 


The EDID menu, when selected, will read 
and display the EDID data of your console 
monitor. 

E

xtended 

D

isplay 

I

dentification 

D

ata is a VESA standard data format that 

contains basic information about a monitor
and its capabilities, including vendor 
information, maximum image size, color 
characteristics, factory pre-set timings, 
frequency range limits, and character 
strings for the monitor name and serial 
number 


Figure 22. EDID display 

Video  

From the main menu, selecting Video will display a menu that allows you to view or change the 
connected computers video information, set the brightness, contrast, horizontal position, vertical 
position, screen width, phase, and format.  Selecting Video Input will display the video information 
QuadraVista has automatically detected from the four video inputs (Plug & Play). 

Video / Video Input 

In the lower part of the Video Input window you define which video input is selected for display. If 
both signal inputs DVI/VGA or VGA/DVI are selected, the first one will be processed and 
displayed. If there is no signal present the other automatically will be selected and processed 


The "S" column shows the type of video detected, 
a = analog, d = digital, g = sync on green,  
c = composite sync 


Figure 23, Video input 

Appendix D shows the video formats QuadraVista can support 
 

28 

QUADRAVISTA INSTALLATION AND OPERATIONS MANUAL 


Summary of Contents for QuadraVista

Page 1: ...QuadraVista QUAD VIDEO KVM SWITCH 10707 Stancliff Road Phone 281 933 7673 Houston Texas 77099 www rose com INSTALLATION AND OPERATIONS MANUAL ...

Page 2: ...HANTABILITY AND FITNESS FOR A PARTICULAR PURPOSE ARE LIMITED IN DURATION TO A PERIOD OF ONE YEAR FROM THE DATE OF PURCHASE AND NO WARRANTIES WHETHER EXPRESS OR IMPLIED WILL APPLY AFTER THIS PERIOD SOME STATES DO NOT ALLOW LIMITATIONS ON HOW LONG AN IMPLIED WARRANTY LASTS SO THE ABOVE LIMITATION MAY NOT APPLY TO YOU IF THIS PRODUCT IS NOT IN GOOD WORKING ORDER AS WARRANTIED ABOVE YOUR SOLE REMEDY S...

Page 3: ...ed by the party responsible for compliance could void the user s authority to operate the equipment Declaration of Conformity This declaration is valid for the following product Equipment Video Keyboard Mouse Switching System Type QuadraVista Hereby the equipment is confirmed to comply with the requirements set out in the Council Directive on the Approximation of the Laws of the Member States rela...

Page 4: ...em Security 17 System Test Pattern 20 System Disable Channel 21 System Control 21 MODE 22 Mode PiP Start 22 Configure 23 Configure Backup Recall Factory Reset 23 Console 25 Video output Keyboard Multi Monitor EDID 25 Console Keyboard 26 Console Multi Monitor 27 Console EDID 28 Video 28 Video Video Input 28 Video Brightness Contrast 29 Video Horizontal and Vertical position 30 Video Screen width 31...

Page 5: ...Figure 19 Console Video output 26 Figure 20 Keyboard layout 26 Figure 21 Multi Monitor setup 27 Figure 22 EDID display 28 Figure 23 Video input 28 Figure 24 Video Brightness Contrast 29 Figure 25 Horizontal Position 30 Figure 26 Screen width 31 Figure 27 Clock phase 31 Figure 28 Video format 32 Figure 29 Computer 32 Figure 30 Computer Keyboard 33 Figure 31 Computer Mouse 33 Figure 32 Computer Rese...

Page 6: ...the other three computers In the PiP mode you can view one display on a full screen while monitoring smaller thumbnails of the other three computers The KVM Station can be switched to any computer by simple keyboard commands or using the on screen menu system This makes configuring monitoring and computer switching quick and easy With a few simple key commands you can switch to any connected compu...

Page 7: ...uality video with resolution up to 1920 x 1200 60Hz Automatic or selectable video in and video out resolutions Keyboard commands and front panel controls for changing modes and channel selection In the Quad mode switch to and control any of the four screens while monitoring the other three connections in real time VGA and DVI video signals are processed simultaneously Supports PS 2 and USB compute...

Page 8: ...r reseller so the problem can be quickly resolved Rose Electronics web site Visit out web site at www rose com for additional information on other products that are designed for data center applications classroom environments and other applications About this manual This manual covers the installation and operation of QuadraVista Disclaimer While every precaution has been taken in the preparation ...

Page 9: ...put resolution to 640 x 480 60Hz 3 4 Resets to unit defaults buttons pressed simultaneously for longer than 1 second buttons pressed simultaneously for longer than 4 seconds Figure 2 Rear View Connectors Power IEC320 Reset Resets unit to factory defaults video keyboard and mouse RS232 RJ45 Flash upgrade port or external device control User Station 1 DVI 2 USB A Computers 4 DVI PS 2 or USB B Y adap...

Page 10: ...at you locate the QuadraVista as close as possible to the computers being connected Installing the KVM station Connect your KVM user station to the QuadraVista as shown in Figure 3 Connect a USB mouse and USB keyboard to the corresponding USB ports on QuadraVista If a PS 2 keyboard and mouse are used a PS 2 to USB converter must be used Next connect a VGA HD15F or DVI monitor to the DVI I port If ...

Page 11: ...e input port on the QuadraVista Connect computer 2 3 and 4 to the corresponding connectors on the QuadraVista s rear panel You are not limited in using the CPU ports to connect to a computer The CPU port can also be connected to a Rose KVM switch s KVM port This can provide access to as many as 1 000 computers or servers The DVI video input can accept any analog or digital video signal from device...

Page 12: ...s in the Quad mode No light and the system is in the full screen mode The PiP LED lights up green when the unit is in the PiP mode No light when PiP is not selected Note LEDs 1 4 only indicate video status not keyboard and mouse Channel 2 selected channels 1 3 and 4 receiving video Push buttons 1 4 are used to select a channel and display in full screen the connected video source If your system is...

Page 13: ...ront panel push buttons have additional features as shown below Simultaneously press and hold for the designated time to active the feature Buttons 1 2 set the VGA resolution to 640 x 480 Press and hold longer than 2 sec Buttons 3 4 perform a hardware reset for the video keyboard and mouse Press and hold longer than 4 sec Buttons Quad PiP display the OSD menu Press and hold longer than 1 sec For e...

Page 14: ...Y command can be assigned to the left Ctrl Shift Alt or the Scroll Lock key Example Press key twice To execute the following commands press the assigned HOTKEY then within 2 seconds press the command key HK Command Description HOTKEY O Invoke the on screen menu system HOTKEY F Change display to full screen mode HOTKEY P Change display to PIP function HOTKEY 1 Switch to computer 1 Full Screen HOTKE...

Page 15: ...configuration Configuration Backup Save current parameters Recall Restore last saved configuration Factory Reset Reset to factory default settings Console Video Output Output resolution auto or selection Keyboard Keyboard layout English German Multi Monitor Assigning mouse keyboard to video EDID Display EDID data of monitor Video Video Input Displays video input DVI VGA VGA DVI or DVI VGA Brightne...

Page 16: ... menu you can set up the system select the start up mode and configure the system features Each OSD menu feature is described in this section System menu The system Menu is called up by highlighting SYSTEM from the main menu and pressing enter From the system menu you can set up the Hotkey Hotmouse Quad Mode OSD Position change OSD languages security display nine different test patterns to fine tu...

Page 17: ... and press enter The SYSTEM HOTKEY window shown in Figure 6 will display From this menu you can modify which multiple keys and Double Click key defines the HOTKEY Use the arrow keys to navigate through the menu Select Yes or No to choose 1 4 keys for the HOTKEY Press the key to switch to the double click menu The double click HOTKEY activation menu allows you to define which key to double click on...

Page 18: ...t be enabled Navigate to the SYSTEM Hotmouse window and enable the Hotmouse set to Yes and set the timeout value 1 to 30 sec This determines how long the selection window is displayed Enabling the HOTMOUSE feature you can perform several functions using only the mouse Switch channels size PiP window and other features Figure 7 System HotMouse To activate the Hotmouse cursor feature move the mouse ...

Page 19: ...ntrol keyboard mouse to that channel Active channel Activating the Hotmouse in the PiP mode has three features 1 Switch active full screen channels Channel 2 Activate Channel 3 active Hotmouse active Move cursor to Keyboard PiP 3 mouse Press left mouse key 2 Move the PiP images vertically Channel 2 Activate Release mouse active Hotmouse key PiP windows Move cursor to are in new vertical PiP window...

Page 20: ...e the system is in To activate the Hotmouse menu first activate the Hotmouse by moving the cursor rapidly to the left and right 4 times When the Hotmouse cursor appears click the right mouse button and depending on the screen mode the Hotmouse menu will display In the Full screen or Quad mode the Hotmouse menu allows you to switch channels change display modes quad full PiP Dual or activate a chan...

Page 21: ...system quad mode menu you can set the timeout of the quad selection window Figure 8 System Quad Mode System OSD Position Selecting OSD position allows you to set the screen position of the OSD menus Use the arrow keys to move the OSD screen position Figure 9 System OSD Position ...

Page 22: ...igure 10 System OSD Language System Security Selecting the Security feature displays the password screen Enter the predefined password and the security window will display Select the security level 1 8 These levels are defined below Figure 11 System security Following lists the security level and functions each level can access Level 1 security can perform all functions Level 0 is the factory secu...

Page 23: ...nnel Control Mode PiP Start Configuration Backup Recall Factory Reset Console Video Output Keyboard Multi Monitor EDID Video Video Input Brightness Contrast Horiz Position Vert Position Screen Width Phase Format Computer Keyboard Mouse Reset PS 2 Help Command About Contact Authorization to this OSD function is permitted Security level 0 is the factory default setting All settings are allowed and a...

Page 24: ... Channel selection in Quad Mode using front panel PiP button Security level 5 is the same as security level 6 with the addition of Display mode setting Quad Full PiP using front panel buttons keyboard or mouse commands Security level 4 is the same as security level 5 with the following OSD additions Modify PiP settings using HotMouse menu System OSD Position Mode PiP Start features Configuration R...

Page 25: ... video circuits or to check the quality of the connected console monitor It s recommended to use all the test patterns for the test procedure Figure 12 System Test Pattern There are nine test patterns to assist in adjusting the colors and skew CROSSHAIRS COLOR GRADIENT RHOMBUS RECTANGLE STRIPES 3 RGB CONVERGENCE MANUFACTURER ...

Page 26: ...the QuadraVista from a computer or external device connected to the serial port Selecting control allows external control of the OSD Selecting synchronize will keep cascaded QuadraVista units in the same video mode See the Serial Operations Section Figure 14 System Control The DCP Device Control Protocol offers three modes off control and synchronize Set the DCP mode to Control if a single QuadraV...

Page 27: ...to single PiP Triple display shows the three non active windows on the right of the screen Single display shows only one non active window PiP size zoom and offset from the top of the screen can be set PiP display modes Triple Displays the three non active channels Single Displays one non active channel Fixed Permanently displays one non active channel Scan Scans non active channels in one PiP win...

Page 28: ... Start from the MODE menu defines which channel is active the display mode and the PiP settings when power is applied Figure 15 Mode PiP Start Configure Configure Backup Recall Factory Reset The backup command saves the current device settings Figure 16 Backup ...

Page 29: ...ERATIONS MANUAL The recall command replaces the current settings with the latest backup Figure 17 Recall The Factory Reset command resets the unit to the original factory settings See Appendix C for factory reset values Figure 18 Reset ...

Page 30: ... output to auto the QuadraVista will read the connected monitor s configuration data and set the mode resolution and frequency based on the monitors DDC table Use the up down arrow keys to select a specific mode resolution and frequency The new setting will display for 10 seconds Within this time press Enter select to accept the new video output setting No change is executed if enter is not presse...

Page 31: ... display the notification window shown to the right Press Enter to accept the new setting or any other key for no change Figure 19 Console Video output Console Keyboard The keyboard option sets the keyboard language to English German Spanish French or Italian Figure 20 Keyboard layout ...

Page 32: ... If your computer uses a graphic card with two video outputs assign the computers keyboard and mouse for Monitor 1 and 2 to channel 1 Example Multi Monitor PC 1 Dual Video keyboard mouse video1 to input 1 video2 to input 2 KVM Switch 3 to input 3 KVM Switch 4 to input 4 Set Multi Monitor options to Monitor 1 Channel 1 Monitor 2 Channel 1 Monitor 3 Channel 3 Monitor 4 Channel 4 Figure 21 Multi Moni...

Page 33: ...formation set the brightness contrast horizontal position vertical position screen width phase and format Selecting Video Input will display the video information QuadraVista has automatically detected from the four video inputs Plug Play Video Video Input In the lower part of the Video Input window you define which video input is selected for display If both signal inputs DVI VGA or VGA DVI are s...

Page 34: ...u can adjust video brightness and contrast for each analog video input Using he arrow keys select the computer to adjust and increase or decrease the brightness or contrast This setting is used to adjust brightness or contrast of the analog input signal for the desired computer Figure 24 Video Brightness Contrast ...

Page 35: ...to man field Select Man and adjust the position using the and keys It is recommended that the Auto setting be used for all computers The Vertical position menu is used to adjust the position of a computer s screen manually To adjust the vertical position select the computer to adjust and then select the auto man field Select man and adjust the position using the and keys It is recommended that the...

Page 36: ...e screen quality by selecting the screen width menu the computer to modify and adjusting the number of horizontal pixels Figure 26 Screen width Video Phase If a computer s phasing is incorrect blurring screen incorrect contrast use the Phase menu to adjust the video phasing from the detected value Figure 27 Clock phase ...

Page 37: ...orders on the left and right side of the display Setting Fit to screen to Yes so that computer will resize the image to fill the entire quadrant or PiP Figure 28 Video format Computer Selecting Computer from the main menu will display the features that can be displayed or modified for each computer connection Figure 29 Computer ...

Page 38: ... 30 Computer Keyboard Computer Mouse Selecting mouse and pressing enter will display the type of mouse the system has detected for each connected computer USB PS 2 or PS 2 wheel The Mouse positioning USB lower section allows you to choose absolute mouse positioning when a device is connected to the console that supports absolute coordinates such as graphic trays screen pads or KVM extenders Figure...

Page 39: ...vailable at each of the four video ports Use the left right arrow keys to select the first video mode to add Once selected use the up down arrow keys to select the second video mode to add Use the left right arrow keys to select the second video mode to add When both video modes have been selected use the up down arrow keys to select signal and the left right arrow keys to select analog or digital...

Page 40: ...e cable from the video output to the computer video input to program 1 4 The video will go blank and programming must be executed blindly When the DVI cable has been connected press ENTER SELECT twice to program the additional video modes Reconnect the console monitor and computer monitor cable and the display to the right will display Repeat this procedure for the other three video input ports if...

Page 41: ...ction will display the keyboard command list about and contact information The Command List option will display the keyboard commands recognized by QuadraVista Figure 35 Help Command The About section informs you of information pertaining to the QuadraVista Figure 36 Help About ...

Page 42: ...QUADRAVISTA INSTALLATION AND OPERATIONS MANUAL 37 The Contact section provides you with information on who to contact for technical assistance and other information Figure 37 Help Contact ...

Page 43: ... www rose com htm download htm in the tech support section and install it on a remote windows based computer Next call up the OSD from the local console and navigate to the System Control section and change the DCP mode setting to control Connect a serial cable from COM1 or COM2 port on the remote Laptop or PC to the RS232 port on the rear panel of QuadraVista as shown below Remote Laptop or PC Se...

Page 44: ...ing the arrow keys and the Enter Select key DCP Synchronizing Multiple Units In systems that use multiple QuadraVista s the display mode can be synchronized so all units are the same display mode To accomplish this first display the OSD and navigate to the Control section System Control Use the up down arrow keys to select Synchronization then exit the OSD Each time you restart a V Switch quad set...

Page 45: ...he device at the end of the chain When the device has completed its startup phase and sent its DCP messages switch on the next device in the chain Finally switch on the first device in the chain which synchronizes the settings of all other devices in the chain with its own settings as it starts up The synchronized chain can have any length Do not connect the last unit to the first to create a loop...

Page 46: ...have a serial communication program installed like HyperTerminal Configure the communication program for the following Transfer rate 57600 Baud Data Bits 8 No parity Stop Bit 1 No flow control Connect to QuadraVista and send the DCP XML text message containing the controlling script A simple example of sending a DCP XML text message that will switch ports is shown below Tabbed spacing in the below...

Page 47: ...SQ type version dcp protocol 1 0 dcp protocol hardware 32 hardware software 1 30 software version mode console channel 0 channel console video channel 0 cjannel layout full layout pip layout triple gap layout size 15 size offset 5 offset direct channel 0 channel direct fixed channel 0 channel fixed scan time 1 scan time pip video mode decide dcp xml ...

Page 48: ...ith changes in one text script The following is an example of querying for the console information and setting the video to channel 1 dcp xml device mode console video channel 0 channel video mode device dcp xml The console and video are queried in the below script dcp xml device mode console video channel video mode device dcp xml The response to the above query is dcp xml device mode console cha...

Page 49: ... the list content too long Contents of a Simple Element exceeding 30 characters timeout Receive timeout This error message is displayed if a DCP message is not complete after expiry of the timeout but no other error has occurred parser stack overflow This error occurs when unknown elements are nested too deeply or in the case of an internal error internal parser error Internal error parser error u...

Page 50: ...seconds DCP messages containing errors are not regarded as completed until the timeout period has elapsed Therefore it is recommended to wait for this time between DCP messages to allow the parser to handle possible errors Correct messages are processed immediately upon completion Unknown elements Unknown tags in a DCP message are ignored for the sake of upwards compatibility of the protocol Messa...

Page 51: ...Rose Electronics Attn RA__________ 10707 Stancliff Road Houston Texas 77099 USA Technical Support If you are experiencing problems or need assistance in setting up configuring or operating your QuadraVista consult the appropriate sections of this manual If however you require additional information or assistance please contact the Rose Electronics Technical Support Department at Phone 281 933 7673...

Page 52: ...damage to them Use only power cords power adapter and connection cables designed for this Unit Keep objects that might damage this Unit and liquids that may spill clear from this Unit Liquids and foreign objects might come in contact with voltage points that could create a risk of fire or electrical shock Do not use liquid or aerosol cleaners to clean this Unit Always unplug this Unit from its ele...

Page 53: ...otice until you have understood the hazardous conditions and have taken appropriate steps Grounding These are Safety Class I products and have protective earthing terminals There must be an un interruptible safety earth ground from the main power source to the product s input wiring terminals power cord or supplied power cord set Whenever it is likely that the protection has been impaired disconne...

Page 54: ...I I to DVI I male male CAB DVIIMFnnn DVI I to DVI I male female CAB DVIIMVMnnn VGA to DVI I male male CAB DVIIMVFnnn DVI I to VGA male female CAB DVIDMMnnn DVI D to DVI D male male CAB USBABnnn USB A to USB B male male CAB CXUSBCnnn DB25 to VGA USB CAB CXV66MMnnn VGA PS2 to VGA PS2 male male CAB C1VS0600Cnnn DB25 to VGA PS 2 CAB MD6MMnnn PS 2 to PS 2 male male CAB MD6M2MD6M PS 2 Y cable CAB QVRJ00...

Page 55: ...de triple gap Offset 0 Quad active channel 1 CONFIGURE Backup Recall Factory Reset User initiated User initiated User initiated CONSOLE Video Output Keyboard Multi Monitor EDID Auto English Monitor 1 2 3 4 channel 1 2 3 4 Display information only VIDEO Video Input Brightness Contrast Horiz Position Vert Position Screen width Phase Format DVI VGA all channels 58 2 all analog channels 63 5 all analo...

Page 56: ...SVGA 800 x 600 56 22 56 SXGA 1280 x 1024 75 75 SVGA 800 x 600 60 60 SXGA 1280 x 1024 85 85 SVGA 800 x 600 72 72 SXGA 1400 x 1050 SVGA 800 x 600 75 75 SGI 1600 x 1024 60 60 SVGA 800 x 600 85 85 180 UXGA 1600 x 1200 50 50 XGA 1024 x 768 60 22 60 UXGA 1600 x 1200 60 60 XGA 1024 x 768 70 70 UXGAr 1600 x 1200 50 50 XGA 1024 x 768 75 75 UXGAr 1600 x 1200 60 60 XGA 1024 x 768 85 85 WSXGA 1680 x 1050 WXGA...

Page 57: ......

Page 58: ...QuadraVista QUAD VIDEO KVM SWITCH 10707 Stancliff Road Phone 281 933 7673 Houston Texas 77099 www rose com INSTALLATION AND OPERATIONS MANUAL SUPPLEMENT ...

Page 59: ...t to distinguish automatically UXGA 1600x1200 60Hz UXGA 1600x1200 60Hz with reduced blanking UXGA 1600x1200 50Hz UXGA 1600x1200 50Hz with reduced blanking SXGA 1400x1050 60Hz WSXGA 1680x1050 60Hz XGA 1024x768 60Hz WXGA 1280x768 60Hz WXGA 1360x768 60Hz For each group you can choose to change the setting from auto the default to one of the video modes in the group Choosing one of the video modes wil...

Page 60: ...Mode Resolution Sync Polarity Frame Rate Hz H V analog digital XGA 1024 x 768 50 22 50 SXGA 1400 x 1050 50 22 50 UWXGA 1280 x 960 72 72 UWXGA 1280 x 960 75 75 CONSOLE FADE Fade Through Black An elegant visual effect for presentations When switching channels or display modes the previous image fades to black and the next image is faded in smoothly To enable fade through black set smooth transitions...

Page 61: ... Click Emulation This new setting in the CONSOLE TOUCHSCREEN menu allows you to choose whether the QuadraVista will emulate the right mouse button If set to Yes touching the screen for 5 seconds will perform a right mouse click ...

Page 62: ... 103 0014 東京都中央区日本橋蛎殻町 1 16 11 TEL 03 3668 8089 FAX 03 3668 9872 URL http www cybernetech co jp ...

Reviews: