ROSE Bikes GmbH
Schersweide 4, 46395 Bocholt, Germany
www.rosebikes.de
Made in China
BIKE BOARD ONE
DE // BEDIENUNGSANLEITUNG
FAHRRADSTÄNDER // BEST.-NR.: 2333497
Allgemeines
Diese Bedienungsanleitung muss vor der ersten Verwendung des Bike Boards gelesen und verstanden
worden sein. Bewahre diese Bedienungsanleitung für späteres Nachschlagen auf. Verkaufst oder verschenkst
du das Bike Board, muss diese Bedienungsanleitung beigelegt werden.
Kompatibilität / Bestimmungsgemäßer Gebrauch
Das Bike Board ist zur Verwendung mit dem Hinterrad eines Fahrrads konzipiert. Beim Auffahren des
Hinterrads und nach dem Ein- bzw. Ausparken des Bike Boards mindestens 2 der 4 Lenkrollen (4) arretieren.
Nur für Fahrräder, ohne Personen benutzen. Auf glatten, ebenen Flächen und nur Indoor verwenden.
Nutzbare Reifengröße 26“-29“, Reifenbreite 25 mm bis 3.0“. Maximale Nutzlast 35 kg.
A
Bike Board montieren
Das Bike Board muss vor der ersten Benutzung in ein paar einfachen Schritten montiert werden.
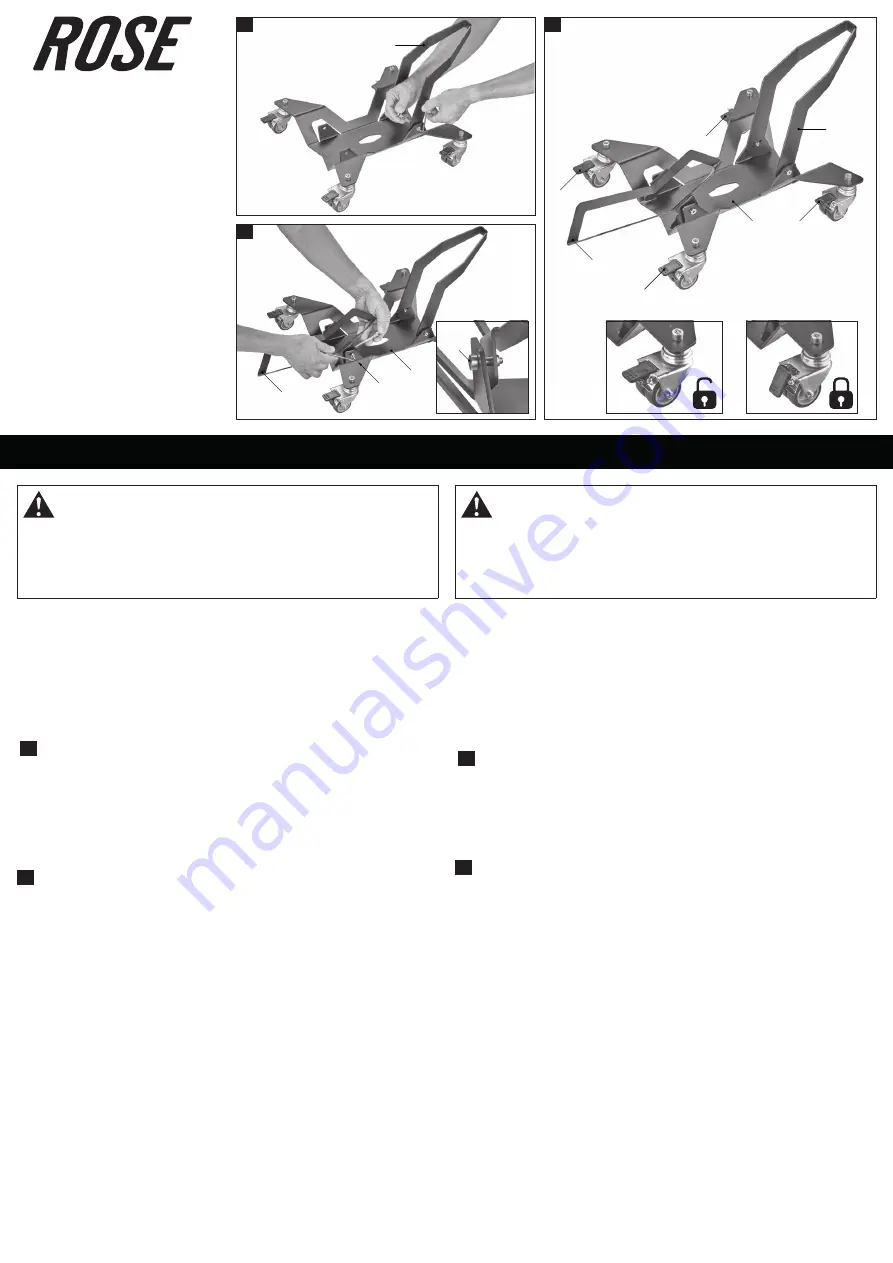
1. Klappe den Klemmarm (1) nach oben und ziehe beide Schrauben des Klemmarms mit einem 10 mm
Schraubenschlüssel und einem 4 mm Innensechskantschlüssel an.
2. Bringe die Wippe (3) am Grundkörper (2) an und stecke beide Schrauben (5) von Außen durch die
Bohrungen.
→
Vergewissere dich, dass die Abstützung der Wippe (3) zur Vorderkante des Grundkörpers (2) zeigt.
3. Drehe die Muttern auf die Schrauben (5) und ziehe beide Schrauben mit einem 10 mm
Schraubenschlüssel und einem 4 mm Innensechskantschlüssel handfest an.
B
Fahrrad im Bike Board abstellen
1. Blockiere mindestens 2 Rollen über die Feststellbremsen (4) und rolle das Fahrrad mit dem Hinterrad
über die Wippe (3) in das Bike Board.
2. Löse die Feststellbremsen (4) und schiebe das Fahrrad auf dem Bike Bord in die gewünschte Position.
3. Blockiere mindestens 2 Rollen über die Feststellbremse (4) in der Parkposition.
Feineinstellung des Bike Boards
Die optimale Standposition ist von Reifenbreite und -durchmesser des Hinterrades abhängig. Im
Klemmarm (1) befinden sich drei Bohrungen zur Feineinstellung der Hinterradaufnahme. Die Mittlere
Bohrung ist universell, die Rechte lässt den Klemmarm näher zur Wippe wandern und ist für schmale oder
26“-Reifen geeignet. Die Linke vergrößert den Abstand zwischen Klemmarm und Wippe für breite oder
29“-Reifen.
Wartung und Pflege
Regelmäßige Wartung und Pflege sorgen für eine lange und zuverlässige Haltbarkeit sowie eine
uneingeschränkte Funktion. ROSE Bikes empfiehlt folgende Tätigkeiten:
• Das Bike Boards sollte sorgsam behandelt und so aufbewahrt werden, dass Verschmutzungen und
Beschädigungen ausgeschlossen werden können. Die einwandfreie Funktion des Bike Boards hängt
maßgeblich von dessen Zustand ab.
Diese Bedienungsanleitung ist zusätzlich unter rosebikes.de/Bedienungsanleitungen verfügbar.
GEFAHR
Gefahr durch Umkippen des Fahrrads!
Wird das Fahrrad falsch im Bike Board abgestellt, kann das Fahrrad umkippen.
• Für einen sicheren Stand und leichtes Rangieren sollte das Hinterrad des Fahrrads im Bike Board
abgestellt werden.
• Beim Abstellen immer mindestens zwei Rollen blockieren.
1
1
2
3
4
4
4
4
A1
B
3
2
5
5
A2
EN // OWNER’S MANUAL
BIKE STAND // PROD. CODE: 2333497
General information
Please read the manual carefully before using the Bike Board for the first time and make sure you
understand everything. Keep this manual for future reference. If you sell or give away the Bike Board, please
also include the owner’s manual.
Compatibility / Intended use
The Bike Board is designed to hold the rear wheel of a bicycle. Block at least 2 of the 4 castor wheels (4)
when rolling the bike with the rear wheel up on the board as well as after parking or taking out the bike
stand from its storage location. For bicycles only. Only use without person on the bicycle. Use on smooth,
even surfaces and only indoors.
Suitable for 26“-29“ tyres with a tyre width of 25mm to 3.0”. Maximum load: 35 kg.
A
Assembling the Bike Board
Before using the Bike Board for the first time, you have to assemble it in just a few simple steps.
1. Fold up the clamping arm (1) and tighten both bolts of the arm with a 10mm spanner and a 4mm hex
wrench.
2. Attach the rocker (3) to the base body (2) and insert both bolts (5) through the holes from the outside.
→
Make sure that the support of the rocker (3) faces the front edge of the base body (2).
3. Thread the nuts onto the bolts (5) and tighten both bolts using a 10mm spanner and a 4mm hex wrench.
B
Parking the bike in the Bike Board
1. Block at least 2 wheels using the parking brakes (4) and roll the bike with the rear wheel over the rocker
(3) up on the bike board.
2. Release the brakes (4) and push the bike on the Bike Board into the desired position.
3. Block at least 2 wheels using the parking brake (4) when the bike stand is in the parking position.
Fine-tuning of the Bike Board
The optimal stand position depends on the rear wheel tyre’s width and diameter. There are three holes in the
clamping arm (1) that allow you to precisely adjust the rear wheel mount. The centre hole is for universal
use, the right one makes the clamping arm move closer to the rocker and is suitable for narrow or 26" tyres.
The left hole increases the distance between the arm and the rocker for wide or 29" tyres.
Maintenance and care
Regular care and maintenance ensure high durability and reliability, as well as unlimited functionality.
ROSE Bikes recommends carrying out the following tasks:
• Handle the Bike Board with care and make sure to protect it from damages and dirt during storage.
A proper functioning of the Bike Board largely depends on its condition.
This manual is also available on rosebikes.com/manuals.
DANGER
Danger of the bike tipping over!
If the bike isn’t placed properly on the Bike Board, it can tip over.
• For a secure hold and easy manoeuvring, you should place the rear wheel of the bicycle on the Bike
Board.
• Always block at least two wheels when parking the bike.


