background image

Step 8

After a few seconds, your tailor-made care will be dispensed on the spatula.

 [2]

Apply the skincare to your face.

Step 9

After the distribution of the skincare, the formulator enters an automatic rinsing
phase.

 [1]

Meanwhile clean the spatula before putting back into the formulator.

2-5 min

1. Do not unplug the formulator while in operation.

Summary of Contents for HyLab

Page 1: ...User Manual ...

Page 2: ...xpress agreement of the brand Read this manual carefully in order to use the device in good conditions and in complete safety SYMBOLS The symbol opposite is used to alert you to potential risks or draw your attention to important safety information Risk of electric shock Warns of a risk of electric shock if the instructions are not followed REGULATION HyLab complies with the following norms IEC 60...

Page 3: ...he condition of the power cable regularly If it appears damaged stop using the device immediately Contact the dealer or their after sales team to replace the cable Do not expose the device to water or excessive moisture Do not use the device with wet hands Prevent any water from splashing onto the device Do not allow the water reservoir to overflow Should water get into any part of the device other...

Page 4: ...ith reduced physical sensory or mental capacity or lacking in experience or knowledge as long as they are properly supervised or have been given instructions for using the device safely and the risks have been taken into account Children must not play with the device User cleaning and maintenance must not be done by children without supervision Precautions for use To use the device safely place it...

Page 5: ...overed by the warranty The warranty will be withdrawn if the device has not been plugged in in accordance with the instructions insertion into the device of elements other than Romy active ingredient capsules and flasks the directions for use have not been followed The warranty becomes void if the device has been opened by persons not approved or authorised by Romy Under no circumstances may the wa...

Page 6: ...Description THE FORMULATOR Front face 1 Capsules tray 2 Spatula Back side 1 Back hatch 2 Flasks area 3 Tank ...

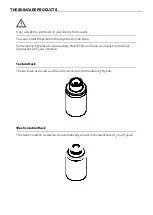
Page 7: ...he on line store Some active ingredients are naturally tinted This can have an impact on the final appearance of your skincare Texture flask The textures are used as a base for skincares formulated by HyLab Wash solution flask This flask contains a cleaner to automatically ensure the cleanliness of your HyLab ...

Page 8: ...our in the range represents a different ingredient Find our complete products range at our website THE APP The Romy app is compatible with iPhone iPad running iOS 11 or higher and with Android version 5 0 Lollipop or higher available respectively through the App Store and the Google Play Store ...

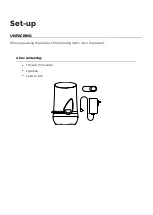
Page 9: ...Set up UNPACKING When unpacking the product the following items must be present A box containing 1 HyLab formulator 1 spatula 1 power box ...

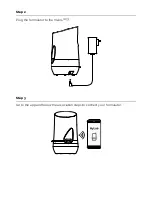
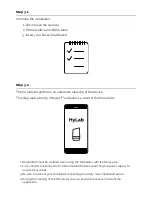
Page 10: ...edients capsules Remove all products from the package Keep the packaging elements for possible return of the unit or for transport Place the unit on a flat level stable surface SETUP ASSOCIATION Step 1 Bluetooth needs to be activated on your smartphone 1 Open the app download the app ...

Page 11: ...Step 2 Plug the formulator to the mains 2 3 Step 3 Go to the app and follow the association steps to connect your formulator ...

Page 12: ...sts about 5 minutes 4 and allows a reset of the formulator 1 Bluetooth must be enabled when using the formulator with the Romy app 2 First connect the connector to the formulator before connecting the power supply to an electrical outlet 3 Be sure to connect your formulator respecting the safety rules mentioned above 4 During the cleaning of the formulator you can access the various menus of the a...

Page 13: ...etup association as well as the first cleaning have been done it s time to formulate your first skincares Step 1 Only if the machine reports an error Fill the water tank fill the tank Insert a flask of wash solution and the desired texture flask load flasks ...

Page 14: ...Step 2 Check the presence and cleanliness of the spatula cleaning the spatula Step 3 Open the Romy app Select your care mode and follow the instructions ...

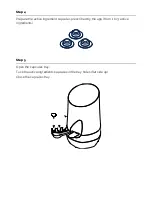
Page 15: ...epare the active ingredient capsules prescribed by the app from 1 to 3 active ingredients Step 5 Open the capsules tray Tuck the active ingredients capsules in the tray holes flat side up Close the capsules tray ...

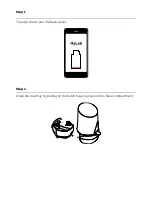
Page 16: ...Step 6 Head back to the app to start your skincare Step 7 Your skincare is being formulated 1 ...

Page 17: ...n the spatula 2 Apply the skincare to your face Step 9 After the distribution of the skincare the formulator enters an automatic rinsing phase 1 Meanwhile clean the spatula before putting back into the formulator 2 5 min 1 Do not unplug the formulator while in operation ...

Page 18: ...ation as well as the first cleaning have been done it s time to formulate your first skincares Step 1 Only if the machine reports an error Fill the water tank fill the tank Insert a flask of wash solution and the desired texture flask load flasks Step 2 Check the presence and cleanliness of the spatula cleaning the spatula ...

Page 19: ...Step 3 Prepare the active ingredients of your choice 1 to 3 ingredients Step 4 Open the capsules tray Tuck the active ingredients capsules in the tray holes flat side up ...

Page 20: ...Step 5 Close the capsules tray in order to start the formulation of your skincare Step 6 Your skincare is being formulated 1 ...

Page 21: ...n the spatula 2 Apply the skincare to your face Step 8 After the distribution of the skincare the formulator enters an automatic rinsing phase 1 Meanwhile clean the spatula before putting back into the formulator 2 5 min 1 Do not unplug the formulator while in operation ...

Page 22: ...2 The delivered skincare can be tinted by the color of the natural ingredients ...

Page 23: ...G FLASKS Make sure there is always a wash solution flask with a texture flask in the flasks compartment of HyLab Be sure to position the pins on the side of the flasks face to face Step 1 Unpack the flasks and remove the cap ...

Page 24: ...tray by pulling on the hatch to gain access to the flask compartment Step 3 Insert the wash solution flask into the slot further to the back of the formulator see above Insert your desired texture flask into the remaining slot ...

Page 25: ... other Step 5 After loading the flasks close the rear tray by pushing on the hatch REPLACING EMPTY FLASKS Make sure there is always a wash solution flask with a texture flask in the flasks compartment of HyLab Be sure to position the pins on the side of the flasks face to face ...

Page 26: ...Step 1 The app shows you the flasks level Step 2 Open the rear tray by pulling on the hatch to gain access to the flask compartment ...

Page 27: ...he empty flask s from their compartment Step 4 Insert the new flask s Make sure there is always a wash solution in the outermost slot of your formulator see above Insert your desired texture flask into the remaining slot ...

Page 28: ...Step 5 Make sure that the pins on the side of the flasks are facing each other Step 6 After loading the flasks close the rear tray by pushing on the hatch REFILLING THE TANK ...

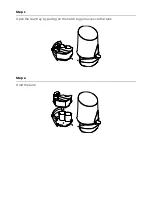
Page 29: ...Step 1 Open the rear tray by pulling on the hatch to gain access to the tank Step 2 Hold the tank ...

Page 30: ...Step 3 Remove the tank hood Step 4 Fill in the tank with clean water Use only water 1 Clean water tank 2 Used water tank ...

Page 31: ...Step 5 Put the hood back onto the tank Step 6 Put the tank back in then close the rear tray by pushing the hatch EMPTYING TRAYS ...

Page 32: ...Step 1 Open the rear tray by pulling on the hatch to gain access to the tank Make sure you don t spill any water inside the device Step 2 Hold the tank ...

Page 33: ... the tank hood Throw away the empty capsules located on the hood of the tank Step 4 Empty the used water tank and rinse it using clean water Clean the tank hood with clean water if required Dry it with a clean cloth ...

Page 34: ...Step 5 Fill in the tank with a non hard water Put the hood back onto the tank Step 6 Put the tank back in then close the rear tray by pushing the hatch CLEANING THE SPATULA ...

Page 35: ...h Do not forget to put the spatula back in place CLEANING THE FORMULATOR OUTSIDE Careful do not insert water inside the formulator except in the water tank Clean the external surfaces of the formulator with a cloth slightly moistened with water and or mild liquid soap ...

Page 36: ...GS Rinsing Rinsing ensures the cleanliness of the formulation system It occurs after each skincare formulation allowing you to enjoy your beauty ritual Remember to check the water level of your tank before formulating your next skincare 2 5 min Cleaning ...

Page 37: ...ormulation system ensuring the purity and innocuity of your skincares It occurs on first use then periodically automatically 5 min Only if the machine reports an error Check the water level Check the presence and level of the wash solution flask ...

Page 38: ...tes it will be available just after that blue fast blinking Automatic rinsing Leave the formulator rinsing itself for several minutes it will be available just after that orange fast blinking Empty or missing water tank Fill in the water tank with clean water and put it back into the machine orange still Empty or missing flask Refer to the app for more information yellow fast blinking Update in pro...

Page 39: ...formulator then plug it back in and if the error still occurs contact the After Sales CONTACT THE SUPPORT You can contact our after sales service by email help romy paris Our teams will answer as soon as possible ...

Page 40: ... max 50 60Hz Electrical supply of the formulator 12V DC 3 33A Electrical classification Dimensions WxHxD 150 x 230 x 150 mm Weight empty 1kg NAMEPLATE The nameplate placed under the device certifies its conformity Romy All rights reserved 2020 Version 1 4 ...

Reviews: