background image

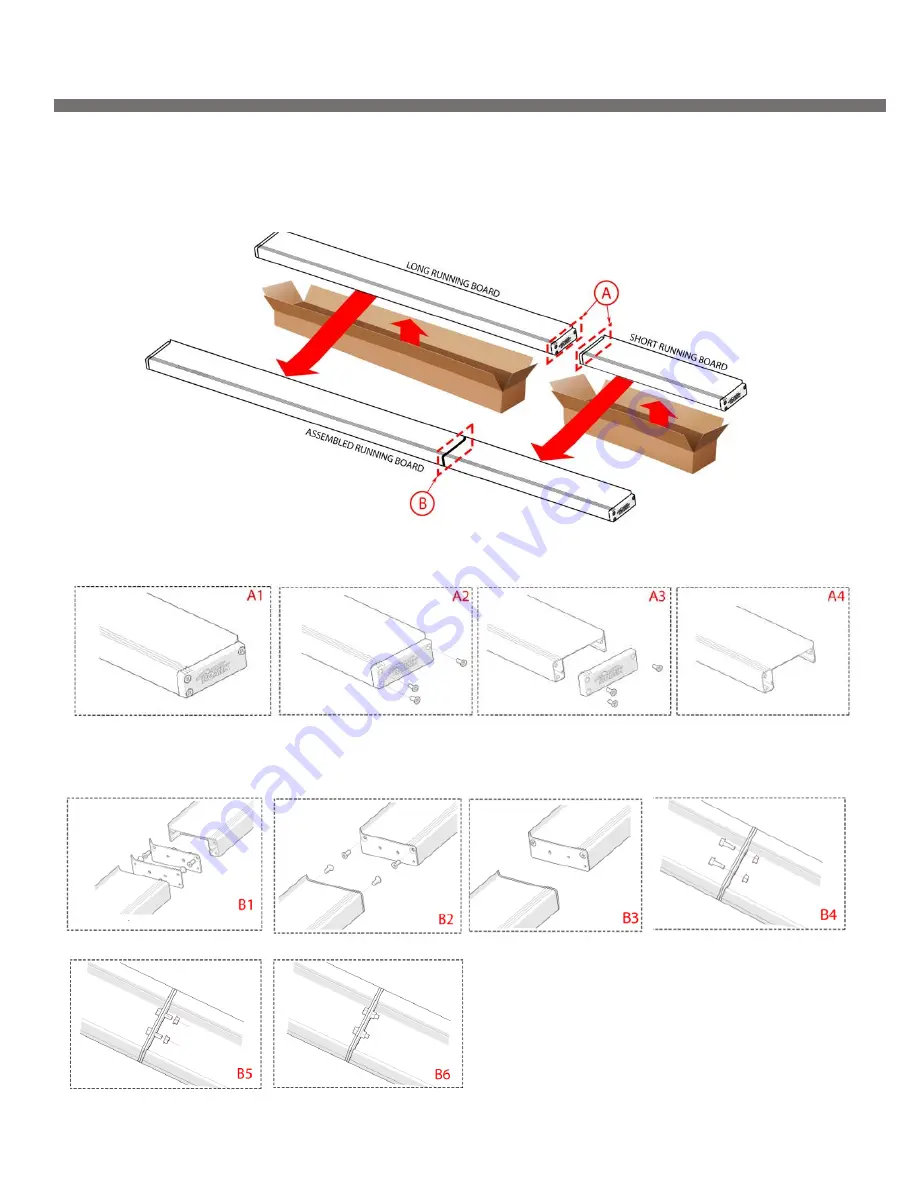
ROF / ROB / RPD 2 PC Romik Connect instructions  


Please follow these steps to successfully 

“join” the 2 PC running boards together.  

Step 1: Remove products from box and placed on a soft surface to avoid scratching. 


Step 2: Remove plastic endcap as shown on Figure A1 

– A4 keep screws as they will be re-used. 

Step 3: Remove Romik Connect plate and assemble as show on Figure B1 

– B3 using original screws. 

Join two running boards together using supplied M8 bolts torque to 7 ft lbs. 


Step 4: Install running boards as per last page of this manual.


Summary of Contents for 2137 2D

Page 1: ...3 4 5 Installation Time 90 Min Hardware Torque Specifications M6 Bolt 3 ft lbs M8 Bolt 7 ft lbs M10 Bolt 16 ft lbs M12 Bolt 28 ft lbs ATTENTION Use correct torque settings to avoid damaging the running boards and or mounting brackets Failure to do so will void your warranty If you have any questions please contact our technical team at 1 866 717 6645 ...

Page 2: ...igure 2 Install provided HTC 243 and M10 bolt as shown Figure 3 Install pre assembled bracket as shown on Figure 4 Step 3 Pre assemble rear drivers bracket Install provided HTC 243 as shown Figure 5 Step 4 If vehicle is equiped with rear ac Remove factory screw will be re used Figure 6 If vehicle does not have rear ac proceed to install HTC 226 Figure 7 Proceed to install pre assembled bracket as ...

Page 3: ...bracket pass second bracket as shown on Figure 11 install provided HTC 243 as shown on Figure 12 Install pre assembled bracket as shown on Figure 9 Do not tighten Step 8 Middle brackets do not require pre assembly clean factory threads Figure 12 and install using supplied M8 hardware Note some models do not have threaded inserts on bottom mount and may require tapping to M8 25 proceed to install d...

Page 4: ...step is for short wheel base models only if you have completed step 8 please proceed to step 10 install provided HTC 243 and attach bracket Figure 15 Do not tighten Step 11 Proceed to last page of this manual for running board install instructions and torque values For Technical support please call our team at 1 866 717 6645 and one of our experts will assist you with this installation Thank you f...

Page 5: ...aced on a soft surface to avoid scratching Step 2 Remove plastic endcap as shown on Figure A1 A4 keep screws as they will be re used Step 3 Remove Romik Connect plate and assemble as show on Figure B1 B3 using original screws Join two running boards together using supplied M8 bolts torque to 7 ft lbs Step 4 Install running boards as per last page of this manual ...

Page 6: ...brackets as shown on Figure 3 4 Adjust running boards centering on vehicle Hand tight M8 hardware on running boards 5 Follow the torque procedures torque M8 hardware to 7 ft lbs using a torque wrench 6 Cleaning and maintaining your running boards is important apply a light coat of a quality carnauba wax at least 2X per year Wash often with mild soap and make sure to remove all soap Residue Many ca...

Reviews: