ROMAN DXHR Instruction Manual Download Page 9

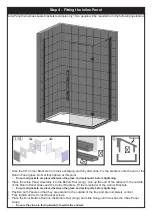
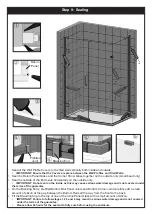
Step 8 - Fitting the Door Seals

1.  At the bottom of Panel Assembly, place a bead of silicon between the Glass and the bottom Rail. Fit the 

Blanking End (select the correct handing) then carefully remove any excess silicon.

2.  Take a measurement from the Hinge Vertical Extrusion to the end of the Door Glass (at the Handle Side).

3.  The Bottom Seal requires a rebate at one end only (Handle side). Fit the Bottom Seal so that the rebated 

end is level with the glass at the Handle side of the door and cut it to length so that it butts up to the Hinge 

Vertical Extrusion when the Door is closed. Push fully onto the glass.

•  IMPORTANT: You MUST ensure that the Deflector on the Bottom Seal is facing inward towards the 

shower.

4.  Fit the Vertical Hinge Seal onto the Door Glass and around the Hinges, carefully trim the bottom so that it 

just sits on top of the Bottom Seal. Trim the top if required.

•  NOTE: Mark the bottom with a pencil, remove then cut and then refit (take care when cutting).

5.  Fit the Panel Seal onto the Panel Glass ensuring the flipper is on the inside, trim to length if required.

•   IMPORTANT: Please ensure that the flipper part of the Seals are placed on the inside of the enclosure.

Rebate

Flipper

Vertical 

Seal

Summary of Contents for DXHR

Page 1: ...s are tiled and grouted before the product is installed 12 If the walls and or the tray are not level you will not achieve maximum adjustment of the product 13 Pictures used are for illustration purposes only product designs may alter slightly as a result of continuing product development 14 We do not stipulate where the European Standard Kite Mark should be positioned on the glass when being fact...

Page 2: ...eaks DO NOT plasterboard over the tray DO NOT grout the tiles when the enclosure has been fitted the grout may discolour the aluminium profiles Make sure the tray is installed as per the manufacturer s instructions When all of the above has been completed please proceed to the Step 2 Step 1 Pre Installation Checks and Tray Sizes Enclosure Code Front Minimum Tray Maximum Tray DXL1HDR DXL1HR10 975 9...

Page 3: ...asonry Drill Bit not supplied and fit the Wall Plugs 5 Remove any debris and apply a bead of sealant the width of the Wall Profiles where they meet the top of the tray wetroom floor and the tiled walls 6 Screw fix both Wall Profiles to the walls using the 40mm Cap Head screws supplied ensuring they are kept completely vertical and are 10mm to 12mm in from the front of the tray 7 Apply a bead of se...

Page 4: ...front of the Panel is completely vertical and remains on the 33mm mark 5 Drill through the grooves in the Wall Profile using the 2 5mm drill bit supplied On both inside and outside drill two holes approximately 50mm from each end now drill a hole in the centre of those 3 holes now drill two further holes between them 5 holes IMPORTANT This is drilled and fixed inside and outside 5 fixings on each ...

Page 5: ...urn Panel Glass and the Corner Brackets Fit the remainder of the Corner Brackets Ensure all gaskets are placed between the glass and metal parts before tightening 3 Position both Panels so that they are parallel to the outside of the tray and are completely vertical 4 Fully tighten all the Corner Bracket screws 5 Place the Door Bottom Rail into the Bottom Rail Long and slide along until it touches...

Page 6: ...de of the glass and 1 on the inside 3 Remove the Handle Assembly from it s packaging and reassemble onto the Door Glass ensure that the set screws are fitted on the inside of the Door and all gaskets are used between the glass and metal parts 4 Fit the Bottom Rail Door Joint to the bottom of the Hinge Profile Assembly Extrusion making sure the correct hand is used ensure the high side is placed to...

Page 7: ... of the Door drill two holes approximately 50mm from each end now drill a hole in the centre of those 3 holes now drill two further holes between them 5 holes Drill another hole just above each hinge 7 holes IMPORTANT This is drilled and fixed inside and outside 7 fixings on each side 14 in total 6 For the other side of the Door repeat procedure 5 except for the holes at the hinge drill them just ...

Page 8: ...Secure the Wall Bracket using the 9mm long Countersink Head Screws supplied 4 Place the Brace Bar Assembly into the Wall Bracket and over the Return Panel Glass and fasten together Ensure gaskets are between the Brace Bar and the Return Panel Glass then tighten all the screws 5 Fit the Wall Profile Covers onto the Wall Profiles by locating the small curved feature onto the Wall Profile hold in pla...

Page 9: ...th so that it butts up to the Hinge Vertical Extrusion when the Door is closed Push fully onto the glass IMPORTANT You MUST ensure that the Deflector on the Bottom Seal is facing inward towards the shower 4 Fit the Vertical Hinge Seal onto the Door Glass and around the Hinges carefully trim the bottom so that it just sits on top of the Bottom Seal Trim the top if required NOTE Mark the bottom with...

Page 10: ...ous water damage and is not covered under the terms of the guarantee 4 On the Blanking Ends prefitted Bottom Rail Panel Joints and Bottom Corner Joint carefully add a small amount of silicon at the gap between the Bottom Rails all the way from the front to the back 5 Fit the Branding Clip to the top of one of the Inline Panel Glass with a small amount of silicon IMPORTANT Failure to follow stages ...

Page 11: ...ofile 1 24 5 Vertical Hinge Seal 1 15 Bottom Rail Door Joint L H 1 25 6 Door Glass 1 16 Bottom Rail Door Joint R H 1 7 Vertical Door Flipper Seal 1 17 Bottom Seal 1 8 Inline Panel Assembly 1 18 Door Bottom Rail 1 9 Corner Bracket Assemblies 2 19 Bottom Rail Long 1 10 Return Panel Assembly 1 20 Blanking End Left Hand 1 If you need to replace any damaged parts please see illustration below for parts...

Page 12: ...an excellent level of service it is important that you quote your product Code and Reference Number these can be found on the Guarantee card Panel Alignment 1 Check the Wall Profile is 10mm to 12mm in from the front of the tray 2 Check the front of the Panel Glass is 33mm in from the tray and is completely vertical 3 Check the Bracing is fitted correctly and is fully tightened Enclosure Alignment ...

Reviews: