


Continued…..
F – Horn Button
The yellow button ‘F’ operates the scooters horn. This should only be used to warn others
of your presence and not as a rebuke of any form.
G - Thumb / Finger Lever (Wig-Wag)
The thumb levers control the reverse and forward motion of the scooter – see ‘Starting
To Drive’ for operation. Remember, more pressure = more speed. Release the thumb
lever and the scooter will automatically come to a safe stop as the electromagnetic
brake is applied. Always release the lever if the scooter behaves erratically.
H – Emergency Handbrake
Should all emergency procedures fail, the emergency handbrake operates a disk brake
on the rear axle. DO NOT use this during normal driving as it could damage the
electronics.
On/Off Key
The keyswitch is located on the right side of the tiller. Simply insert the key and turn
clockwise to switch the power on. The display will light up to indicate the power is on.
There may be a slight delay before the thumb levers operate as the controller checks
the scooters circuits. Never leave the key in the switch unattended to prevent
unauthorised use. Do not switch the power off to stop the scooter unless it is an
emergency. The scooter will stop very abruptly if stopped in this way.
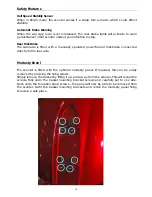
LCD Display
The Granada uses a LCD display – this indicates all the functions of the scooter when in
use. See the image below for a description of the display.
Battery Level Indicator Gauge
This gauge gives you a guide to the amount of charge left in the scooters batteries. This
will give the truest reading when the scooter is in motion. Always fully charge the
batteries before driving your scooter and never let the batteries become completely
drained, as this may cause permanent damage to the batteries.
Fault Code Indicator – See page 15
9
Summary of Contents for Granada S743
Page 19: ...Notes 19 ...