Part No 4801-5176 Rev 01-11-16
RS-Divider Curtain
Page 7
and squaring the mounting brackets.
4.
Adjust end brackets so they are parallel, level and square.
5.
Install and tighten the remaining bolts or lag screws into the end brackets.
6.
Re-verify alignment and make adjustments as needed.
IMPORTANT: Leveling and plumb are very important. The curtain may bind if not
properly squared.
5.5
Setting Limit Switches
See Section 7, Wiring the RS-Divider Curtain, for power and switch wiring instructions.
The UP position & DOWN position have to be set. This is where the Door curtain will automatically stop.
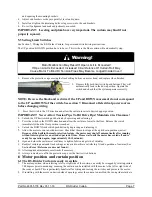
Warning!
Motor Malfunction May Result If Open Limit Is Exceeded!
If Open Limit Is Exceeded, Increased Circumference Of Curtain Roll May
Cause Motor To Bind Or Tension Pipes May Become Lodged Inside Cover!
1.
Remove the protective cap covering the limit setting buttons on motor head, and replace when finished.
2.
Depress fully both limit switch push buttons. They will
automatically lock in the down position. Operate the
switch and check that the system operates correctly.
NOTE: Reverse the black and red wire if the UP and DOWN movement do not correspond
to the UP and DOWN of the switch, See section 7. Disconnect all electrical power sources
before changing wiring.
3.
Press the switch in the UP direction and allow the curtain to raise to desired upper position.
IMPORTANT! Never Allow Tension Pipe To Hit Drive Pipe! Maintain 4 in. Clearance!
4.
Unlock the UP limit switch push button by depressing and releasing it.
5.
Press the switch in the DOWN direction and allow the curtain to lower to the floor. Release the switch
immediately when the floor position is reached.
6.
Unlock the DOWN limit switch push button by depressing and releasing it.
7.
Allow the motor to run in both directions. Check that the motor stops at the up & down positions just set.
Because of the built in thermal protection feature, the motor may shut off automatically after running
without interruption for an extended period of time. Please wait until the motor has cooled off and is
ready for operation again, (approximately 10-15 minutes).
8.
Open and close the curtains several times to tighten fabric and get rid of wrinkles
9.
Readjust curtain panels and limit settings as required to achieve satisfactory fit and operation of curtains (See
Section
Error! Reference source not found.
).
10.
After required adjustments, reset limits if necessary.
11.
Always remember to affix the protective cap over the limit switch buttons.
6
Motor position and curtain position
6.1
The RS-Divider Curtain is easily reversible
1.
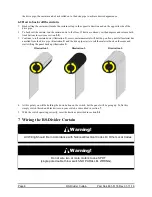
The motor position, when referring to left or right side of the curtain, can easily be swapped by rotating curtain
180 degrees prior to mounting; meaning, the curtain can be installed with the motor to the left or right side of
the room or booth. This is particularly beneficial for wiring and routing the switches and power to the motor.
2.
If installing with the motor on desired side of opening causes the curtain to unroll on the wrong side relative to
!

