background image

20

Hunter Products warrants that your 12V Kid's ATV will be free from defects in 
materials and workmanship for the vehicle (except for the 12-volt battery) for a 
period of 12 months, from the date of purchase.  This warranty only applies 
where the product is completely and correctly assembled and used in 
accordance with all accompanying recommendations and users instructions.  
This warranty is in additionto your rights under the Australia Consumer Law.

Hunter Products, at its option will provide you with a refund or replacement 
parts for this product if the 12V Kid's ATV  becomes defective within the 
warranty period. Hunter Products will bear the reasonable expense of claiming 
the warranty.  This warranty will no longer apply where the defect is a result of 
an accident, misuse, abuse, neglect or other causes not arising out of defects 
in materials or workmanship, nor does it cover damages arising out of damages 
arising out of service by other than an authorised service person. 

Our goods come with guarantees that cannot be excluded under the Australian 
Consumer Law. You are entitled to a replacement or refund for a major failure 
and compensation for any other reasonably foreseeable loss or damage. You 
are also entitled to have the goods repaired or replaced if the goods fail to be of 
acceptable quality and the failure does not amount to a major failure.

Please retain your receipt as proof of purchase and contact Hunter Products for  
further assistance on how to process any warranty claims.

Summary of Contents for W442

Page 1: ...and the entire manual before assembly and operation The vehicle must be assembled by an adult who has read and understands the instructions Made in China Styles and colours may vary Call 1 800 224 094...

Page 2: ...8V Thank you for purchasing this RollPlay vehicle We hope the rider enjoys it for miles to come Please read this instruction guide carefully before assembling and operating the vehicle Please contact...

Page 3: ...he Front Wheels 8 Assemble the Rear Wheels 9 Assemble the Steering Rod 10 Assemble the Front Bumper 11 Attach the Handlebar 12 Operating Instructions 14 Attach the Seat 13 Battery Maintenance 15 Gener...

Page 4: ...cles or in areas where there is road traffic Do not operate near potential hazards such as steps steep inclines or hills Operate on relatively level ground Do not operate in dangerous weather conditio...

Page 5: ...5 Safety Continued...
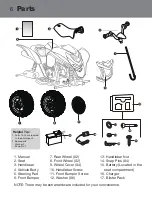
Page 6: ...Cover X4 10 Handlebar Screw 11 Front Bumper Screw 12 Washer X6 13 Handlebar Nut 14 Snap Pins X4 15 Battery Located in the seat compartment 16 Charger 17 Blister Pack NOTE There may be extra hardware...

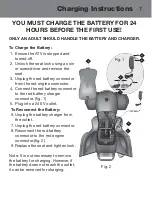
Page 7: ...m the red engine connector 4 Connect the red battery connector to the red battery charger connector fig 1 5 Plug into a 240 V outlet To Reconnect the Battery 6 Unplug the battery charger from the outl...

Page 8: ...sure the gear teeth are facing in towards the vehicle Then slide another washer on the axle 4 Slide a snap pin into the hole on the axle 5 Snap a wheel cover onto the wheels make sure the tabs and slo...

Page 9: ...ar wheel on the axle with the gear teeth facing in 3 For the left rear wheel align the gear teeth on the wheel with the gear box on the axle 4 Slide a washer on the axle 5 Slide the snap pin through t...

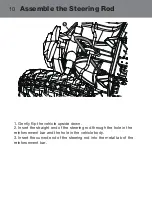
Page 10: ...flip the vehicle upside down 2 Insert the straight end of the steering rod through the hole in the reinforcement bar and the hole in the vehicle body 3 Insert the curved end of the steering rod into t...

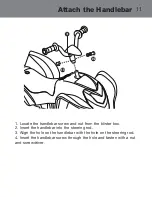
Page 11: ...ndlebar screw and nut from the blister box 2 Insert the handlebar into the steering rod 3 Align the hole on the handlebar with the hole on the steering rod 4 Insert the handlebar screw through the hol...

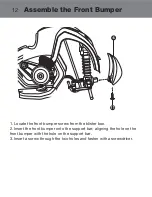
Page 12: ...ate the front bumper screw from the blister box 2 Insert the front bumper onto the support bar aligning the hole on the front bumper with the hole on the support bar 3 Insert a screw through the two h...

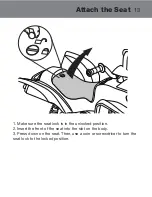
Page 13: ...eat 1 Make sure the seat lock is in the unlocked position 2 Insert the front of the seat into the slot on the body 3 Press down on the seat Then use a coin or screwdriver to turn the seat lock to the...

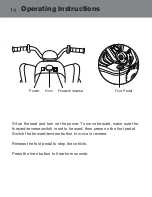
Page 14: ...e forward make sure the forward reverse switch is set to forward then press on the foot pedal Switch the forward reverse button to move in reverse Release the foot pedal to stop the vehicle Press the...

Page 15: ...nnect the charger and call Customer Service for assistance Keep the charger away from water or excessive moisture to prevent short circuiting Do not charge the battery with any other charger Do not at...

Page 16: ...contact Customer Service for replacement parts See Service and Repairs on Page 19 for more information DO NOT operate the vehicle if there are any damaged parts Carefully clean the vehicle with a damp...

Page 17: ...e connection when the battery is recharging Recharge for at least 8 12 hours Overcharged battery Never charge the battery for more than 30 hours Battery is old Call customer service to order replaceme...

Page 18: ...shift while vehicle is moving Stop the vehicle before shifting Motor or gear box making grinding noises Motor or gear damage Contact Customer Service Battery will not recharge Charger is not plugged i...

Page 19: ...Customer Service Business name Hunter Products Pty Ltd Business address Level 2 424 Warrigal Road Moorabbin VIC 3189 Australia Telephone number Australia wide local call cost 1800224094 Monday to Fri...

Page 20: ...easonable expense of claiming the warranty This warranty will no longer apply where the defect is a result of an accident misuse abuse neglect or other causes not arising out of defects in materials o...

Reviews: