11
RolliBot RolliCOOL 208-20V2 Portable AC User Manual
Section 3. Setting Up the Unit
• Before using the unit, keep it upright for at least two hours.
• Do not use extension cords etc. Only plug the unit into a grounded wall outlet.
• Do not use the unit in bathrooms or other excessively humid environments.
• After installation, keep the unit at least 11.8 in. from the walls at all times.
Installation – Part 1 of 4: Prepare the Unit
Step 1.
Keep the unit upright for at least 2 hours.
Step 2.
Select the perfect placement for the unit that includes:
• unobstructed access to a window
• unobstructed direct access to a power outlet
• flat, level surface
• at least 11.8” from walls or other obstructions
• adequate space for water runoff when using the upper drainage hole (required for
cool and dehumidify modes)
Step 3.
Test the unit’s placement:
• verify the AC unit has direct, unobstructed access to a grounded outlet (do not use an
extension cord)
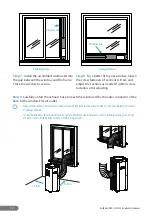
• carefully unfurl the exhaust hose and adjust its length to reach the window
Keep the exhaust hose as short and free of curves as possible. Make sure the exhaust hose remains unobstructed and free of
sharp bends and bends.
For best results, add weather stripping to your window to improve hold on the window kit and reduce cooled air loss.
Installation – Part 2 of 4: Water Drain
Do not skip this step. To avoid unit failure, you must connect the
upper drain hose when using cool and/or dehumidify mode or
operating in humid environments.
Step 1.
Locate the upper drainage hole on the
back of the unit. Set a large container close to the
drainage hole for water runoff.
Step 2.
Remove the cap from the upper drainage
hole.
Step 3.
Place one end of the draining tube in the
container and connect the other end to the unit’s
upper drainage hole.
• If the draining tube is too stiff and/or cannot be attached, try
soaking the end in hot water to soften it first.
• For optimal experience, use a large container for water drainage.
Container should not exceed height of the upper drainage hole.


