


b) First starting
:
Before the first use, remove the anti
-
corrosion protection fat with a cleaner. Then, it is
necessary to grease plates with oil. Then proceed to the seasoning of the cast iron
plates. For this
-
Grease the cast iron plates with oil
-
Plug in the waffle iron, turn the thermostat (n°3 on picture) to the maximum set-
ting :the orange pilot light (n°2 on picture) and the green pilot light (n°1 on picture)
switch on.
-
Close the upper plate and let the waffle iron work during 30min
-
After this seasoning, the first waffles will be very bad looking with black residue.
-
To finish, grease slightly the plates. Your machine is ready to function.
First cleaning
Clean the device and all accessories before the first use. (see 6 Cleaning)
Connection of the device
-
Check that the tension and the frequency of the electricity network suit to the val-
ues indicated on the descriptive plate.
-
Check that neither the cord nor the plug are damaged
-
Make sure that every control knob is positioned on 0.
-
Unwind completely the electric power cable and connect it in a plug connected
with the earth.
-
The device is connected.
NB: in case of connection of the device in a plug without earth protection or directly on
the electricity network, confide its connection to a qualified person .
c) Use of device
:
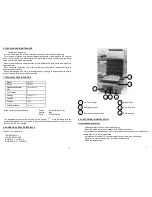
Elements of command and display
Never use the machine without drip trays (n°5 and 6 on picture).
Command/Display
Function
Thermostat (n°3 on picture)
Temperature setting
Green pilot light
(n°1 on picture)
Machine on (pilot light on)
Machine off (pilot light off)
Orange pilot light
(n°2 on picture)
Machine is heating (pilot light on)
Temperature reached (pilot light off)
Digital timer
(n°4 on picture)
Cooking time
6
Putting on
Turn on the thermostat control knob (n°3 on picture) on the wished position: the or-
ange pilot light (n°2 on picture) ignites. The machine is warming up.
Once orange pilot light (n°2 on picture) is off, the machine reached the wished tem-
perature.
Grease the plates before each cooking.
Preset cooking time
Temperature setting
Set the temperature by positioning the thermostat (n°3 on picture) to the desired tem-
perature. The orange pilot light (n°2 on picture) switches on if a higher level of tem-
perature is required and switches off when the same is reached.
If the temperature is too high, just open the plates to make it cool quickly.
Caution: if the temperature of cooking is too high, the waffle may stick on the
plates when turning out
Digital timer setting
Installation:
1) Install battery with correct polarity positioning
2) Peel off display protective sheet
3) The unit will display «
00 00
» and is ready for use
Use:
1) Press [MIN] / [SEC] to set the desired count down time
2) Press [START/STOP] to start timer. The buzzer will sound when displays
counts down to “00 00”.
3) Press [START/STOP] to stop timer and the preset value will be displayed
4) Press [MIN] / [SEC] simultaneously to clear display value to “00 00”
5) Press [START/STOP] to start the count up time
Stopping the appliance
Set thermostat control knob (n°3 on picture) on 0
Disconnect the power cable.
Let the device cool
Clean the appliance. (see 6. Cleaning)
Grease the plates
d) Breakdown / repair:
In case of breakdown or of damaged part, please call your after
-
sales service and
confide any technical operation to qualified person.
When you contact the after
-
sales service of your distributor or your store, give him the
complete reference of your device (commercial name, type and serial number). This
information appears on the visible descriptive plate behind the device.
7
Summary of Contents for GES 23
Page 2: ...11 ...


