background image

20

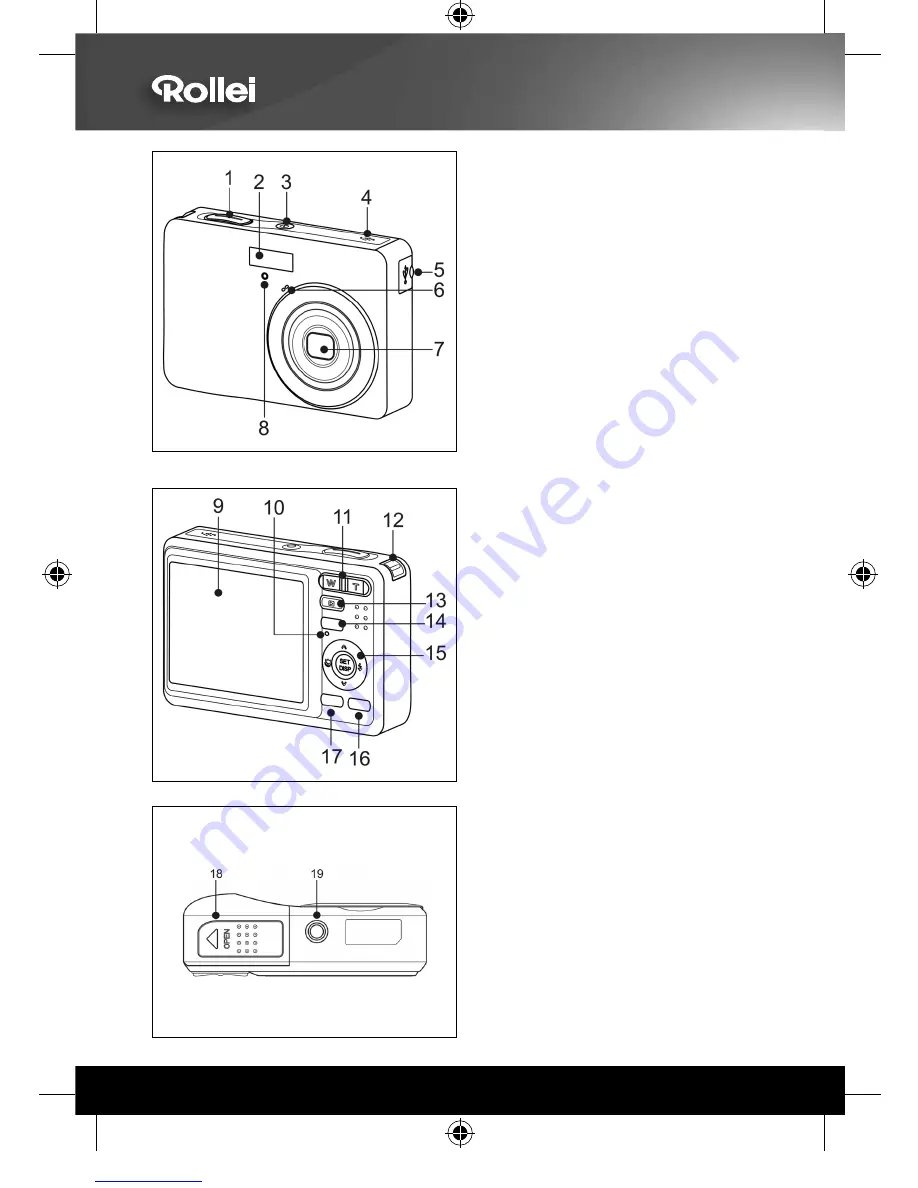
18. Coperchio batterie
 

• Lo slot della scheda di memoria 

e posizionato sotto il coperchio 
delle batterie, adiacente al vano 
batterie.

19. Attacco treppiede 

9. Schermo LCD 

10.  Spia di funzionamento
11.  Pulsante di zoom
12. Montaggio cinghia
13. Modo riproduzione
14. Pulsante MENU
15.  Tasto multifunzione 5 direzioni:
 • 

Pulsante 

Flash

 • 

Pulsante 

Macro

 • 

Pulsante 

SET/DISP

16.  Pulsante modalità fotocamera
17. Cancella

1. Pulsante otturatore
2. Flash
3.  Pulsante di accensione
4. Altoparlante
5.  Porta USB / Morsetto uscita video  
6. Microfono
7. Obiettivo
8. Luce autoscatto

QuickStartGuide_8325.indd   20

uickStartGuide_8325.indd   20

20.03.2008   12:55:05 Uhr

20.03.2008   12:55:05 Uhr

Downloaded from 

www.Manualslib.com


manuals search engine


Summary of Contents for RCP-8325

Page 1: ...SATION BEDIENUNGSANLEITUNG MANUAL DEL USUARIO MANUALE DELL UTENTE G RCP 8325 8 MEGA PIXELS ROLLEI 3x APOGON ZOOM 2 5 COLOUR LTPS LCD USB 2 0 FULL SPEED SDHC 4 GB SUPPORT Downloaded from www Manualslib...

Page 2: ...subject to the following two conditions 1 this device may not cause harmful interference and 2 this device must accept any interference received including interference that may cause unsatisfactory op...

Page 3: ...SIZE AND QUALITY 21 USING THE ZOOM FUNCTION 22 USING THE FLASH 23 USING THE MACRO 24 USING THE SELF TIMER BURST 25 RECORDING MOVIE CLIPS 26 SETTING THE MOVIE SIZE 26 RECORDING AUDIO CLIPS 27 PLAYING B...

Page 4: ...NG CONNECTIONS 44 CONNECTING THE CAMERA TO A TV 44 CONNECTING THE CAMERA TO A PC 45 USING THE CARD READER 45 CONNECTING THE CAMERA TO A COMPUTER WITH THE USB CABLE 45 APPENDIX 46 ABOUT THE FOLDER FILE...

Page 5: ...ction explains playback delete and edit functions of still images movies and audio files Making Connections This section tells you how to connect this camera to a computer or TV Appendix This section...

Page 6: ...y Charger y Actual accessories may be different y Items marked with are available as optional accessories y Note that the shape of the charger plug depends on the area where you purchased the camera y...

Page 7: ...bnail page 34 y Playback Zoom page 33 6 Playback Button page 13 7 Menu Button page 15 8 Operation Lamp 9 Mode Button page 13 10 Delete Button page 35 11 LCD Monitor page 9 12 SET DISP Button page 11 1...

Page 8: ...Strap Ring 16 Shutter Button page 19 26 17 Power Button page 12 18 Speaker 19 USB AV Terminal page 18 45 21 Battery Cover page 5 22 Tripod Socket Downloaded from www Manualslib com manuals search eng...

Page 9: ...the low battery indicator appears y Risk of explosion if battery is replaced by an incorrect type dispose of used batteries according to the instructions y Be sure to turn off the camera power before...

Page 10: ...d if removed while the camera is on y Do not touch the connection terminals on the back side of the card About Camera Memory This camera is equipped with internal memory If the memory card is not inse...

Page 11: ...ress or to select a language and press or the SET button to apply the setting Press the MENU button to close the menu Setting the Date Time Turn the power on and set the camera to the Setup Menu page...

Page 12: ...settings press the SET or the MENU button to apply the setting y If the batteries are removed for longer than 48 hours the Date and Time will need to be re set 4 C Ca au ut ti io on n Downloaded from...

Page 13: ...ning page 19 2 Flash page 23 13 Shutter speed page 19 3 Zoom indicator page 22 14 Aperture value page 19 4 Shots remaining 15 Exposure page 30 5 Storage media 16 Metering page 29 6 Macro page 24 17 IS...

Page 14: ...age 28 9 Voice memo control page 28 4 File number Total 10 DPOF page 42 5 Storage media 11 Resolution page 21 6 Recording info page 11 y Some information may not display correctly if you display image...

Page 15: ...asic OSD y You cannot change the LCD status in the following situation Manual exposure Recording movie clips or audio files Playing movie clips or audio files Playing the slideshow Viewing in thumbnai...

Page 16: ...REC mode and PLAYBACK mode page 13 Power Saving Function For saving the battery power the LCD monitor automatically turns off 1 minute after the last control accessed factory preset setting Press any...

Page 17: ...camera to the REC mode page 13 Launch the mode palette y Press the MODE button o to show the scene mode palette Select a mode y Use the four way control to select a desired mode and press the SET butt...

Page 18: ...he beach or snow scenes Fireworks Slow shutter speed to take fireworks exploding Night Scene Shooting the subject while keeping the background night scenery Kids Take a still image to capture moving k...

Page 19: ...enu Select an item y Press or o to select a menu item Change the setting y Press or o to change the setting Press the MENU n or the SET o button to save the settings and close the menu REC menu list S...

Page 20: ...to open the REC or PLAYBACK menu y The menu displays depends on whether you are in the REC mode or the PLAY BACK mode Open the Setup menu y Press four way control o to select SETUP and then press the...

Page 21: ...period of time y The power save feature will not activate in some situation page 12 Date Time Sets the date time page 7 Select a language for display menus and other information from the following 21...

Page 22: ...in the memory card if you are using a card or all data stored in the internal memory if there is no card inserted y A BUSY PLEASE WAIT message displays and the memory card is starting format y A COMP...

Page 23: ...then shutter speed o aperture value p and ISO value q are displayed y If the shutter speed is slow or the possibility that image may be blurred the shake warning icon may appear on the LCD monitor To...

Page 24: ...ec 10 sec Double Burst Beep Off On Menu Auto Review Off 3 sec 5 sec Rest of settings will not be controlled as below y Quality S Fine y Highlight Off y Metering Multi y Sharpness Normal y White balanc...

Page 25: ...5 Resolution Values Image Size Print Size 3264 x 2448 Printing larger than A4 size 3264 x 2176 3264 x 1840 2816 x 2112 2272 x 1704 1600 x 1200 640x480 Printing to postcards or attaching to e mail Larg...

Page 26: ...wide angle shot T zoom in for a telephoto shot y When the zoom button is pressed the zoom bar appears on the LCD monitor y When the optical zoom o factor is at maximum zooming stops temporarily Press...

Page 27: ...ly when shooting conditions require extra lighting Red eye reduction Flash strobes to let the subject s eyes adjust to the flash then fires again to take the actual image Your camera will detect the s...

Page 28: ...telephoto setting Turn the power on and set the camera to the REC mode page 13 Press the macro button n enters the macro mode y The macro icon o displays in the LCD monitor y To leave the macro mode p...

Page 29: ...the SET button Off Record a single image 2 sec The shutter release will be delay for 2 seconds 10 sec The shutter release will be delay for 10 seconds Double Record two images in a shot after pressing...

Page 30: ...The White Balance is set and locked to the settings of the first frame y Sound cannot be recorded while pressing the zoom button y The digital zoom cannot be used in Movie mode Finish recording y Pre...

Page 31: ...gain to end recording y The camera will stop recording automatically when the memory capacity has been reached Playing Back Audio Clips Turn the power on and set the camera to the PLAYBACK mode page 1...

Page 32: ...ss the SET button to start recording for 30 seconds y Press the SET button again to end recording y The voice memo cannot be added to a movie clip or a protected image y You cannot delete only the voi...

Page 33: ...y corrects white balance Ideal for general photography Adjusts for bright sun conditions or natural light conditions Adjusts for cloudy days or twilight conditions Adjusts for normal indoor lighting c...

Page 34: ...rease the image noise To take clean images use as low an ISO speed as possible Setting the Exposure Set the exposure value manually to compensate for unusual lighting conditions such as indirect indoo...

Page 35: ...n Description Off No effect is added to the image B W Convert image to black white Sepia Recorded image will be stored in a sepia tone Negative Opposite what they were in the original image Mosaic Add...
Page 36: ...ying Back Movie Clips Turn the power on and set the camera to the PLAYBACK mode page 13 Press or to select a movie clip that you want to playback Start playing back y Press to start playing the movie...

Page 37: ...age y Press T n to magnify the image and the central portion of the image is displayed You can use the arrow button p to view different parts of the magnified image y Press the MENU button o to return...

Page 38: ...set the camera to the PLAYBACK mode page 13 Enter the slide show y Press the MENU button n use the four way control o to select Slide Show and press the SET button o Change the slide show settings y U...

Page 39: ...ET button o Press or o to select the image you want to delete Press the SET button o to delete the image y Repeat step 4 5 to delete images y To quickly delete the current display image 1 Select the i...

Page 40: ...that you want to delete are displayed with an icon Delete images y Press the MENU button then select Yes and press the SET button All selected images will be deleted y To cancel delete press the MENU...

Page 41: ...to protect images y To unlock the file press the SET button again in step 5 The will disappear and the file is unlocked Protecting All Files Turn the power on and set the camera to the PLAYBACK mode p...

Page 42: ...the selected image turns green Select multiple images y Use the four way control to select the image y Press the SET button toggles the on and off Repeat this step until all images that you want to p...

Page 43: ...o select OK and then press the SET button to finish rotating Changing the Image Size Turn the power on and set the camera to the PLAYBACK mode page 13 Press or to select the image you want to resize O...

Page 44: ...the image you want to add the effect Open the menu y Press the MENU button then use the four way control to select Effect and press the SET button Press or to select an option and then press the SET...

Page 45: ...button then use the four way control to select Copy to card and press the SET button Press or to select Single then press the SET button y To copy all images to a memory card select All Press or to s...

Page 46: ...POF setting for all images select All in this step y To reset all DPOF settings to initial default select Reset in this step Press or to select the image you want to print out then press the SET butto...

Page 47: ...e camera to the Setup Menu page 16 Press or to select S Image then press or the SET button Press or to select a desired option and press the SET button to apply the setting Off Disable the start up im...

Page 48: ...TV Use the supplied AV cable to connect the camera to the TV set Set the TV input signal to Video In y Refer to the documentation included with your TV for more information Display on TV y Everything...

Page 49: ...he memory card Copy images from the card into a directory of your choice on the computer s hard disk Connecting the Camera to a Computer with the USB Cable Install the USB software driver included wit...

Page 50: ...owed by a 4 digit number that increases in sequence File numbering starts from 0001 when a new folder is created If the highest folder number is 999 and highest file number exceeds 9999 the camera wil...

Page 51: ...e camera steady when shooting picture Image is blurry or out of focus The subject was beyond the range within which the camera can focus Turn the Macro mode on it the subject is within 15 cm or 40 cm...

Page 52: ...works Night scene Kids Food Building Text Sensitivity Auto ISO 50 ISO 100 ISO 200 ISO 400 White Balance Auto Daylight Cloudy Tungsten Fluorescent H Fluorescent L Custom Exposure Control 2EV to 2EV in...

Page 53: ...000 1 1 2000 1 15 1 2000 Off z z z z z z z z z z z z Macro On z z Auto 3 z z z Red eye z z Force on z Slow sync z Button Flash Force off z z z z 8M 3 16 9 3 2 6M 4M 2M Resolution VGA 16 9 640 3 Movie...

Page 54: ...Drive Mode Burst Off z z z z z z z z z z z z z AEB On Off z z z z z z z z z z z z z Highlight Hard z z z Normal 3 z z z z z z z z z Sharpness Soft Off z z z z z z z z z z z z z B W Sepia Negative Red...

Page 55: ...51 3 Factory setting z Default Available Not available Setting is retained even after mode switch or power off Set to OFF after power off Downloaded from www Manualslib com manuals search engine...

Page 56: ...ik GmbH Co KG Tarpen 40 Geb ude 6b D 22419 Hamburg Hotline 49 0 6 31 3 42 84 49 welcome rcp technik com www rcp technik com Subject to technical changes Downloaded from www Manualslib com manuals sear...

Page 57: ...SPEED SDHC 4 GB SUPPORT QUICK START GUIDE GUIDE D UTILISATION RAPIDE KURZANLEITUNG GU A R PIDA DE INICIO GUIDA RAPIDA QuickStartGuide_8325 indd 1 uickStartGuide_8325 indd 1 20 03 2008 12 54 43 Uhr 20...

Page 58: ...QuickStartGuide_8325 indd 2 uickStartGuide_8325 indd 2 20 03 2008 12 54 46 Uhr 20 03 2008 12 54 46 Uhr Downloaded from www Manualslib com manuals search engine...

Page 59: ...CIO 16 GUIDA RAPIDA 20 RCP 8325 8 MEGA PIXELS ROLLEI 3X APOGON ZOOM 2 5 COLOUR LTPS LCD USB 2 0 FULL SPEED SDHC 4 GB SUPPORT QuickStartGuide_8325 indd 3 uickStartGuide_8325 indd 3 20 03 2008 12 54 46...

Page 60: ...Battery Cover The memory card slot is located beneath the battery cover adja cent to the battery compartment 19 Tripod Socket 1 Shutter Button 2 Flash 3 Power Button 4 Speaker 5 USB AV Terminal 6 Mic...

Page 61: ...ging the Mode You can record images and voices in the REC mode And using the PLAYBACK mode to replay delete or edit images on the LCD monitor Switching between REC mode and PLAYBACK mode In REC mode P...

Page 62: ...the SET button are used to make the desired settings REC menu Turn the power on and set the camera to the REC mode Open the REC menu Press the MENU button to display the menu Select an item Press e or...

Page 63: ...ct an item Press c or d to select a menu item and then press f or the SET button to launch the submenu Change the setting Press c or d to select an option and press e or the SET button to apply the se...

Page 64: ...uton 14 Bouton MENU 15 Boutons multifunction quadridirectionnel Bouton Flash Bouton Macro Bouton DISP SET 16 Bouton mode de cam ra 17 Bouton Effacer 1 Interrupteur d alimentation 2 Flash 3 D clencheur...

Page 65: ...Changer le mode Vous pouvez enregistrer des images et des voix dans le mode ENR Et utiliser le mode LECTURE pour relire supprimer ou diter les images sur le moniteur LCD Basculer entre le mode ENR et...

Page 66: ...bouton REGLER sont utilis s pour effectuer les r glages d sir s REC menu Mettez sous tension et r glez l appareil photo sur le mode ENR Ouvrez le menu ENR Appuyez sur le bouton MENU pour afficher le m...

Page 67: ...nt Appuyez sur c ou d pour s lectionner une option et appuyez sur f ou sur le bouton SET pour appliquer le r glage Changez le param tre Appuyez sur c ou d pour s lectionner une option et appuyez sur e...

Page 68: ...er Batterie fachabdeckung neben dem Batteriefach 19 Stativanschluss 9 LCD Anzeige 10 Betriebsleuchte 11 Zoom Taste 12 Schlaufe 13 Wiederabemodus Taste 14 MEN Taste 15 5 funkionstasten Blitz Makro Tast...

Page 69: ...Modus ndern Im Aufnahmemodus k nnen Sie Bilder und Sprache aufnehmen Im Wiedergabemodus Zwischen Aufnahmemodus und Wiedergabemodus umschalten Im Aufnahmemodus Dr cken Sie die Taste um in den Wiederga...

Page 70: ...der Vierwegschalter und der SET Taste vor Aufnahmemen Schalten Sie die Kamera ein und rufen Sie den Aufnahmemodus auf ffnen Sie das Aufnahmemen Dr cken Sie die Taste MENU um das Men aufzurufen W hlen...

Page 71: ...oder d um einen Men punkt auszuw hlen und dr cken Sie anschlie end die Taste f oder SET um das Untermen aufzurufen ndern Sie die Einstellung Dr cken Sie die Taste c oder d um eine Option auszuw hlen u...

Page 72: ...ucci n 14 Bot n MENU 15 Botones multifunction de 5 opciones Bot n Macro Bot n DISP SET Bot n Flash 16 Bot n de modo la c mara 17 Bot n Borrar 1 Bot n del obturador 2 Flash 3 Bot n de encendido 4 Altop...

Page 73: ...bater as Cambiar de modo En el modo GRABAR puede grabar im genes y voces Mediante el modo reproducir puede reproducir eliminar o editar im genes en el monitor LCD Cambiar entre el modo GRABAR y el mo...

Page 74: ...atro direcciones y el bot n SET para realizar los cambios deseados Men de Grabaci n Encienda la c mara y establezca el modo GRABAR Abra el men REC GRABAR Pulse el bot n MENU para mostrar el men Selecc...

Page 75: ...eccionar un elemento de men y despu s pulse el bot n SET para mostrar el submen Cambie la configuraci n Pulse c o d para seleccionar una opci n y despu s e o el bot n SET para aplicar las modificacion...

Page 76: ...e 14 Pulsante MENU 15 Tasto multifunzione 5 direzioni Pulsante Flash Pulsante Macro Pulsante SET DISP 16 Pulsante modalit fotocamera 17 Cancella 1 Pulsante otturatore 2 Flash 3 Pulsante di accensione...

Page 77: ...a modalit In modalit REC Registrazione si possono registrare immagini ed audio Con la modalit PLAY Esecuzione si possono riprodurre eliminare o modificare le immagini sul display LCD Commutazione tra...

Page 78: ...il tasto SET possono essere utilizzati per effettuare le impostazioni desidera te Menu Registra Accendere la fotocamera ed impostarla in modalit REC Registrazione Aprire il menu REC Registrazione Prem...

Page 79: ...zare il menu Setup Impostazioni Selezionare una voce Premere c o d per selezionare una voce del menu quindi premere f o il tasto SET per aprire il sottomenu Cambiare le impostazioni Premere c o d per...

Page 80: ...tline 49 0 6 31 3 42 84 49 welcome rcp technik com www rcp technik com Subject to technical changes QuickStartGuide_8325 indd 24 uickStartGuide_8325 indd 24 20 03 2008 12 55 09 Uhr 20 03 2008 12 55 09...

Reviews: