background image

EN-30

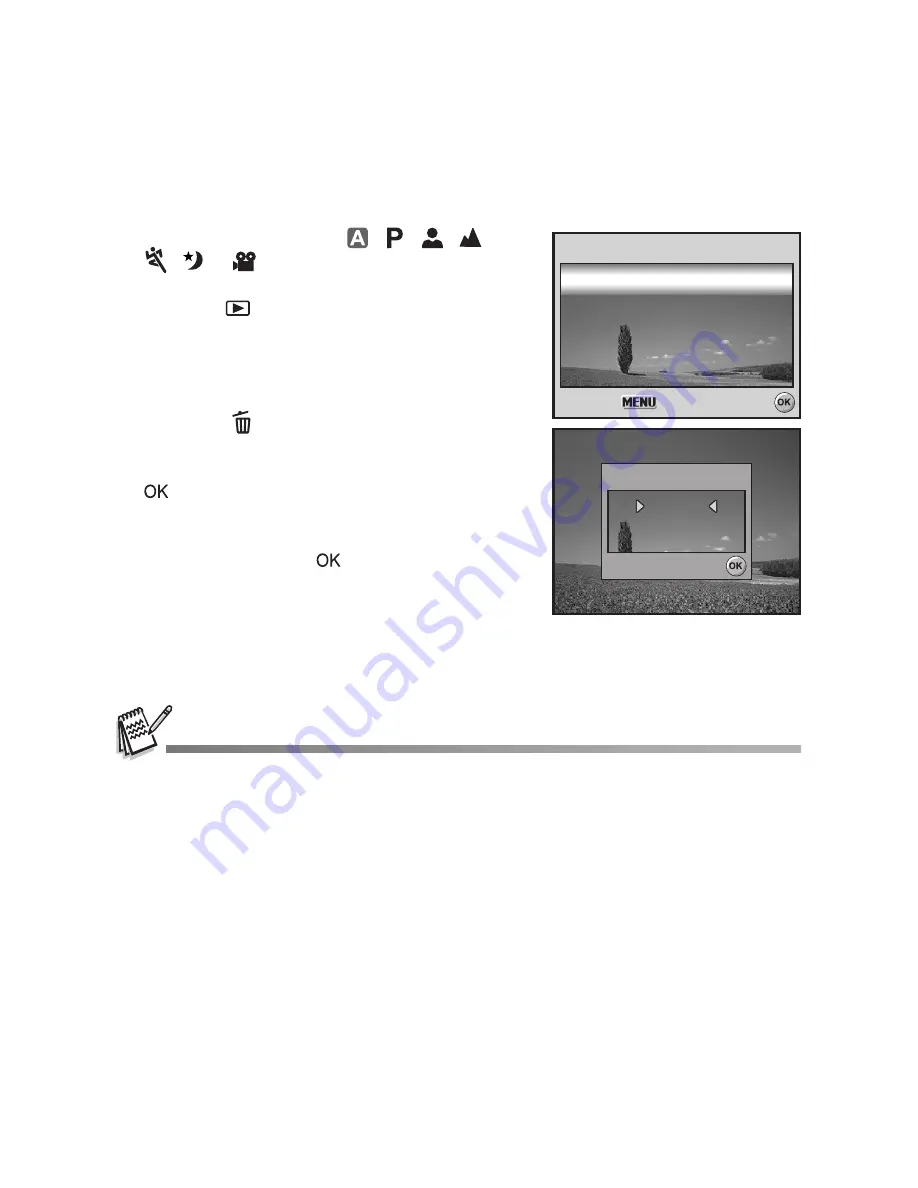
Deleting Images/Movie Clips

Use this function to delete one or all images/movie clips stored in  SD memory card or
the internal memory. Please note that the deleted images or movie clips cannot be
recovered. Exercise caution before deleting a file.

1. Rotate 

the 

mode 

dial 

to , , , ,

 or 

 and turn your camera on by

pressing the power switch.

2. Press the 


button.

„

The last recorded image/movie clip
appears on the LCD monitor screen. 

3. Use the four-way controller (

WX

) to select

the image/movie clip you want to delete. 

4. Press


the 

 button to delete.

5. Use the four-way controller (

ST

) to select

[This Image] or [All Images], then press the


button.

6. When the delete message appears, use

the four-way controller (

ST

) to select

[Yes], then press the 


button to confirm

the deletion.

„

If you wish to cancel the deletion, select
[No].

„

Protected images cannot be deleted with the delete function.

Delete

Delete

Select :

Select :

Select :

Cancel :

Cancel :

Cancel :

This Im

his Image

All Im

All Image

ges

Delete

This Image

All Images

Select :

Select :

Select :

This  image

This  image

No

No

Y

Yeess

No

Yes

This  image

Summary of Contents for RCP-7324

Page 1: ...lation If this equipment does cause harmful interference to radio or television reception which can be determined by turning the equipment off and on the user is encouraged to try to correct the inter...

Page 2: ...ith your camera may be different from those described in this manual This is due to the fact that different retailers often specify slightly different product inclusions and accessories to suit their...

Page 3: ...nal inspection ask the store of purchase Use the supplied AC adapter only with the indicated power supply voltage Use with any other power supply voltage might cause fire or electric shock Do not use...

Page 4: ...precision instrument Do not drop it strike it or use excessive force when handling the camera This might cause damage to the camera Do not use the camera in humid steamy smoky or dusty places This mi...

Page 5: ...that you fully charge the battery and discharge it for at least one complete cycle before use The batteries may feel warm after a long period of continuous use of the camera or the flash This is norm...

Page 6: ...BASICS 25 Viewing Images 26 Magnifying Images 26 Thumbnail Display 27 Slideshow Display 27 Resizing an Image 28 MOVIE MODE 28 Recording Movie Clips 28 Playing Back Movie Clips 29 PLAYBACK MODE ADVANC...

Page 7: ...conjunction with the 3x optical zoom permit zoom photography of up to 12x Package Contents Carefully unpack your kit box and ensure that you have the following items In the event that any item is mis...

Page 8: ...EN 8 GETTING TO KNOW YOUR CAMERA Front View 8 1 6 4 3 2 7 5 9 1 Shutter release button 2 Mode dial 3 Power switch 4 Flash 5 Self timer LED 6 PC AV terminal 7 DC input terminal 8 Lens 9 Microphone...

Page 9: ...button 3 MENU button 4 Arrow button Up Self timer button 5 Arrow button Right Focus button 6 OK OK button Display button 7 Strap holder 8 Arrow button Down Exposure compensation button 9 Playback butt...

Page 10: ...button all the way down to capture the image Mode Description 1 Program Select this mode to permit the ISO EV and White Balance to be set manually 2 Portrait Select this mode to make people stand out...

Page 11: ...imer 10 2 sec Self timer 4 Focus mode Standard Macro Infinity 5 Possible number of shots 6 Memory status Built in memory without card SD memory card 7 Battery and AC adapter Full battery power Medium...

Page 12: ...White balance 15 Image quality 16 Recorded pixels Movie Playback 1 Playback mode 2 Movie mode 3 Number of movie 4 Memory status 5 Battery power and AC adapter indicator 6 Index number of total number...

Page 13: ...d cover and make sure it is locked securely Be careful not to drop the batteries when opening or closing the battery cover Due to the characteristics of alkaline batteries camera performance may be le...

Page 14: ...iption Activity LED indicator Solid green The digital camera is on LED indicator Blinking red and green USB communication transfer in progress LED indicator Blinking red and green Charging the flash S...

Page 15: ...era on by pressing the power switch 2 Set up1 is displayed 3 Use the four way controller T to select Language then press the button 4 Use the four way controller ST to select the language you want 5 P...

Page 16: ...ing means preparing an SD memory card to record images this process is also called initialization This utility formats an SD memory card or the internal memory and erases all stored images and data 1...

Page 17: ...Auto Focus feature automatically focuses the image The focus frame turns green if the subject is in focus Proper exposure is determined and locked at the same time 4 Press the shutter release button...

Page 18: ...he power switch 2 Press the MENU button Mode1 is displayed In the mode Auto is displayed 3 Use the four way controller T to select Image Size then press the button 4 Use the four way controller ST to...

Page 19: ...ted after your camera reaches its maximum optical zoom factor 3x and the zoom bar is within the digital zoom area You can enlarge the subject to a maximum magnification equivalent to 12 times A useful...

Page 20: ...has four flash modes Auto Auto Red eye Flash on and Flash off The table below will help you to choose the appropriate flash mode Flash mode Description Auto The flash fires automatically according to...

Page 21: ...below will help you choose the appropriate focus mode Focus mode Description Standard Select Standard focus setting for most occasions when you want the camera to automatically determine the focus set...

Page 22: ...ode will be set to Flash Off automatically Auto Bracket In this mode the camera automatically changes the exposure within a set range to take three shots after you press the shutter release button onc...

Page 23: ...S or press the shutter release button halfway The table below will help you choose the appropriate self timer mode After one shot is taken the self timer mode is turned off If you wish to take anothe...

Page 24: ...lance This feature lets you make adjustments to compensate for different lighting types according to your shooting conditions 1 Rotate the mode dial to or 2 Press the power switch to turn on the power...

Page 25: ...o view the previous image press the four way controller W To view the next image press the four way controller X For protected images movie clips mark will be displayed Refer to the section in this ma...

Page 26: ...ns of the images press the four way controller STWX to adjust the display area The magnification factors range from 1 5X to 4X within 6 stages 1 5X 2 0X 2 5X 3 0X 3 5X and 4 0X Thumbnail Display This...

Page 27: ...e following sizes 2560 x 1920 pixel 1600 x 1200 pixel and 640 x 480 pixel 1 Press the button The last recorded image appears on the LCD monitor screen 2 In the mode use the four way controller WX to s...

Page 28: ...or screen However the sound recorded with movie clips can only be played back on a computer 1 Press the button 2 Use the four way controller WX to go through the images until the movie clip you want t...

Page 29: ...evices to be connected 1 Connect one end of the AV cable to the AV terminal of the digital camera 2 Connect the other end to the AV input socket of the TV set 3 Turn the TV and digital camera on 4 Pla...

Page 30: ...the four way controller WX to select the image movie clip you want to delete 4 Press the button to delete 5 Use the four way controller ST to select This Image or All Images then press the button 6 Wh...

Page 31: ...then press the button Protect One Protect one image movie Protect All Protect all images movies at once 5 Use the four way controller ST to select Lock then press the button to confirm Press the MENU...
Page 32: ...he four way controller WX to select the desired image you want to print 2 Press the MENU button Use the four way controller ST to select DPOF then press the button 3 Use the four way controller ST to...

Page 33: ...ore you perform the DPOF settings on your camera always remember to copy your images from the internal memory to an SD memory card first The print icon will appear on the LCD monitor screen indicating...

Page 34: ...to select PC then press the button 5 Turn off your camera 6 Connect your camera and the computer via the supplied USB cable 7 Turn your camera on by pressing the power switch 8 From the Windows deskto...

Page 35: ...and create fun photo projects Edit and enhance images browse your photo collection and express your creativity with stunning special effects and creative photo projects To install software 1 Insert th...

Page 36: ...ork or Internet connection Video conferencing or video editing software is not included with the digital camera This mode is not supported for Mac Step 1 Install the PC camera driver The PC camera dri...

Page 37: ...NetMeeting To use Windows NetMeeting for videoconferencing 1 Go to Start Programs Accessories Communications NetMeeting to launch the NetMeeting program 2 Click the Start Video button to view live vi...

Page 38: ...1600 x 1200 640x480 Quality Sets the quality compression at which the image is captured Refer to the section in this manual titled Setting Image Resolution and Quality for further details Fine Normal...

Page 39: ...d and the ISO figure is increased photography will become possible even in dark locations but the more pixelated grainier the image will appear Auto 64 100 200 400 Item Functional Description Metering...

Page 40: ...three different degrees of color Your images will demonstrate different impression by selecting different degrees of color This is called Saturation High Medium Low Date Imprint The date of recording...

Page 41: ...ress the four way controller ST to select the desired setting then press the button 5 To exit the movie menu press the MENU button Item Functional Description Color Refer to the Camera Menu s option i...

Page 42: ...ay for further details 3 Sec 5 Sec 10 Sec Protect Set the data to read only to prevent images from being erased by mistake Refer to the section in this manual titled Protecting Images Movie Clips for...

Page 43: ...details 2560 x 1920 1600 x 1200 640x480 Quality Change Changes the quality compression of a recorded image Compresses images and overwrites an old size images with a newly compressed image Only quali...

Page 44: ...Louder Soft Off Date Time This sets the date and the time Refer to the section in this manual titled Setting the Date and Time for further details d m y m d y y m d Language Sets the language that is...

Page 45: ...ic period of time the power to the camera is automatically turned off This feature is useful to reduce battery wear 2 Min 3 Min 5 Min Off Item Functional Description Reset Number Sets whether or not t...

Page 46: ...format JPEG Exif 2 2 DCF Motion JPEG AVI Lens F no Wide 2 8 Tele 4 8 Focal length 6 1mm 18 3mm equivalent to 36 108mm Focus range Normal 40 cm infinity Macro Wide 5cm infinity Tele 35cm infinity Flash...

Page 47: ...the shutter release button is pressed The camera is in the or mode Memory is full Rotate the mode dial to or Transfer the desired files to your computer and then delete unnecessary files or use a dif...

Page 48: ...ording time may vary depending on the shooting conditions and settings The frame rate is 30 fps frames per second Resolution Quality Internal Memory SD Memory Card 32 MB 64 MB 128 MB 256 MB 512 MB 1GB...

Page 49: ...rint Mode Lets you print the specified image with PictBridge Step Figure Procedure 1 Use the four way controller ST to select the Print mode then press the button 2 Use the four way controller WX to s...

Page 50: ...ting Step Figure Procedure 1 If you wish to print all the images stored in the camera you may choose Print All in Printing Mode Select 2 To set Print Settings follow steps 2 to 6 in Print Mode Step Fi...

Page 51: ...ch could otherwise arise due to inappropriate waste handling 2 In other Countries outside the EU If you wish to discard this product please contact your local authori ties and ask for the correct meth...

Reviews: