background image


33


Software Installation   

Installation Software/Hardware Driver 

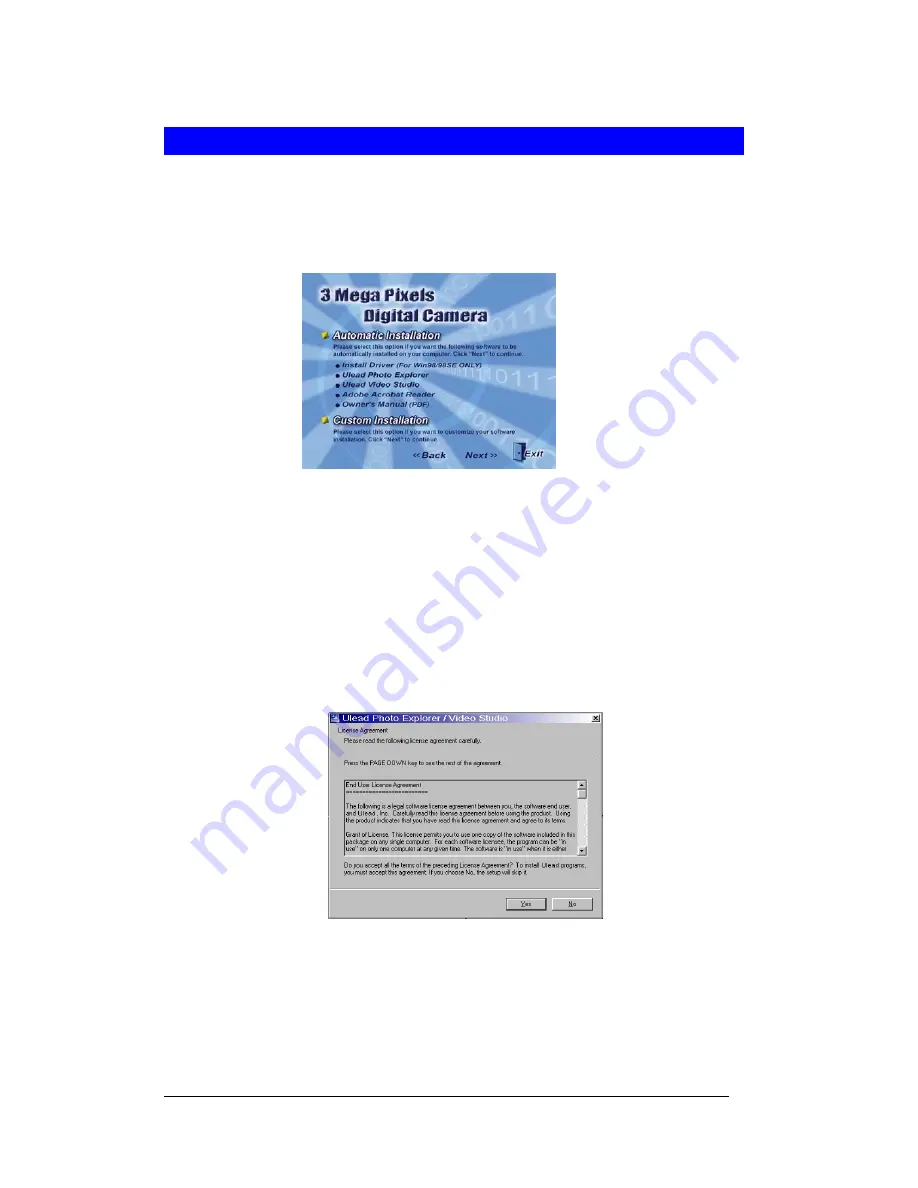
Insert the software CD into the CD-ROM drive. The CD should auto run and the installer menu will 

appear (see below). If the CD does not auto run; go to: Start 

  Run, and type in "D:\setup.exe" 

where D:\ is the CD-ROM drive 


Two installation options: 

Automatic Installation

 and 

Custom Installation

Automatic Installation

is 

recommended.. 

 
Automatic Installation 

The automatic installation will install all the software on the CD to the computer. When prompted 

to accept a license agreement with the third party software company at the beginning of the 

software installation, click “Yes” and continue the installation. 


Ulead License Agreement 


When prompted to restart the computer, save and close all running programs to prevent any loss 

of data, and then select “Yes, I want to restart my computer now.” and click “OK” to finish the 

software installation. After restarting the computer, the driver will automatically install Acrobat 

Reader program.

 (Note: Please keep the CD inside the CD-ROM drive after restarting the 

computer. Remove the CD after all applications are successfully installed.)


Summary of Contents for Prego da3

Page 1: ...Gebrauchsanleitung Instruction Manual Rollei Prego da3...

Page 2: ...dio frequency energy and if not installed and used in accordance with the instructions may cause harmful interference to radio communications However there is no guarantee that interference will not o...

Page 3: ...panies or product names are trademarks or registered trademarks of the respective companies Safety Handling Precautions Camera Information Do not take apart or attempt to service the camera yourself D...

Page 4: ...Low Alert 7 Setting the Language and Date Time 8 Setting Language 8 Setting Date Time 8 Capturing Still Images 9 Full Auto Mode 9 Portrait Mode 9 Landscape Mode 9 Close up Mode 9 Shooting with Scene...

Page 5: ...hite Balance 25 ISO Speed 25 Setting Auto Exposure AE Metering 26 Setting Sharpness 27 Setting Saturation 27 Setting DPOF Print 28 Setting DPOF for Printing a Single Image 28 Setting DPOF for Printing...

Page 6: ...Tripod AC adapter 3V 2 5 A center positive SD MMC card System Requirements For optimal use of this camera your computer should have the following minimum system requirements PC Pentium processor Micro...

Page 7: ...with a 3 Mega Pixels CCD image sensor and 3X optical zoom lens which allow you to quickly and easily take high quality digital pictures Top Front View 1 Shutter button 2 Mode Dial Switch 3 Power LED...

Page 8: ...ton 6 Zoom in button 7 Playback button 8 Strap eyelet 9 Up arrow Self timer button c 10 Right arrow button f 11 Menu OK button OK 12 Down arrow Burst button d 13 Left arrow LCD on off button e 14 Batt...

Page 9: ...h On Red eye deduction P 23 Saturation High no icon Medium Low P 27 ISO Speed Auto 100 200 400 P 27 Scene Mode Full Auto Portrait Landscape Close up Sport Night Landscape Night Portrait Museum Backlig...

Page 10: ...Steady Camera in error modes Card memory full Card corrupted Card protected O FF O FF SCENE SCENE Power LED Red Blinking Insufficient battery Off Self timer off Red Steady Video is recording Red Blin...

Page 11: ...all the way down to capture the image Up arrow c for menu selection Self timer On Off switch Down arrow d for menu selection Drive mode single and Burst shooting Left arrow e for review playback imag...

Page 12: ...eries according to the manufacturer s instructions Switching the Camera ON OFF 1 To switch ON turn Mode Dial from OFF to the desired shooting mode Use Full Auto mode if it s your first time to use Gre...

Page 13: ...Language 1 Press Up or Down arrow c d button to select the desired language 2 Press Menu OK button to setup Setting Date Time 1 Press Left arrow e and Right arrow f to select the Year Month and Date...

Page 14: ...Shutter button down fully to capture the image 5 The LCD Monitor will have a QuickView of the just captured image for about 3 seconds Shooting with Scene Modes In addition to Full Auto Portrait Lands...

Page 15: ...and at a lower shutter speed Tripod is recommended to use Backlight Mode Use this mode to take picture of subjects with strong backlight Note When taking silhouetted scenes please turn the Flash Off 1...

Page 16: ...ress Menu OK button to return 5 Press Up arrow c button to select EXIT MENU and press Menu OK button to return to LiveView mode The selected Scene mode icon is displayed at the center top of the LCD M...

Page 17: ...t cease to function during video mode 2 Frame the subject on the LCD Monitor 3 Press Shutter button to start video recording The message REC will display on the LCD Monitor Press the Shutter button to...

Page 18: ...ess Left arrow e button or Right arrow f button to select the image you want to add audio 3 Press Menu OK button Press Up arrow c or Down arrow d button to select the RECORD AUDIO Press Menu OK button...

Page 19: ...arow Self timer button c The Self timer screen will display on the LCD monitor for 3 seconds The Self timer icon will display on the LCD monitor 2 Press the Shutter button 3 Camera starts to countdow...

Page 20: ...mode Magnifying a Still Image The playback image can be magnified up to 6 times of its original size at an increment of 0 5 per step 1 Follow Step 1 2 of Playback a Still Image 2 Press Zoom In or Zoo...

Page 21: ...nu 5 Select Start and press Menu OK button The slideshow will start from the 1st image in the current memory location 6 The slideshow will stop after the last image is displayed if the Slideshow Loop...

Page 22: ...r Down arrow button to select VIDEO OUT 3 Press Menu OK 4 Set your video system format NTSC or PAL 5 Connect the provided AV cable to the camera and the TV Video IN terminal 6 Turn the TV on and set t...

Page 23: ...property information which includes filename image quality aperture value shutter speed and ISO speed 1 Turn On camera Press Playback button 2 Press Menu OK button to enter PICTURE INFO 3 Press Menu O...

Page 24: ...s Playback button 2 Press Menu OK button 3 Press the Up arrow or Down arrow button to select ROTATE 4 Press Right arrow f Left arrow e Down arrow or Up arrow button to rotate the image in 90 270 180 a...

Page 25: ...button 2 Press Left arrow e or Right arrow f to select the image to be deleted 3 Press DELETE button and a delete confirmation screen will pop out Press Down arrow d or Up arrow c to select Yes and p...

Page 26: ...low Step 1 2 of Deleting All Images 2 Select Format Internal or Format Memory if a memory card is installed 3 Press Menu OK button 4 Press Down arrow d or Up arrow c to select Yes and press Menu OK bu...

Page 27: ...h OFF the LCD monitor 2 To switch On the LCD press the Left arrow LCD on off button e again Setting LCD Always Off 1 Press Menu OK button 2 Select SETUP MENU by pressing Down arrow d or Up arrow c but...

Page 28: ...o capture the image with two shots when the Shutter button is pressed Single Frame Mode Only one shot is taken Burst Mode Two shots are taken when you press the Shutter button When Burst mode is set t...

Page 29: ...o select IMAGE QUALITY 3 Press Menu OK button to enter the submenu 4 Press Up arrow c or Down arrow d button to select 5 Press Menu OK button to apply the setting Setting Exposure Compensation 1 Press...

Page 30: ...p arrow c or Down arrow d button to select WHITE BALANCE 3 Press Menu OK button 4 Press Up arrow c or Down arrow d button to select the EXIT MEMU 5 Press Menu OK button to apply the setting ISO Speed...

Page 31: ...AE metering Average Center weighted and Sport metering 1 Press Menu OK button 2 Press Up arrow c or Down arrow d button to select the AE METERING 3 Press Menu OK button 4 Press Up arrow c or Down arr...

Page 32: ...SHARPNESS 3 Press Menu OK button 4 Select Sharpness level 5 Press Menu OK button to apply the setting Setting Saturation This camera provides 3 levels of image saturation High Medium and Low 1 Press...

Page 33: ...or Down arrow button to setup the copy quantity 7 Press Menu OK button to apply the DPOF setting Set DPOF for Printing Multiple Images 1 Follow Step 1 to 4 of Set DPOF for Printing a Single Image 2 H...

Page 34: ...ty Best EV Compensation 0 White Balance Auto ISO Speed Auto AE Metering Center Weighted Saturation Medium Sharpness Medium Slide Show Interval 5 Seconds Slide Show Loop Off Redefine Camera Setting Par...

Page 35: ...utton 2 Press to select SETUP MENU 3 Press Menu OK button 4 Select DIGITAL ZOOM 5 Press Menu OK button 6 Press Off to disable Digital Zoom and press Menu OK button to apply the settings To enable this...

Page 36: ...olume level of this camera can be set to High Low and Off 1 Press Menu OK button 2 Select SETUP MENU 3 Press Menu OK button 4 Select CAMERA SOUND 5 Press Menu OK button 6 Select the desired sound leve...

Page 37: ...inserted into the camera you may move the images from the internal memory into the card Note This feature is only function when the memory card is inserted 1 Press Menu OK button 2 Select SETUP MENU...

Page 38: ...re on the CD to the computer When prompted to accept a license agreement with the third party software company at the beginning of the software installation click Yes and continue the installation Ule...

Page 39: ...d com Downloading Transferring Files to Computer 1 Plug the small end of the USB cable to the USB AV port of your camera Plug the other end of the USB cable to the USB port of your computer 2 Set the...

Page 40: ...load Pictures via Ulead Photo Explorer Follow the instructions below to transfer your digital files using third party applications 1 Connect the camera to the computer 2 Power on the camera 3 Launch U...

Page 41: ...batteries LCD display The Card Requires Formatting Improper formatting of the memory card Re format the memory in the camera LCD display Card Full Memory card has no more space to store the picture b...

Page 42: ...0 200 400 Flash Auto On Off Red eye reduction Shooting mode Movie Full Auto Portrait Landscape Close up Preset Scene Preset Scene Sports Night Landscape Night Portrait Museum Backlight Tripod mount Ye...

Reviews: