background image


Notice originale : Français                                                                                                                                                    NT0002         V –p – 03/2014 

34 

7-


Servicing and maintenance 


In  order  to  execute  the  servicing  operations  in  good  conditions,  please  respect  the 
following safety rules: 


Block the wheels. 


Tighten the mechanic brake. 


Remove the vehicle from its loading. 


1.


Verifying of the braking system (every 6 months) 
 

a-


Parking and rupture brake 


Verify the good tension of parking/ rupture brake.  
 The parking brake lever should not be able to evolve in the last ¼ of its stroke.  If this is 
not the case, re-stretch the cable. 


Procedure for cable stretching : 


Put  the  lever  of  parking  brake  in  rest  position  and  be  sure  of  the  vehicle 
immobilization by blocking it in the front and in the back of the wheels. 


Unfasten the rope clamps from one side 


Re- stretch the cable 


Fasten again the rope clamps 


Do again a test 


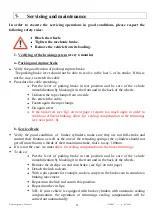
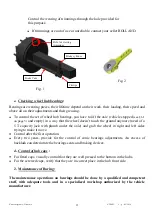
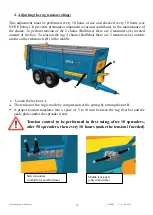
If  the  brake  rod  (see  fig1  on next  page  )  require  too  much  angle  in  order  to 
enable an efficient braking, allow for  sealing compensation in the trimmings 
(see next point : b) 


b-


Service Brake 


Verify  the  good  condition    of    brakes  cylinders,  make  sure  they  are  not  full-stroke  and 
control their fixation as well as the one of the retracting springs (the cylinders should not 
get off more than two thirds of their maximum stroke, that’s to say: 100mm  


If it is not the case, we must 

allow for sealing compensation in the brake trimmings. 


To do so : 


Put  the  lever  of  parking  brake  in  rest  position  and  be  sure  of  the  vehicle 
immobilization by blocking it in the front and in the back of the wheels. 


Remove the circlips  on end cam brake 


(see fig1 on next page) 


Detach the link rod cam. 


With a pin spanner for example, make a couple in the brake cam to simulate a 
braking movement. 


Reposition  the link rod cam in this position. 


Reposition the circlips. 


N.B: If your vehicle is equipped with brake cylinders with automatic sealing 
compensation,  the  operation  of  trimmings  sealing  compensation  will  be 
carried out automatically. 

Summary of Contents for ROLLFORCE

Page 1: ...of your spreader will depend on this as will your safety and that of others Keep this document in its entirety should you need to consult it in due course This must always be kept in the spreader eve...

Page 2: ...6 Adjustments 32 Jib 7 Servicing and Maintenance 34 Braking Systems Ro Ro Transport Cleaning Lubrication Regulation of Belt Tension Tracker Adjustments Maintenance Regulator and Hydraulic Power Statio...

Page 3: ...ation of the machine General Safety Regulations and Contingency Plan against Accidents 1 Definition of the vehicle s consignment before undertaking any actions on the machine switch off the engine rel...

Page 4: ...our workshops or those not manufactured by our distributers without our prior authorisation 2 where the original serial number has been falsified 3 where the factory assembled pieces produced by ROLL...

Page 5: ...also be fitted with a ROLLFAST hydraulic suspension rod These are mounted onto a chassis fitted with an adjustable spring or hydraulic jib Identification To know the features of your trailer please r...

Page 6: ...Rolland s vehicles come supplied with their official documentation and a label containing the EC conformity stamp These two documents verify that the two sets of regulations have been adhered to In ad...

Page 7: ...014 7 Sideways View ROLLFORCE ROLLMAX Front and rear view 1 Chassis 7 Ro Ro Transport 2 Front Deck 8 Spiked roller 3 Protective Hood 9 Hatch 4 Front Nose 10 Spreader Frame 2100Kg maxi 5 Jib 11 Spreade...

Page 8: ...03 2014 8 Technology and options available Demount Ring Jibs with 8 hole interfaces allowing for the mounting of several types of rings flat swivel spoon DIN Rollforce Jib Rollmax Jibs Swivel ring st...

Page 9: ...ROLLFORCE Undercarriage option on ROLLMAX 5420 6325 and7130 Offset pin bogie beam standard on ROLLMAX 5420 6325 and7130 Semi Tandem option on ROLLFORCE Rod Tandem option sur ROLLMAX Triple Axle stand...

Page 10: ...actor s coupling connectors 1 Base Forward drive belt solely Manual adjustment 110 Without display 111 With display 112 With display DPA 113 2 2 functions With display Without display 121 With display...

Page 11: ...tributor Opening or closing the hood trap as in the photo N B A collar is fitted as standard to prevent shifting to LS involuntarily causing risk of pump deterioration Rest on the knurled nut to perfo...

Page 12: ...233 Multiplicator Provides the impetus to turn at1000r min to spin the pump 3000 tr min 1 emptying per year or after every 200 hours usage Amount 0 32 litres max Viscosity Index 400 211 212 213 221 2...

Page 13: ...13 211 212 213 2 way distributor Allows for oil feed for shock absorbers and hatch functions 121 122 123 221 222 223 3 way distributor Allows for oil feed for tappet and hatch and tractor funnel funct...

Page 14: ...e belt Clearance is achieved through the tractor s distributor command box 112 212 On top of the basic functions it can invert the belt s direction give the order for the hatch 2 functions to be opene...

Page 15: ...auto pilots can be turned into axles when attached to a treadless tractor since the blocking cylinders of the axle lock have been preserved The advantage of this system is that heat doesn t need to e...

Page 16: ...ems Weighing information is shown on the jib or axle mounted sensors Weighing information is then caught on the weighing control box The data is then recorded in the box by client or plot of land work...

Page 17: ...go ahead and use the product as follows Press the ON OFF switch 1 to the ON position Characteristics Aluminium box Dimensions l 160mm L 110mm P 40mm IP 67 Protected against reverse polarity Beam base...

Page 18: ...et 2 After set up of first adjustment press on 1st press by touch 5 to change menu and save the set up The adjustable set ups are Normal Menu Operation A page which permits spreader speed reference co...

Page 19: ...ge indicating work time belt deployment time since it was last reset to at zero Resetting to zero can be done by pressing touch for this counter 4 Page indicating working time total belt operating tim...

Page 20: ...tow bar lowered and ring and tow pole married up Once in position raise the towing apparatus the ring will automatically find its own level Lockt he device in place Re introduce the hydraulic or mech...

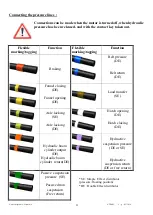
Page 21: ...tion Braking Belt pressure DE Belt return DE Funnel closing DE Funnel opening DE Load transfer SE Axle locking SE Axle locking DE Hatch opening DE Hatch closing DE Hydraulic boom cylinder output DE Hy...

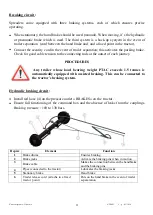
Page 22: ...ney PROCEDURES Any trailer whose load bearing weight PTAC exceeds 1 5 tonnes is automatically equipped with assisted braking This can be connected to the tractor s braking system Hydraulic braking cir...

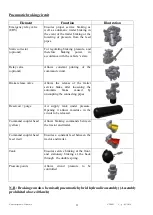
Page 23: ...ake release valve Allows the release of the trailer service brake after loosening the automatic brake caused by uncoupling the connecting pipes Reservoir purge Air supply tank under pressure Opening i...

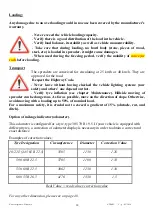
Page 24: ...t the time of first use it may prove necessary to adjust transmission length To do this Ensure the correct length of drive shaft tubing The tubes must not hit against the crossbeams during extreme tur...

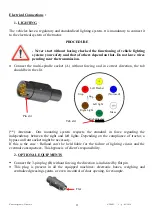
Page 25: ...A without forcing and in correct direction the tab should be in the slit Attention Our mounting system respects the standard in force regarding the independency between the right and left lights Depen...

Page 26: ...tractor the positions of clevis mountings may vary For one auto pilot axle For two auto pilot axles When the tractor is fully blocked check that there is approximately 20mm margin at the piston rods o...

Page 27: ...head for about 10 meters Make sure the handbrake of the tractor is pulled PROCEDURE Close the selector valve of the circuit Open the isolating valves of the different circuits Using the manual pump in...

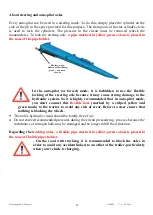
Page 28: ...le because it may cause strong damage to the hydraulic system So it is highly recommended that in auto pilot mode you don t connect this flexible hose marked by a striped yellow and green mark to the...

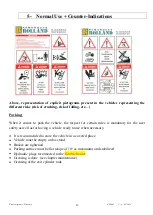
Page 29: ...rk the vehicle the respect for certain rules is mandatory for the user safety as well as for having a vehicle ready to use when necessary It is recommended to store the vehicle in a covered place Vehi...

Page 30: ...the vehicle lighting system your safety and others one depend on that Verify tyre inflation see chapter Maintenance Hillside moving of spreader can be dangerous As far as possible move on the directi...

Page 31: ...king the machine from the rear see page 32 To do this handling the use of Individual Protection Equipment is mandatory gloves glasses helmet Regulator can also be used in manual mode in case of breakd...

Page 32: ...with the vehicle empty Operate on horizontal and stable ground Make sure the parking brakes are tightened tractor and trailer Install the safety pin above the tractor coupling ring Put the machine in...

Page 33: ...front of chassis Lay down jib adjustment axle reference 280814 Position the jib in a way that spreader is horizontal when he is coupled to tractor The jib position will be adjusted into the nearest l...

Page 34: ...too much angle in order to enable an efficient braking allow for sealing compensation in the trimmings see next point b b Service Brake Verify the good condition of brakes cylinders make sure they are...

Page 35: ...ed of a 5 T capacity jack with plumb under the axle and grab the wheel in right and left sides trying to make it move Control after the first operation Every two years provide for the control of conic...

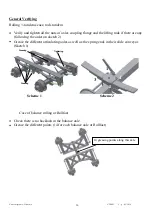
Page 36: ...ere are any following the order on sketch 2 Grease the different articulating axles as well as the spring ends in their slide conveyor Sketch 1 Greasing Greasing Tightening 1 2 3 4 Scheme 1 Scheme 2 C...

Page 37: ...h 50 hours Lubrication of rolling jib and bearings of the shaft 1 3 times year following utilization Lubrication of the scraper bearings on the right of TCE up on the vertical in the upper crankcase P...

Page 38: ...ll the interventions above the ground must be made with the appropriate means of access All interventions in the rear of the machine must be done with machine stopped power disconnected and using indi...

Page 39: ...side of the box To tension the rug 4 chains RollMax there are 2 tensioners A outside and two other tensioners B in the middle Loosen the lock nut A The tension of the rug is made by compression of the...

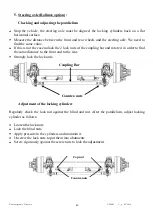
Page 40: ...case unlock the 2 lock nuts of the coupling bar and rotate it in order to find the same distance to the front and to the rear Strongly lock the lock nuts Coupling Bar Counter nuts Adjustment of the l...

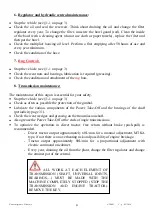
Page 41: ...ential for your safety Stop the vehicle see 1 1 on page 3 Check as often as possible the protection of the gimbal Lubricate the various components of the Power Take Off and the bearings of the shaft p...

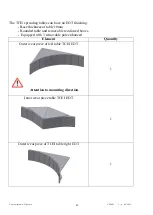
Page 42: ...ic duration of lifetime for these parts as they wear out faster or slower depending on the type of manure or as settings made by the user Element Quantity per scraper or per disk wearing pin disk 3 Sh...

Page 43: ...Base thickness of table 10mm Rounded table and removable reinforced boxes Equipped with 3 removable pale enhanced Element Quantity Outer wear piece of left table TCEI EDT 1 Inner wear piece table TCE...

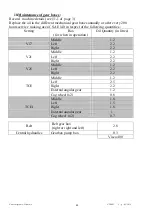
Page 44: ...spect of the following quantities Setting Box for when in operation Oil Quantity in litres V17 Middle 1 2 Left 2 2 Right 2 2 V21 Middle 1 2 Left 2 2 Right 2 2 V25 Middle 1 2 Left 2 2 Right 2 2 TCE Mid...

Page 45: ...ositioning Use only clean rims in a good state of repair and work on clean surfaces Use only appropriate tools for tyres and rims To facilitate assembly and disassembly lubricate the bases green and t...

Page 46: ...660 1623x662 1 76 650 65 R 34 Els Nokian 4 9400 1645x650 1 78 650 65 R 26 5 A380 Alliance 4 9110 1520x650 1 65 710 50 R 30 5 Michelin Cargo 4 8840 1495x728 1 62 Available tyre qualities for Rollmax Ty...

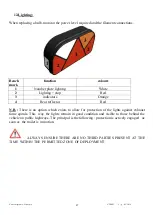
Page 47: ...ators Orange 4 Rear reflector Red N B There is an option which exists to allow for protection of the lights against exhaust fume spirals This way the lights remain in good condition and visible to tho...

Page 48: ...8 Assembly Flashing light assembly The flashing light can be fed by the pilot lights in certain cases it can be fed independently with the help of a 3 way contact If there is a pilot light feed connec...

Page 49: ...place to guarantee the absence of risk most notably with the chute PROCEDURE Having already grease coated them instal the rear piles Greasing makes assembly and disassembly easier since adjustments ar...

Page 50: ...Notice originale Fran ais NT0002 V p 03 2014 50 Assemble rear sockets and middle piles and then affix in place using the screws provided...

Page 51: ...Notice originale Fran ais NT0002 V p 03 2014 51 Assemble rear sockets having followed the piles in front and then secure them using the screws provided...

Page 52: ...sub assembly sections is stated on stickers supplied Unscrew and remove all framework support fasteners on the box Remove the framework using the overhead bridge crane and rest it on its supports Fix...

Page 53: ...tighten up the assembled set section By means of an overhead bridge crane a hoist or a loader put the box set in place with the crossbeam Attach to the cheeks with the screws supplied Finish by placi...

Page 54: ...ich are powered by hydraulic technology rather than by parabolic springs The system is governed by the tractor The user can correct the height of his tiller trailer in real time 2 OPERATING PRINCIPLES...

Page 55: ...dumper is loaded it can knock itself over and when going spreading the jacks can be deployed and no corrective action is possible This method of use is strongly advised against despite the potential b...

Page 56: ...ary Adjustment is made in such a way that there is an optimum maximum articulation of the load A jack stroke being at 200mm optimum articulatuion will be about 100mm The user cannot rectify the height...

Page 57: ...cient for example it is necessary to go ahead in the following manner Passive suspension block Attach the pipe marked by a spot to the tractor the long green one Open the two external block valves see...

Page 58: ...tractor pipe Only the short green vert court drain return pipe should remain connected RECOMMENDATIONS FOR USE The tube which serves to regulate the height of the hopper must only be connected in susp...

Page 59: ...at the beginning of each season Check for axle tightness or the axle fulcrum Twice a year or at the beginning of each season Grease points indicated in the handbook Check before each use Actions to b...

Page 60: ...Notice originale Fran ais NT0002 V p 03 2014 60 Maintenance Log Date Operation Remarks...

Page 61: ...ssier Name B atrice LE GALL Address Z A des Landes 29800 TREFLEVENEZ Through this document we declare that The machine Brand ROLLAND Commercial Designation Type Serial Number is in accordance with the...

Page 62: ...itions of use must be respected at all times where this isn t the case then the guarantee will be rendered invalid Movement and transport are not included in the guarantee Only fully purchased vehicle...

Page 63: ...ck your choice Compliance with delivery terms Good Average Bad Delivery quality First impressions of vehicle Start up quality Your decision was based on 3 possible choices on descending scale 1 3 1 be...

Reviews: