background image

5

USING
YOUR WATCH

ROLEX
SERVICE

THE HEART OF THE 
CELLINI MODELS

THE CLASSICAL WATCH  

ACCORDING TO ROLEX

Rolex is introducing the Cellini collection, 
a contemporary celebration of classicism 
and the eternal elegance of traditional 
timepieces. This collection of classically  
inspired models combines the best of  
Rolex know-how and its high standards  
of perfection with an approach that  
highlights watchmaking heritage in its 
most timeless form. 

Sober and refined lines, noble materials, 
quality finishings: every detail respects 
the codes of the art of watchmaking. 
The round case is a traditional 39 mm 
in diameter. The flared shape of the 

screw-down crown highlights its refined 
aesthetics. The dials, whose layouts are 
determined by the watches’ different 
functions, also bear witness to know-how 
and tradition.

The Cellini models are equipped with  
a self-winding mechanical movement, 
certified as a chronometer and entirely 
manufactured by Rolex.

In the purest traditional style, the Cellini 
models are fitted with a leather strap.

Summary of Contents for CELLINI

Page 1: ...T I M E D AT E D U A L T I M E M O O N P H A S E C E L L I N I ...

Page 2: ...cisely To wind the watch manually unscrew the winding crown completely then turn it several times clockwise Turning in the other direction has no effect A minimum of 25 turns is required for adequate partial winding The watch will then be wound automatically as long as it is worn on the wrist Carefully screw the crown back down against the case to ensure waterproofness ...

Page 3: ...ies of specific final controls by Rolex in its own laboratories in addition to the official COSC certification of its movement This unique testing of its chronometric precision waterproofness self winding and reliability pushes back the boundaries of performance and makes Rolex the benchmark for excellence in mechanical watches For further information please visit rolex com ...

Page 4: ...OVERVIEW OF THE CELLINI DATE 10 11 SETTING THE CELLINI DATE 12 15 OVERVIEW OF THE CELLINI DUAL TIME 16 17 SETTING THE CELLINI DUAL TIME 18 25 OVERVIEW OF THE CELLINI MOONPHASE 26 27 THE PHASES OF THE MOON 28 29 SETTING THE CELLINI MOONPHASE 30 41 ROLEX SERVICE CARING FOR YOUR ROLEX 42 43 AFTER SALES SERVICE 44 45 WORLDWIDE SERVICE NETWORK 46 ROLEX COM 47 ...

Page 5: ......

Page 6: ...ritage in its most timeless form Sober and refined lines noble materials quality finishings every detail respects the codes of the art of watchmaking The round case is a traditional 39 mm in diameter The flared shape of the screw down crown highlights its refined aesthetics The dials whose layouts are determined by the watches different functions also bear witness to know how and tradition The Cel...

Page 7: ...6 USING YOUR WATCH ROLEX SERVICE THE HEART OF THE CELLINI MODELS OVERVIEW CELLINI TIME Hour hand Minute hand Seconds hand Winding crown ...

Page 8: ......

Page 9: ...nual winding position 1 the crown is unscrewed To wind the watch manually turn the crown clockwise Turning in the other direction has no effect When setting the watch for the first time or if the watch has stopped complete a minimum of 25 turns for partial winding Setting the time position 2 the crown is unscrewed and pulled out to the first notch The seconds hand is stopped allowing you to set th...

Page 10: ... pull out To screw the crown back down against the case return it to position 1 and apply light pressure on it while screwing it down clockwise against the case After every use carefully screw the crown back down against the case to guarantee the waterproofness The crown should never be unscrewed under water ...

Page 11: ...10 USING YOUR WATCH ROLEX SERVICE THE HEART OF THE CELLINI MODELS OVERVIEW CELLINI DATE Hour hand Minute hand Seconds hand Date hand Winding crown ...

Page 12: ......

Page 13: ...e When the crown is in this position the Cellini Date is guaranteed waterproof to a depth of 50 metres 165 feet Manual winding position 1 the crown is unscrewed To wind the watch manually turn the crown clockwise Turning in the other direction has no effect When setting the watch for the first time or if the watch has stopped complete a minimum of 25 turns for partial winding ...

Page 14: ...s 14 15 C Set the date see pages 14 15 Unscrew and then pull out To screw the crown back down against the case return it to position 1 and apply light pressure on it while screwing it down clockwise against the case After every use carefully screw the crown back down against the case to guarantee the waterproofness The crown should never be unscrewed under water ...

Page 15: ... date changes every other time the hour hand passes 12 o clock During this oper ation the watch continues to function Setting the time position 3 the crown is unscrewed and pulled out to the second notch The seconds hand is stopped allowing you to set the time to the precise second To set the hour and minute turn the crown in either direction To avoid confusion between a m and p m hours move the h...

Page 16: ... the case return it to position 1 and apply light pressure on it while screwing it down clockwise against the case After every use carefully screw the crown back down against the case to guarantee the waterproofness The crown should never be unscrewed under water ...

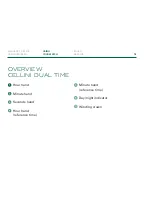
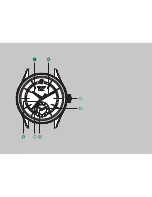
Page 17: ...NG YOUR WATCH ROLEX SERVICE THE HEART OF THE CELLINI MODELS OVERVIEW CELLINI DUAL TIME Hour hand Minute hand Seconds hand Hour hand reference time Minute hand reference time Day night indicator Winding crown ...

Page 18: ......

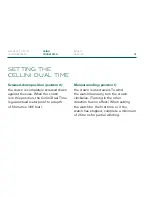
Page 19: ...e When the crown is in this position the Cellini DualTime is guaranteed waterproof to a depth of 50 metres 165 feet Manual winding position 1 the crown is unscrewed To wind the watch manually turn the crown clockwise Turning in the other direction has no effect When setting the watch for the first time or if the watch has stopped complete a minimum of 25 turns for partial winding ...

Page 20: ...Unscrew ...

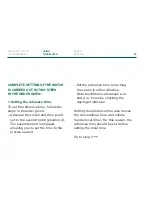
Page 21: ...d then pull it out to the second notch position 3 The seconds hand is stopped allowing you to set the time to the precise second Set the reference time by turning the crown in either direction Note the differ ence between a m and p m hours by checking the day night indicator Setting the reference time also moves the conventional hour and minute hands local time For this reason the reference time s...

Page 22: ...Unscrew and then pull out Reference time Geneva 10 10 a m ...

Page 23: ...iven Pull the crown out to the first notch position 2 Set the local time by turning the crown in either direction The hour hand moves in increments of one hour Push in and then screw down the crown The local time is identical to the reference time if the wearer is currently located in his reference zone It can be easily adjusted when travelling ...

Page 24: ...ew the crown back down against the case return it to position 1 and apply light pressure on it while screwing it down clockwise against the case After every use carefully screw the crown back down against the case to guarantee the waterproofness The crown should never be unscrewed under water ...

Page 25: ...follow the steps in the order given Unscrew the crown and then pull it out to the first notch position 2 Set the local time by turning the crown in either direction The hour hand moves in increments of one hour Push in and then screw down the crown The day night indicator is linked to the reference time and tells the wearer whether it is day or night in the reference time zone ...

Page 26: ...rew the crown back down against the case return it to position 1 and apply light pressure on it while screwing it down clockwise against the case After every use carefully screw the crown back down against the case to guarantee the waterproofness The crown should never be unscrewed under water ...

Page 27: ...ATCH ROLEX SERVICE THE HEART OF THE CELLINI MODELS OVERVIEW OF THE CELLINI MOONPHASE Hour hand Minute hand Seconds hand Date hand Moonphase indicator Moonphase correction pusher Moonphase correction tool Winding crown ...

Page 28: ...Screwed down position Manual winding Setting the date and the hour Setting the moonphase Setting the minute Full moon symbol New moon symbol ...

Page 29: ...FULL MOON WANING GIBBOUS LAST QUARTER WANING CRESCENT NEW MOON WAXING CRESCENT FIRST QUARTER WAXING GIBBOUS NORTHERN HEMISPHERE THE PHASES OF THE MOON ...

Page 30: ...FULL MOON WANING GIBBOUS LAST QUARTER WANING CRESCENT NEW MOON WAXING CRESCENT FIRST QUARTER WAXING GIBBOUS SOUTHERN HEMISPHERE THE PHASES OF THE MOON ...

Page 31: ...sition the Cellini Moonphase is guaranteed waterproof to a depth of 50 metres 165 feet Manual winding position 1 the crown is unscrewed To wind the watch manually turn the crown clockwise Turning in the other direction has no effect When setting the watch for the first time or if the watch has stopped complete a minimum of 25 turns for partial winding SETTING THE CELLINI MOONPHASE ...

Page 32: ... return it to position 1 and apply light pressure on it while screwing it down clockwise against the case After every use carefully screw the crown back down against the case to guarantee the waterproofness The crown should never be unscrewed under water ...

Page 33: ...orrection pusher as many times as necessary to align the full moon symbol as closely as possible with the moonphase indicator Unscrew the crown and then pull it out to the second notch position 3 Finely adjust the alignment of the full moon symbol and the moonphase indicator by turning the crown in either direction several turns may be required Bring the minute hand to 12 o clock by turning the cr...

Page 34: ...Unscrew and then pull out ...

Page 35: ...the moonphase correction pusher with the correction tool as many times as the number of days calculated in the previous step The moonphase is now set Example The current date is 28 March The last full moon was 12 March 16 days have passed since that full moon 28 12 The correction pusher must therefore be pressed 16 times In the event that the corrector is pushed an incorrect number of times start ...

Page 36: ...x 16 Unscrew and then pull out 12 13 14 15 16 17 18 19 20 21 22 23 24 25 26 27 28 16 days MARCH ...

Page 37: ... displayed The hour hand moves in increments of one hour and the date changes every other time the hour hand passes 12 o clock Example Referring back to the example in step 1 the date here is set to the 28th of the month Set the hour by turning the crown in either direction The hour hand moves in increments of one hour Note the difference between a m and p m hours the date changes as the hand pass...

Page 38: ......

Page 39: ...the crown in either direction The other functions hour date and moonphase are synchronized accordingly Push in and then screw down the crown If a previously correctly synchronized watch has stopped for no more than two days it is possible to adjust it simply by pulling out the crown to the second notch position 3 First adjust the date then the hour and then the minute by turning the crown clockwis...

Page 40: ... the case return it to position 1 and apply light pressure on it while screwing it down clockwise against the case After every use carefully screw the crown back down against the case to guarantee the waterproofness The crown should never be unscrewed under water ...

Page 41: ...crown and then pull it out to the first notch position 2 Set the local time by turning the crown in either direction The hour hand moves in increments of one hour Push in and then screw down the crown Adjusting local time desynchronizes the moonphase which is always indexed to reference time After the wearer returns from a trip the contrary adjustment resynchronizes the moonphase ...

Page 42: ... the case return it to position 1 and apply light pressure on it while screwing it down clockwise against the case After every use carefully screw the crown back down against the case to guarantee the waterproofness The crown should never be unscrewed under water ...

Page 43: ...ll require very little day to day care You can help preserve its lustre by cleaning it occasionally with a microfibre cloth You can also wash the case from time to time using soapy water and a soft brush Before cleaning your watch always ensure that the crown is screwed down properly against the case to guarantee waterproofness ...

Page 44: ...43 To keep the leather strap in good condition it is recommended that you protect it from water and humidity ...

Page 45: ...nd waterproofness Rolex recommends that you periodically return your watch to an Official Rolex Retailer or Service Centre for professional servicing When your watch is serviced by a Rolex watchmaker the watch is completely dismantled and all of its components are ultrasonically cleaned Each individual component is closely examined and those that no longer meet Rolex s functional and aesthetic spe...

Page 46: ...45 guarantee its waterproofness power reserve and precision After a complete Rolex service your watch is covered by a service guarantee ...

Page 47: ...expertise of highly skilled watchmakers carefully selected and trained by Rolex Official Rolex Retailers can advise you on all the technical aspects of your watch s functions Whether your bracelet needs sizing or it is time for a complete service highly qualified Rolex watchmakers are on hand worldwide to meet all of your service needs For a list of Official Rolex Retailers and Service Centres ple...

Page 48: ...X COM We invite you to visit rolex com a privileged place to learn more about the functions of your Rolex watch and about the quality know how and fundamental values of the brand Welcome to the world of Rolex ...

Page 49: ...olex reserves the right to modify the models illustrated in this publication at any time Rolex SA 3 5 7 rue François Dussaud 1211 Geneva 26 Switzerland 668 62 Eng 4 2017 Printed in Switzerland rolex com ...

Page 50: ......

Reviews: