background image

12

Getting Ready

Basic Operation

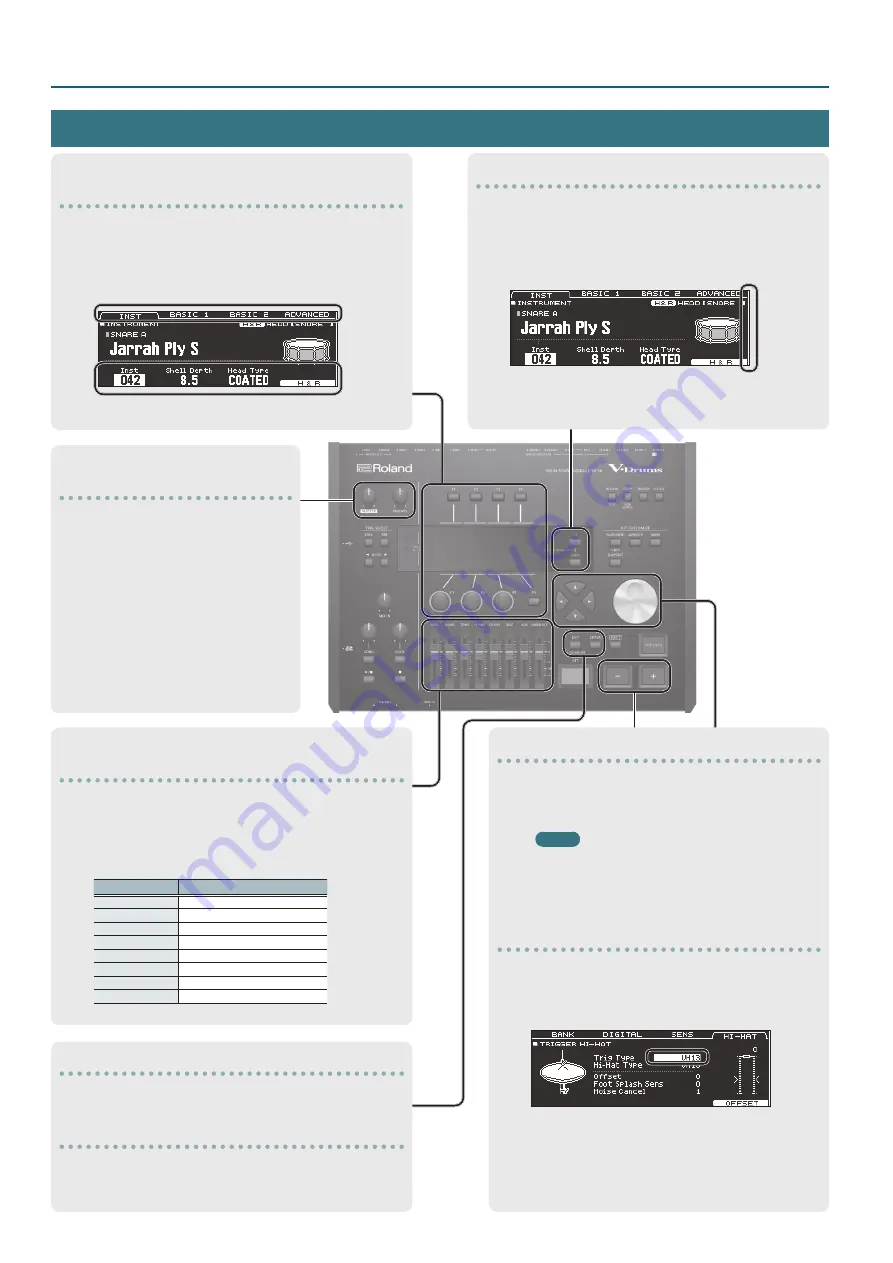
Switching tabs and specifying functions ([F1]–

[F5] buttons, [R1]–[R3] knobs)

You can use the [F1]–[F5] buttons to switch the tabs that are 

shown at the top of the display, or specify the functions that 

are shown at the top and bottom of the display.
You can also use the [R1]–[R3] knobs to change the values 

that are shown at the bottom of the display.

Switching pages (PAGE [UP] [DOWN] buttons)

Use the PAGE [UP] [DOWN] buttons to switch pages in the 

screen.
In screens where you can switch pages, the PAGE [UP] [DOWN] 

buttons are lit, and in the right side of the display there is an 

indication of which page you are in.

Adjusting the volume balance of each pad 

(faders)

Use the faders to adjust the volume balance of the entire 

TD-50.
By using the mixer (p. 22), you can adjust the volume balance 

of the pads in each kit. Mixer settings can be saved for each 

individual kit.
You can adjust the following trigger inputs and volumes.

Fader

Explanation

KICK

KICK

SNARE

SNARE

TOMS

TOM1–4

HI-HAT

HI-HAT

CRASH

CRASH1, 2

RIDE

RIDE

AUX

AUX1–4

AMBIENCE

AMBIENCE

Editing a value ([–] [+] buttons/dial)

To edit the value that’s highlighted by the cursor, use the 

dial or the [–] [+] buttons.
If you operate these while holding down the [SHIFT] 

button, the value changes more quickly.

MEMO

If you hold down the [+] button and press the [–] 

button, the value will increase rapidly. If you hold 

down the [–] button and press the [+] button, the 

value will decrease rapidly.

Moving the cursor (cursor buttons)

Cursor refers to the highlighted characters indicating an 

on screen parameter that can be set. When there is more 

than one possibility within the screen, use the cursor 

buttons to move it.

Returning to the previous screen ([EXIT] button)

When you want to return to the previous screen, press the 

[EXIT] button.

Confirming an operation ([ENTER] button)

Press this button to finalize a value or confirm an operation.

Adjusting the overall volume 

([MASTER] knob, [PHONES] knob)

Use the [MASTER] knob to adjust the 

volume that is output from the MASTER 

OUT jacks. Use the [PHONES] knob to 

adjust the headphone volume.

Summary of Contents for V-Drums TD-50

Page 1: ...Copyright 2016 ROLAND CORPORATION Reference Manual...

Page 2: ...of a Pad PREVIEW button 20 Adjusting the Mic Settings MIC POSITION 20 Adjusting the Attack and Release TRANSIENT 20 Layering Instruments SUB INSTRUMENT 21 Simulating the Ambience of a Performance Spa...

Page 3: ...Backup Data from an SD Card LOAD 39 Backing Up Drum Kit to an SD Card 1 KIT SAVE 40 Loading Kit Backup Data from an SD Card 1 KIT LOAD 40 Deleting Backup Data from an SD Card DELETE 1 KIT DELETE 41 Ch...

Page 4: ...instrument can reproduce the timbral changes caused by the depth of a drum shell and lets you apply mic settings or transient effects An audio file that you create on your computer can also be loaded...

Page 5: ...d performance settings Data from SD card or preset memory can also be loaded or copied into this area p 31 The following settings are saved in user memory 5 5 Drum kits p 4 5 5 Set lists p 33 5 5 Trig...

Page 6: ...the rim and the rim itself Hi Hat Playing method Explanation Open closed The hi hat tone changes smoothly and continuously from open to closed in response to how far the pedal is pressed You can also...

Page 7: ...nob Adjusts the volume of the song audio file This does not affect the sound of an internal song s drum performance nor the sound of a recorded drum performance SONG button Accesses the SONG screen Pr...

Page 8: ...l Front Pane A B C Computer SD card Headphones Audio player No Jack Explanation Page A USB COMPUTER port Use a USB cable to connect the TD 50 to your computer You can use DAW software to record your T...

Page 9: ...t kick and other pads here If connecting a dual trigger type pad use a stereo TRS cable K DIGITAL TRIGGER IN ports Connect pads that support digital connection e g PD 140DS or CY 18DR here G H I J K M...

Page 10: ...f the unit by pressing the L switch 1 Minimize the volume of the TD 50 and the connected devices 2 Turn off the power to the connected devices 3 Press the TD 50 s L switch The screen will indicate Ple...

Page 11: ...ton stops flashing and remains lit 8 Press the KIT button to return to the DRUM KIT screen Reference If you need make further adjustments to the parameters refer to Data List PDF Settings for theVH 11...

Page 12: ...volumes Fader Explanation KICK KICK SNARE SNARE TOMS TOM1 4 HI HAT HI HAT CRASH CRASH1 2 RIDE RIDE AUX AUX1 4 AMBIENCE AMBIENCE Editing a value buttons dial To edit the value that s highlighted by th...

Page 13: ...e the XSTICK icon is not shown in the screen Stopping All Currently Played Sounds ALL SOUND OFF Here s how to stop the currently playing drum performance sounds and user samples p 27 The effect reverb...

Page 14: ...dio file CLICK knob Adjust the volume of the click track p 15 This might be unavailable depending on the type of song Reference 5 5 By outputting an audio file from the SD card as a click track you ca...

Page 15: ...ultaneously with the song it s convenient when you want a desired click sound to play back along with the song To play back a click track you must prepare a song and a click audio file in WAV format M...

Page 16: ...8 16 Measures Specify the length measures of the interval for which the click will alternate between Sounding and Quiet Quiet Of the measures specified by Measures this setting specifies the length of...

Page 17: ...to select another recorded song and press the s button to play it 7 Press the s button to stop playback RecordingYour Performance Along with a Song You can record your performance along with a song Re...

Page 18: ...3 to specify the export settings only if exporting an audio file Parameter Explanation Export Gain By pressing the s button you can preview play the recorded data that is produced by the export While...

Page 19: ...obs to edit the value 5 Press the KIT button to return to the DRUM KIT screen MEMO You can copy the settings of an instrument p 31 Selecting an Instrument 1 Press the INSTRUMENT button 2 Press the PAG...

Page 20: ...a variety of sounds depending on the combination of the currently selected pad and instrument For example you could audition the sound of the snare head s outer circumference a shallow rim shot or the...

Page 21: ...rument B is added as a layer only if the strike is stronger than Fade Point FADE2 FADE3 Volume Playing Dynamics If the strike is stronger than Fade Point the sub instrument B is added as a layer accor...

Page 22: ...dit p 20 3 Edit the mixer settings 4 Press the KIT button to return to the DRUM KIT screen Specifying theVolume and Pan of Each Pad You can adjust the volume and pan stereo position for each pad 1 Pre...

Page 23: ...applied to the final stage of the master output The master comp and EQ effect is not applied to the DIRECT OUT jacks If the routing setting p 44 Master Out is set to DIRECT master compressor and mast...

Page 24: ...ely after selecting a drum kit or STOCK press the F2 or F3 button to select the drum kit settings to which you want to return If you want to continue with the current drum kit settings press the KIT b...

Page 25: ...knob Select lowercase characters R3 123 knob Select numerals F3 INSERT button Insert a space at the cursor location F4 DELETE button Delete the character at the cursor location 3 Press the F5 EXIT but...

Page 26: ...3 POS AREA button 1 Specifies the striking area for the head or rim F4 MUTE GRP button Mutes the sound of a specific pad when you strike the pad mute group 1 This supports the following trigger inputs...

Page 27: ...ed from an SD card into the TD 50 and played as instruments user sample function You can edit the sound of a user sample or apply effects to it in the same way as other instruments Audio files that ca...

Page 28: ...ign a user sample to a sub instrument Listing the User Samples Here s how to view a list of all user samples that have been imported You can audition the sound specify looping and edit the name 1 Hold...

Page 29: ...of the F1 RENUMBER F3 DELETE ALL buttons to select a function A confirmation message appears Example If you select RENUMBER If you decide to cancel select CANCEL and press the ENTER button Button Expl...

Page 30: ...value Parameter Value Explanation Driver Mode GENERIC Use the driver provided by the operating system Operation is limited to USB MIDI VENDOR Use the TD 50 s dedicated driver provided by Roland USB MI...

Page 31: ...s settings that you want to keep back them up to an SD card p 39 1 Hold down the SHIFT button and press the SD CARD button The COPY MENU screen appears 2 Use the PAGE UP DOWN buttons and the function...

Page 32: ...et memory Choose this if you want to return to the factory set kit settings User samples that are assigned to a factory set kit cannot be copied F3 SD CARD button Copies instruments from backup data s...

Page 33: ...TEP 2 STEP 1 Set list 1 STEP 32 STEP 2 STEP 1 Set list 2 STEP 32 STEP 2 STEP 1 Drum kit 7 Drum kit 13 Drum kit 23 Drum kit 1 Drum kit 14 Drum kit 5 Drum kit 3 Drum kit 8 Drum kit 11 Creating a Set Lis...

Page 34: ...the KIT button to return to the SET LIST screen Using Set Lists Selecting a set list 1 Press the SET LIST button to make it light The set list function turns on 2 Press the F1 K SET LIST button or F2...

Page 35: ...e of a trigger input that s assigned to a pad that supports a digital connection MEMO When you specify the trigger type the trigger parameters with the exception of certain parameters such as cross st...

Page 36: ...a maximum of 127 for pads that are connected to a TRIGGER IN jack or with a maximum of 127 32 when MIDI CONTROL HI Reso Velocity is ON for pads that support HI Reso Velocity and are digitally connect...

Page 37: ...t shows the force velocity with which each pad is struck how far the hi hat is open and the strike position on the snare ride cymbal toms and AUX MEMO Performance data received from the MIDI IN connec...

Page 38: ...t place pads in contact with each other 5 5 If attaching multiple pads to the same stand increase the distance between them 5 5 Firmly tighten the knobs that fasten the pad to ensure that the pad is...

Page 39: ...assign a name p 25 7 Press the F5 EXECUTE button A confirmation message appears If you decide to cancel select CANCEL and press the ENTER button 8 Select OK and press the ENTER button The backup data...

Page 40: ...rd can be loaded into the TD 50 1 Insert an SD card into the TD 50 p 8 2 Press the SD CARD button 3 Press the PAGE UP DOWN button to access page 2 SD CARD BACKUP 1KIT 4 Press the F2 1KIT LOAD button T...

Page 41: ...of settings that are saved on the SD card 1 Insert an SD card into the TD 50 p 8 2 Press the SD CARD button 3 Press the PAGE DOWN button to access page 3 SD CARD UTILITY 4 Press the F1 INFO button Th...

Page 42: ...creen press the F1 OUTPUT button 2 Use the PAGE UP DOWN buttons and the function buttons to select the audio output that you want to assign 1 page PAD OUTPUT F1 MASTER button Specify each pad s output...

Page 43: ...All Drum monitor DIRECT OUT 1 KICK PA external mixer DIRECT OUT 2 SNARE DIRECT OUT 3 HI HAT DIRECT OUT 4 RIDE DIRECT OUT 5 6 TOM 1 4 Stereo DIRECT OUT 7 8 CRASH 1 2 AUX 1 4 Stereo Example 2 Sending t...

Page 44: ...sound processed by the master compressor and master EQ 5 5 If you want the output of the MASTER OUT jacks to be output as direct output assign the output to MASTER DIRECT in the PAD OUTPUT screen DIR...

Page 45: ...F2 PAD CTRL button The PAD SWITCH CONTROL screen appears 3 Use cursor buttons to select a parameter and use the buttons or the dial to edit the value MEMO 5 5 If you don t want sound to be heard when...

Page 46: ...tton of the selected pad is blinking 3 Press the KIT button to return to the DRUM KIT screen Restoring the Factory Settings FACTORY RESET The Factory Reset operation returns all data and settings stor...

Page 47: ...ed SD Card is Locked The SD card is locked Unlock the SD card The file attribute is read only Clear the read only attribute of the file SD Card is not connected No SD card is in the SD card slot Inser...

Page 48: ...rt Trigger does not respond Is the trigger input set correctly After connecting the pad specify the trigger input that it will play p 9 Could you be using carbon or metal sticks Use wood or plastic st...

Page 49: ...T BALANCED jacks L R XLR type balanced DIRECT OUT BALANCED jack x 8 1 4 inch TRS phone type balanced PHONES jack x 2 Stereo 1 4 inch phone type Stereo miniature phone type MIX IN jack x 2 Stereo 1 4 i...

Reviews: