background image

47

Making Detailed Settings for Tones

You can make more detailed settings to the tones assigned to each of the layer.
In certain selected Tones, there may be parameters that cannot be changed.

1. 

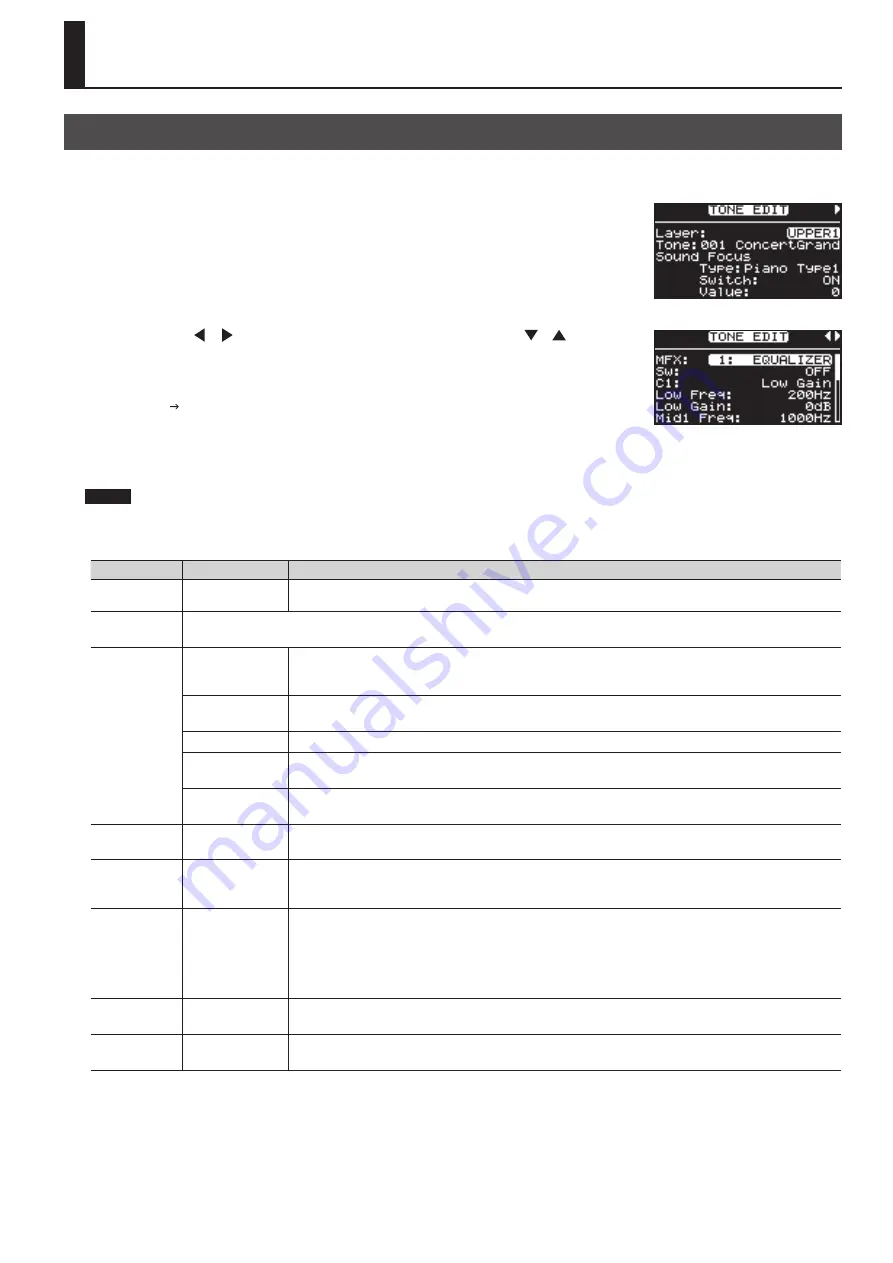
In the Live Set screen, press the [TONE EDIT] button .

The [TONE EDIT] button lit, and the TONE EDIT screen appears.

2. 

Press the Cursor [

] [

] buttons to switch screens, and press the Cursor [

] [

] buttons 

to move the cursor to the parameter to be set .

Move the cursor to one of the following menus and press the [ENTER] button, then select the parameter you 

want to set in the screen that follows.
Micro Tune Edit   “Finely Adjusting the Tuning” (p. 44)

3. 

Use the [DEC] [INC] buttons to edit the value .

4. 

When you finish making settings, press the [TONE EDIT] button, extinguishing its indicator .

You are returned to the Live Set screen.

NOTE

If you’ve selected a Piano tone, some items will not be available for editing. The value is shown as “- - -” for such items.

Tone parameter list

Parameter

Value

Description

Layer

UPPER1, UPPER2, 

LOWER

Choose the Layer for which you want to make settings.

Tone

When the layer to be set is selected, the name of the assigned tone appears.
You can select tone using the LIVE SET buttons.

Sound Focus 

Type

Piano Type1

Limits the volume change produced by variations in your playing touch, and also reduces the sense of stereo, allowing your 

sound to be more prominent in the band’s overall mix.
This parameter is effective only with respect to SuperNATURAL Piano.

Piano Type2

Reduces the sense of stereo.
This parameter is effective only with respect to SuperNATURAL Piano.

Sound Lift

Limits the volume change produced by variations in your playing touch.

Enhancer

Controls the harmonic content of the upper range, making your sound more prominent.

This setting has no effect with respect to SuperNATURAL Piano tones .

Mid Boost

Boosts the mid-range frequencies.

This setting has no effect with respect to SuperNATURAL Piano tones .

Sound Focus Sw

OFF, ON

Turns Sound Focus on/off. This setting will alternate each time you press the [SOUND FOCUS] button.
With some Tones, the effect does not work as intended.

Sound Focus 

Value

0–127

Adjusts the depth of the effect. To switch this setting, hold down the [SOUND FOCUS] button and use the [INC] [DEC] 

buttons.
With some Tones, the effect does not work as intended.

MFX

You can make settings for the multi-effect applied to a tone.
The multi-effects are general-purpose effects that modify the sound itself, and are able to completely transform the 

character of the sound. There are 78 types of effects, and you can choose the type that’s suitable for your purposes.
Some types consist of a single effect such as distortion or flanger, and other types combine effects in series or in parallel. 

Reverb and chorus are also provided as multi-effect types, and these are handled independently from the Reverb (p. 66) and 

Chorus (p. 66) effects described later.

Coarse Tune

-48–+48  

(+/- 4 octaves)

This sets the pitch of the tone.
Sets the sound’s pitch in semitone units.

Fine Tune

-50–+50  

(+/- 50 cents)

This sets the pitch of the tone.
Sets the sound’s pitch in units of one cent.

Making Tone Settings

Summary of Contents for RD-300NX

Page 1: ......

Page 2: ......

Page 3: ...e United States and or other countries 201a Before using this unit carefully read the sections entitled USING THE UNIT SAFELY p 4 and IMPORTANT NOTES p 6 These sections provide important information c...

Page 4: ...t should be used only with a stand KS G8 that is recommended by Roland 006 When using the unit with a stand KS G8 recommended by Roland the stand must be carefully placed so it is level and sure to re...

Page 5: ...cause the stand to overturn Please be mindful of any safety issues before using this product 102c Always grasp only the plug on the AC adaptor cord when plugging into or unplugging from an outlet or...

Page 6: ...f insecticides perfumes alcohol nail polish spray cans etc near the unit Swiftly wipe away any liquid that spills on the unit using a dry soft cloth Maintenance 401a For everyday cleaning wipe the uni...

Page 7: ...aterial musical works visual works broadcasts live performances etc belonging to a third party in part or in whole without the permission of the copyright owner is forbidden by law C 01 2 Do not use t...

Page 8: ...ve Sets You Like 40 Storing Settings to Live Sets 41 Making Detailed Settings for the ONE TOUCH Tones 42 Making Detailed Settings for the Piano Tones 42 Saving the Settings 42 Changing the Key Touch 4...

Page 9: ...p Live Set Files LIVE SET Load 69 Deleting a Live Set File LIVE SET Delete 69 Copying a Live Set File LIVE SET Copy 70 Deleting a Song SONG Delete 71 Copying a Song SONG Copy 71 Formatting Memory Form...

Page 10: ...4 COMPRESSOR Button Turns the compressor on off p 33 Adjusts the amount of compression p 33 SOUND FOCUS Button Turns Sound Focus on off p 34 Allows you to enhance the sound s definition p 34 4 CONTROL...

Page 11: ...screens for related parameters for the following functions by holding down this button while pressing buttons turning knobs or operating other controllers ENTER Button This is used to finalize a valu...

Page 12: ...et of headphones can be connected to this jack p 15 Even when headphones are connected sound will still be output from the OUTPUT jacks 18 Ground Terminal Depending on the circumstances of a particula...

Page 13: ...causing the instrument to fall or overturn and resulting in injury or damage For details on how to assemble the stand refer to the owner s manual that accompanied the stand Align the rubber pads of th...

Page 14: ...AC adaptor Power Cord AC Outlet Indicator AC Adaptor Place the AC adaptor so the side with the indicator see illustration faces upwards and the side with textual information faces downwards The indic...

Page 15: ...SB memory are not included Consult your Roland dealer if you need to purchase accessories such as these NOTE To prevent malfunction and or damage to speakers or other devices always turn down the volu...

Page 16: ...pedals as necessary NOTE Use Stereo headphones Use headphones made by Roland Using other headphones might not give you enough volume Use only the specified expression pedal EV 5 EV 7 sold separately...

Page 17: ...rief interval a few seconds after power up is required before the unit will operate normally Always make sure to have the volume level turned down before switching on power Even with the volume all th...

Page 18: ...Memory You can copy Live Set files and song files to separately sold USB memory for safekeeping You can also play back SMF music files that s saved on USB memory or play audio files from USB memory p...

Page 19: ...mly all the way into the connector Do not use excessive force 2 Switch on power to the connected CD drive 3 Switch on the RD 300NX s power NOTE Use a CD drive sold by Roland We cannot guarantee operat...

Page 20: ...emory Non rewritable memory Preset memory The data in preset memory cannot be rewritten If you ve edited data that was recalled from preset memory you can store it in rewritable memory user memory or...

Page 21: ...xternal MIDI sound generators with the RD 300NX in the same manner as with the Layer You can likewise control the external MIDI sound generator with the three parts UPPER 1 UPPER 2 and LOWER with this...

Page 22: ...this screen is displayed You can change Rhythm patterns Songs and the tempo p 36 p 37 You can also connect USB memory sold separately to the USB MEMORY connector and play SMF music files or audio file...

Page 23: ...Display Pages When arrow symbols and appear at the upper right of the display screen it indicates that there are additional pages in the directions shown by the arrows You can switch screens with the...

Page 24: ...eases it Purpose Panel operation To continuously change the value Hold down the DEC button or INC button To rapidly increase the value While holding down the INC button press the DEC button Conversely...

Page 25: ...and press the DUAL button The Demo screen appears 2 Use the Cursor buttons or the DEC INC buttons to select a demo song 3 Press the ENTER button or the TONE EDIT PLAY button to start playback of the d...

Page 26: ...reserve these settings store them to a Live Set p 41 2 Use the DEC INC buttons to select a variation MEMO By holding down a PIANO button or a E PIANO button for several seconds you can store the varia...

Page 27: ...light 2 Press any of the LIVE SET buttons to select the category The indicator of the selected LIVE SET button will light 3 Use the DEC INC buttons to select the tone Play the keyboard and you will h...

Page 28: ...dding the LOWER tone For details refer to Selecting the Layer that You want to Sound Layer Switch p 29 Playing DifferentTones inTwo Different Sections of the Keyboard Split Mode Such a division of the...

Page 29: ...ange Lower p 49 UPR Key Range Upper p 49 value also changes You can change the split point adjusting it in semitone increments by holding down the SPLIT button and pressing the DEC INC buttons You can...

Page 30: ...o select the tone category and then use the DEC INC buttons to select a tone Adjusting theVolume Level for Individual Layers With the RD 300NX each of the parts that is performed using the internal so...

Page 31: ...l be set to 0 For example to have E sound when you play C on the keyboard hold down the TRANSPOSE button and press the E4 key The degree of transposition then becomes 4 When you release the TRANSPOSE...

Page 32: ...yer setting LAYER EDIT REV Reverb Amount is at 0 there will be no effect even if you adjust the reverb depth p 49 Adding Breadth to the Sound CHORUS DELAY You can apply a chorus and delay effect to th...

Page 33: ...ing Liveliness to the Sound COMPRESSOR Switching on the Compressor suppresses differences in volume for a more consistent sound 2 2 1 1 Press the COMPRESSOR button getting its indicator to light Compr...

Page 34: ...NX is equipped with a three band equalizer You can use the EQUALIZER LOW knob MID knob and HIGH knob to adjust the level of each frequency range By holding down the EXIT SHIFT button and turning the c...

Page 35: ...the Buttons Panel Lock The panel lock function allows you to temporarily disable the buttons and knobs so that their settings will not be accidentally changed for example while you re on stage However...

Page 36: ...hmTempos 1 In the RHYTHM screen press the Cursor button to move the cursor to the tempo indication in the top line of the screen 2 Use the DEC INC buttons to change the tempo The Rhythm are played at...

Page 37: ...change the Live Set while song playback is stopped the tempo will be changed to the tempo that is stored in the Live Set Selecting the Song 1 In the SONG screen use the buttons to move the cursor to t...

Page 38: ...cation in the upper right of the screen If an audio file is selected the indication will be the playback time 2 Use the DEC INC buttons to change the value The playback position will change as shown b...

Page 39: ...the TONE EDIT button The TONE EDIT button will light and the TONE EDIT screen will appear The MFX parameters are shown if UPPER 1 is selected 3 Use the Cursor buttons to choose MFX 4 Use the Cursor bu...

Page 40: ...e Sets in each of the four banks to the Favorite Live Sets 1 In the Live Set screen recall the Live Set that you want to register 2 Hold down the BANK PRESET button and press the BANK USER button The...

Page 41: ...ng the name moves the cursor to the save destination Live Set number 6 Select the save destination Live Set number either by using the DEC INC buttons 7 When you have finished determining the save des...

Page 42: ...Sym Resonance 4 Write 5 Initialize 4 Use the DEC INC buttons to edit the value For details on the parameters refer to the Piano Parameters table p 43 5 When you finish making settings press the EXIT S...

Page 43: ...armonics Because no damper sound stopping mechanism is applied to the front or back sections of the string the resonating sounds linger even after the sound of the string stops when you release the pl...

Page 44: ...ty Keyfollow Sensitivity 63 63 This setting changes the touch sensitivity according to the key range being used As the value is increased the touch becomes heavier in the upper registers and lighter i...

Page 45: ...ns BYPASS no cut P Sft HPF BYPASS 16 15000 Hz Center frequency of filter used to cut the low frequency portions of the fluctuations BYPASS no cut P Sft to Rev 0 127 Amount by which the fluctuations ar...

Page 46: ...iano tone selected this setting may not be available Saving the Settings Here s how to save the One Touch E PIANO settings 1 Press the TONE EDIT button The TONE EDIT screen will appear 2 Use the Curso...

Page 47: ...ano Piano Type2 Reduces the sense of stereo This parameter is effective only with respect to SuperNATURAL Piano Sound Lift Limits the volume change produced by variations in your playing touch Enhance...

Page 48: ...ressed for a sound to reach full volume Higher values produce a milder attack lower values produce a sharper attack With some Tones the effect does not work as intended Release Time Offset This is the...

Page 49: ...enter REV Reverb Amount 0 127 This sets the depth of the reverb and chorus effects If this value is set to 0 there will be no effect even if you hold down the REVERB button or CHORUS button and operat...

Page 50: ...sregarded with certain tones V Reserve Voice Reserve 0 64 Specifies the number of voices that will be reserved for each layer if you attempt to play more than 128 voices Dp ON OFF Specifies whether th...

Page 51: ...a standard specification that allows musical data to be exchanged between electronic musical instruments and computers By using a MIDI cable to connect devices that have MIDI connectors you can creat...

Page 52: ...its name is shown in lowercase characters Selecting the MIDI Connector to Use for Output The RD 300NX provides a MIDI OUT connector and a USB MIDI connector For each layer you can select the MIDI OUT...

Page 53: ...lay the following screen NOTE When Rec Mode is set to ON in the Utility Rec Setting in Edit mode the MIDI screen as shown above is not displayed Set Rec Mode to OFF when setting the MIDI Transmit chan...

Page 54: ...77 2 Use the Cursor buttons to move the cursor and use the DEC INC buttons to set the MSB LSB and PC for each layer Pressing the DEC INC buttons simultaneously switches the settings value to OFF When...

Page 55: ...48 Setting the Key Range for Each Layer Key Range Set the keyboard range in which each Layer will sound This can be used to make notes in different areas of the keyboard play different Tones Specify t...

Page 56: ...for a clear cut sound COF CC74 Higher values brighten the sound lower values make the sound seem darker RES CC71 Higher value makes the special quality of the sound stronger lower value reduce these...

Page 57: ...H 05H OFF 0 127 Turning Each Controller On and Off These settings determine whether the external MIDI device is controlled ON or not OFF by the pedals connected to each PEDAL jack the slider the Modul...

Page 58: ...hat Can Be Set Menu Parameter Page 0 System Master Tune p 60 Master Volume p 60 Pedal Mode p 60 Tone Remain p 60 S1 S2 Mode p 60 LIVE SET Control Channel p 61 USB Driver p 61 USB Memory Mode p 61 Damp...

Page 59: ...stem functions 1 Press the MENU button getting the indicator to light The EDIT MENU screen appears 2 Press the Cursor button to select 0 System 3 Press the ENTER button to display the EDIT screen 4 Pr...

Page 60: ...ps up to 4 octaves higher 133 OCTAVE DOWN Each pedal press lowers the key range in octave steps up to 4 octaves lower 134 START STOP The external sequencer will start stop 135 TAP TEMPO The tempo will...

Page 61: ...e rotary effect between slow and fast 17 LIVE SET UP Switches the Live Sets in ascending order 18 LIVE SET DOWN Switches the Live Sets in descending order 19 PANEL LOCK Switches the Panel Lock p 35 on...

Page 62: ...ter Value Description Temperament EQUAL Equal Temperament This tuning divides an octave into 12 equal parts Every interval produces about the same amount of slight dissonance JUST MAJ Just Major This...

Page 63: ...the touch of an acoustic piano HEAVY This sets the keyboard to a heavy touch You have to finger the keyboard more forcefully than MEDIUM in order to play fortissimo ff so the keyboard touch feels heav...

Page 64: ...is increased the touch becomes heavier in the upper registers and lighter in the lower keys Specifying the Note off Keyboard Depth Key Off Position Parameter Value Description Key Off Position STND ST...

Page 65: ...t switches the rotary effect between slow and fast 142 SOUND FOCUS Adjusts the depth of the Sound Focus effect Assigning Functions to the S1 S2 Buttons S1 S2 Assign This setting determines the functio...

Page 66: ...d then changing only the necessary parameters Parameter Value Description Rev Type Reverb Type OFF No reverb is used REVERB Normal Reverb ROOM Simulates the reverberation of room interiors It produces...

Page 67: ...change the this parameter the Compressor parameters will be automatically adjusted to the optimal values You can make the settings easily by first setting the Compressor Type and then changing only th...

Page 68: ...B memory connected to the USB MEMORY connector on the rear panel 5 Press the Cursor buttons to move the cursor to the positions where the characters are to be input 6 Use the DEC INC buttons to enter...

Page 69: ...o settings p 42 p 46 Pedal assignment for when Pedal Mode is set to SYSTEM p 60 Compressor settings p 67 6 Use the Cursor buttons to select the file you want to call up then press the ENTER button The...

Page 70: ...or to light The EDIT MENU screen appears 2 Press the Cursor buttons to select 5 File then press the ENTER button The EDIT screen appears 3 Press the Cursor buttons to select 3 LIVE SET Copy then press...

Page 71: ...al memory to USB memory sold separately You can also copy a song file from USB memory to the RD 300NX s internal memory 1 Press the MENU button getting the indicator to light The EDIT MENU screen appe...

Page 72: ...icator to light The EDIT MENU screen appears 2 Press the Cursor buttons to select 5 File then press the ENTER button The EDIT screen appears 3 Press the Cursor buttons to select 6 Format then press th...

Page 73: ...po 10 500 MEMO The way Rhythm is played and the tempo display may differ with some Rhythm Patterns Adjusting theVolume Volume Adjusts the volume of the Rhythm Parameter Value Volume 0 127 Changing Pat...

Page 74: ...U button getting the indicator to light The EDIT MENU screen appears 2 Press the Cursor buttons to select 7 V LINK 3 Press the ENTER button to display the EDIT screen 4 Press the Cursor buttons to mov...

Page 75: ...FF ON When playing back audio data this causes sounds located in the center e g vocals or melodic instruments to be reduced in volume MIDI OUT Port ALL INT MIDI USB This sets the MIDI connector port f...

Page 76: ...is in progress no sounds are produced even when the keys are pressed In addition Rhythms being played are also stopped Factory Reset Current 4 Press the ENTER button A screen like the one shown below...

Page 77: ...n to select 8 Utility 3 Press the ENTER button to display the EDIT screen 4 Press the Cursor buttons to select 1 Rec Setting 5 Press the ENTER button and the following screen will appear Parameter Val...

Page 78: ...switch that connects and disconnects the MIDI connection between the keyboard controller section and the sound generator section p 20 is called the Local switch Since essential information describing...

Page 79: ...ure that the power to all devices has been turned off 2 After reading Connecting External Equipment to the RD 300NX p 15 connect an audio device system or headphones 3 Connect the external MIDI device...

Page 80: ...sure to turn the volume all the way down and turn off the power on all equipment before you make any connections Only MIDI data can be transmitted and received via USB A USB cable is not included If y...

Page 81: ...ant to use the standard USB driver that was included with your computer 6 Press the LAYER EDIT WRITE button 7 Turn the power off then on again Changing the USB Memory Setting In some cases when USB me...

Page 82: ...in Edit mode set the Local ON OFF to ON p 74 Are the effect settings correct Check following settings ON OFF settings for MFX Effect balance and level p 39 p 47 Could the volume have been lowered by M...

Page 83: ...me Key is Pressed Panned In some Tones the settings are such that sounds randomly play from the left or right side are panned each time the keys are pressed These settings cannot be changed Sound is D...

Page 84: ...d USB memory products If you are unable to read or write USB memory successfully change the USB Memory Mode setting p 61 Reverberation remains even if you defeat the Reverb effect The RD 300NX s piano...

Page 85: ...that the RD 300NX can play p 86 Error 16 Data could not be read fast enough for playback of the song Data was not called up in time for playback of the song You may be able to play the song after wait...

Page 86: ...overwrite change a filename Panel is Locked The panel is locked Press the EXIT SHIFT button to cancel Panel Lock p 35 Types of audio files that the RD 300NX can play WAV Sampling Frequency 44 1 kHz Bi...

Page 87: ...DISTORTION 37 VS OVRDRIVE 38 VS DIST 39 GTR AMP SIM 40 COMPRESSOR 41 LIMITER 42 GATE 43 DELAY 44 LONG DELAY 45 SERIAL DLY 46 MOD DELAY 47 3TP PAN DLY 48 4TP PAN DLY 49 MULTTAP DLY 50 REVERSE DLY 51 S...

Page 88: ...ern 200 patterns Controllers LAYER LEVEL slider x 3 EQUALIZER knobs Pitch Bend Modulation lever S1 S2 Buttons Assignable Display 128 x 64 dots graphic LCD with backlit Connectors OUTPUT Jacks L MONO R...

Page 89: ...yer 21 47 LAYER EDIT Button 11 LAYER LEVEL Slider 10 30 52 Layer Switch 29 52 Level 45 67 LF Damp Freq 45 Lid 43 45 Live Set 21 27 40 LIVE SET buttons 11 LIVE SET Copy 70 LIVE SETCtrl Ch 61 LIVE SET D...

Page 90: ...etic Resonance 44 System memory 20 System Settings 59 T Temperament 62 Temperament Key 62 Tempo 36 38 73 Temporary area 20 Threshold 67 Tone 21 47 TONE 49 Tone Character 43 TONE EDIT Button 11 Tone Re...

Page 91: ...n 0 System Temperament p 62 Transposing the entire keyboard TRANSPOSE button p 31 Changing the pitch for each Tone TONE EDIT button Coarse Tune p 47 TONE EDIT button Fine Tune p 47 Changing the pitch...

Page 92: ...Distribuidora De Instrumentos Musicales J E Olear y ESQ Manduvira Asuncion PARAGUAY TEL 595 21 492147 PERU Audionet Distribuciones Musicales SAC Juan Fanning 530 Lima PERU TEL 511 4461388 TRINIDAD AM...

Page 93: ...93 For EU Countries For China...

Page 94: ...re of the following measures Reorient or relocate the receiving antenna Increase the separation between the equipment and receiver Connect the equipment into an outlet on a circuit different from that...

Page 95: ......

Page 96: ...5 1 0 0 0 1 9 8 8 3 0 1...

Reviews: