Roland PRELUDE 2.0 Supplementary Manual Download Page 11

11

Creating a new Style

You can assign the following Tones to each style part.
Drums (ADrum): rhythm sets

Bass (ABass): tones other than rhythm sets

Accompaniment (Acc 1–6): any tone
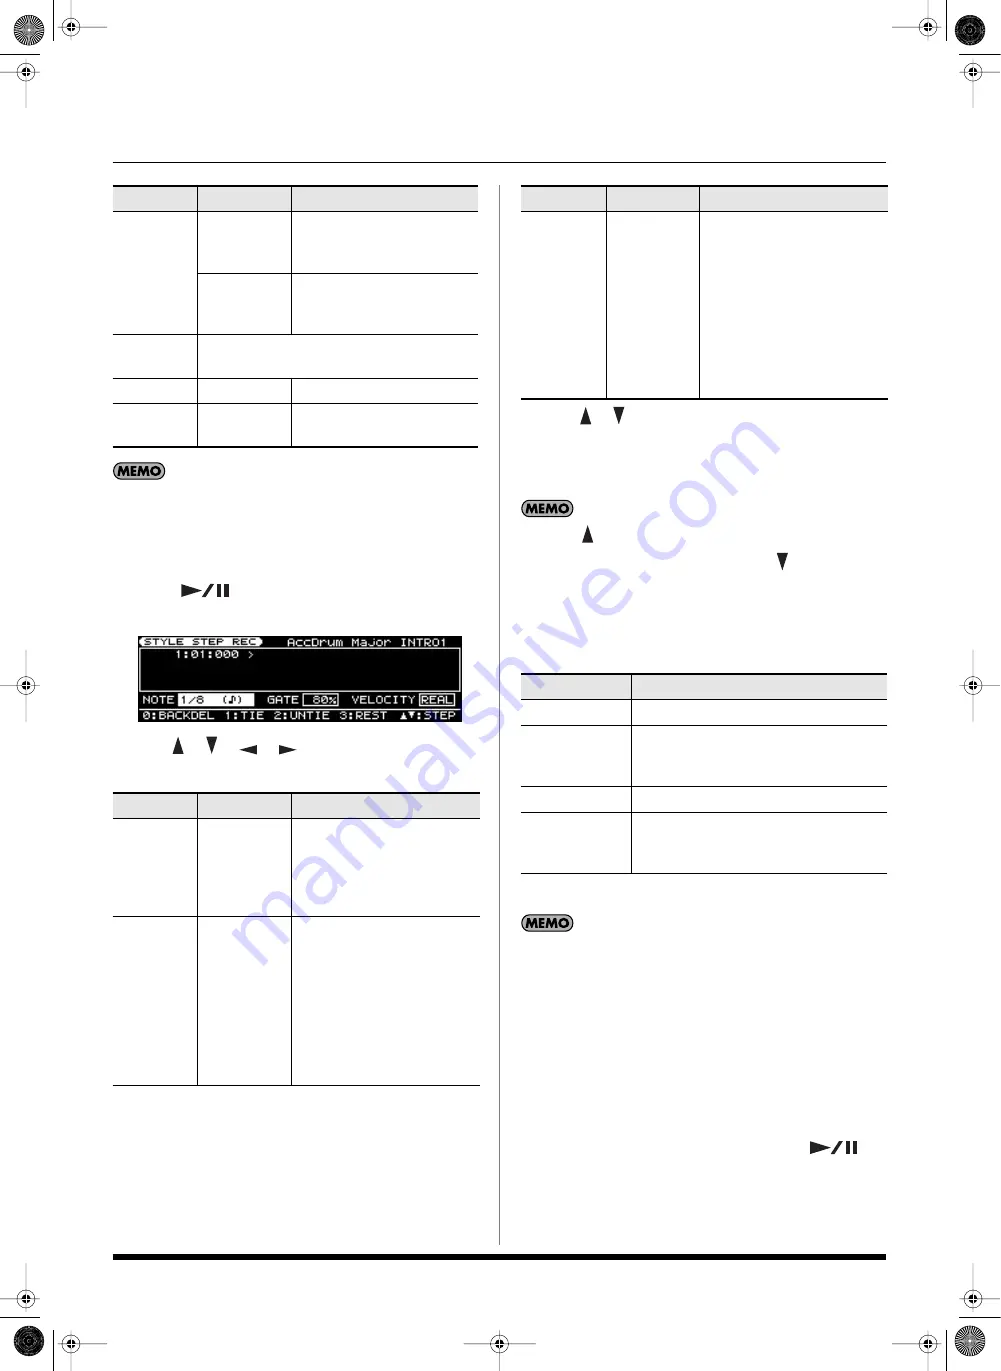
7. Press [

] to start recording.

The STYLE STEP REC screen will appear.

8. Use [

] [

] [

] [

] to select a parameter, and 

specify the note value that you want to input.

9. Use [

] [

] to move the input location (step), and press 

a key.

When you press a key, the input location will advance by 
the length of the NOTE setting.

Pressing [

] will move the input location back by the length 

of the current NOTE setting, and pressing [

] will move the 

input location forward by the length of the current NOTE 
setting.
You can use the [0]–[3] buttons to perform the following 
operations.

10. Repeat steps 7–9 to enter the desired notes.

Each parameter will retain the value you entered most 
recently, so if you want the same settings for the next note you 
input, there’s no need to change them. Once you’ve specified 
GATE and VELOCITY, there is usually no need to change these 
parameters until the end; simply specify the NOTE and the 
pitch (key).

Entering chords

Play the chord. The input location will advance to the next step 
when you release all of the keys.

11. When you’re finished step-recording, press [

].

If you want to keep the Style you just recorded, proceed 
as described in “Saving the Style you recorded” (p. 12).

Rec Mode

REPLACE

New material is recorded as 
previously recorded material 
is erased.

MIX

New notes are recorded on 
top of notes previously 
recorded.

Start

Specifies the location at which recording will 
start (MEAS: BEAT: TICK).

Key

C–B

Specifies the key to record.

Octave

-4–+4

Adjusts the notes during 
recording, in octave steps.

Parameter

Value

Explanation

NOTE

1/32–2/1

Specifies the length of the 
note to be input. 
The note value is indicated as 
the length from one note-on to 
the next note-on.

GATE

1–100%

Specifies the duration from 
note-on to note-off, as a 
percentage of the note value. 
Specify a shorter value if you 
want staccato, or a larger 
value if you want to create a 
tenuto or slur. 
Normally, this should be set 
to about “80%”.

Parameter

Value

Explanation

VELOCITY

REAL, 
1–127

Specifies the volume of the 
note to be input. 
Select “REAL” if you want the 
velocity to reflect the force 
with which you play the key. 
Otherwise, select the desired 
value: approximately 60 for 
“p” (piano), 90 for “mf” 
(mezzoforte), or 120 for “f” 
(forte).

Button

Explanation

[0] (BACK DEL)

Cancels the last-entered note.

[1] (TIE)

Enters a tie by extending the duration of 
the last-entered note by the current length 
setting.

[2] (UNTIE)

Cancels the last-entered tie.

[3] (REST)

Enters a rest. Set NOTE to the length of 
the rest that you want to enter, and then 
press [3] (REST).

Parameter

Value

Explanation

Prelude_OM_Ver2.book  Page 11  Wednesday, September 9, 2009  5:38 PM

Summary of Contents for PRELUDE 2.0

Page 1: ...s along with the Prelude Owner s Manual Version 2 Supplementary Manual Copyright 2009 ROLAND EUROPE All rights reserved No part of this publication may be reproduced in any form without the written pe...

Page 2: ...e length of each part Style Part Length 20 Specifying the time signature Time Signature 21 Editing a Style in more detail STYLE MICROSCOPE 21 Automatically generating Style data EZ CONVERT 23 Creating...

Page 3: ...addition to realtime recording which records your performance just as you play it version 2 0 provides step recording which lets you enter notes and rests one at a time You can select the recording me...

Page 4: ...anel 8 Follow the procedure described under Loading User Data Saved on USB Memory Import on page 48 in the owner s manual to import the desired songs Now you are ready to enjoy karaoke performances wi...

Page 5: ...he STYLE COMPOSER screen press ENTER to access the STYLE COMPOSER ZOOM screen In the STYLE COMPOSER ZOOM screen you can view the tone used by each part of the selected division 1 Tone This indicates t...

Page 6: ...yle effects Creating a new style You can initialize a new Style and then use realtime or step recording to create the performance data for each division The performance data you create can be edited u...

Page 7: ...edit the value STYLE MFX screen To access this screen press 2 from the STYLE COMPOSER screen or press from the STYLE MFX SETTING screen Changing the Style s sounds STYLE MAKEUP Parameter Value Explan...

Page 8: ...tinue with the save operation the new Style will be overwritten onto ROCK The new Style data will be saved with the name ROCK and the Style data that was previously in ROCK will be lost With the curso...

Page 9: ...o create a new Style from scratch initialize p 9 the Style and then proceed to step 4 If you want to record using an existing Style select the desired Style p 25 in the owner s manual 2 Press MENU so...

Page 10: ...EALTIME and STEP REC You can also switch between REALTIME and STEP REC by moving the cursor to REC TYPE and turning the VALUE dial 6 Use to select a parameter and turn the VALUE dial to change the val...

Page 11: ...proceed as described in Saving the Style you recorded p 12 Rec Mode REPLACE New material is recorded as previously recorded material is erased MIX New notes are recorded on top of notes previously re...

Page 12: ...all the characters you were inputting The Relation between Note Value Length and Gate Time The relation between the length of the note value and the gate time is shown below Since the Prelude s song r...

Page 13: ...dit the performance data recorded in each division 1 Select the Style that you want to edit p 25 in the owner s manual 2 Press MENU so the button is lit 3 Use to select Style Composer and press ENTER...

Page 14: ...the region to which Quantize is to be applied To MEAS BEAT TICK 0001 01 000 Specifies the end of the region to which Quantize is to be applied Resolution 1 4 1 8 1 8T 1 16 1 16T 1 32 1 32T 1 64 Speci...

Page 15: ...TION PANPOT EXPRESSION REVERB CHORUS PC PITCH BEND Specifies the type of data to be erased Note Range Min C Note Range Max value Specifies the lowest pitch to be erased This is available only if Data...

Page 16: ...ect ALL in the SOURCE settings this setting will be fixed at ALL and cannot be changed If you change the copy source Style this will change in tandem CHORD Maj min 7th Selects the chord If you change...

Page 17: ...xecuting this operation Inserting blank space Insert Parameter Value Explanation PART ADrum ABass Acc1 6 ALL Selects the Style part into which blank space is to be inserted CHORD Maj min 7th Selects t...

Page 18: ...whose velocity is to be modified Bias 99 99 Specifies the amount by which the velocity is to be modified Magnify 0 200 Allows you to make the velocity more uniform or to decrease or increase the dyna...

Page 19: ...d Note Range Max Note Range Min value G9 Specifies the highest pitch whose gate times are to be modified Replacing performance data Global Change Parameter Value Explanation PART ADrum ABass Acc1 6 AL...

Page 20: ...ion PART ADrum ABass Acc1 6 ALL Selects the Style part whose timing is to be shifted CHORD Maj min 7th Selects the chord DIVISION INT1 4 MAIN1 4 FILL1 4 END1 4 Selects the division From MEAS BEAT TICK...

Page 21: ...on velocity Pitch bend value 1 Select a Style p 25 in the owner s manual 2 Press MENU so the button is lit 3 Use to select Style Composer and press ENTER The STYLE COMPOSER screen will appear 4 Use t...

Page 22: ...nt to see 3 Press EXIT to close the View Select window Only the events for the performance data types that have a check mark will be shown 8 If you want to keep the changes you ve made to the Style pr...

Page 23: ...ns of the specified chord The Style data in the divisions of the specified DESTINATION chord will be overwritten If the selected SOURCE chord has divisions that don t contain performance data the corr...

Page 24: ...formance that you want to use p 36 in the owner s manual 2 Press SONG REC SONG REC will blink 3 Press to start recording 4 Perform 5 Press to stop recording When you stop recording the SONG TRACK scre...

Page 25: ...oadly speaking there are two ways to create a song Editing an existing song You can create a new song by changing an existing song s Tones adjusting the volume balance between parts or changing the ef...

Page 26: ...screen appears 3 Use to move the cursor to MFX and press ENTER The SONG MFX screen will appear 4 Use to select a page and use to select the parameter that you want to edit You can also access the SONG...

Page 27: ...not distinguished internally For example suppose that a song named SONG1 has been saved If you now record a different song assign it the name song1 and then attempt to save it SONG1 and song1 will be...

Page 28: ...ill be lost 1 If you want to create a new song initialize the song p 27 and then proceed to step 3 If you want to record using an existing song select the desired song p 29 in the owner s manual 2 Pre...

Page 29: ...ects the part to record TONE Selects a tone Rec Mode REPLACE New material is recorded as previously recorded material is erased MIX New notes are recorded on top of notes previously recorded Count In...

Page 30: ...o keep the song you ve recorded proceed as described in Saving the song you recorded p 31 Parameter Value Explanation PART 1 16 Selects the part to record TONE Selects a tone Rec Mode REPLACE New mate...

Page 31: ...ress EXIT you ll return to the previous screen without saving the song The Relation between Note Value Length and Gate Time The relation between the length of the note value and the gate time is shown...

Page 32: ...to edit p 29 in the owner s manual 2 Press PART VIEW so the button is lit The SONG TRACK screen will appear 3 In the SONG TRACK screen select EDIT and press ENTER The Song Edit Menu window will appear...

Page 33: ...1 64 Specifies the timing interval for quantization Strength 0 100 Specifies the amount of timing correction applied relative to the Resolution timing interval If you select 100 notes will be correct...

Page 34: ...rameter that you want to change and use the VALUE dial to make the desired settings Deleting an unwanted region Delete Parameter Value Explanation Part ALL 1 16 Selects the Song part from which data i...

Page 35: ...s 3 Select EXECUTE and then press ENTER It is not possible to restore the data to its original state after executing this operation Parameter Value Explanation DESTINATION settings Part 1 16 Selects t...

Page 36: ...C Note Range Max value Specifies the lowest pitch to be transposed Note Range Max Note Range Min value G9 Specifies the highest pitch to be transposed Modifying the note dynamics Change Velocity Para...

Page 37: ...AS BEAT TICK 0001 01 000 Specifies the end of the region whose gate times are to be modified Bias TICK 4800 4800 TICK Specifies the amount by which the gate times are to be modified in units of a tick...

Page 38: ...timing Shift Clock Parameter Value Explanation Part ALL 1 16 Selects the Song part whose timing is to be shifted From MEAS BEAT TICK 0001 01 000 Specifies the beginning of the region to be shifted To...

Page 39: ...dual MIDI events of the Song data You can individually edit the following items An event s position Controller number Note number Controller value Note gate time Program change number Note on velocity...

Page 40: ...ll be shown 6 If you want to keep the Song you ve edited proceed as described in Saving the song you recorded p 31 Button Explanation 0 CREATE Inserts a new event at the desired location When you pres...

Page 41: ...ve Edit window you can use the 0 2 buttons to perform the following operations Editing data that applies to the entire song SONG MASTER TRACK Button Explanation 0 CREATE Pressing 0 CREATE will open th...

Page 42: ...ng For this reason please do not edit any System Exclusive messages other than those listed in the MIDI Implementation The Prelude s MIDI Implementation can be downloaded from the Roland website 7 If...

Page 43: ...screen and use to select the parameter that you want to edit 4 Turn the VALUE dial to edit the value When you re finished making system settings press EXIT STYLE FINDER Function Explanation 0 NUMBER...

Page 44: ...gram changes will be transmitted when you switch between divisions of the Style Rx Style PC Rx Style PC Channel 1 16 Specifies the receive channel for program changes from an external device that will...

Page 45: ...en you re finished making system settings press EXIT The Chord Zone setting applies only to the keyboard of the Prelude itself If NTA is turned on chords will be detected using the entire range of not...

Page 46: ...Destination Style Full Recording is not possible because you have exceeded the maximum number of events that can be stored in a Style Use track edit operations such as Delete or Erase to remove unnee...

Page 47: ...unch In 29 Punch Out 29 Punch Sw 29 Q Quantize 14 33 R Realtime Recording Song 28 Style 9 Rec Mode 10 11 29 30 Rx NTA Channel 44 RX NTA Switch 44 S Saving Song 27 31 Style 8 12 Shift Clock 20 38 SOLO...

Page 48: ...R 602 00 0388 RES 735 09 Owner s Manual V2 E Prelude Prelude_OM_Ver2 book Page 48 Wednesday September 9 2009 5 38 PM...

Reviews: