background image

53

Menu List

Menu item

Value 

(Bold: default)

Explanation

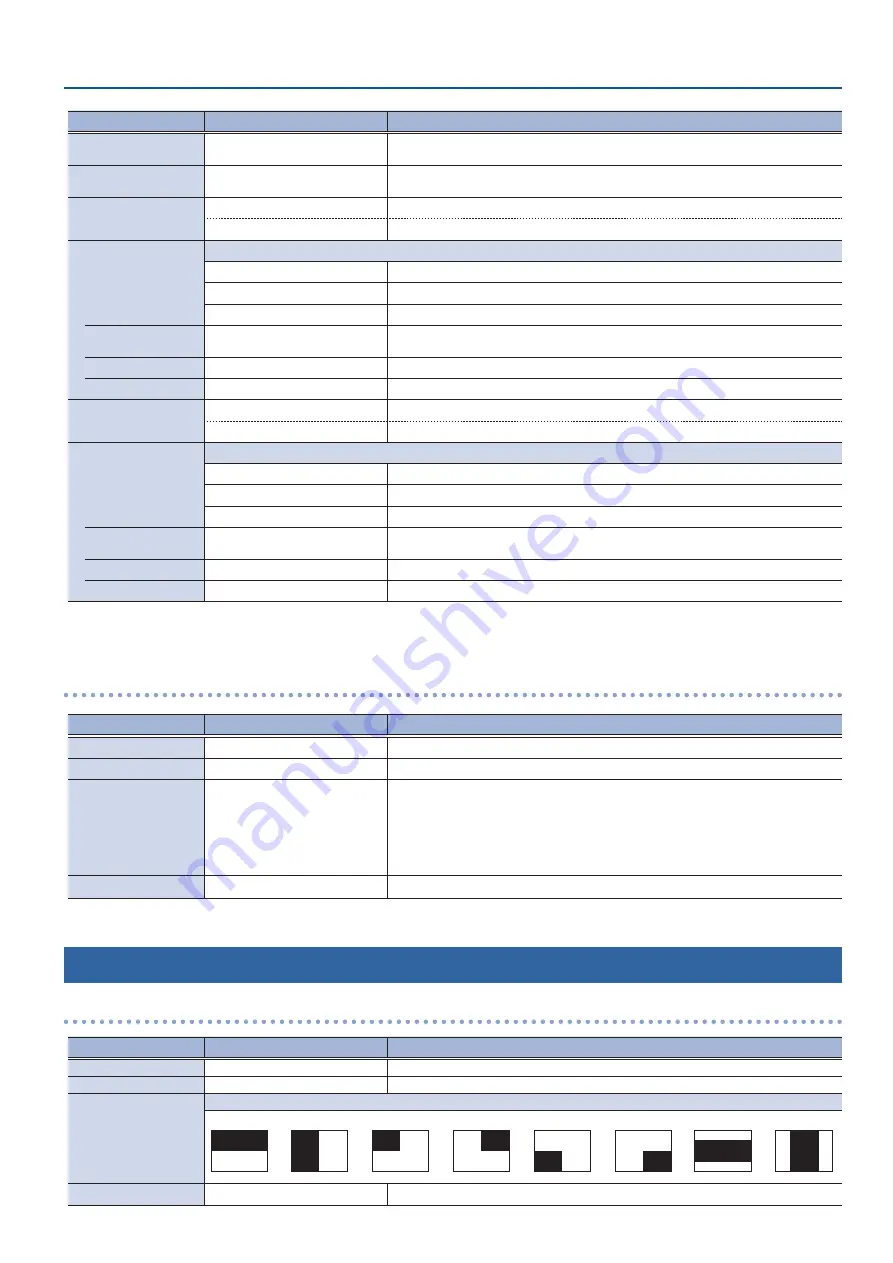
SHUTTLE Speed

x1, x2, x4, x8, x16, x32, 

x64

, x128 When in shuttle mode, this sets the speed factor (maximum value) when you turn 

the [JOG/SHUTTLE] dial.

[SHUTTLE] + Dial

x1, x2, x4, x8, x16, x32, x64, 

x128

When in shuttle mode, this sets the speed factor (maximum value) when you turn 

the [JOG/SHUTTLE] dial while holding down the [SHUTTLE] button.

Import LIVE Title

[ENTER]

Imports the title material (still image) from USB storage for the live in video.

(File name)

Displays the filename of the imported title material.

LIVE IN Title 

This sets the title shown on the live in video.
Off

The title is not shown.

LIVE

Displays the preinstalled still image (a text-based image that says “LIVE”).

Imported

Displays the imported title material.

Position

Left Top

, Right Top, Left Bottom, 

Right Bottom

Sets the title position.

Offset H (*1)

0

–200

Adjusts the horizontal position of the title.

Offset V (*1)

0

–200

Adjusts the vertical position of the title.

Import REPLAY Title

[ENTER]

Imports the title material (still image) from USB storage for the replay video.

(File name)

Displays the filename of the imported title material.

REPLAY Title 

Selects the title shown on the replay video.
Off

The title is not shown.

REPLAY

Displays the preinstalled still image (a text-based image that says “REPLAY”).

Imported

Displays the imported title material.

Position

Left Top, 

Right Top

, Left Bottom, 

Right Bottom

Sets the title position.

Offset H (*2)

0

–200

Adjusts the horizontal position of the title.

Offset V (*2)

0

–200

Adjusts the vertical position of the title.

(*1)  This can be set if LIVE IN Title is “Imported.”
(*2)  This can be set if REPLAY Title is “Imported.”

Project Utility

Menu item

Value 

(Bold: default)

Explanation

Open

[Exec]

Opens the project.

Delete

[Exec]

Deletes the project.

Export Rec Data (mp4)

[Enter]

Here’s how to convert video files in a project to MP4 (.mp4), and export this data to 

an SD card or to USB storage.
* The time range information for clips added to the clip list is simultaneously 

exported as an EDL file (.edl) and an FCPXML file (.fcpxml).

* Each exported file is saved to the “/P-20HD_Export” folder on your SD card or USB 

storage are shared.

Export Project

[Enter]

Archives a project and exports it to an SD card or to USB storage.

2: Transition

LIVE IN

Ë

REPLAY, REPLAY

Ë

LIVE IN

Menu item

Value 

(Bold: default)

Explanation

Time 

0.0–

1.0

–5.0sec 

Sets the transition effect time.

Type 

Mix

, Wipe 

Sets the transition effect type.

Wipe Pattern 

Selects the wipe pattern.

Horizontal

Vertical

Upper Left

Upper Right

Lower Left

Lower Right

H-Center

V-Center

Wipe Direction 

Normal

, Reverse 

Selects the wipe direction.

Summary of Contents for P-20HD

Page 1: ...e AUDIO IN Audio with the Audio from the Video 35 Annotation 36 Connecting a Pen Display Pen Tablet 36 Getting Ready to Use Annotation 37 Drawing on the Screen 38 Other Functions 39 Saving this Unit s...

Page 2: ...cooling vents If the cooling vents are blocked the internal temperature might rise causing the unit to malfunction Name Explanation MARKER section 12 LIVE IN button Switches between marker reference t...

Page 3: ...r speakers or related equipment AUDIO IN L R jacks Use these jacks for audio input Connect an audio mixer CD player or other audio equipment DC IN jack Connect the included AC adaptor to this jack Use...

Page 4: ...To prevent the batteries from running down remove the plugs from the jacks when you re not using the BOSS FS 6 MODE POLARITY switch FS 5U FS 6 FS 7 FS 5U x 2 Stereo 1 4 phone type 1 4 phone type x 2 C...

Page 5: ...ark appears when the SD card is locked 5 LIVE IN audio level meter Displays the audio levels for the LIVE IN bus p 32 6 Record icon and recording time indicator An icon showing the recording status an...

Page 6: ...e 13 Pad tab This tab shows the type of pad that s now selected The display changes according to the selection made using the pad switching buttons If the PALETTE button is lit the selected palette nu...

Page 7: ...d The clip now playing back is shown in yellow 29 Clip color indicator Shows the color label that s set for each clip 30 Clip number Shows the clip position 01 16 within the list 31 Thumbnail Shows a...

Page 8: ...rn the power on again About SD Cards You can t use the features of the P 20HD without inserting an SD card except for making menu settings Make sure to insert an SD card before you use this unit SD ca...

Page 9: ...ternal clock the first time you turn on this unit The date and time you set here is shown onscreen and is stored as data in the files you record NOTE The battery powered internal clock keeps operating...

Page 10: ...cording Data Audio Still Import Import REC Max 512 Clip List CLIP1 CLIP74 CLIP22 CLIP4 CLIP16 CLIP40 CLIP15 Max 64 Page 1 8 Page 1 64 Palette 1 8 CLIP26 Rec CLIP1 CLIP4 CLIP7 CLIP2 CLIP5 CLIP8 CLIP3 C...

Page 11: ...er or play back in continuous order in a playlist Eight palettes are available for each project Page Each type of clip is grouped into units of eight within the material storage area These units are r...

Page 12: ...200 60 Hz Audio input format HDMI Linear PCM 24 bits 48 kHz 2 ch Output formats Frame rate When set to 59 94 Hz When set to 50 Hz 1080 59 94p 1080 50p 1080 59 94i 1080 50i 720 59 94p 720 50p Audio out...

Page 13: ...3 Select the input format EDID and press the VALUE knob This switches the input format EDID 4 Press the MENU button to close the menu Setting the Output Format Here s how to specify the output format...

Page 14: ...video Frame Rate frame rate priority mode A recording and playback mode in which frame rate is given priority This is effective for video with rapid motion such as sporting events 6 Select Create and...

Page 15: ...ayback Speed Use the SPEED lever and the JOG SHUTTLE dial to advance through the frames of the video during playback or to change the playback speed MEMO You can also freely play back video data recor...

Page 16: ...utput from the OUTPUT MAIN connector OUTPUT REPLAY button The video of the REPLAY bus is output from the OUTPUT MAIN connector Using effects when switching videos mix wipe You can use effects such as...

Page 17: ...from the current position to a previous or following marker 1 Press the or button The playback position moves to the previous or the following marker MEMO When you press but there is no marker before...

Page 18: ...ton to move the current position to the location of the marker that you want to delete 2 Press the DELETE button The marker at the current position is deleted Markers can only be deleted when the DELE...

Page 19: ...n on the timeline and the button goes dark The time at which you press the MARKER IN button marks the start of the time range Specify the OUT point the end of the time range The MARKER OUT button ligh...

Page 20: ...LIP button is dark The IN OUT points for the clip may be little off compared to the times you specified depending on when you press the MAKE CLIP button MEMO If the MARKER LIVE IN button in step 1 is...

Page 21: ...IN and REPLAY automatically return to how they were prior to playback NOTE You can t use the SPEED lever or JOG SHUTTLE dial to change the playback speed with the lever jog or shuttle operations when...

Page 22: ...a clip to change its start position end position and length 1 On the CLIP LIST PALETTE screen select the clip to display the CLIP MENU screen 2 Use the button and the JOG SHUTTLE dial to move the rec...

Page 23: ...ist 1 On the CLIP LIST screen select the clip to display the CLIP MENU screen 2 Select Delete and press the VALUE knob 3 A dialog appears select OK and press the VALUE knob The clip is deleted and the...

Page 24: ...lect OK and press the VALUE knob The clip list is now initialized AddingTransition Effects You can add transition effects between clips when playing back a playlist 1 Press the MENU button select Play...

Page 25: ...one in which you just registered the clip MEMO The operation for playing back clips in the PALETTE screen is the same as with the CLIP LIST screen Selecting a Palette 1 Hold down the PALETTE button an...

Page 26: ...the IN point in order to create a thumbnail 1 Press the MENU button Pad select PALETTE and press the VALUE knob The menu screen for the selected palette appears 2 Select Create Thumbnails and press th...

Page 27: ...SB 3 0 port of this unit 2 Press the STILL button The STILL screen is shown 3 Turn the VALUE knob to move the cursor to the position of the still image clip to import 4 Press the VALUE knob The Still...

Page 28: ...lays back Direction Sets the direction of motion used when the still image plays back When In Transition is set to Fade no effect is applied Out Transition Sets the type of effect used when wiping the...

Page 29: ...ss a pad from 1 8 corresponding to the position of the audio clip you want to play back The audio clip plays back MEMO You can individually set the loop volume and so on from the menu in the AUDIO CLI...

Page 30: ...INPUT 1 and 2 connectors 1 Press the MENU button Video Input select LIVE IN 1 or LIVE IN 2 and press the VALUE knob 2 Select a menu item shown below and press the VALUE knob Menu Explanation LIVE IN...

Page 31: ...tween input video LIVE IN 1 LIVE IN 2 PinP SPLIT 1 Press the INPUT SELECT button Each time you press the button the video switches in this order LIVE IN 1 LIVE IN 2 PinP SPLIT LIVE IN 1 MEMO You can d...

Page 32: ...ume is not where it should be even after you ve adjusted the levels so that the level meters light up yellow try adjusting the volume on your speakers or amp Adjusting the levels using the OUTPUT LEVE...

Page 33: ...audio output 1 Press the MENU button Audio Output select Main Bus or Preview Bus and press the VALUE knob 2 Select the menu item of the effect and press the VALUE knob The effects that can be used de...

Page 34: ...or Preview Bus and press the VALUE knob 2 Select Mute and press the VALUE knob 3 Select On and press the VALUE knob 4 Press the MENU button to close the menu Switching Between Audio Output from Each...

Page 35: ...udio signal from the Live In video This lets you record narration at the same time as you record the video 1 Select AUDIO INPUT AUDIO IN Send To Live In Bus from the MENU button and press the VALUE kn...

Page 36: ...this unit you can draw on the video image while looking at it on the pen display and composite the image with what you draw Use the cable included with your pen display and connect the pen display to...

Page 37: ...reen that is output to the PREVIEW connector On The cursor is shown in the annotation screen that is output to the PREVIEW connector Auto The cursor is shown or hides depending on the type of pen tabl...

Page 38: ...s shown around the selected button You can set the pen and eraser thickness individually Draw 4 Draws using the pen Button Explanation Undo Redo 5 Reverts to the previous operation Undo The operations...

Page 39: ...a different filename 1 Press the MENU button SD Card USB Memory select Save Settings As and press the VALUE knob The Save Settings as screen appears 2 Select either Save to SD Card or Save to USB Mem...

Page 40: ...ed and the unit returns to the main screen Formatting an SD Card When using an SD card for the first time you must format it on the P 20HD NOTE The P 20HD does not recognize SD cards that were not for...

Page 41: ...ect a still image to import and then press the VALUE knob A confirmation message appears If you decide to cancel press the EXIT button 6 Select OK and press the VALUE knob The still image is imported...

Page 42: ...LUE knob 4 Select either Export to SD Card or Export to USB Memory depending on the media to which you want to export the data and press the VALUE knob A confirmation message appears 5 Select OK and p...

Page 43: ...g on the media to which you want to export the data and press the VALUE knob A confirmation message appears 5 Select OK and press the VALUE knob The project begins exporting When export is finished th...

Page 44: ...t again once the switch is in the off position Using a Footswitch You can use a footswitch connected to the CTL EXP 1 and 2 jacks to control the P 20HD with your foot You can assign various functions...

Page 45: ...p Calibration and press the VALUE knob 4 Following the onscreen instructions push down on the pedal with your heel and press the VALUE knob The minimum value min can be set to a position below the cen...

Page 46: ...anel lock off hold down the VALUE knob again and long press the MENU button for at least three seconds The message Lock Released appears and the panel lock is deactivated ReturningtotheFactorySettings...

Page 47: ...O button a CLIP LIST button c PALETTE button p PALETTE button pads 1 8 p 1 8 Pads 1 8 1 8 button Page Down Move to the first page Ctrl Page Down button Page Up Move to the last page Ctrl Page Up SPEED...

Page 48: ...how settings are made for the IP address subnet mask and default gateway Using DHCP The IP address and other information needed for connecting to the network is obtained automatically from the DHCP s...

Page 49: ...can use an FTP client to connect your computer to the P 20HD and perform the following file operations When using an FTP connection the contents of the P 20HD_Export folder on your SD card or USB stor...

Page 50: ...232 crossover cable to connect the P 20HD and the controller an RS 232 compatible computer or other device P 20HD Control device N C 1 1 RXD 2 2 RXD TXD 3 3 TXD DTR 4 4 GND 5 5 GND DSR 6 6 RTS 7 7 CT...

Page 51: ...appears 5 Use the VALUE knob to change the setting as shown below Menu item Setting Baudrate Use the same settings as the V 60HD Remote Control Switcher Target Model V 60HD Input Channel Ch5 or Ch6 s...

Page 52: ...ive for high definition video Frame Rate A recording and playback mode in which frame rate is given priority This is effective for video with rapid motion such as sporting events Project Settings Menu...

Page 53: ...The title is not shown REPLAY Displays the preinstalled still image a text based image that says REPLAY Imported Displays the imported title material Position Left Top Right Top Left Bottom Right Bott...

Page 54: ...es the settings for all still image clips AUDIO ENTER Configures the settings for all audio clips CLIP LIST ENTER Configures the settings for the clip list PALETTE current palette number ENTER Configu...

Page 55: ...that can be input to the P 20HD resolution color space color depth and audio information Based on the EDID data that the source device receives it outputs the most appropriate video format to the P 2...

Page 56: ...00 0 Adjusts the vertical position at which the inset screen video is shown View Zoom 100 0 1000 0 Adjusts the zoom of the inset screen video Border Color White Yellow Cyan Green Magenta Red Blue Blac...

Page 57: ...50i 720 59 94p 50p Sets the output format Output Assign only for PREVIEW OUTPUT Main Preview Replay Specifies the output bus that is assigned to the PREVIEW OUTPUT Color Space RGB 0 255 RGB 16 235 YPb...

Page 58: ...30 860 5000ms Adjusts the length of time until the audio is fully attenuated after the audio level falls below the threshold Compressor Off On Turns the compressor on off Effect Audio that exceeds the...

Page 59: ...VIEW connector If this is set to On the input audio is temporarily muted AUDIO PLAYER Menu item Value Bold default Explanation Level INF 80 0 0 0 10 0dB Adjusts the input volume Mute Off On Turns the...

Page 60: ...in the high band Mid Gain 15 0 0 0 15 0dB Boosts or attenuates the midrange band Mid Freq 20Hz 500Hz 20 0kHz Adjusts the center frequency when changing the volume in the midrange band Mid Q 0 5 1 0 16...

Page 61: ...ttings file saved on a SD card or USB storage back into this unit Save Settings ENTER Saves the settings of this unit by overwriting an existing file on an SD card or USB storage Save Settings As ENTE...

Page 62: ...P Plays back the clip AUTO PLAY PLAYLIST Plays back the playlist Add BOOKMARK Adds a bookmark Jump to Prev BOOKMARK Jumps to the previous bookmark Jump to Next BOOKMARK Jumps to the next bookmark Jump...

Page 63: ...ther information needed for connecting to the network is obtained automatically from the DHCP server of the LAN Manually This is to be configured manually IP Address 8 Specifies the IP address as appr...

Page 64: ...u REC Button Off On REC button AUDIO OUT Knob Off On AUDIO OUT knob INPUT OUTPUT Section Off On Controls shown below INPUT SELECT Button Off On INPUT SELECT button OUTPUT SELECT Buttons Off On OUTPUT...

Page 65: ...Managua Manaus Marigot Martinique Matamoros Mazatlan Menominee Merida Metlakatla Mexico_City Miquelon Moncton Monterrey Montevideo Montserrat Nassau New_York Nipigon Nome Noronha North_Dakota Beulah...

Page 66: ...r on your SD card or USB storage Ref Info ENTER Shows which the clip is assigned to the palettes PALETTE Menu item Value Bold default Explanation Name Give the clip a name In Position hour munutes sec...

Page 67: ...direction for wiping the displayed still image clip When Out Transition is set to Fade no effect is applied Swap with ENTER Swaps the position of still image clips Delete Exec Deletes a still image cl...

Page 68: ...lip and press the VALUE knob Removing the SD Card Hold down the EXIT button and press the MENU button Deleting a specified clip While the clip list palette is shown press the MARKER DELETE button whil...

Page 69: ...x4 4 x8 5 x16 6 x32 7 x64 8 x128 Change playback speed stxSPC a ACK a 0 100 Switch playback speed range stxSPR a ACK a 0 SPEED RANGE button is unlit 1 SPEED RANGE button is lit IN point settings stxM...

Page 70: ...0 dB 100 10 0 dB Get playlist containing currently selected clip stxQPS stxQPS a a 0 clip list 1 8 palettes 1 8 Get number of currently selected clip stxQCS stxQCS a a 1 512 for clip list 1 64 for pa...

Page 71: ...lected Check the OUTPUT buttons LIVE IN and REPLAY p 16 Video does not play back Is the SPEED lever in the correct position Check the position of the SPEED lever as well as the playback speed indicato...

Page 72: ...ugh storage space Delete any files you don t need or use a different SD card SD Card Error No SD card inserted An SD card has not been inserted Make sure that the SD card is inserted correctly SD Card...

Page 73: ...color uncompressed PNG File png 1920 x 1080 pixels 480 x 270 pixels for title image 24 bit color 8 bits alpha channel Up to 16 files can be stored in each project Recording mode Instant Replay Mode f...

Page 74: ...hes TFT Color LCD 480 x 272 dots Power Supply AC adaptor Current Draw 3 A Power Consumption 36 W Operation Temperature 0 to 40 degrees Celsius 32 to 104 degrees Fahrenheit Dimensions 265 W x 216 D x 8...

Page 75: ...LEVEL PREVIEW MUTE PREVIEW SEND MAIN METER MAIN LEVEL PREVIEW LEVEL MAIN MUTE PREVIEW MUTE OUTPUT BUS L R MAIN PREVIEW L R PHONES LEVEL PREVIEW MUTE PREVIEW SEND EQ LIMITER LIMITER HPF 75Hz EQ DELAY H...

Page 76: ...LEVEL PREVIEW MUTE PREVIEW SEND MAIN METER MAIN LEVEL PREVIEW LEVEL MAIN MUTE PREVIEW MUTE OUTPUT BUS L R MAIN PREVIEW L R PHONES LEVEL PREVIEW MUTE PREVIEW SEND EQ LIMITER LIMITER HPF 75Hz EQ DELAY H...

Reviews: