


4
Using the JX-8P Model Expansion
Installing the JX-8P Model Expansion
Saving Files to a USB Flash Drive
* When using a USB flash drive for the first time, you must format it
on the JUNO-X.
Ø
“Formatting a USB Flash Drive” (Startup Guide)
1 .
Connect the USB flash drive to your computer.
2 .
Save the file (EXM003_JX8P.exz) to the root directory
of the USB flash drive.
3 .
Disconnect the USB flash drive from your computer.
Installing on the JUNO-X
1 .
Insert the USB flash drive you prepared in “Saving
Files to a USB Flash Drive” into the JUNO-X.
2 .
Turn the power of the JUNO-X on while holding
down the [ENTER] (INIT) button.
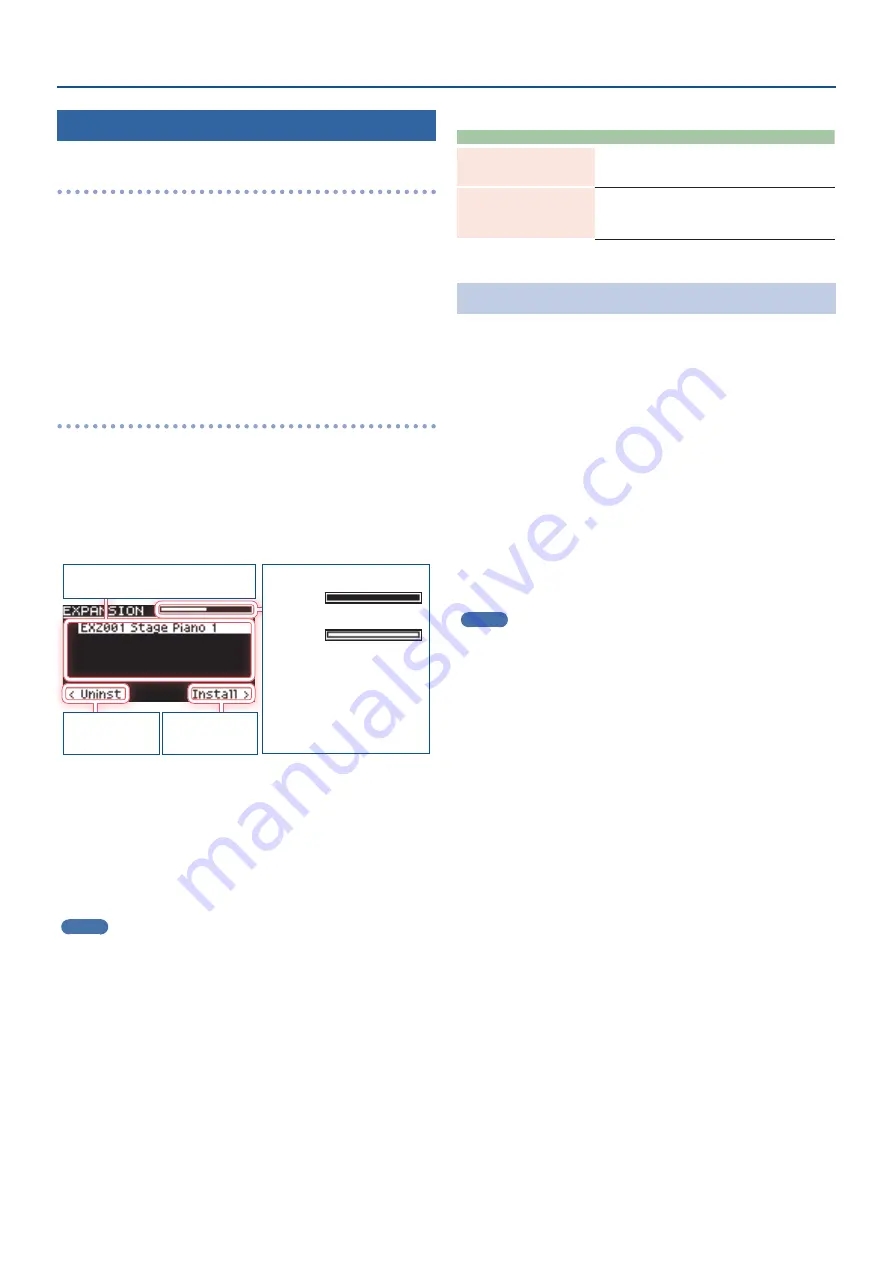
The EXPANSION top screen appears.
Memory used
EMPTY:
A new file can be installed.
FULL:
A new file cannot be installed.
You must free up some memory
for installation.
“Uninstalling a Model Expansion” (p. 4)
List of installed Model Expansions
Uninstall
([
Í
] button)
Install
([
Ë
] button)
3 .
Press the [
Ë
] button to go to the installation screen.
4 .
Use the [
Ç
SELECT
É
] knob to select “EXM003_JX8P”,
and press the [ENTER] (INIT) button or the [
Ë
]
button.
A confirmation message appears.
If you decide to cancel, press the [EXIT] button.
MEMO
The user license registration screen appears if you’re installing for
the first time.
To continue installing, use the [
Ë
] button to select “OK”, and then
press the [ENTER] (INIT) button.
5 .
To execute, use the [- VALUE +] knob to select “OK”,
and then press the [ENTER] (INIT) button.
6 .
Turn the power off, then on again.
This allows you to use the JX-8P Model Expansion.
Error Messages
Indication
Action
Expansion Memory Full!
There is not enough memory available for installation.
Follow the steps in “Uninstalling a Model Expansion” to
free up the memory.
Incorrect License! Please
Remove License
The JX-8P Model Expansion is currently linked to a
different user license.
Follow the steps in “Initializing Your User License”
(p. 5) to initialize the user license.
Uninstalling a Model Expansion
If there is not enough free memory, you can uninstall Model
Expansions that are already installed, and then install the JX-8P Model
Expansion.
1 .
Hold down the [ENTER] (INIT) button and turn the
JUNO-X on.
The EXPANSION top screen appears.
2 .
Use the [
Ç
SELECT
É
] knob to select the file to
uninstall, and then press the [
Í
] button to go to the
uninstallation screen.
A confirmation message appears.
If you decide to cancel, press the [EXIT] button.
3 .
To execute, use the [- VALUE +] knob to select “OK”,
and then press the [ENTER] (INIT) button.
MEMO
The uninstall process works the same even if you’ve installed the
Model Expansion with Roland Cloud Connect (WC-1).


