background image

4

Operating Guide

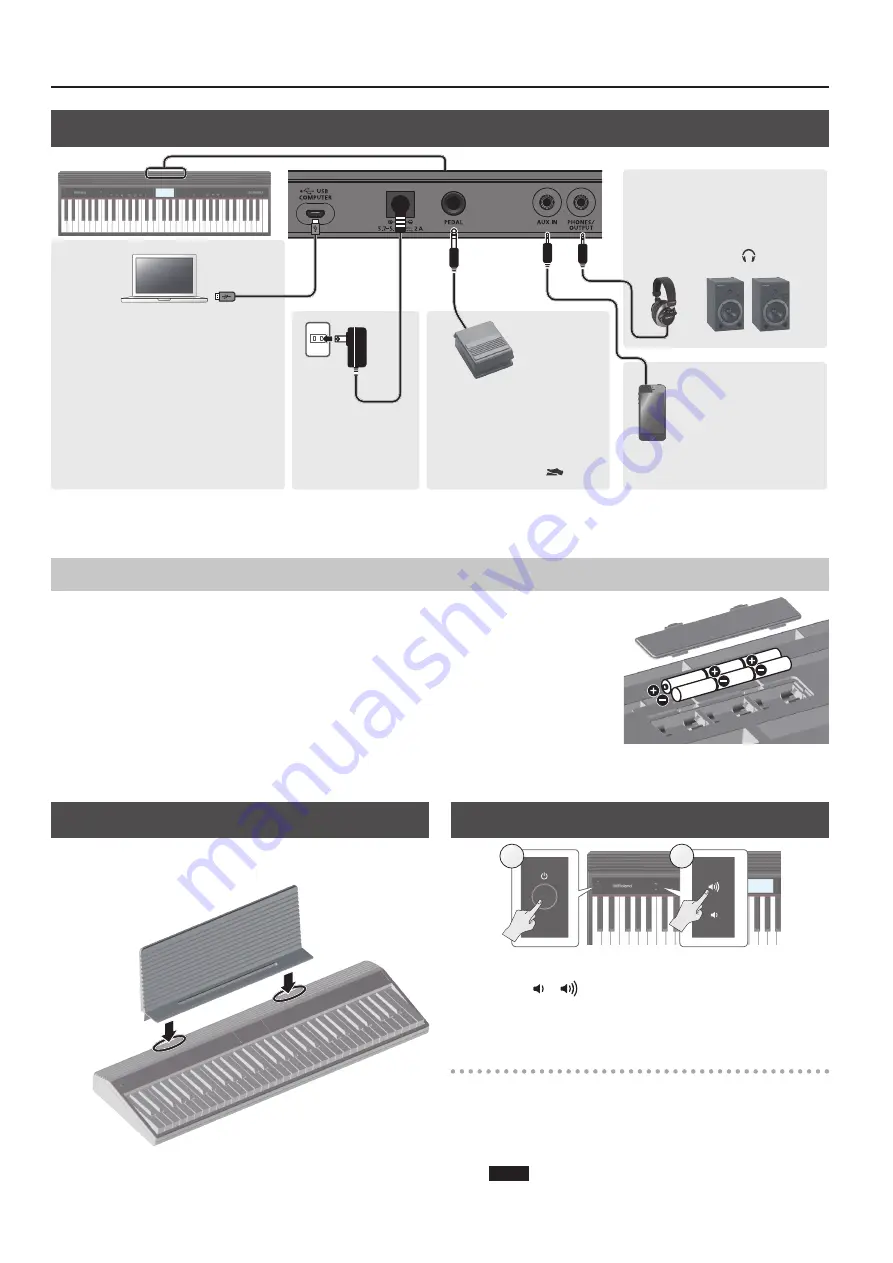
Attaching the Music Rest

Attach the included music rest to the instrument as shown in the 

illustration.

Turning the Power On/Off

1

2

1  

Press the [

L

] (power) button to turn on the power.

2  

Use the [ ] [

] buttons to adjust the volume.

3  

To turn the power off, hold down the [

L

](power) 

button for one second or longer.

Concerning the Auto Off function

The power to this unit will be turned off automatically after a 

predetermined amount of time has passed since it was last used for 

playing music, or its buttons or controls were operated (Auto Off function).
If you do not want the power to be turned off automatically, disengage 

the Auto Off function (p. 7).

NOTE

To restore power, turn the power on again.

Connecting Equipment

USB COMPUTER port

You can connect this instrument to your 

computer, and back up this instrument’s 

song data and settings to the computer 

(p. 5).
Use a commercially available micro USB 

cable to make this connection.
*  Do not use a micro USB cable that is 

designed only for charging a device. 

Charge-only cables cannot transmit 

data.

PHONES/OUTPUT jack

You can connect headphones 

(sold separately) or an amplified 

speaker here.
If this is connected, “   ” is lit.

DC IN jack

Connect the 

included AC adaptor 

here.

AUX IN jack

You can connect an 

audio player (such as a 

smartphone) or other 

audio playback device 

here.

PEDAL jack

You can connect a pedal switch 

(sold separately: DP series) and 

use it as a hold pedal.
If this is connected, “ 

 ” is lit.

*  To prevent malfunction and equipment failure, always turn down the volume, and turn off all the units before making any connections.

Installing Batteries

If six commercially available nickel-metal hydride or alkaline AA batteries are installed, you can 

perform without connecting an AC adaptor.

1  

Remove the battery cover.

2  

Install the batteries, making sure that they are oriented correctly.

3  

Close the battery cover.

*  If you handle batteries improperly, you risk explosion and fluid leakage. Make sure that you 

carefully observe all of the items related to batteries that are listed in “USING THE UNIT SAFELY” and 

“IMPORTANT NOTES” (leaflet “USING THE UNIT SAFELY” and Owner’s Manual p. 11).

*  When the batteries run low, the display indicates “Battery Low!” When this occurs, install fresh batteries.

Summary of Contents for GO:PIANO

Page 1: ...CTORY RST 6 Using the Bluetooth Functionality 8 Here s What You Can Do 8 Using Bluetooth Audio 8 Registering a Mobile Device Pairing 8 Connecting an Already Paired Mobile Device 8 Transferring MIDI Da...

Page 2: ...n change the pitch range of the keyboard in steps of one octave Changing the keyboard pitch range 3 0 3 Use the buttons are lit MEMO When you re making settings p 6 these buttons also operate as curso...

Page 3: ...can back up the recorded song to your computer p 5 5 5 When playing back or recording the screen shows the current measure and the status of play record progress within one measure Play stop Press the...

Page 4: ...e only cables cannot transmit data PHONES OUTPUT jack You can connect headphones sold separately or an amplified speaker here If this is connected is lit DC IN jack Connect the included AC adaptor her...

Page 5: ...our computer can also be restored to this instrument Before you execute backup or restore use a micro USB cable to connect this instrument to your computer Backing Up BACKUP 1 In settings p 6 make the...

Page 6: ...e button is lit 2 Use the cursor buttons to select an item 3 Use the buttons to change the value of the setting 4 Press the button when you re finished making settings is unlit Indication Value Explan...

Page 7: ...peakersWhen Headphones Are Connected SP PHONES SW This specifies whether connecting headphones automatically mutes this instrument s speakers On or does not mute them Off SONG LOAD Refer to Loading a...

Page 8: ...ETOOTH turned On 1 Place the mobile device that you want to connect nearby this unit MEMO If you have more than one unit of this model power on only the unit that you want to pair power off the other...

Page 9: ...If you have more than one unit of this model power on only the unit that you want to pair power off the other units 2 Turn on the Bluetooth function of the mobile device MEMO The explanation here uses...

Page 10: ...h function On Setting0turn BLUETOOTH On Bluetooth Audio function A device named GO PIANO Audio appears Bluetooth MIDI function A device named GO PIANO MIDI appears You can check this from the settings...

Page 11: ...geable Ni MH batteries Even if batteries are installed the power turns off if the power cord is disconnected from the AC outlet while the power is on or if the AC adaptor is disconnected from this ins...

Page 12: ...product names appearing in this document are registered trademarks or trademarks of their respective owners PlacingThis Unit on a Stand Be careful not to pinch your fingers when setting up the stand...

Page 13: ...ss Ride Cymbal1 Fl Key Click China Cymbal Laughing Ride Bell Scream Tambourine Punch SplashCymbal Heart Beat Cowbell Footsteps 1 CrashCymbal2 Footsteps 2 Vibra slap Applause Ride Cymbal2 Door Creak Hi...

Reviews: