4
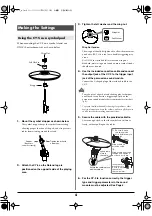
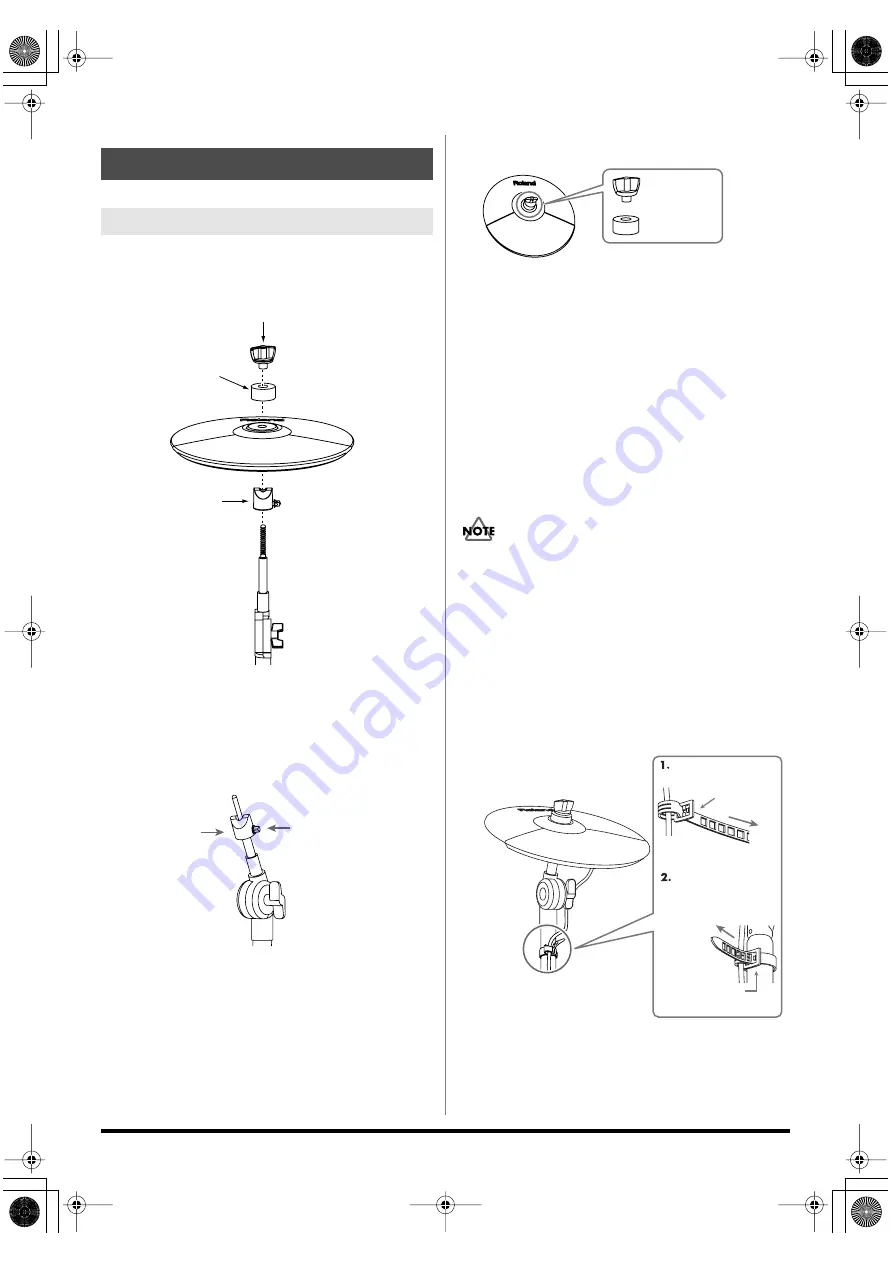
When mounting the CY-5 on a cymbal stand, use
ONLY the attachment set as shown below.
fig.CY-03.j
1.
Mount the cymbal stopper as shown below.
The cymbal stopper keeps the cymbal from rotating,
allowing proper function of the pad, and also prevents
cables from winding around the stand.
2.
Attach the CY-5 so the Roland logo is
positioned on the opposite side of the playing
area.
3.
Tighten the felt washer and the wing nut.
Wing Nut tension
The wing nut should be tightened to allow the movement
you desire. BUT, if it is too loose, double triggering may
occur.
Use ONLY the included felt washer and wing nut.
Standard, metal wing nuts found on most cymbal stands
should never be used.
4.
Use the included connection cable and connect
the output jack of the CY-5 to the trigger input
jack of the percussion sound module.
Connect the L-shaped plug of the included cable to the
CY-5.
To make use of edge shot and choking play techniques,
you’ll need to connect to a trigger input jack on the
percussion sound module that accommodates rim shots
(p. 6).
921
* To prevent malfunction and/or damage to speakers or other
devices, always turn down the volume, and turn off the power
on all devices before making any connections.
5.
Secure the cable with the provided cable tie.
Leave enough slack, so that the cymbal can still move
freely, without pulling on the cable
....
6.
For the CY-5 to function correctly, the trigger
type and trigger parameters in the sound
module must be adjusted. See Page 6.
Making the Settings
Using the CY-5 as a cymbal pad
Felt Washer
Wing Nut
Stopper
Stopper
(Be sure to
orient it correctly)
Tighten the bolt with
a drum key.
Wing Nut
Felt Washer
Wind a cable tie around
the pipe and tighten it
in order to not to slip.
Insert the small
plastic hook to
a hole to secure
the cable to
the cymbal arm.
Be sure to make
this small plastic
hook visible from you.
Wind a cable tie
around a cable.
Secure the cable in place
with the cable tie
Leave some
slack in
the cable
CY-5_e.fm 4 ページ 2007年6月19日 火曜日 午後3時0分


