background image

Before you start using the BK-5 OR

Backing Keyboard BK-5 OR 

r

17

5.

Before you start using the BK-5 OR

Connecting the AC adaptor

1.

Turn the [VOLUME] knob all the way to the 
left to minimize the volume.

2.

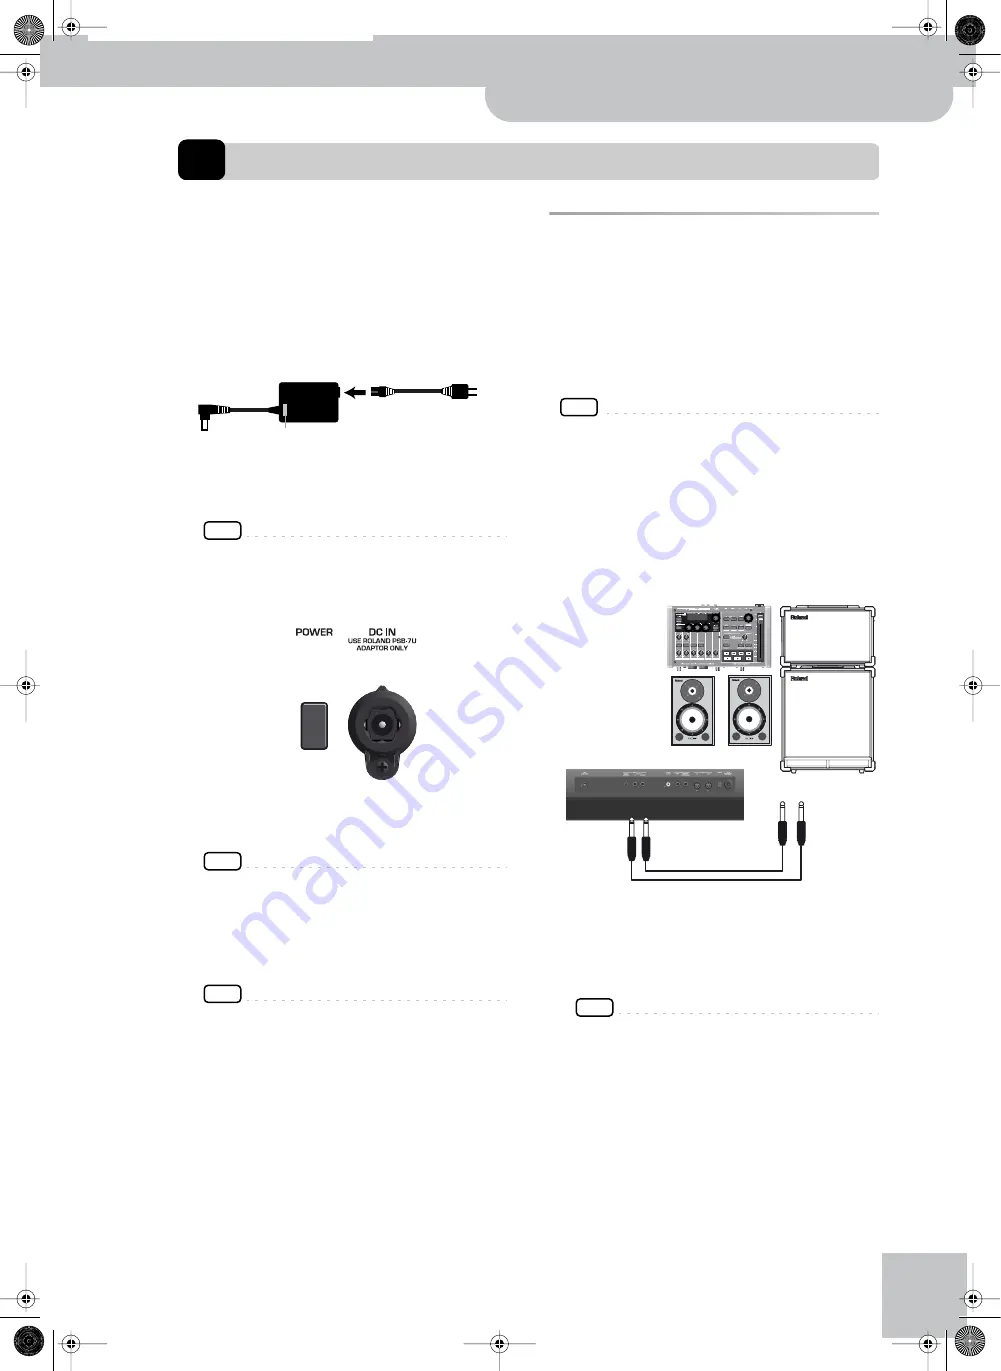
Connect the included power cord to the AC 
adapter.

The indicator will light once you plug the AC adaptor 
into a wall outlet.

Place the AC adapter so the side with the indicator 
(see illustration) faces upwards and the side with tex-
tual information faces downwards.

NOTE

Depending on your region, the included power cord may 
differ from the one shown above.

3.

Connect the AC adaptor to the BK-5 OR’s DC 
IN jack.

4.

Plug the power cord into a power outlet.

The indicator will light once you plug the AC adaptor 
into a wall outlet

NOTE

Be sure to use only the AC adaptor supplied with the unit 
(PSB-7U). Also, make sure the line voltage at the installa-
tion matches the input voltage specified on the AC 
adapter’s body. Other AC adapters may use a different 
polarity, or be designed for a different voltage, so their use 
could result in damage, malfunction, or electric shock.

NOTE

If you won’t be using the BK-5 OR for an extended period 
of time, disconnect the power cord from the electrical out-
let.

Connecting the BK-5 OR to an 
amplifier, mixer, etc.

The BK-5 OR contains speakers and therefore doesn’t 
need to be connected to an external amplifier.
You can, however, connect the BK-5 OR’s OUTPUT sock-
ets to an external amplifier (Roland KC-series) or the 
audio inputs of an external instrument (digital piano, 
etc.).

NOTE

To prevent malfunction and equipment failure, always turn 
down the volume and turn off all units before making any 
connections.

1.

Turn the [VOLUME] knob all the way to the 
left to minimize the volume.

2.

Switch off all devices.

3.

Connect the BK-5 OR’s OUTPUT jacks to the 
inputs of your external device.

For the connection to an amplifier, please choose 
unbalanced (mono) cables with 1/4” plugs at one end 
(for the BK-5 OR). The connectors at the other end 
need to match the input sockets of the device to 
which you are connecting the BK-5 OR.

NOTE

When connection cables with resistors are used, the vol-
ume level of equipment connected to the audio inputs may 
be low. If this happens, use connection cables that do not 
contain resistors.

AC adapter

Power cord

Indicator

to an AC outlet

BK-5 OR’s rear 
panel

OUTPUT R + 
L/MONO

INPUT L + R

Connecting the BK-5 OR to an amplifier

BK-5or_US.book  Page 17  Monday, February 13, 2012  12:19 PM

Summary of Contents for BK-5OR

Page 1: ...r Owner s Manual BK 5or_US book Page 1 Monday February 13 2012 12 19 PM ...

Page 2: ...he receiver is connected Consult the dealer or an experienced radio TV technician for help This device complies with Part 15 of the FCC Rules Operation is subject to the following two conditions 1 This device may not cause harmful interference and 2 This device must accept any interference received including interference that may cause undesired operation Unauthorized changes or modification to th...

Page 3: ...es that you can turn to for additional or related information are given like this p The explanations in this manual include illustrations that depict what should typically be shown by the display Note however that your unit may incorporate a newer enhanced version of the system e g include newer sounds so what you actually see in the display may not always match what appears in the manual Before u...

Page 4: ...ver allow foreign objects e g flammable material coins pins or liquids e g water or juice to enter this unit Doing so may cause short circuits faulty operation or other malfunctions Immediately turn the power off remove the AC adaptor from the outlet and request servicing by your retailer the nearest Roland Service Center or an authorized Roland distributor as listed on the Information page when T...

Page 5: ...s grasp only the plug on the AC adaptor cord when plugging into or unplugging from an outlet or this unit At regular intervals you should unplug the AC adaptor and clean it by using a dry cloth to wipe all dust and other accumulations away from its prongs Also discon nect the power plug from the power outlet whenever the unit is to remain unused for an extended period of time Any accumulation of d...

Page 6: ...t has been slightly dampened with water To remove stubborn dirt use a cloth impregnated with a mild nonabrasive detergent Afterwards be sure to wipe the unit thoroughly with a soft dry cloth Never use benzene thinner alcohol or solvents of any kind to avoid the possibility of discoloration and or deformation Additional precautions Unfortunately it may be impossible to restore the contents of data ...

Page 7: ... is forbidden by law Do not use this unit for purposes that could infringe on a copy right held by a third party Roland assumes no responsibility what soever with regard to any infringements of third party copyrights arising through your use of this unit About audio files Audio files in the following formats can be played back WAV format 16 bit linear Sampling rate of 44 1kHz Stereo mono mp3 files...

Page 8: ...OR comes with three MIDI parts Upper 1 Upper 2 Lower that can be played in real time 16 Song parts The BK 5 OR also provides 16 Song parts which are used for Standard MIDI File playback but can also be controlled via MIDI a computer connected to the MIDI IN socket or the COMPUTER USB port This allows you to use the BK 5 OR as a 16 part multitim bral MIDI tone generator Song and Rhythm Makeup Tools...

Page 9: ... OR as a USB player 37 Getting ready to use the BK 5 OR as a USB player 37 File types the BK 5 OR can read and play back 37 Selecting a song or rhythm on a USB memory 37 Playing back a song or rhythm from a USB memory38 Renaming or deleting files folders on a USB memory 39 Rename 39 Delete 39 Using the Search function to locate songs rhythms or pictures 40 Activating the Play All Songs parameter f...

Page 10: ...adding more tracks 89 Saving your rhythm 89 Recording other tracks and divisions 90 Help function on the main Rhythm Composer page 90 Muting tracks while recording others 91 Solo 91 Rhythm Track Edit functions 92 Editing individual rhythm events Micro Edit 103 General procedure 103 Editing events 104 Other edit operations 105 MIDI parameters 106 Local 107 Loading a MIDI Set 107 Edit Rhythm Parts 1...

Page 11: ... locks the currently selected rhythm see p 57 E TAP TEMPO button Pressing this button several times allows you to change the current rhythm s or song s tempo to the value calculated from the speed at which the button is pressed Pressing and holding this button locks the current tempo setting see p 57 F TEMPO buttons These buttons can be used to decrease or increase the tempo of the currently selec...

Page 12: ...ong file this button allows you to rewind NOTE You can also press this button during rhythm playback N ENDING button When you activate this button rhythm playback stops with a musical ending whose complexity depends on which VARIATION button currently lights there are four different ending phrases per rhythm After selecting a song file this button allows you to fast forward O START STOP button Thi...

Page 13: ...art at the center of an audio file WAV or mp3 allowing you to sing or play that part yourself Pressing and holding this button calls up a display page where you can select the Standard MIDI File or rhythm part s that you don t want to hear X USB MEMORY button Press this button to call up a list of the files stored on the USB memory connected to the BK 5 OR s USB MEMORY port Y USB MEMORY port Conne...

Page 14: ...ory see p 33 e MELODY INTELL button This buttons is used to add an automatic counter melody second or third voice to your solos or melo dies Pressing and holding it calls up a display page where you can view the Melody Intelligent parame ter f NUMERIC button Press this button if you want to use the TONE buttons g to enter numeric values see p 26 g TONE buttons Tone selection 0 9 numeric but tons T...

Page 15: ...or BOSS FS 5U foot switch connected to this socket can be used to hold the notes of the real time parts The MELODY INTELL part can also be sustained in this way This function is also referred to as sustain or damper F PEDAL SWITCH EXPRESSION socket Connect a separately available pedal switch Roland DP series a separately available foot switch BOSS FS 5U or a separately available expression pedal R...

Page 16: ...shes pressing and holding this button will cancel that mode use it if you don t want to record after all Locks the key setting to keep it from changing when you select another Performance memory Opens the Rhythm Track Mute or Song Track Mute page Opens the display page that shows which Tone is currently selected for the Lower part Opens the display page that shows which Tone is currently selected ...

Page 17: ...n extended period of time disconnect the power cord from the electrical out let Connecting the BK 5 OR to an amplifier mixer etc The BK 5 OR contains speakers and therefore doesn t need to be connected to an external amplifier You can however connect the BK 5 OR s OUTPUT sock ets to an external amplifier Roland KC series or the audio inputs of an external instrument digital piano etc NOTE To preve...

Page 18: ...mputer you ll be able to do the following things Use the BK 5 OR as a sound module By transferring MIDI data between the BK 5 OR and your sequencer software you ll be able to enjoy a wide range of possibilities for music production and editing 1 Use a standard USB cable A B type con nectors commercially available to connect the BK 5 OR to your computer as shown below 2 Refer to the Roland website ...

Page 19: ...ssion pedal hold pedal The BK 5 OR provides a PEDAL SWITCH EXPRESSION jack to which you can connect an optional foot switch Roland DP series or BOSS FS 5U or an expression pedal Roland EV series If you connect a footswitch you can select the func tion it should perform page 73 By default the foot switch will control the Start Stop function The BK 5 OR also provide a HOLD socket to which you can co...

Page 20: ...eakers 2 Use the BK 5 OR s VOLUME knob to adjust the headphone volume Cautions when using headphones To prevent damage to the cord s internal conductors avoid rough handling When using headphones mainly try to handle either the plug or the headset Your headphones may be damaged if the volume of a device is already turned up when you plug them in Minimize the volume before you plug in the head phon...

Page 21: ...o adjust the vol ume Turning the power off 1 Turn the VOLUME knob all the way to the left to minimize the volume NOTE Never switch off the BK 5 OR while playback or recording is running or while data are being read from or written to an external USB memory 2 Switch off your external amplification sys tem if you are using one 3 Press the BK 5 OR s POWER switch The display will go dark and the power...

Page 22: ... of the BK 5 OR s demo function See Connecting a television set on p 19 1 Simultaneously press the MENU and EXIT buttons The BK 5 OR plays back a song and the external dis play introduces the BK 5 OR s features 2 Press the EXIT button to leave the demo function NOTE No data for the music that is played back will be output from MIDI OUT NOTE All rights reserved Unauthorized use of this material for...

Page 23: ... once again appears on a white background and the CURSOR VALUE dial can once again be used to select another parameter Moving between windows Here is how to navigate the menu to select the setting you want to change 1 Press MENU button The display changes to This page allows you to select the function group that contains the setting you want to change NOTE In some cases the MENU button may recall ...

Page 24: ...y The remaining entries provide access to additional display pages 4 Try to select other Menu functions by pro ceeding as follows a Press the EXIT button once to return to the Menu page b Rotate the CURSOR VALUE dial to select an entry then press the ENTER SELECT button to go to the corresponding function group or setting c Press and hold the EXIT button to return to the BK 5 OR s main page The EX...

Page 25: ... UP1 UP2 or LWR whose field is currently dis played in reverse Tones can be selected in two ways Using the UP2 or LWR button to select Tones 1 Press and hold the UP2 or LWR button The display now shows a list of Tones where the cur rently selected sound is displayed in reverse 2 If the Tone you need belongs to another family press another Tone button 3 Rotate the CURSOR VALUE dial to select the de...

Page 26: ...he BK 5 OR receives a sound select cluster bank select program change message for which there is no Tone the display shows instead of a Tone name and the real time part in question no longer sounds Using the Numeric function to select Tones Rhythms and Performances The Numeric function can be used to enter the number of the Tone Rhythm or Performance memory you want to use which is faster than scr...

Page 27: ...ur entry The Numeric pop up disappears and the display jumps to the Tone and family you selected 5 Press the EXIT button to return to the main page Checking a Tone s or rhythm s MIDI address Tones and rhythms can also be selected via MIDI To this effect they use an internal address which is not usu ally displayed For MIDI applications involving sequenc ers or external controllers knowing the offic...

Page 28: ...planations about the parameters currently shown in the display To view this information proceed as follows 1 Select a page where the above field is dis played then press and hold the NUMERIC button A pop up window similar to the following appears 2 Press the EXIT button or press NUMERIC again to close the Help window BK 5or_US book Page 28 Monday February 13 2012 12 19 PM ...

Page 29: ...ent parts of the selected rhythms follow the chords you play on the keyboard Using rhythms The interactive aspect about the rhythms is that you can change the key of the accompaniment simply by playing different notes or chords Additionally you can select different variations more or less complex arrangements for the active rhythm The BK 5 OR pro vides several buttons for this START STOP This butt...

Page 30: ... stop when you release all keys Dark Rhythm playback needs to be started and stopped using the START STOP button or the assigned optional footswitch VARIATION Explanation 1 The simplest accompaniment pattern A good choice for the first of the songs you play 2 A slightly more complex pattern you may want to use for subsequent verses 3 This pattern would be a good choice for the first chorus 4 This ...

Page 31: ...the new song section NOTE The duration of the fill ins transitions can be halved if you like See Fill In Half Bar on p 67 You can also speed up or slow down playback during a fill in See Fill Ritardando on p 67 Selecting rhythms 1 Press a RHYTHM FAMILY button to select the rhythm family NOTE By pressing and holding one of these buttons you activate the lock function for rhythm selection which mean...

Page 32: ... the START STOP button to start rhythm playback The START STOP indicator lights and the BK 5 OR starts playing back the introductory phrase 9 Play different chords on the keyboard and listen to the effect this has on the rhythm 10 Switch on the AUTO FILL IN button it lights This means that when you select a different VARIA TION pattern the BK 5 OR will play a transition fill in before switching to...

Page 33: ...elp you select Tones for the real time parts that match the atmosphere of the cur rent rhythm There are four such ONE TOUCH memories per rhythm 1 Select the desired rhythm See page 31 2 Press the EXIT button to return to the main page 3 Switch on the ONE TOUCH button its indi cator lights If you haven t selected any ONE TOUCH memory since switching on the BK 5 OR the indicators of TONE buttons 1 2...

Page 34: ...w can you tell whether the ONE TOUCH function is on or off If the ONE TOUCH field on the main page is fol lowed by a number 1 4 the ONE TOUCH function is currently on If the ONE TOUCH field is followed by a dash the ONE TOUCH function is off Programming your own ONE TOUCH settings One Touch Edit The BK 5 OR allows you to save your own ONE TOUCH settings which may come in handy for CUSTOM rhythms f...

Page 35: ...R VALUE dial to select Yes then press the ENTER SELECT button If you don t want to overwrite the existing rhythm file select No and press ENTER SELECT to return to the One Touch Edit 8 Press the EXIT button to return to the main page Using oriental tunings Your BK 5 OR allows you to change the tuning of the keys which then applies to all notes of the same name Here s an example if you press the US...

Page 36: ...memory press the MEMORY button in question again so that its indicator goes dark and or switch off all USER SCALE buttons whose indicators light In the second case the MEMORY indicator of the last memory you selected starts flashing to signal that the current USER SCALE settings no longer corre spond to the ones of the last memory you select I e that memory is still selected but has since been mod...

Page 37: ...es with a capacity of up to 2TB File types the BK 5 OR can read and play back Selecting a song or rhythm on a USB memory 1 Connect an optional USB memory to the BK 5 OR After a few seconds the display shows the contents of the USB memory Press the USB MEMOMRY button if you inserted the USB memory at an earlier stage and now want to return to this display page Extension Format Rhythms stl Standard ...

Page 38: ...io files 1 Select a song SMF or audio file on the USB memory See page 37 2 Press the START STOP button to start play back This button is also labeled π The π button s indicator lights and song playback starts 3 If necessary you can change the song s playback tempo Press the TEMPO or button to decrease or increase the tempo NOTE If you set a tempo value close to the upper or lower limit for an mp3 ...

Page 39: ... you to the fact that you cannot make any changes 4 Press the ENTER SELECT button to call up the following display page 5 Rotate the CURSOR VALUE dial to select the desired character then use the TONE buttons You can press the NUMERIC button to switch between upper and lower case characters as well as numbers The LWR button can be used to delete the selected character The UP2 button allows you to ...

Page 40: ...a Search function that allows you to search the connected USB storage device for the files you need This function is available even while the BK 5 OR is playing back a song or rhythm allowing you to prepare the next song or picture without keeping your audience waiting 1 Connect an optional USB memory to the BK 5 OR After a few seconds the display shows the contents of the connected USB storage de...

Page 41: ...The BK 5 OR searches the USB storage device for files whose names match the character string you entered and displays them The title bar shows the path of the folder that contains the selected files NOTE The Search function can find and display 100 files at a time 10 Rotate the CURSOR VALUE dial to select the song or rhythm you want to play back then press the ENTER SELECT button to confirm your s...

Page 42: ...essing ENTER SELECT the Play All Songs function is switched off and the following message appears 8 Press the π button to stop sequential play back Deactivating the Play All Songs function The Play All Songs function needs to be deactivated if you no longer need it To do so proceed as follows 1 If the display doesn t currently show the contents of the connected USB memory press the USB MEMORY butt...

Page 43: ...yed back over and over 6 Press the VARIATION 3 button again it flashes to deactivate loop playback This does not delete the loop positions The song is once again played back in the usual way i e until the end 7 Press VARIATION 3 yet again it lights to return to the loop start position and activate the loop NOTE The marker positions are deleted when you start playback of another song or switch off ...

Page 44: ...ow disap pears Press the EXIT button to close it immediately NOTE If you also need to change the Mode setting see p 66 Changing the octave This function allows you to transpose the real time parts UP1 UP2 and LWR up or down in octave steps 1 If necessary press the EXIT button to return to the main page The display shows the current octave setting OCT for all 3 real time parts 2 Use the CURSOR VALU...

Page 45: ...rhythm or an SMF song 2 Press and hold the TRACK MUTE CENTER CANCEL button This function can also be selected using MENU but ton Global Rhythm SMF Track Mute Depending on the file type the display changes to or When you start playback you will notice that active parts are indicated by moving bar graphs that simu late level meters The bar graphs of muted parts do not move 3 Rotate the CURSOR VALUE ...

Page 46: ... lights The BK 5 OR is now in Split mode note numbers below the split point see Split on p 59 are used to transpose rhythm playback in real time and to play the LWR part if it is active Note numbers above the split point can be used to play melodies using the UP1 and or UP2 part In Split mode the Type parameter see p 66 is automatically set to Intelligent NOTE See page 25 for how to select the rea...

Page 47: ... OR r 47 NOTE You can also select the desired volume value by pressing the ENTER SELECT button rotating the CURSOR VALUE dial and pressing ENTER SELECT again 7 Press the EXIT button to return to the main page BK 5or_US book Page 47 Monday February 13 2012 12 19 PM ...

Page 48: ...ains 5 SMF files These lists cannot be deleted or edited Loading a Performance Music Assistant Factory Songs List 1 Switch on the BK 5 OR See page 21 2 Connect an optional USB memory to the BK 5 OR This step is unnecessary if you want to use the Music Assistant or Factory Songs list because these lists reside in the BK 5 OR s internal memory 3 Press the PERFORMANCE LIST button The display now show...

Page 49: ...on SYNC START etc During playback of that rhythm or song you can already select a new Performance Music Assistant Factory Songs memory 3 If you need to return to the main page press the EXIT button To return to the page that lists the memories press PERFORMANCE LIST again Quickly locating Performance memories Performance memories can also be loaded using the BK 5 OR s Numeric function See Using th...

Page 50: ...RFORMANCE LIST button The display now shows all Performance Lists on the connected USB memory 3 Rotate the dial to select the desired Perfor mance List 4 Press the MENU button The display now changes to a page with the follow ing options 5 Rotate the dial to select the desired option then press the ENTER SELECT If you select Rename The display changes to This page allows you to change the name of ...

Page 51: ... press the NUMERIC button to switch between upper and lower case characters as well as numbers The LWR button can be used to delete the selected character The UP2 button allows you to insert a character 2 Rotate the CURSOR VALUE dial to select the next character position you want to change then use the TONE buttons again 3 Repeat steps 1 and 2 above to complete the name 4 Press the WRITE button to...

Page 52: ...rmance List then press the ENTER SELECT button A message confirms that the data have been saved 8 Press the EXIT button If you did not save the Performance List the BK 5 OR now signals that you need to save it to preserve your changes 9 Rotate the dial to select YES to save your changes to the USB memory or NO if you wish to keep the previous version 10 Press the ENTER SELECT button to confirm you...

Page 53: ...TART STOP π button to play back the song A slide show suitable for the character of the song will be shown on the external display or television set connected to the BK 5 OR NOTE When you press the SYNC START button to stop song playback the slideshow also stops When you load another VIMA TUNES song the previous slideshow stops and the display shows the first picture for the new song Enjoying a sl...

Page 54: ...ains the picture you want to use to the BK 5 OR s USB MEMORY port The display shows a list of the files on the USB stor age device 2 Select the JPG file you want to use That picture now appears on the external screen if connected This picture will be considered your User setting and the Background Mode parameter see p 71 will be set to USER 3 To revert to the colored background or logo you must se...

Page 55: ...e as accom paniment Set the levels and effects etc 3 Set the desired balance between the rhythm song and the real time parts using the BALANCE buttons You may also want to set the Audio In Level param eter page 72 4 Press the AUDIO REC button its indicator flashes NOTE If you pressed the AUDIO REC button by accident press and hold it until its indicator goes dark again 5 Press the START STOP butto...

Page 56: ...y the BK 5 OR simply press the WRITE button see step 5 below 2 Use the TONE buttons to select a different character 3 Rotate the CURSOR VALUE dial to select the next character position you want to change then use the TONE buttons again You can press the NUMERIC button to switch between upper and lower case characters as well as numbers The LWR button can be used to delete the selected character Th...

Page 57: ... you select it While the tempo setting is locked the tempo no longer changes when you select a different rhythm NOTE The Save Global parameter page 74 also saves the lock and hence the Performance Hold settings Whenever you switch a lock function on or off the dis play briefly informs you about this The lock status of the functions that provide this protec tion is also displayed on the main page S...

Page 58: ...on Internal Lyrics Allows you to activate the display of lyrics data on the BK 5 OR itself Only for SMF and mp3 files for which there are lyrics data External Lyrics Allows you to cancel Off or activate On the display of song lyrics on an external screen Performance Edit This function group allows you to select different Tones and effects set tings for the keyboard parts the selected rhythm to set...

Page 59: ...dible Parameter Group Explanation Tone Part View This is where you can edit settings related to Tones See page 59 Tone Part MFX Contains the effects parameters for the keyboard parts LWR UP2 UP1 See page 63 Rhythm Parts This group contains all parameters of the rhythm parts See page 64 Split This parameter allows you to change the split point i e the separation between the lower and upper keyboard...

Page 60: ... 0 127 Parameter Setting Chorus Send 0 127 Parameter Setting Panpot L63 0 R63 Parameter Setting range Explanation Curve High Medium Low Fixed High Select this set ting for maximum expressiveness Even small variations of the force with which you strike a key produce audible changes The trade off is however that you have to strike the keys forcefully to reach the maximum volume Medium Medium velocit...

Page 61: ...a considerable amount of striking preci sion see Min Value and Max Value on p 60 you could invert UP2 s response to the expression pedal so that UP1 doesn t sound when UP2 does and vice versa Hold Pedal This parameter allows you to specify whether and how a hold damper pedal you connect to the PEDAL HOLD socket should respond to Hold messages CC64 Auto means that the part in question only responds...

Page 62: ...ht movements of the BENDER MODULATION lever Bender Range This parameter sets the pitch interval i e the value that will be used when the BENDER MODULATION lever is pushed all the way to the left or right Modulation Assign This parameter allows you to specify for each key board part how it should respond to Modulation messages CC01 Auto The keyboard part only responds to backward movements of the B...

Page 63: ...tings make the preset pitch modulation faster and negative settings make it slower Vibrato Depth This parameter adjusts the intensity of the pitch modulation Positive settings mean that the wobble becomes more prominent while negative settings make it shallower Vibrato Delay This parameter adjusts the time required for the vibrato effect to begin Positive settings increase the time before vibrato ...

Page 64: ...er rhythm parts are switched off Volume Adjusts the volume of the selected rhythm part Selecting 0 means that the part is question is no longer audible Exp Pedal Select Off if you don t need pedal expression for the selected part This means that the rhythm part in question no longer responds to an expression pedal you may have connected to the SWITCH EXPRESSION socket 1 Thru 2 Stereo EQ 3 Overdriv...

Page 65: ...d area This function is only avail able while the SPLIT button lights If you select Off the LWR part stops sounding as soon as you release all keys in the left area Scale Tune Switch This parameter can be selected using MENU button Performance Edit Scale Tune Switch Scale Tune This parameter can be selected using MENU button Performance Edit Scale Tune This parameter allows you to change the tunin...

Page 66: ... play in the left half of the keyboard You can also tell the Arranger to scan another part of the keyboard for usable chords Though Left is probably the most popular setting you could select Right to have the Arranger scan the right half of the keyboard Switch off the SPLIT button if the Arranger should scan the entire keyboard Whole The range of the left and right keyboard areas depends on the Sp...

Page 67: ...do The FILL RIT function is suitable for ballads It causes the next Fill In to slow down ritardando See Tempo Change Fill Rit below for how to set how strongly the tempo should be decreased As the name implies it is only available while the AUTO FILL IN button lights a Set Fill Ritardando to On b Start Arranger playback c Press a VARIATION 1 4 button The BK 5 OR plays a Fill In The tempo slows dow...

Page 68: ...g and holding the MELODY INTELL button The following parameters are available Switch Select On if you want to add a MELODY INTELL part This part is triggered by the chord recognition of the BK 5 OR s Arranger and plays automatic harmonies that are added to the melody that you are playing using the UP1 part You can choose from among 18 harmony types see below NOTE This Switch parameter can also be ...

Page 69: ...ER SELECT button The BK 5 OR then returns to the Performance Edit page Global parameters The settings of the Global parameters can be saved to the BK 5 OR s global memory If you don t save them your changes are lost when you switch off the BK 5 OR See Save Global on p 74 for how to save these set tings Display Contrast This parameter can be selected using MENU button Global Display Contrast It is ...

Page 70: ... SELECT button to highlight the setting c Rotate the dial to select On The metronome starts counting NOTE The metronome is not available while an audio song file mp3 or WAV is selected The metronome parameters you can set are Parameter Setting Tempo Off On Tone Part Off On Intro Ending Off On Variation Off On Expression Pedal Off On Scale Tune Off On Parameter Setting Rhythm Off On Tempo Off On Ex...

Page 71: ... Explanation Video Mode PAL NTSC Select the setting that corresponds to the for mat used by the con nected screen Aspect Ratio Full Center Specify the appropri ate aspect ratio for the screen you are using Parameter Setting Explanation Parameter Setting Explanation Background Mode Color Logo User Color The back ground is empty but uses the selected color see below Logo The BK 5 OR s logo is shown ...

Page 72: ...UT sockets Parameter Setting Explanation USB Driver Generic Original Generic Choose this if you want to use the standard USB driver that was included with your computer Nor mally you should use this mode Original Choose this if you want to use a USB driver down loaded from the Roland website www roland com Recall MIDI Set Off Key Rhythm PK Series Song User1 User2 User3 User4 User5 User6 User7 User...

Page 73: ...hen the former is selected the chord rec ognition area see Zone on p 66 is automatically set to Left When you switch to Pianist1 the chord recognition area is automatically set to Whole Scale Upper Allows you to assign the selected Scale Tune see p 65 setting to the two Upper parts Scale Lower Allows you to assign the selected Scale Tune see p 65 setting to the two Upper parts Up2 Allows you to sw...

Page 74: ...ythm and SMF song parts This processor is called Mastering Tools because it allows you to perfect the signal mix to adapt it to the sound system you are using The parameters discussed here can be selected using MENU button Mastering Tools Compressor This multi band compressor limiter allows you to pro cess three frequency ranges separately A compressor reduces high levels peaks and boosts low leve...

Page 75: ...band in question should start processing the signal once the level of that band exceeds the Thresh old level Choose a smaller value if you prefer a com pression similar to that of FM radio stations Higher values may yield a snap pier or funkier sound Release 50 5000ms This parameter allows you to specify how fast the com pressor of the corresponding band should stop working when the signal level d...

Page 76: ...none of the preset memories contains the settings you need you can change the fol lowing parameters by first pressing the ENTER SELECT button and then using the CURSOR VALUE dial 1 Flat 2 Rock 3 Pop 4 Jazz 5 Classic 6 Standard 7 User Parameter Setting range Explanation Level 0 127 Use this parameter to set the equalizer s input level This may be neces sary when the level of the input signals is so...

Page 77: ...he rhythm or SMF song you wish to modify on the connected USB memory see p 37 You can also select an internal rhythm 2 Press the START STOP button to start play back of the song or rhythm This allows you to listen to the song or rhythm before you start editing it Press the START STOP button again to halt playback NOTE If you selected a rhythm or SMF song on the connected USB memory press and hold ...

Page 78: ...m or song as a whole like the reverb or chorus effect the tempo etc Instrument Select this entry to change the instru ments used in the rhythm or song and their parameters See page 79 Freeze Data Select this entry to burn your new set tings into the file Doing so will allow you to use your new version with any sequencer software or compatible Roland arranger instrument See page 83 Save Select this...

Page 79: ... and the BK 5 OR to play realistic drum and percussion parts The following parameters are available Tone T Drum D Allows you to select a different Tone within the active Tone family See the separate booklet for a list of available Tones and Drum Sets While selecting a Tone you can press a TONE button to select a different family Mute T Drum Mute D Switches the selected instrument off The corre spo...

Page 80: ...pass and the sound will become softer darker NOTE For some sounds positive Cut Off settings will cause no noticeable change because the preprogrammed Cut Off parameter is already set to its maximum value Resonance This is a parameter one invariably associates with a synthesizer When the Resonance value is increased the overtones in the area of the cutoff frequency will be emphasized creating a sou...

Page 81: ...t all instruments that use this Mfx processor See page 64 for a list of the available Mfx types NOTE Each Mfx can be assigned to as many instruments as you like Be aware however that selecting a different type will affect all instruments that use this Mfx processor NOTE While the Mfx parameter is set to Off you cannot select a different type In that case the display will show the message Mfx Edit ...

Page 82: ... ment you want to edit Parameters for the selected instrument Mute Off On Suppress or add the selected instrument Parameter Setting Explanation Solo Off On Switch off all instru ments except the selected instrument Volume 127 127 Use this parameter to set the volume of the selected drum instru ment Reverb 127 127 Use this parameter to set the reverb send level of the selected drum instrument The e...

Page 83: ...u did not perform the Freeze Data command need to be saved using this proce dure if you want to keep the changes 2 Use the CURSOR VALUE dial and the ENTER SELECT button to select a different location if you do not want to overwrite the original version 3 Press the WRITE button it flashes The BK 5 OR automatically adopts the name of the selected rhythm or song If you want to save the new version un...

Page 84: ...her you want to overwrite it In this case select YES using the CURSOR VALUE dial and press ENTER SELECT to replace the old file with the new one the old file will be lost Otherwise select NO and press the ENTER SELECT button to return to the Save page and enter a dif ferent name BK 5or_US book Page 84 Monday February 13 2012 12 19 PM ...

Page 85: ...ines In most cases less means more i e do not program six melodic accompaniments just because the BK 5 OR pro vides that facility If you listen very carefully to a CD you will discover that it is not the number of instruments you use that makes a song sound big but rather the right notes at the right time Looped vs one shot patterns The BK 5 OR uses two kinds of patterns looped divi sions and one ...

Page 86: ...CURSOR VALUE dial to select the Division you want to record Intro Main Fill or Ending Parameter Setting Explanation Rec Track ADrum ABass Acc1 Acc2 Acc3 Acc4 Acc5 Acc6 This parameter allows you to select the track whose settings you want to change Inst Tone assigned to the track This is where you select a sound or Drum Set for the track marked for recording Rec Track Tempo 20 250 You can already s...

Page 87: ...he key of AccDrums parts cannot be set because that doesn t make sense Octave 4 4 This parameter allows you to transpose the keyboard in octave steps which may be convenient for extremely high or low notes or for using the special noises of certain sounds Mode Major Minor 7th M m M 7 m 7 M m 7 This parameter allows you to specify whether you are about to record the accompani ment for major minor o...

Page 88: ...ctivate the record function for a track that does not yet contain data If you select a track that already contains data this parameter is set to Mix but could be changed to Replace if you wanted to over write the previous ver sion Mix The data you record are added to the existing data of the selected track The AccDrums track can only use Drum Sets only the TONE DRUMS button is available for this t...

Page 89: ...ythm and adding more tracks 1 Press the START STOP button to listen to your track The main Rhythm Composer page contains two parameters that allow you to select the pattern you want to audition Here s how to select it 2 Use the CURSOR VALUE dial to select the MODE parameter then press the ENTER SELECT button 3 Rotate the CURSOR VALUE dial to select Major Minor or 7th Only one mode can be selected ...

Page 90: ...ss ENTER SELECT to replace the old file with the new one the old file will be lost Otherwise select NO and press the ENTER SELECT button to return to the Save page and enter a dif ferent name Recording other tracks and divisions You can now record the second track probably the bass If you d like to do the guided tour again return to page 86 Do not forget to set the key for the bass part see Key on...

Page 91: ...ot appear in your accompani ments see p 93 Solo If you need to listen to a track in isolation press and hold the TRACK MUTE button and start playback This mutes all other tracks while the selected track is flagged with an S Press the TRACK MUTE button again to switch off the function of the Solo function NOTE If the track you solo was muted it will be soloed like any other track After switching of...

Page 92: ...Explanation Track ADrums Acc6 ALL Allows you to select the track you wish to edit You can also select ALL here in which case the opera tion applies to all tracks Mode Major Minor 7th Allows you to select the Mode to be edited Division Intro 1 4 Main 1 4 Fill Dwn 1 3 Fill Up 1 3 End 1 4 Use this parameter to select the Division you want to edit From Bar 1 last mea sure of the track or pat tern Refe...

Page 93: ...that the selected Res olution value is not applied 0 correc tion while 100 means that all notes are shifted to the mathematicallycorrect positions From Note 0 C 127 G9 This parameter allows you to set the note or lower limit of the note range to be modified within the specified From To time range To Note 0 C 127 G9 This parameter allows you to set the upper limit of the note range to be modified w...

Page 94: ...e BENDER MODULA TION lever PanPot CC10 messages that specify the stereo posi tion Expression CC11 messages that are used for tempo rary volume changes Reverb Reverb Send messages how strongly the part should be processed by the reverb effect Chorus Chorus Send messages how strongly the part should be processed by the chorus effect Program Change Program change mes sages used to select sounds or Dr...

Page 95: ...l to select the Track parameter then press the ENTER SELECT button 5 Rotate the CURSOR VALUE dial to select the track to be copied You can also select ALL to copy all tracks of a given Mode Division In that case Destination Track see below is also set to ALL 6 Repeat this operation with the Mode and Division parameters to select the Mode Major Minor 7th ALL and Division Int 1 4 Int ALL Main 1 4 Ma...

Page 96: ...T button to specify the target posi tion using the three Into parameters 16 Press the WRITE button its indicator flashes to confirm your settings and edit the data Insert Insert allows you to insert space and shift data that lie behind the From position further towards the end of the track this is the exact opposite of Delete The empty measures you create can be filled using the Copy function or b...

Page 97: ...ee page 92 For Bar For Beat For CPT Specifies how many bars beats and CPTs are to be inserted Parameter Setting Explanation Track ADrums Acc6 ALL Allows you to select the track you wish to edit You can also select ALL here in which case the opera tion applies to all tracks Mode Major Minor 7th Allows you to select the Mode to be edited Division Intro 1 4 Main 1 4 Fill Dwn 1 3 Fill Up 1 3 End 1 4 U...

Page 98: ...e Select a posi tive value to increase the velocity the value is added to the velocity value of the affected notes or a negative value to decrease the velocity values that value is subtracted Select 0 if you prefer to work with the Magnify parameter see below Magnify 0 200 This parameter works like a Compander effect a dynamics pro cessor that simulta neously acts as compressor and expander althou...

Page 99: ... 92 Bias 1920 1920 This parameter sets the amount by which the duration or gate time of the selected notes is to change The shortest possible Gate Time value is 1 used for all drum notes so that selecting 1000 for notes with a Gate Time value of 1 in the specified time range still leaves you with the same value Magnify 0 200 Use this parameter rather than Bias to produce proportional changes to th...

Page 100: ...LL 1 128 Enter the original data value i e the value that is being used right now by the selected track s for From For To specify the new value that should replace the From value These are what we call absolute changes you don t add or subtract values you replace them with other values This sys tem is only available for messages that allow you to select sounds or sound banks Inc Dec Expression Rev...

Page 101: ... t exist From Note To Note 0 C 127 G9 From Note allows you to set the note or lower limit of the note range to be modified within the specified From To time range To Note allows you to set the upper limit of the note range to be modified Parameter Setting Explanation Parameter Setting Explanation Track ADrums Acc6 ALL Allows you to select the track you wish to edit You can also select ALL here in ...

Page 102: ...dy recorded pattern its notes and events are reshuffled so that you may end up with incomplete measures None of your data are deleted however Press the WRITE button its indicator flashes to confirm your settings and edit the data Mode Major Minor 7th Major Minor Major 7th Major Minor 7th Minor 7th Choose the Modes to which the new length setting should apply You can also switch on two or all three...

Page 103: ... Position indications Sequencers only register events whose positions and distances specify when the notes are to be sounded or when they should change i e their sequence Each event is executed at a given point in time which is why they all have a position indication 1 01 119 for example The first figure refers to the bar the second to the beat within that bar and the third to the clock CPT betwee...

Page 104: ...be set to the desired value 0 127 when the corresponding effect is needed but they also need to be reset to 0 to avoid unpleasant surprises About the Note messages As stated above note messages comprise a note number a velocity value and a Gate Time value The range for note numbers is 0 C 127 G9 Velocity messages can be set anywhere between 1 extremely soft and 127 The value 0 cannot be entered be...

Page 105: ...end of that group The selected event is inserted with a default value Obviously you will then need to change the default settings depending on the result you want to achieve Press the WRITE button to confirm your settings and add the new event The BK 5 OR returns to the Micro Edit page Erase Event This function allows you to remove one or several events without changing the positions of the remain...

Page 106: ...nt s Place Event This function is only available if the Rhythm Com poser s clipboard already contains events that you copied using Copy Event 1 Select the Place Event function 2 Set To Bar To Beat and To CPT 3 Press the WRITE button to confirm your settings and paste the new event s NOTE Events inserted with Place Event are added to any events that may already exist in that area Existing events ar...

Page 107: ... a PK series MIDI pedalboard The most impor tant settings are Part Switch is set to Int and Rhythm PcRx is set to On Song This option restores the factory settings for the BK 5 OR s SMF song parts and switches off the MIDI transmission and reception of the real time and rhythm parts User1 8 The BK 5 OR also allows you to store and recall 8 dif ferent MIDI configurations NOTE Loading a MIDI Set onl...

Page 108: ...xternal MIDI instrument or computer The maximum possible transposition is four octaves up 48 or down 48 Each step repre sents a semi tone Rx Limit Low Limit High Limit Low and Limit High allow you to set the note range to be received If not all note messages received on a given MIDI channel should be played by the selected BK 5 OR part narrow down the range NOTE The Limit Low value cannot be highe...

Page 109: ... Limit Low High Rx Event For the explanation of these parameters please refer to page 108 Filter Setting Explanation Program Change Off On Select On to receive pro gram change and bank select CC00 CC32 mes sages Pitch Bender Off On Select On to receive Pitch Bend messages Modulation Off On Select On to receive Mod ulation messages CC01 Volume Off On Select On to receive Vol ume messages CC07 Panpo...

Page 110: ...rameters are used to synchronize external MIDI devices See below Basic The parameters of this group affect the BK 5 OR s Basic channel The Basic chan nel is used to receive and transmit Pro gram Change and Bank Select messages for selecting Performances as well as for the reception and transmission of other kinds of messages that are not directly related to a specific MIDI channel See page 111 Rhy...

Page 111: ...hem to The following parameters are available here Tx Switches the transmission of MIDI messages on the Basic channel on or off Tx Channel The channel used to transmit MIDI messages Performance PC Tx This parameter is used to enable or disable the trans mission of program change and bank select messages related to Performance selection Part Switch Tx Whenever you mute or un mute a part on the Rhyt...

Page 112: ...annel The channel used to transmit MIDI messages Rx Switches the reception of MIDI messages on the Rhythm channel on or off Rx Channel Use this parameter to assign a MIDI receive channel to the Rhythm section Rhythm Volume Rx Allows you to enable or disable the reception of vol ume messages relating the rhythm Rhythm Pc Rx This parameter allows you to enable or disable the reception of program cha...

Page 113: ... continuous flux The value you set will be used for all notes sent to MIDI OUT USB COMPUTER Tx SysEx Use this parameter to specify whether On or not Off the BK 5 OR should send SysEx messages Such messages are not standardized so that each manufacturer can use them ad lib for temporary or permanent changes to the way a part behaves Effects parameters for instance can only be changed via SysEx mess...

Page 114: ...channel for the Visual Control function The BK 5 OR does not receive Visual Control messages By default this channel is set to 16 Save MIDI Set This function allows you to save your changes to a User memory for quick recall This function can be selected using the WRITE button while the MIDI page is displayed 1 Edit the desired MIDI parameters Edit Rhythm Parts Edit Song Parts Edit Tone Parts Edit ...

Page 115: ...ction allows you to format the connected USB memory USB memories using the FAT 32 file system may not need to be formatted We nevertheless recommend for matting all new USB storage devices with the BK 5 OR IMPORTANT NOTE Formatting a USB memory means that all files songs rhythms etc it contains are lost Always check the contents of the memory before decid ing to format it 1 Connect the a USB stora...

Page 116: ...ssing the USB MEMORY button You need to press the PERFORMANCE LIST button gain access to the files it con tains The contents can be viewed on a computer however My Recordings This folder is used to store your audio recordings see p 55 My Songs This folder can be used to save SMF songs you edited with the Makeup Tools functions see p 77 My Rhythms This folder can be used to save rhythms you edited ...

Page 117: ...e EDIROL P 10 In order to enjoy the Visual Control function with the BK 5 OR and the EDIROL P 10 you ll need to make con nections using a MIDI cable sold separately NOTE To prevent malfunction and speaker damage you must mini mize the volume on all equipment and turn off their power before you make any connections 1 Connect the BK 5 OR s MIDI OUT socket to the MIDI IN socket of the optional MIDI V...

Page 118: ...eys are temporarily unavailable for playing notes Key MIDI Visual Control V LINK MIDI message C 6 Control the image bank Bank Select BF 00 00 D6 Switch images Clip 1 CF 00 D 6 Control the image bank Bank Select BF 00 01 E6 Switch images Clip 2 CF 01 F6 Switch images Clip 3 CF 02 F 6 Control the image bank Bank Select BF 00 02 G6 Switch images Clip 4 CF 03 G 6 Control the image bank Bank Select BF ...

Page 119: ... TRACK MUTE CENTER CANCEL button is lit the vocal sound will be attenuated If the TRACK MUTE button is lit the melody of the MIDI files will be muted Switch it off 45 A buzz is heard from the external amplifier Is the external amplifier or other device used with the BK 5 OR connected to a different AC power outlet Connect the amplifier or other device to the same AC outlet as the BK 5 OR Can t pla...

Page 120: ...ut this is due to the characteristics of the tele vision and is not a malfunction on the BK 5 OR Lyric display is wrong For some types of music files the lyrics may sometimes be dis played incorrectly Some words may be incorrectly shown outside the screen display area Insufficient volume from a device connected to the BK 5 OR s AUDIO INPUT STEREO socket Could you be using a connection cable that c...

Page 121: ...Multi band compressor 6 presets 1 User memory Rhythm section Rhythms Over 250 in 6 Rhythm families localized rhythms for specific areas are included Rhythm Composer Internal Rhythm Composer SMF to Rhythm Converter provided as PC application Win dows on the bundled CD ROM One Touch memories 4 programmable registrations per rhythm Rhythm Makeup Tools Instrument oriented editing Songs Real time playe...

Page 122: ...MIDI OUT Visual Control function VIDEO OUTPUT jack RCA type CVBS PAL or NTSC selectable Foot pedal jacks HOLD SWITCH EXPRESSION programmable General specifications Speakers 2x 10 cm Rated power output 2x 12 W RMS Power supply AC adaptor PSB 7U adaptor Power consumption 1100mA Auto Off function Off 10min 30min 240min Dimensions Without music rest 1044 W x 317 D x 129 H mm 41 1 8 W x 12 1 2 D x 5 1 ...

Page 123: ...stem requirements Operating system Microsoft Windows XP Microsoft Windows Vista This does not work with the 64 bit edition of Windows Vista Microsoft Windows 7 CPU clock Pentium Celeron processor 1 GHz or higher RAM 512 MB or more Hard disk 2 MB or more Display colors 800 x 600 or higher 65 536 colors 16 bit High Color or more Others CD ROM drive BK 5or_US book Page 123 Monday February 13 2012 12 ...

Page 124: ... O O O O O Reverb 1 O Chorus 1 O 1 O 1 Bank Select Modulation Portamento Time Data Entry Volume Panpot Expression C1 Hold 1 Portamento Sostenuto Soft Hold 2 Resonance Realease Time Attack Time Cutoff Decay Time Vibrato Rate Vibrato Depth Vibrato Delay Portamento Control Effect 1 Depth Effect 3 Depth NRPN LSB MSB RPN LSB MSB Program Change True O 1 O 1 0 127 Program Number 1 128 System Exclusive O ...

Page 125: ... Dm E m Em Fm Cm7 C m7 Dm7 E m7 Em7 Fm7 Cdim C dim Ddim E dim Edim Fdim Dm7 5 Em7 5 Caug C aug Daug E aug Eaug Faug C7sus4 C 7sus4 D7sus4 E 7sus4 E7sus4 F7sus4 Fm7 5 E m7 5 C m7 5 Csus4 C sus4 Dsus4 E sus4 Esus4 Fsus4 C7 13 C 7 13 D7 13 E 7 13 E7 13 F7 13 CmM7 C mM7 DmM7 E mM7 EmM7 FmM7 BK 5or_US book Page 125 Monday February 13 2012 12 19 PM ...

Page 126: ...m7 A m7 Am7 B m7 Bm7 F dim Gdim A dim Adim B dim Bdim Gm7 5 Am7 5 Bm7 5 F aug Gaug A aug Aaug B aug Baug F 7sus4 G7sus4 A 7sus4 A7sus4 B 7sus4 B7sus4 B m7 5 A m7 5 F m7 5 F sus4 Gsus4 A sus4 Asus4 B sus4 Bsus4 F 7 13 G7 13 A 7 13 A7 13 B 7 13 B7 13 F mM7 GmM7 A mM7 AmM7 B mM7 BmM7 BK 5or_US book Page 126 Monday February 13 2012 12 19 PM ...

Page 127: ...4 Computer 18 Connecting MIDI 18 Contrast 69 Control Pedal 19 Copy 95 Event 106 Mode 96 Count In 71 CPT 101 Create Event 105 Cut Off 62 80 D Data Type 94 Data Change 113 Decay 63 80 Default 69 Degree 100 104 Delay 78 Vibrato 63 Delete Performance 51 Performance List 51 Rhythm Composer 94 Demo 22 Depth 63 Display 23 Brightness 69 Contrast 69 Division 87 Driver 18 Drum Mute 79 Drum Instrument 82 Dyn...

Page 128: ...une 69 Master Volume Rx 111 Mastering Tools 74 MBS 25 Melody Intell 46 Melody Intelligence 46 Melody Intelligent 73 MEMORY 35 Metronome 70 MFX 61 81 Edit 64 81 Micro Edit 103 Mid 75 Mid Boost 74 MIDI 18 85 Basic Channel 111 Local control 108 Parameters 113 Set saving 114 SPP 110 Synchronization 110 USB 18 Visual Control 117 MIDI Channels 18 Minor 89 Minus One 45 Mix Record 88 Rhythm Copy 96 Mode 1...

Page 129: ...8 Sysex 114 Transpose 114 Velocity 114 S Save 90 As Default 69 Global 74 MIDI Set 114 Rhythm 89 Saving 49 Scale Tune 35 65 Search 40 Second Tone 68 Shift Clock 100 Short Dly 78 Dly FB 78 SMF Clock Tx 110 Position Tx 110 Quick Start 71 Start Stop Tx 110 Soft 73 Comp 74 Thru 114 Solo 64 79 91 Song Parts MIDI 107 Playback 37 Position Pointer 110 Searching 40 Sostenuto 73 Specifications 121 Split 46 H...

Page 130: ... 60 Version Info 72 Vibrato 81 Delay 63 Depth 63 Rate 63 Video 117 Mode 71 Settings 71 VIMA TUNES 53 Visual Control TxCh 114 Visual Ctrl Mode 72 V Link Visual Control 117 Volume 46 Instrument 59 64 79 Makeup Tools 78 Metronome 70 W Wait Note 88 WAV 20 55 Whole 73 Words 58 Write 49 Rhythm 83 Song 83 User 75 77 Z Zone 66 BK 5or_US book Page 130 Monday February 13 2012 12 19 PM ...

Page 131: ...d BK 5 OR r 131 When you need repair service call your nearest Roland Service Center or authorized Roland distributor in your country as shown below Information BK 5or_US book Page 131 Monday February 13 2012 12 19 PM ...

Page 132: ...132 rBacking Keyboard BK 5 OR MEMO BK 5or_US book Page 132 Monday February 13 2012 12 19 PM ...

Page 133: ...For EU Countries For China For China For EU countries For China BK 5or_US book Page 133 Monday February 13 2012 12 19 PM ...

Page 134: ...r 602 00 0523 RES 868 11 BK 5 OR OM E BK 5or_US book Page 134 Monday February 13 2012 12 19 PM ...

Reviews: