background image

28

ÍNDICE

1.  Advertencias generales  ...............................................................................................29
2.  Información técnica  .....................................................................................................32
3.  Instalación  ....................................................................................................................33
4.  Teclado y pantalla  ........................................................................................................36
5.  Funcionalidad y programación  ...................................................................................37

5.1.  Encendido y apagado (stand-by) .........................................................................37
5.2. Ajustar día y hora  ..................................................................................................37
5.3. Selección de temperatura .....................................................................................38
5.4. Bloquear / Desbloquear teclado ...........................................................................38
5.5. Menú principal ........................................................................................................39

5.6. Menú principal: Submenú de configuración

 ........................................................39

5.7. Menú principal: Submenú de energía ...................................................................40
5.8. Menú principal: Submenú equilibrio.....................................................................42
5.9. Menú principal: Submenú programación .............................................................42

5.9.1. Funciones manual / automático .....................................................................43
5.9.2. Programación ..................................................................................................43
5.9.3. Modo usuario ...................................................................................................45
5.9.4. Función HILO PILOTO......................................................................................47
5.9.5. Tecnología Fuzzy Logic Control .....................................................................47

6. Emparejamiento  ............................................................................................................47
7.  Manteniemiento y limpieza  .........................................................................................47
8.  Normativa Europea (RAEE) 2012/19/UE  ....................................................................48
9.  Garantía  .........................................................................................................................48
10.  Cómo registrar la garantía de su producto  ..............................................................51
Directiva ERP Reglamento de la Comisión  .................................................................. .102
Declaración UE de conformidad  ................................................................................... .103

Summary of Contents for D SERIES

Page 1: ...UIKERSHANDLEIDING Page 77 ES EN PT NL D SERIESDigital radiator with Wi Fi Radiador digital con Wi Fi Radiador digital com Wi Fi Digitale radiator met Wi Fi GUARANTEE GARANTÍA GARANTIA GARANTIE ON THE BODY EN EL CUERPO NO CORPO IN HET LICHAAM YEARS AÑOS ANOS JAAR YEARS AÑOS ANOS JAAR ON ELECTRONICS EN ELECTRÓNICA NA ELECTRÓNICA IN ELEKTRONICA ...

Page 2: ...es or similar objects within 250 mm of the radiator HOT SURFACE This symbol indicates that your surfaces are hot during and immediately after use These must not be touched danger of burns OBSERVE THE INSTRUCTIONS IN THE MANUAL Please read this manual carefully before installing and using the product Keep it for later use Read all instructions and safety warnings Failure to follow these can result ...

Page 3: ...u Submenu settings 14 5 7 Main Menu Energy sub menu 15 5 8 Main menu Equilibrium Balance sub menu 17 5 9 Main menu Program sub menu 17 5 9 1 Manual Automatic functions 18 5 9 2 Programming options 18 5 9 3 User mode 20 5 9 4 Pilot wire function 22 5 9 5 Fuzzy Logic Control technology 22 6 Wi Fi Pairing 22 7 Maintenance and cleaning 23 8 European Regulation WEEE 2012 19 EU 23 9 Guarantee 23 10 How ...

Page 4: ...uct unless supervised DO NOT use the product in enclosed spaces if the persons present cannot leave the room independently and are not under constant supervision DO NOT COVER To avoid overheating do not cover the radiator DO NOT place spray cans volatile substances or similar objects within 250mm of the product DO NOT use insecticides paints or chemicals on or near the product Some parts of this p...

Page 5: ... should be used Please observe the current and relevant regulations when disposing of this product and its thermal fluid If the power cable is damaged it must be replaced by personnel authorised by ROINTE to prevent any damage To avoid the risk of suffocation do not leave the packaging including bags and other items within reach of babies or children The product has an IP24 degree of protection an...

Page 6: ...correct sizing of the product unless it has been followed by an official ROINTE technical study Before the first start up or before the start of winter or when the product has not been used for many days the appliance should be cleaned follow the steps in the maintenance section of this manual Do not sit or lean on the product Temperature contrasts can generate clicks or noises in the device This ...

Page 7: ...inish White RAL 9016 Graphite RAL color ELECTRICAL CHARACTERISTICS Nominal power W 330 550 770 990 1 210 1 430 1 600 Effective power W 125 209 293 376 460 543 608 Voltage V 230 V 230 V 230 V 230 V 230 V 230 V 230 V Current A 1 5 2 4 3 4 4 3 5 3 6 2 7 0 SAFETY INSTALLATION Safety thermostat Protection Grade IP 24 IP 24 IP 24 IP 24 IP 24 IP 24 IP 24 Template Installation Kit EAN CODE WHITE 843604591...

Page 8: ...the wall in the position shown in the accompanying image using the brackets and with the fixings supplied Our products transfer heat through the natural air convection If the product is covered this will disrupt the airflow and could cause overheating It must be positioned in accordance with the minimum distances shown in the accompanying picture WARNING The product has an IP24 degree of protectio...

Page 9: ... mark the holes for the brackets and screws Observe the minimum distance requirements from the previous page Use the floor as a base for the template not the skirting board 3 Remove the template and carefully drill out the marked holes 4 Secure the upper brackets with the rawl plugs and screws provided Then fix the lower bracket To distinguish it the lower bracket has a different design from the t...

Page 10: ...product to the power supply and switch it on 8 See section 5 for operating instructions IMPORTANT Measurement template per model 0330RAD 0550RAD 0770RAD 0990RAD 1210RAD 1430RAD 1600RAD Floor Floor Floor Floor Floor Floor ...

Page 11: ...al ANTI FROST mode active Connected to the server and router minimum net signal Control panel locked through keypad Connected to router Not connected to the server Control panel locked through remote Not connected to the server or to the router AUTOMATIC function active PILOT WIRE function not available in UK Only on demand On Off button Accept Confirm button Programming Time Days of the week Temp...

Page 12: ...After 3 seconds the Rointe logo will appear 5 2 ADJUST THE DAY AND TIME It is possible to change the radiator time from the control panel but it is preferable to wait for automatic synchronisation once it is paired with the Rointe Connect application and the product is connected to the E life Technology servers Pressing the key you can access the Main Menu To move left press the button and to move...

Page 13: ...ology is activated the symbol will replace the symbol in the top right of the display panel To learn more about Fuzzy Logic Energy Control technology please see section 5 9 5 5 4 LOCK THE CONTROL PANEL To lock the keypad manually please hold and press the button AND the button TOGETHER for 3 seconds The symbol will appear on the display panel and the keys will not respond To unlock the keypad manu...

Page 14: ...on displayed in the Main Menu screen and press to confirm Use the and buttons to move across the different options on the sub menu to choose your parameter and press to access The below icons displayed on the screen take you to the following parameters Display backlight brightness Wi Fi settings Language Time Adjust display backlight brightness This allows you to change the brightness of the displ...

Page 15: ... language To change the language of your product ensure the icon is highlighted in the Settings sub menu and press the button to access Use the and buttons to move up or down respectively until your chosen language is highlighted and confirm by pressing the button Adjust the day and time This option sets the hour minutes and day of the week in your product Please refer to section 5 2 5 7 MAIN MENU...

Page 16: ...r product is connected to the mains After a few seconds without pressing any button the display will show the nominal power and the effective power of the product The effective power corresponds to the average power value that our product actually consumes during operation Information This function will display the software version the date of this release and the rated power of the product To acc...

Page 17: ...con using the keys and Confirm by pressing the key Once pressed the product returns to the main screen with the temperature set at 19 C and the MANUAL function icon on 5 9 MAIN MENU PROGRAM SUB MENU This section explains the operational aspects of your product in its various functions and modes What are the functions of MANUAL AUTOMATIC and PILOT WIRE functions MANUAL This function allows you to c...

Page 18: ...L AUTOMATIC FUNCTIONS To change or choose the MANUAL or AUTOMATIC function ensure the icon is highlighted in the Program sub menu and press the button to confirm You can change from AUTOMATIC to MANUAL and vice versa by pressing the button again The Automatic function activates the programming set in the product On the display panel the symbol will appear for the AUTOMATIC function and the symbol ...

Page 19: ...your AUTOMATIC program The day will stop flashing once selected Repeat for all the days you wish to program and once all days are selected press the button to move onto setting the hour STEP 4 Select the Hours Once step 3 has been completed 0h appears on the display panel 0h is equal to midnight Use the or buttons to select the hour you wish to change Use the button to change the mode COMFORT ECO ...

Page 20: ...be shown The below icons displayed on the screen take you to the following functions ENABLE DISABLE functions Change PIN Upper temperature limit Lower temperature limit Enable Disable functions To access the Enable Disable function ensure the icon is highlighted in the Program sub menu and press the button to access Use the and buttons to move up and down respectively to select ON to enable or OFF...

Page 21: ...limit of your product ensure the icon is highlighted in the Program sub menu and press the button to access Use the and buttons to decrease or increase your desired upper temperature between 19ºC to 30ºC and press the button to confirm You will then return to the USER function screen To exit press the button to go back to the main display panel or leave for 30 seconds Lower temperature limit To se...

Page 22: ...ct s energy consumption in the most efficient way FUZZY LOGIC ENERGY CONTROL is a technology that bases its operation on the generation of thousands of micro cuts in the energy consumption of the heating element to keep the water temperature stable with minimum consumption When the symbol replaces the symbol then FUZZY LOGIC ENERGY CONTROL technology is in operation 6 WI FI PAIRING To pair the dev...

Page 23: ...TEE 1 Agreement 1 1 This section describes the guarantee conditions available to the buyer when purchasing a new product of the Rointe brand These conditions include all the rights that the buyer has in accordance with current national legislation as well as the guarantee and additional rights offered by the brand Any incident detected in your Rointe product can be dealt with by the seller of the ...

Page 24: ...orce at the time of installation 2 1 3 The guarantee is only applicable to those cases that refer to defects in material design and manufacture and in no case covers damage to the product for the following reasons i Damage caused by negligence and or misuse of the product i e used for purposes other than its normal use or by not respecting the instructions for use maintenance and cleaning given by...

Page 25: ...ise you if you need to purchase any parts not covered by this guarantee or outside of this guarantee 2 6 This guarantee will not be valid if the product has been tampered with modified and or repaired in any way and or by unauthorised persons This guarantee will also not be valid if the product is not correctly installed 2 7 This guarantee is not transferable and does not include claims for limesc...

Page 26: ...chase such as your invoice in PDF JPEG or PNG format This is not mandatory but doing so ensures that your warranty period is accurate 7 Click on Register 8 Congratulations Your product is now registered EMAIL 1 Send an email to support rointe com with the following information Customer name Address and postcode Telephone number and email address Product reference Serial number The date of purchase...

Page 27: ...objetos similares a menos de 250 mm del radiador SUPERFICIE CALIENTE Este símbolo indica que sus superficies están calientes durante e inmediatamente después de su uso Estas no deben ser tocadas peligro de quemaduras OBSERVE LAS INSTRUCCIONES EN EL MANUAL Por favor lea cuidadosamente el manual antes de instalar y utilizar el producto Guárdelo para su uso posterior Leatodaslasinstruccionesyadverten...

Page 28: ...configuración 39 5 7 Menú principal Submenú de energía 40 5 8 Menú principal Submenú equilibrio 42 5 9 Menú principal Submenú programación 42 5 9 1 Funciones manual automático 43 5 9 2 Programación 43 5 9 3 Modo usuario 45 5 9 4 Función HILO PILOTO 47 5 9 5 Tecnología Fuzzy Logic Control 47 6 Emparejamiento 47 7 Manteniemiento y limpieza 47 8 Normativa Europea RAEE 2012 19 UE 48 9 Garantía 48 10 C...

Page 29: ...sean supervisados No usar el dispositivo en espacios cerrados si hay personas presentes que no pueden abandonar la habitación independientemente y no están bajo constante supervisión NO CUBRIR Para evitar sobrecalentamientos no cubrir el radiador No colocar botes de spray sustancias volátiles u objetos similares a una distancia inferior a 250mm del producto No utilice insecticidas pinturas product...

Page 30: ...ecambio oficiales aprobadas por el fabricante Por favor respete las normas al desechar este producto y su fluido térmico Si el cable de alimentación está dañado debe ser sustituido por ROINTE o por su personal autorizado para evitar cualquier daño Para evitar riesgos de asfixia no dejar las bolsas y demás accesorios al alcance de bebes y niños ElproductotieneungradodeprotecciónIP24ypuedeutilizarse...

Page 31: ...sable de los productos con un dimensionamiento incorrecto a menos que se haya seguido un estudio técnico oficial de ROINTE Antes del primer arranque o antes del comienzo de la campaña de invierno o cuando el emisor no se ha usado durante muchos días el aparato debe ser limpiado siga los pasos del punto mantenimiento de este manual No se siente o apoye sobre el producto Los contrastes de temperatur...

Page 32: ...xturado Color RAL CARACTERÍSTICAS ELÉCTRICAS Potencia nominal W 330 550 770 990 1 210 1 430 1 600 Potencia efectiva W 125 209 293 376 460 543 608 Voltaje V 230 V 230 V 230 V 230 V 230 V 230 V 230 V Intensidad A 1 5 2 4 3 4 4 3 5 3 6 2 7 0 SEGURIDAD E INSTALACIÓN Termostato de seguridad Grado de protección IP 24 IP 24 IP 24 IP 24 IP 24 IP 24 IP 24 Plantilla y kit de instalación CÓDIGO EAN BLANCO 84...

Page 33: ...ntilla ROINTE el kit de instalación y los elementos de fijación suministrados No instalar el producto de forma que quede en contacto con cable de alimentación El producto debe ser montado en la pared en la posición mostrada en la imagen adjunta usando los soportes y con las fijaciones suministradas Nuestros productos transfieren el calor a través de la convección natural del aire Si el producto es...

Page 34: ...ne el lugar adecuado de la pared Coloque la plantilla en la pared y marque los agujeros para los soportes y los tornillos Observe los requisitos de distancia mínima de la página anterior Utilice el suelo como base para la plantilla no el rodapié 3 Retire la plantilla y taladre cuidadosamente los agujeros marcados 4 Fije los soportes superiores con los tacos y tornillos suministrados Luego fije el ...

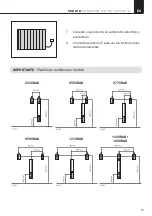
Page 35: ...I FI 35 7 Conecte su producto al suministro eléctrico y enciéndalo 8 Consulte la sección 5 para ver las instrucciones de funcionamiento IMPORTANTE Plantilla de medidas por modelo 0330RAD 0550RAD 0770RAD 0990RAD 1210RAD 1430RAD 1600RAD ...

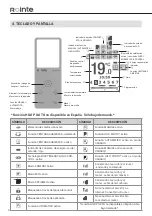
Page 36: ... Conectado al servidor y al router señal de red mínima Bloqueado a través del panel de control No conectado al servidor o a Internet Conectado al router Bloqueado a través de aplicación No conectado al servidor No conectado al router Función AUTOMÁTICO activo Función HILO PILOTO no disponible en España Sólo bajo demanda Encendido Apagado Aceptar Confirmar Programación Hora Días de la semana Temper...

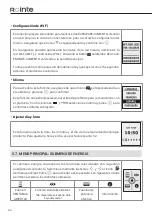
Page 37: ...á el logo de Rointe 5 2 AJUSTAR DÍA Y HORA Es posible cambiar la hora del radiador desde el panel de control pero es preferible esperar a la sincronización automática una vez se empareje con la aplicación Rointe Connect y el producto esté conectado a los servidores de E life Technology Pulsando el botón accede al menú principal Usando los botones y que dirigen a la izquierda y a la derecha respect...

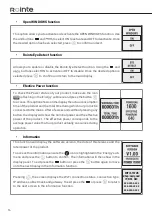
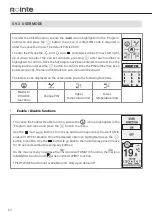
Page 38: ...namiento el logo aparecerá en la pantalla en el lugar donde se encontraba el símbolo de resistencia activa Para saber más acerca de la tecnología Fuzzy Logic Energy Control vea por favor el punto 5 9 5 5 4 BLOQUEAR DESBLOQUEAR TECLADO Desde el propio producto pulsando simultáneamente durante 3 segundos los botones y se bloquea el teclado encendiéndose el icono de bloqueo de teclado Al pulsar cualq...

Page 39: ...icono del menú principal y confirme pulsando el botón Aparecerá la pantalla de la derecha y podrá moverse por las distintas opciones del submenú utilizando los botones y y pulse para acceder Los siguientes iconos permiten acceder a los distintos submenús que se explican a continuación Iluminación de la pantalla Configuración de WiFi Idioma Hora Ajustar la iluminación de la pantalla Esta función pe...

Page 40: ...rpadeando en el submenú y presione para confirmar Esta función nos permite seleccionar el idioma preferido para comunicarnos con el producto Con los botones y seleccione el idioma y pulse para confirmar el idioma subrayado Ajustar día y hora Esta función ajusta la hora los minutos y el día de la semana desde el propio producto Para ajustar la hora y el día vea por favor el punto 5 2 5 7 MENÚ PRINC...

Page 41: ... de su producto asegúrese que el icono parpadea en el submenú Energía y presione el botón para acceder Esta opción muestra en la pantalla el tiempo de consumo real del producto y el tiempo total durante el cual nuestro producto se encuentra conectado a la red eléctrica Transcurridos unos segundos sin pulsar ningún botón la pantalla mostrará la potencia nominal y la potencia efectiva del mismo La p...

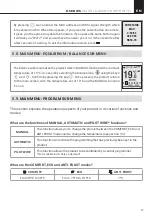
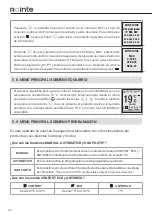
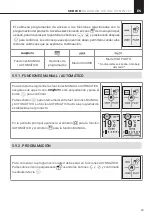
Page 42: ...función MANUAL con una temperatura constante de 19 C Accedemos seleccionando desde el menú principal el icono equilibrio usando las teclas y Confirme mediate una pulsación de la tecla Una vez pulsado el producto vuelve a la pantalla principal con la temperatura establecida en 19 C y el icono función MANUAL encendido 5 9 MENÚ PRINCIPAL SUBMENÚ PROGRAMACIÓN En este apartado se explican los aspectos ...

Page 43: ... HILO PILOTO No disponible en España Sólo bajo demanda 5 9 1 FUNCIONES MANUAL AUTOMÁTICO Para cambiar o elegir entre las funciones MANUAL o AUTOMÁTICO asegúrese de que el icono esté parpadeando y pulse el botón para confirmar Pulse el botón para intercambiar entre las funciones MANUAL y AUTOMÁTICO La función AUTOMÁTICO activa la programación establecida en el producto En la pantalla principal apar...

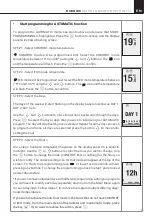
Page 44: ...ura modo ECO Modo ECO será programado a continuación Seleccione la temperatura modo ECO entre 7 5ºC y 18 5ºC El icono y la temperatura parpadearán Presione para confirmar PASO 3 Seleccione el día Los días de la semana empezarán a parpadear en la pantalla y se mostrará como DÍA 1 DÍA 2 DÍA 3 etc Use los botones y para moverse delante o detrás por los días expuestos Presione para seleccionar el día ...

Page 45: ... usted deberá modificar cada día por separado empezando desde el menú principal para cada día o días a modificar Siga de los pasos 1 hasta el 4 para programar diferentes días horas y temperaturas 5 9 3 MODO USUARIO Para acceder al modo USUARIO asegúrese de que el icono está parpadeando en el submenú y presione para confirmar Será necesario un PIN de cuatro dígitos para acceder al menú El pin estab...

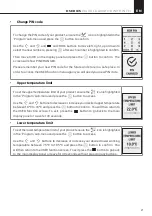
Page 46: ...lo bajo demanda Cambiar el código PIN Para cambiar el código PIN de su producto asegúrese que está sobre el icono parpadeando en el menú y presione para confirmar Esta función permite cambiar la contraseña para acceder al modo Usuario Seleccione los números del nuevo PIN usando los botones y Una vez realizado el proceso acepte pulsando OK apareciendo la pantalla PIN CHANGED para confirmar el cambi...

Page 47: ...ir En la pantalla principal aparecerá 5 9 5 TECNOLOGÍA FUZZY LOGIC ENERGY CONTROL Este producto incluye la tecnología FUZZY LOGIC ENERGY CONTROL la cual gestiona el consumo de energía del producto de la manera más eficiente FUZZY LOGIC ENERGY CONTROL es una tecnología que basa su funcionamiento en la generación de miles de micro cortes en el consumo energético de la resistencia para mantener la te...

Page 48: ... El símbolo del cubo de basura tachado sobre barra horizontal se marca sobre todos los productos Rointe para recordar al consumidor la obligación de separarlos para la recogida selectiva El consumidor debe contactar con la autoridad local o con el vendedor para informarse en relación a la correcta eliminación de su aparato 9 GARANTÍA 1 Acuerdo 1 1 En este apartado se describen las condiciones de g...

Page 49: ... dicha garantía haya sido registrada en ROINTE correctamente incluyendo la referencia del producto el número de serie marcado en la etiqueta metálica del producto la fecha de compra y el comprobante de compra La garantía del producto puede registrarse en nuestro sitio web en www rointe com o puede enviarse por correo electrónico a sat rointe com en un plazo de 90 días a partir de la instalación RO...

Page 50: ... producto debe instalarse de forma que permita el acceso de los técnicos de ROINTE o de personas autorizadas en caso de que necesiten acceder al producto para su reparación o mantenimiento El usuario cliente es responsable de los medios organizativos necesarios para permitir el acceso a los productos por ROINTE para su reparación o sustitución 2 5 El departamento de Soporte Técnico de ROINTE le as...

Page 51: ... la factura en formato PDF JPEG o PNG Esto no es obligatorio pero al hacerlo se asegura que su período de garantía es exacto 7 Haga clic en Registro 8 Enhorabuena Su producto ya está registrado EMAIL 1 Envíe un correo electrónico a sat rointe com con la siguiente información Nombre del cliente Dirección y código postal Número de teléfono y dirección de correo electrónico Referencia del producto Nú...

Page 52: ...melhantes num raio de 250 mm do radiador SUPERFÍCIE QUENTE Este símbolo indica que as suas superfícies estão quentes durante e imediatamente após a sua utilização Não devem ser tocados perigo de queimaduras OBSERVAR AS INSTRUÇÕES DO MANUAL Por favor leia atentamente o manual antes de instalar e utilizar o produto Guarde o para utilização posterior Ler todas as instruções e avisos de segurança O nã...

Page 53: ...l Submenu de configuração 64 5 7 Menu principal Submenu de energia 65 5 8 Menu principal Submenu equilibrio 67 5 9 Menu principal Submenu programação 67 5 9 1 Funções manual automático 68 5 9 2 Programação 68 5 9 3 Modo usuario 70 5 9 4 Função HILO PILOTO 72 5 9 5 Tecnología Fuzzy Logic Control 72 6 Emparelhamento Wi Fi 72 7 Manutenção e limpeza 73 8 Regulamento Europeu RAEE 2012 19 UE 73 9 Garant...

Page 54: ...a menos que sejam supervisionadas Não manusear o dispositivo em espaços fechados se estiverem presentes pessoas que não possam sair da sala independentemente e que não estejam sob supervisão constante NÃO COBERTAR Para evitar o sobreaquecimento não cobrir o radiador Não colocar latas de spray substâncias voláteis ou objectos semelhantes num raio de 250mm do produto Não utilizar insecticidas tintas...

Page 55: ... substitução oficiais aprovadas pelo fabricante É favor observar os regulamentos ao eliminar este produto e o seu fluido térmico Se o cabo de alimentação for danificado deve ser substituído por ROINTE ou pelo seu pessoal autorizado para evitar qualquer dano Para evitar o risco de asfixia não deixar os sacos e outros acessórios ao alcance de bebés e crianças O produto tem um grau de protecção IP24 ...

Page 56: ...bilizada por produtos com dimensões incorrectas a menos que um inquérito técnico oficial ROINTE tenha sido seguido Antes do primeiro arranque ou antes do início da estação de Inverno ou quando o transmissor não tiver sido utilizado durante vários dias o dispositivo deve ser limpo seguir os passos na secção manutenção deste manual Não sentar ou apoiar no produto Os contrastes de temperatura podem g...

Page 57: ...ranco RAL 9016 Grafite texturizado Cor RAL CARACTERÍSTICAS ELÉCTRICAS Potência nominal W 330 550 770 990 1 210 1 430 1 600 Potência efectiva W 125 209 293 376 460 543 608 Voltagem V 230 V 230 V 230 V 230 V 230 V 230 V 230 V Intensidade A 1 5 2 4 3 4 4 3 5 3 6 2 7 0 SEGURANÇA E INSTALAÇÃO Termostato de seguança Grau de protecção IP 24 IP 24 IP 24 IP 24 IP 24 IP 24 IP 24 Kit de instalação incluído C...

Page 58: ...odelo ROINTE kit de instalação e fixadores fornecidos Não instalar o produto de forma que este entre em contacto com o cabo de alimentação O produto deve ser montado na parede na posição indicada na imagem anexa utilizando os parênteses e fixações fornecidos Os nossos produtos transferem calor através da convecção natural do ar Se o produto estiver coberto isto perturbará o fluxo de ar e poderá ca...

Page 59: ...e cartão 2 Seleccionar a localização apropriada na parede Colocar o modelo na parede e marcar os furos para os suportes e parafusos Observar os requisitos de distância mínima na página anterior Utilizar o chão como base para o modelo não o rodapé 3 Retirar o modelo e perfurar cuidadosamente os furos marcados 4 Fixar os suportes superiores com as cavilhas e parafusos fornecidos Em seguida fixar o s...

Page 60: ...oduto à fonte de alimentação e ligue o 8 Consultar a secção 5 para instruções de funcionamento IMPORTANTE Modelo de medição por modelo 0330RAD 0550RAD 0770RAD 0990RAD 1210RAD 1430RAD 1600RAD Chão Chão Chão Chão Chão Chão ...

Page 61: ...o ANTICONGELANTE activo Ligado ao servidor e ao router sinal de rede mínimo Bloqueio através do painel de controlo do producto Não ligado ao servidor ou à Internet Bloqueado através do comando à distância Não ligado ao servidor Não ligado ao router Função AUTOMÁTICO activo Não disponível em Espanha ou Portugal Somente por encomenda Ligar Desligar Aceitar Confirmar Programação Hora Dias da semana T...

Page 62: ...se á 5 2 AJUSTAR DIA E HORA O usuário pode alterar a hora do radiador a partir do painel de controlo mas será sempre preferível esperar pela sincronização automática que ocorrerá quando ligar o aparelho à aplicação Rointe Connect e o produto estiver ligado aos servidores E life Technology Ao carregar no botão acederemos ao menu principal Utilizando os botões e selecionaremos o submenu de configura...

Page 63: ...ma vez ativada a tecnologia Fuzzy Logic Energy Control é exibido o logotipo no ecrã no mesmo local onde se encontrava o símbolo de resistência ativa Veja o ponto 5 9 5 5 4 BLOQUEIO DO PAINEL DE CONTROLO A partir do próprio produto e se carrega simultaneamente durante 3 segundos nos botões e ligar se á o ícone de bloqueio do teclado Ao carregar em qualquer tecla irá aparecer lhe no visor a imagem d...

Page 64: ...cone do menu principal e confirmaremos ao carregar no botão Aparecerá no visor da direita e poderemos mover nos pelas distintas opções do submenu utilizando os botões e e carregue para aceder Os seguintes ícones permitem nos aceder aos distintos submenus que se indicam abaixo Iluminação de tela Configurações de WiFi Idioma Hora Ajuste a iluminação do display Esta função permite alterar o brilho do...

Page 65: ...o ícone está a piscar no submenu e prima para confirmar Esta função permite nos seleccionar a língua preferida para comunicar com o produto Utilize os botões e seleccione a língua e prima para confirmar a língua sublinhada Ajustar dia e hora Esta função ajusta a hora os minutos e o dia da semana a partir do próprio produto Para ajustar a hora e o dia consulte por favor o ponto 5 2 5 7 MENU PRINCIP...

Page 66: ... visor o tempo de consumo real do produto e o tempo total durante o qual se encontra conectado à rede eléctrica Passados uns segundos sem ter que carregar em nenhum botão o visor mostrará a potência nominal e a potência efectiva do mesmo A potência efectiva corresponde ao valor da potência média que realmente consome durante o funcionamento Informação Esta opção mostra a versão do software a data ...

Page 67: ...NU PRINCIPAL SUBMENU PROGRAMAÇÃO Esta secção explica aspectos relacionados com o funcionamento do produto nas suas diferentes funções e modos O qué é que são as funções MANUAL AUTOMÁTICO e FIO PILOTO MANUAL Esta função permite alternar entre os modos de trabalho CONFORTO ECO e ANTICONGELANTE modificando a temperatura como se indicou no ponto 5 3 AUTOMÁTICO Esta função activa a programação que tenh...

Page 68: ... o símbolo para a função AUTOMÁTICO e o símbolo para a função MANUAL 5 9 2 PROGRAMAÇÃO Para começar a programação temos que estar em função Automático Carregue sobre o ícone utilizando os botões e para mover se e confirme mediante a tecla START PROGRAMMING para modo Automático Para programar o função Automático veja os pontos anteriores e assegure se que o START PROGRAMMING está selecionado Pressi...

Page 69: ...o para passar a configurar a hora PASSO 4 Seleccione as horas Uma vez concluída a etapa 3 0h aparecerá no visor 0h é igual a meia noite Use os botões e para seleccionar a hora que deseja mudar Use o botão para mudar COMFORT ECO ou modo nada durante o tempo que desejar mudar O ícone correspondente aparecerá para cada modo Para terminar a programação premir ou esperar 30 segundos sem premir nenhum b...

Page 70: ...eder aos distintos menus que se detalham abaixo Activar desactivar modo de USUARIO Alterar o código PIN Limite máximo de temperatura Limite mínimo de temperatura Activar Desactivar modo USUARIO Primeiro certifique se de que o ícone está a piscar e confirme com o botão Usando as teclas e para cima e para baixo respectivamente seleccionar ON para activar e OFF para desactivar Uma vez destacada a opç...

Page 71: ...o seu novo código PIN Limite máximo de temperatura Assegure se que está sobre o ícone e que este pisca no menu agora pressione para confirmar Esta função permite modificar a temperatura máxima de trabalho do produto Com os botões e pode se aumentar ou reduzir a temperatura entre os 19ºC e 30ºC Quando selecione o valor desejado carregue em para sair Para terminar carregue no botão ou espere 30 segu...

Page 72: ...duto da forma mais eficiente FUZZY LOGIC ENERGY CONTROL é uma tecnologia que baseia o seu funcionamento na geração de milhares de micro cortes no consumo de energia do elemento de aquecimento para manter uma temperatura de água estável com um consumo mínimo Quando o símbolo substitui ao símbolo então a tecnologia FUZZY LOGIC ENERGY CONTROL está em funcionamento 6 EMPARELHAMENTO Para emparelhar o d...

Page 73: ...rar ao consumidor a obrigação de os separar para recolha separada O consumidor deve contactar a autoridade local ou o retalhista para obter informações sobre a correcta eliminação do seu aparelho 9 GARANTIA 1 Acordo 1 1 Esta secção descreve as condições de garantia que o comprador tem quando compra um novo produto da marca Rointe Estas condições incluem todos os direitos que o comprador tem em con...

Page 74: ...odificada após a compra do produto original 2 1 2 A garantia só é aplicável se o produto tiver sido instalado por uma pessoa competente de acordocomestemanualdeinstalaçãoetodososregulamentosemvigornomomentodainstalação 2 1 3 A garantia só é aplicável aos casos que se referem a defeitos de material desenho e mão de obra e em nenhum caso cobre danos ao produto pelas seguintes razões i Danos causados...

Page 75: ...técnico de ROINTE irá assesorar caso necessite adquirir alguma peça que não está coberta pela garantia ou fora dela 2 6 Estagarantianãoseráválidaseoprodutotiversidoadulterado modificadoe oureparado de qualquer forma e ou por pessoas não autorizadas Esta garantia também não será válida se o produto não estiver correctamente instalado 2 7 Esta garantia não é transmissível e não inclui reclamações po...

Page 76: ...o uma factura em formato PDF JPEG ou PNG Isto não é obrigatório mas ao fazê lo garante que o seu período de garantia é preciso 7 Clique em Registar 8 Parabéns O seu produto está agora registado EMAIL 1 Enviar um e mail para sat rointe com com as seguintes informações Nome do cliente Endereço e código postal Número de telefone e endereço de correio electrónico Referência do produto Número de série ...

Page 77: ...fen of soortgelijke voorwerpen op minder dan 250 mm van de radiator HEETE ZUUR Dit symbool geeft aan dat uw oppervlakken heet zijn tijdens en onmiddellijk na gebruik Hete oppervlakken mogen niet aangeraakt gevaar voor brandwonden NEEM DE AANWIJZINGEN IN DE HANDLEIDING IN ACHT Gelieve zorgvuldig te lezen de handleiding voordat u het product installeert en gebruikt Bewaar deze voor later gebruik Lee...

Page 78: ...ngen submenu 89 5 7 Hoofdmenu Energie submenu 90 5 8 Hoofdmenu Balanceer submenu 92 5 9 Hoofdmenu Programma submenu 92 5 9 1 Handmatige automatisch functies 93 5 9 2 Programmeer opties 93 5 9 3 Gebruikers modus 95 5 9 4 Waakvlam functie 97 5 9 5 Fuzzy Logic Control technologie 97 6 Wi Fi pairing 97 7 Onderhoud en reiniging 98 8 Europese Verordening WEEE 2012 19 EU 98 9 Garantie 98 10 Hoe registree...

Page 79: ...onder toezicht staan Gebruik het apparaat niet in gesloten ruimtes waar mensen aanwezig zijn die de ruimte niet zelfstandig kunnen verlaten en niet onder continu toezicht staan NIET VERDIEPEN Om oververhitting te voorkomen mag u de radiator niet afdekken Plaats geen spuitbussen vluchtige stoffen of voorwerpen binnen 250mm van het product Geen insecticiden verf chemicaliën gebruiken op of nabij het...

Page 80: ...em alstublieft de voorschriften in acht bij het wegwerpen van dit product en zijn thermische vloeistof Als het netsnoer beschadigd is moet het worden vervangen door ROINTE of door haar bevoegd personeel om schade te voorkomen Laat geen zakken of andere voorwerpen die een verstikkingsgevaar met zich meebrengen in de buurt van baby s en kinderen Het product heeft een IP24 beschermingsgraad en kan wo...

Page 81: ...oducten met een onjuiste dimensionering tenzij wanneer het vastgesteld is door een officieel technisch onderzoek door ROINTE Voor de eerste opstart voor de winterstop of wanneer de zender gedurende meerdere dagen niet zal worden gebruikt moet het toestel worden gereinigd volg de stappen in het hoofdstuk onderhoud van deze handleiding Ga niet op het product zitten of leunen Temperatuurschommelingen...

Page 82: ...tuur Kleur RAL ELEKTRISCHE EIGENSCHAPPEN Nominaal vermogen W 330 550 770 990 1 210 1 430 1 600 Effectief vermogen W 125 209 293 376 460 543 608 Spanning V 230 V 230 V 230 V 230 V 230 V 230 V 230 V Intensiteit A 1 5 2 4 3 4 4 3 5 3 6 2 7 0 VEILIGHEIDSPRESTATIES EN INSTALLATIE Veiligheidsthermostaat Mate van bescherming IP 24 IP 24 IP 24 IP 24 IP 24 IP 24 IP 24 Installatie kit inbegrepen CODE EAN WI...

Page 83: ...everde gereedschap Installeer het product op een manier dat het niet in contact komt met stroomkabels Het product moet aan de muur worden bevestigd op de plaats die is aangegeven in de bijgevoegde afbeelding met behulp van de bijgeleverde beugels en bevestigingsmiddelen Onze producten dragen warmte over via natuurlijke luchtconvectie Als het product is afgedekt zal dit de luchtstroom verstoren en ...

Page 84: ...n bevat 2 Kies de juiste plaats op de muur Plaats de sjabloon op de muur en markeer de gaten voor de beugels en schroeven Let op de minimale afstandsvoorschriften op de vorige bladzijde Gebruik de vloer als basis voor het sjabloon niet de sokkel 3 Verwijder het sjabloon en boor voorzichtig de gemarkeerde gaten 4 Bevestig de bovenste beugels met de bijgeleverde haringen en schroeven Maak dan de tra...

Page 85: ... 85 7 Sluit uw product aan op de stroomvoorziening en schakel het in 8 Zie hoofdstuk 5 voor gebruiksaanwijzingen BELANGRIJK Metingssjabloon per model 0330RAD 0550RAD 0770RAD 0990RAD 1210RAD 1430RAD 1600RAD Vloer Vloer Vloer Vloer Vloer Vloer ...

Page 86: ...ter maximaal netwerk signaal VORSTVRIJ modus actief Verbonden met de server en router minimaal netwerk signaal Bedieningspaneel vergrendeld door toetsenbord Verbonden met router Niet verbonden met de server of het internet Vergrendeld met de afstandsbediening afstandsbediening Niet verbonden op de server of router AUTOMATISCHE functie actief Stuurdraad bedieningsfunctie is niet beschikbaar in Nede...

Page 87: ... modus met het woord STAND BY zichtbaar op het display Na 5 seconden verschijnt het Rointe logo 5 2 DAG EN TIJD INSTELLEN U kunt zelf de tijd op de radiator instellen via het bedieningspaneel van het apparaat of wachten op de automatische synchronisatie nadat de radiator via wifi aan de Rointe Connect app verbonden is Om de dag en tijd in te stellen drukt u op de gaan we naar het hoofdmenu Met de ...

Page 88: ...rechterbovenhoek van het display Voor meer informatie over de Fuzzy Logic Energy Control technologie zie paragraaf 5 9 5 5 4 HET BEDIENINGSPANEEL VERGRENDELEN Vanaf het product zelf en als u gelijktijdig 3 seconden op de toetsen en zal het icoon van de toetsenbordvergrendeling oplichten Wanneer op een toets wordt gedrukt verschijnt het beeld aan de rechterkant van het display Om te ontgrendelen dr...

Page 89: ...vestigen Het verschijnt op het rechterdisplay en we kunnen door de verschillende submenu opties gaan met behulp van de knoppe en endrukopomtoegangtekrijgen Devolgendepictogrammen geven toegang tot de verschillende hieronder aangegeven submenu s Achtergrond verlichting van het display WiFi instellingen Taal Tijd Achtergrondverlichting van het display instellen Hiermee kunt u de helderheid van het d...

Page 90: ... wijzigen dient u het symbool te markeren in het submenu Instellingen en drukt u op de toets om deze te openen Met deze functie kunt u de voorkeurstaal kiezen om met het product te communiceren Gebruik de toetsen en om de taal te selecteren en druk op om de onderstreepte taal te bevestigen Dag en tijd instellen Hiermee stelt u op uw product de tijd en de dag van de week in Voor meer informatie zie...

Page 91: ...an het Effectief Vermogen van uw product te controleren controleert u of het pictogram knippert in het submenu Energie en drukt u op de toets om toegang te krijgen Deze optie toont op het display de werkelijke verbruikstijd van het product en de totale tijd dat het op het lichtnet is aangesloten Na enkele seconden zonder op een toets te drukken toont het display het nominale en effectieve vermogen...

Page 92: ...HANDMATIGE modus met een constante temperatuur van 19ºC Open het door in het hoofdmenu het balansicoon te selecteren met de en toetsen Bevestig door op de toets te drukken Na het indrukken keert het product terug naar het hoofdscherm met de temperatuur ingesteld op 19 C en het functie icoon HANDMATIG aan 5 9 HOOFDMENU PROGRAMMA SUBMENU Dit gedeelte geeft uitleg over de operationele aspecten van uw...

Page 93: ...ties GEBRUIKERS modus STUURDRAAD bedieningsfunctie Niet beschikbaar in Nederland Alleen op aanvraag 5 9 1 HANDMATIGE AUTOMATISCH FUNCTIES Als u de functies HANDMATIG of AUTOMATISCH wilt wijzigen dient u het symbool te markeren in het submenu Programma en druk op de toets om deze te openen U kunt overschakelen van AUTOMATISCH naar HANDMATIG en vice versa door nogmaals op de toets te drukken In het ...

Page 94: ...igen STAP 2 Selecteer de temperatuur voor de ECO modus Vervolgens wordt de ECO modus geprogrammeerd Stel uw ECO modus temperatuur in tussen de 7 5ºC en 18 5ºC met behulp van de en toetsen Het symbool en de temperatuur knipperen Druk op de toets om te bevestigen STAP 3 Selecteer de dagen De dagen van de week knipperen in het display ze worden getoond als DAG 1 DAG 2 DAG 3 enz Gebruik de toetsen en ...

Page 95: ...de dagen dient u elke dag of dagen individueel in te stellen Begin voor elk afzonderlijke programma vanaf het hoofdmenu Volg de stappen 1 t m 4 hierboven om de verschillende dagen uren temperaturen te programmeren 5 9 3 GEBRUIKERS MODUS Om de GEBRUIKERS functie in te stellen dient u het symbool te markeren in het submenu Programma en drukt u op de toets om deze te openen Een 4 cijferige PIN code i...

Page 96: ...ppert in het menu druk nu om te bevestigen Met deze functie kunt u het wachtwoord voor toegang tot de gebruikersmodus wijzigen Selecteer de nummers van de nieuwe PIN met de toetsen en Wanneer het proces is voltooid accepteert u met door op OK te drukken en PIN GEWIJZIGD verschijnt op het display om de wijziging te bevestigen Onthoud uw nieuwe pincode voor de toekomst en bewaar deze op een veilige ...

Page 97: ...n en OFF om te deactiveren Druk op om te bevestigen en af te sluiten Op het hoofdscherm verschijnt 5 9 5 FUZZY LOGIC ENERGY CONTROL TECHNOLOGIE Dit product is voorzien van de FUZZY LOGIC ENERGY CONTROL technologie die het energieverbruik van het product op de meest efficiënte manier beheert FUZZY LOGIC ENERGY CONTROL is een technologie die haar werking baseert op het genereren van duizenden micros...

Page 98: ...oor de menselijke gezondheid en het milieu te beperken Het symbool van de doorgekruiste vuilnisbak op een horizontale balk staat op alle Rointe producten om de consument te herinneren aan de verplichting om ze te scheiden De consument moet contact opnemen met de plaatselijke autoriteit of de verkoper voor meer informatie over het correct weggooien van uw apparaat 9 GARANTIE 1 Ovweeenkomst 1 1 In d...

Page 99: ...ele garantie is afgegeven door de verkoper en wanneer de garantie correct bij ROINTE is geregistreerd inclusief de referentie van het product het serienummer aangegeven op het metalen etiket op het product de fabricagedatum de datum van en een bewijs van aankoop De productgarantie kan worden geregistreerd op onze website op www rointe com of kunnen per e mail worden gezonden naar sat rointe com to...

Page 100: ...n eigendom van ROINTE en worden als zodanig geretourneerd 2 4 Het product moet zo geïnstalleerd worden dat het toegankelijk is voor ROINTE technici of bevoegdepersoneninhetgevaldatzijtoegangtothetproductnodighebbenvoorreparatiesof onderhoud De gebruiker opdrachtgever is verantwoordelijk voor de nodige organisatorische middelen om ROINTE toegang te verlenen tot de producten voor reparatie of vervan...

Page 101: ... uw aankoopbewijs zoals een factuur in PDF JPEG of PNG formaat Dit is niet verplicht maar het garandeert wel dat uw garantieperiode accuraat is 7 Klik op Registreren 8 Gefeliciteerd Uw product is nu geregistreerd EMAIL 1 Stuur een e mail naar support rointe com met de volgende informatie Naam klant Adres en postcode Telefoonnummer en e mail adres Productreferentie Serienummer De datum van aankoop ...

Page 102: ...ALORÍFICA DE TEMPERATURA INTERIOR TIPO DE SAÍDA DE CALOR CONTROLO DE TEMPERATURA DO AR TYPE WARMTEAFGIFTE REGELING BINNENTEMPERATUUR Electronic indoor temperature control and weekly timer Control electrónico de temperatura interior y temporizador semanal Controlo electrónico da temperatura interior e temporizador semanal Elektronische binnentemperatuurregeling en wekelijkse timer SI SI SI SI SI SI...

Page 103: ...ingen van de volgende relevante norm en specificatie s richtlijn en ErP Directive 2009 35 EU UE 2015 1188 LVD Directive 2014 35 EU EN 60335 1 2012 Annexes A11 2014 A13 2017 EN 60335 2 30 2010 Annexes A11 2012 EMC Directive 2014 30 EU EN 55014 1 2017 EN 55014 2 2015 EN 62233 2008 AC 2008 RoHS Directive 2011 65 EU EN 62321 1 2013 EN 50581 2012 RED 2014 53 EU EN 300 328 V2 1 1 EN 301 489 1 V2 2 3 EN ...

Page 104: ... nos o direito de alterar ou modificar quaisquer produtos ou especificações sem aviso prévio Isto também se aplica aos produtos que já foram encomendados desde que tais alterações possam ser feitas sem alterações subsequentes às especificações já acordadas Não podemos aceitar responsabilidade por quaisquer erros em catálogos ou outros materiais impressos Alle rechten voorbehouden In het kader van ...

Reviews: