background image

11 


8. DRAIN SYSTEM 


Your kayak has been designed with a drain system located on the underside of the kayak 

in the rear. It consists of a fixed base and a screwable cap. It enables to easily drain the 
water from the kayak once your ride is over. 

 
Screw  the  cap 

closed

  before  putting  the  kayak  into  the  water.  It  is  not  a  self-draining 

hole. If the cap is open, water will leak inside the kayak. 


9. DEFLATION 
 

After rinsing your kayak with clean water, open the drain cap to let the water out. 

 
To deflate the kayak, remove the valve cap from the valves in the side bladders first and 

kayak floor second. 


Clean and check the kayak as well as all the accessories. 

Make sure that no sand nor gravel remains inside the kayak nor between the hull and the 
inner chambers: this could result in abrasion or even punctures while storing the kayak. 

Use  soapy  water,  no  detergents  or  silicone-based  products. 

Make  sure  the  kayak  is 

completely dry before putting it away.


Summary of Contents for GRAND VOYAGER GV410

Page 1: ...1 USER GUIDE ROCKSIDE INFLATABLE KAYAK VULCAIN V335 VS335 SUPERCHARGED GRAND VOYAGER GV410 GVS410 SUPERCHARGED Version EN...

Page 2: ...1 General information 3 2 Usage 4 3 Technical specifications 4 4 Builder s plate 5 5 Fin setup 6 6 Inflation 7 7 Seats setup 10 8 Drain system 11 9 Deflation 11 10 Folding 12 11 Storage 13 12 Repairs...

Page 3: ...u wear buoyancy aids life jackets or buoyancy aids In some countries these tools may be mandatory legal requirement Please refer to the regulations in force in the country of use of the inflatable can...

Page 4: ...ximum load Avoid contact of the air bladders with sharp objects and corrosive liquids e g acid This product comes with a carrying bag Keep it out of reach of children danger of suffocation 3 TECHNICAL...

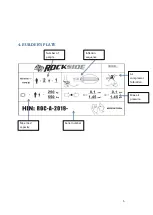
Page 5: ...5 4 BUILDER S PLATE Air compressor forbidden Max air pressure Serial number Max load capacity Inflation sequence Number of people...

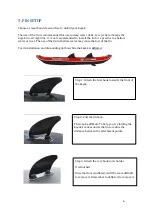
Page 6: ...ow water may cause the loss of the fin For its installation and dismantling do this while the kayak is deflated Step 1 Attach the first hook towards the front of the kayak Step 2 Pull the fin back Thi...

Page 7: ...es 1 Boston Valve s Unscrew the valve cap screw the valve insert onto its base and check that the valve cap stays accessible Insert the pump hose end piece and inflate it until you will reach the requ...

Page 8: ...flate the bottom floor Side bladder Bottom floor Air pressure V335 GV410 1 45 psi 0 1 bar Air pressure Supercharged Version 7 00 psi 0 48 bar Air pressure V335 GV410 1 45 psi 0 1 bar Air pressure Supe...

Page 9: ...l is reached Under pressure re inflate slightly WARNING If you leave your kayak exposed to the hot sun check the pressure and deflate it slightly Otherwise the kayak may become over inflated and stret...

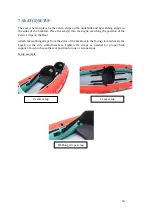
Page 10: ...kayak matching the position of the Velcro strips on the floor Attach the webbing straps from the sides of the backrest to the D rings located inside the kayak on the side walls chambers Tighten the s...

Page 11: ...nside the kayak 9 DEFLATION After rinsing your kayak with clean water open the drain cap to let the water out To deflate the kayak remove the valve cap from the valves in the side bladders first and k...

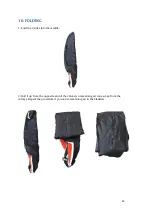
Page 12: ...10 FOLDING 1 Fold the 2 sides into the middle 2 Roll it up from the opposite end of the valves so remaining air can escape from the valves Repeat the procedure if you notice remaining air in the bladd...

Page 13: ...a repair in optimal conditions the hygrometric degree must be less than 60 and the temperature must be between 18 C 25 C Avoid repairing in rain or sunlight To remove a tube open the zipper on the cov...

Page 14: ...repair or replace the defective part or item as deemed necessary by Rockside Rockside shall not be held liable for incidental and consequential damages There are no warranties which extend beyond the...

Reviews: