background image

dome.

  3. Once the replacement Coil/Dome Assembly and

Magnet Enclosure are together, gently pull the
voice coil wires extending out from the bottom of
the Magnet Enclosure until any extra slack has
been eliminated. Wrap the voice coil wires around
the edge of the Magnet Enclosure away from the
metal parts. Make sure that the Coil/Dome Assem-
bly is seated firmly in place by pressing lightly on
the Gasket along its perimeter.

  4. Affix the replacement Adhesive Ring around the

Gasket, extending it onto the plastic edge of the
Magnet Enclosure. Press lightly on the Adhesive
Ring along its perimeter to ensure that it is sealed
in place.

  5. Place the Enclosure Shell over the Magnet Enclo-

sure and screw it on as far as possible. When it
becomes difficult to continue, insert the Transport/
Tool into the two holes in the Magnet Enclosure
that do not contain wires, and screw the two pieces
together tightly.

    6. While holding the voice coil wires against the sides

of the Enclosure shell, insert the positive (coded)
lead of the replacement Wire Harness into the hole
used as "+" in step 2 above. Carefully push the wire
up into the hole as far as it will go. Insert the other
wire into the hole used as "–" in step 2.

  7. Once the replacement Wire Harness is in place,

trim off the excess voice coil wire that extends out
of the Magnet Enclosure. Trim the wire as far down
as possible to prevent it from touching any metal
parts or the metal Mounting Cup.

  8. Replace the strain relief clip onto the back of the

tweeter to hold the wires in place.

  9. Test completed tweeter assembly to verify conti-

nuity and correct operation.

10. Re-connect and re-mount the tweeter assembly.

8

Summary of Contents for Punch Audiophile ND4-XFM

Page 1: ...AUDIOphile 1 NEODYMIUM TWEETER WITH HIGH PASS CROSSOVER ND4 XFM ND8 XFM Owner s Manual...

Page 2: ...Fosgate image order your Rockford accessories which include everything from T shirts and jackets to hats and sunglasses To get a free brochure on Rockford Fosgate products and Rockford accessories ple...

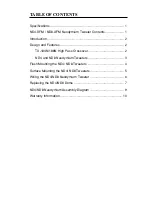
Page 3: ...esign and Features 2 TX 184N 188N High Pass Crossover 2 ND4 and ND8 Neodymium Tweeters 3 Flush Mounting the ND4 ND8 Tweeters 4 Surface Mounting the ND4 ND8 Tweeters 5 Wiring the ND4 ND8 Neodymium Twee...

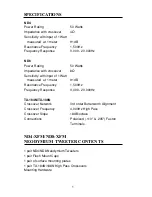
Page 4: ...Watt measured at 1 meter 91dB Resonance Frequency 1 500Hz Frequency Response 3 000 20 000Hz TX 184N TX 188N Crossover Network 3rd order Butterworth Alignment Crossover Frequency 4 000Hz High Pass Cro...

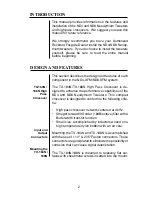
Page 5: ...system The TX 184N TX 188N High Pass Crossover is de signed to enhance the performance capabilities of the ND4 and ND8 Neodymium Tweeters This compact crossover is designed to conform to the followin...

Page 6: ...er ferrite magnets that are com monly used in speaker manufacturing The tight tolerances of the neodymium tweeter call for ferrofluid as the ideal cooling agent thereby giving the tweeters an increase...

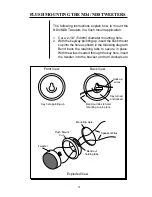
Page 7: ...NG THE ND4 ND8 TWEETERS The following instructions explain how to mount the ND4 ND8 Tweeters in a flush mount application 1 Cut a 2 1 8 54mm diameter mounting hole 2 With the keyway pointing up insert...

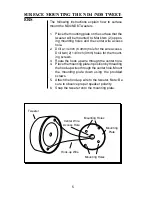
Page 8: ...for the wire access Drill two 2 1 8 inch 3mm holes for the mount ing screws 3 Route the hook up wire through the center hole 4 Place the mounting plate in position by threading thehook upwiresthrought...

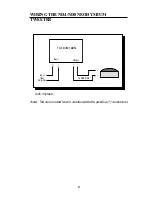
Page 9: ...WIRING THE ND4 ND8 NEODYMIUM TWEETER TX184N 188N Input Output Input from Amplifier To ND4 ND8 lock in place Note The color coded wire is connected to the positive terminal on TX 184N 188N 6...

Page 10: ...cleanly 7 Place the Magnet Enclosure on a flat hard surface Gently insert the tip of a sharp pointed object under the edge of the Adhesive Ring and lift up The entire Coil Dome Assembly should lift ou...

Page 11: ...ble When it becomes difficult to continue insert the Transport Tool into the two holes in the Magnet Enclosure that do not contain wires and screw the two pieces together tightly 6 While holding the v...

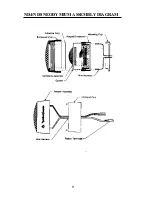
Page 12: ...9 ND4 ND8 NEODYMIUM ASSEMBLY DIAGRAM...

Page 13: ...arranty are obtained from any source other than Rockford Fosgate or an Authorized Rockford Fosgate Service Center The warranty is the only express warranty and does not create any implied warranties R...

Page 14: ...ockford Fosgate A Division of Rockford Corporation 546 South Rockford Drive Tempe Arizona 85281 U S A In U S A 602 967 3565 In Canada call Korbon 416 567 1920 In Europe Fax 49 4207 801250 CP 8675 6 93...

Reviews:

Related manuals for Punch Audiophile ND4-XFM