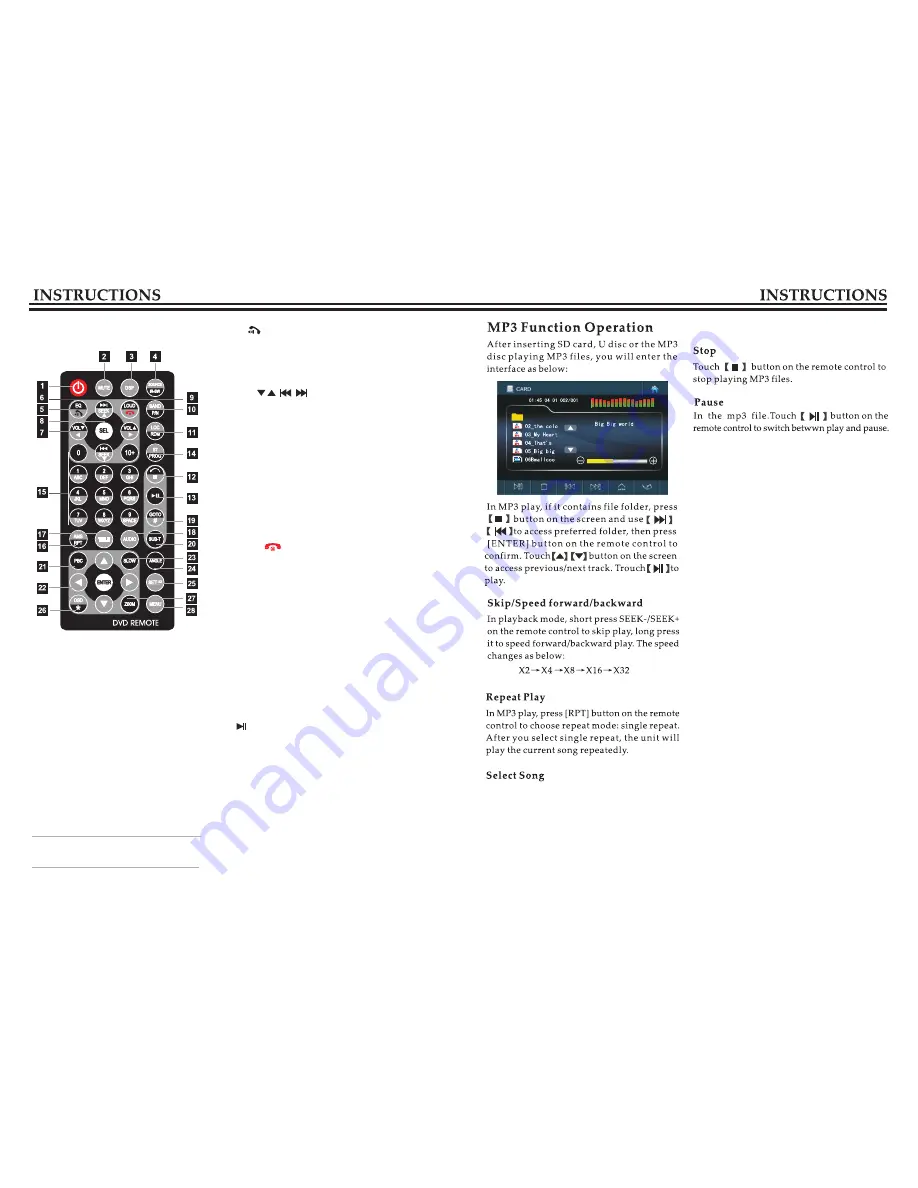
Remote control function
1.POWER
Press once to switch on, press again to
switch off.
2.MUTE Button
Press once to turn off audio output,
press again to resume volume level.
3.DSP
Press this button to show the time.
4.SOURCE/IR-SW
Short press the button to switch the
mode. Long press the button to switch
between foreground/background remote
control.
﹒
Only works when the background
mode is on.
5.EQ/
Press the button to select different sound effect
mode.
When the unit supports Bluetooth, press the
button to answer the call.
6
.SEEK
In playback mode, short press the button to
access previous track/next track; long press it to
speed forward/backward play. In radio mode,
short press this button can search station
manually; long press it to scan radio station
manually.
7.VOL
Press this button to increase/decrease volume level.
8.SEL
Press this button repeatedly to choose sound
feature.
9.LOUD/
Press to turn on/off LOUD function. If the unit
supports Bluetooth, press this button to hang up
the call.
10.BANS/P/N
In radio mode, press it to switch band. In playback
mode, press it to choose AUTO, PAL or NTSC
system.
11.LOC/RDM
In radio mode, press the button to switch between
remote and local. In playback mode, press it to
random play.
12.STOP
Press it once to pause, press it twice to stop.
13.
Press to switch between play and pause; in stop
status, press it to play.
14.ST/PROG
In radio mode, press this button to select stereo
or mono station. In playback mode, work with
number button to access programmed play.
15.0-10+
In radio mode, press the button to select pre-stored
station; long press the button (1-6) to save current
frequency in the pre-stored station. In playback
mode, press number button can directly choose
song and chapter.
In playback mode, directly press number
buttons 1-9 on the remote control to input the
serial number of the song, the unit will play
the corresponding program automatically.
For the discs that have more than 10 songs,
use number button 10+ and 0-9 on the remote
control to choose.
08
17
Summary of Contents for DD-6501BT
Page 1: ......
Page 3: ...Park the car in a safe place Lens is dirty 03 22...
Page 4: ...Warn 04 21...


