background image

Pagina | 5


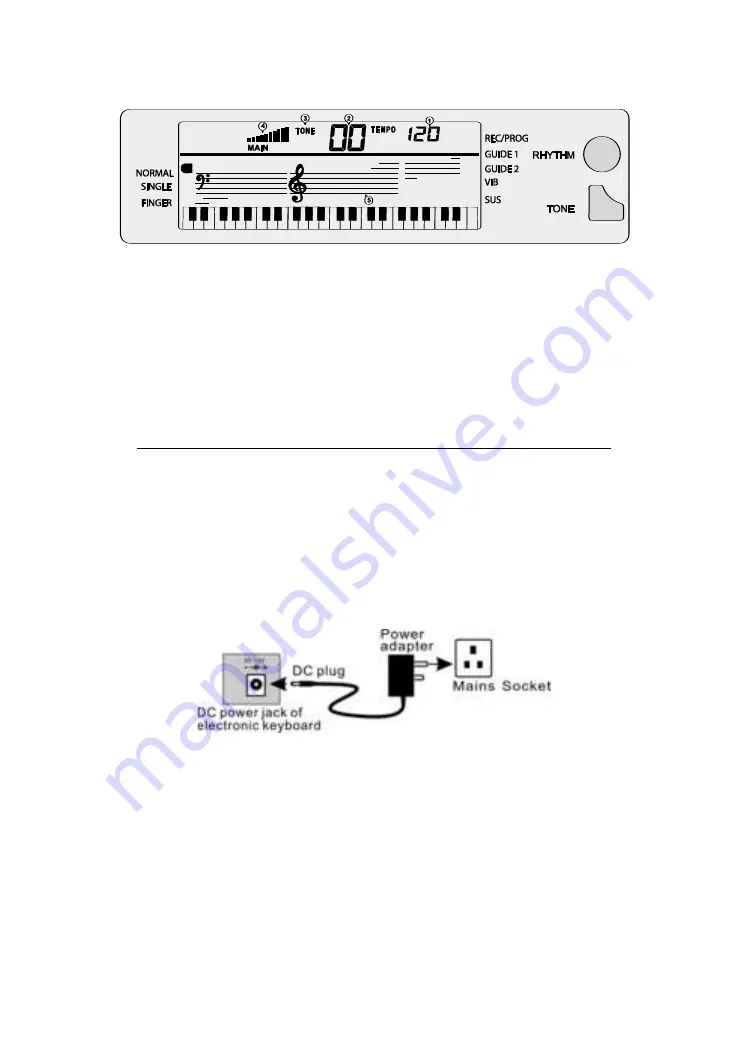
Display LCD 


1. Valore velocità di ritmo e canzone (bpm) 
2. Display digitale di brano, ritmo e numero di tono 
3. TONE, RHYTHM o brano DEMO  
4. Display del livello di volume 
5. Visualizzazione pentagramma 

Preparazione antecedente il primo utilizzo 

Alimentazione 

Uso 

dell’adattatore

 CA/CC 


Utilizzare lo speciale adattatore CA/CC fornito con la tastiera elettronica o un 

adattatore con tensione di uscita CC 9V e corrente di uscita 500 mA con una spina con centro 
positivo. Collegare la spina CC 

dell’adattatore

 alla presa di corrente CC 9V sul retro della 

tastiera, poi collegare 

l’altra

 estremità alla presa di corrente e accendere.


Attenzione: 

Quando la tastiera non viene utilizzata, scollegare l'adattatore dalla presa di 

corrente. 


Summary of Contents for RJ654

Page 1: ...ion 54 touches Guide utilisateur 54 Tasten Multifunktions Keyboard Bedienungsanleitung Tastiera multifunzione a 54 tasti Guida per l utente Wielofunkcyjny instrument klawiszowy 54 klawisze Podręcznik użytkownika Teclado Multifunción de 54 teclas Manual de instrucciones ...

Page 2: ...54 Keys Multi Function Keyboard User Guide ...

Page 3: ...c keyboard To avoid damaging the appearance of the electronic keyboard or damaging the internal parts please do not place the electronic keyboard in a dusty environment in direct sunlight or in places where there are very high or very low temperatures Do not place the electronic keyboard on an uneven surface To avoid damaging internal parts do not place any vessel holding liquid onto the electroni...

Page 4: ... 6 Auto Power Off 6 Jacks and Accessories 6 Using headphones or external speakers 6 Connecting a microphone 6 Basic Operation 7 Power and Volume 7 Power control 7 Adjustment of the Master Volume 7 Tone 7 Tone Selection 7 Effect Control 8 Sustain 8 Vibrato 8 Transpose 8 Panel Percussion Instruments 9 Rhythm 9 Selecting the rhythm 9 Start Stop 9 Sync 10 Fill in 10 Rhythm Volume Adjustment 10 ...

Page 5: ...n 12 Demo Song Playback 13 Teaching Modes 13 LEARN 1 13 LEARN 2 13 Appendix I Rhythm Table 14 Appendix II Tone Table 15 Appendix III Demo Song Table 16 Appendix IV Troubleshooting 16 Appendix V Chord Tables 17 Single Finger Chords 17 Fingered Chords 18 Appendix VI Technical Specification 19 Product Disposal Instructions 20 ...

Page 6: ... 9 Number Buttons 10 LCD Display 11 Sync 12 Fill In 13 Select 14 Demo External Connections 15 Start Stop 16 Single Finger Chord 17 Fingered Chord 18 Chord Off 19 Vibrato 20 Sustain 21 Learn 2 22 Learn 1 23 Program 24 Playback 25 Record 26 Percussion 27 Chord Keyboard Area DC 9V Power Input OUT Headphones External Speaker Output OK Microphone Input ...

Page 7: ...se the special AC DC power adapter that came with the electronic keyboard or a power adapter with DC9V output voltage and 500mA output current with a centre positive plug Connect the DC plug of the power adapter into the DC9V power socket on the rear of the keyboard and then connect the other end into the mains wall socket and switch on Caution When the keyboard is not in use you should unplug the...

Page 8: ...r section of the keyboard will go into a low power standby mode if no key is pressed for 3 minutes Press any key to come out of the low power mode Note the keyboard will not enter the low power mode during demo song or rhythm playback Jacks and Accessories Using headphones or external speakers Connect the 3 5mm headphone or external speaker plug into the OUT jack on the rear of the keyboard The ke...

Page 9: ...e the volume press the MASTER VOLUME buttons The volume level is indicated by the bars on the LCD display Pressing both the MASTER VOLUME buttons at the same time will make the master volume return to the default level Tone Tone Selection When the keyboard is first switched on the default status is TONE To change the tone you can either press the or buttons on the numerical keypad or directly inpu...

Page 10: ...button to enter Vibrato mode The LCD display will show a flag next to VIB Once this mode is selected each time a note is played a trembling effect is added to the end of the note Pressing the Vibrato button again will turn the Vibrato feature off and exit this mode Transpose Pressing the Transpose button alters the musical scale of the note being played You can adjust the scale by 6 levels upwards...

Page 11: ...hm You can choose from any of the 100 built in rhythms Please refer to the appendix for the detailed rhythm table Press the RHYTHM button to enter the rhythm selection function The LCD display will show the current rhythm number You can select the rhythm you require by pressing the corresponding digits on the numerical keypad or by pressing the buttons Start Stop Press the START STOP button to pla...

Page 12: ...u can fill in a length of interlude if you press the FILL IN button during the rhythm playback After the fill in the rhythm will continue playing as normal Rhythm Volume Adjustment The default Rhythm Volume is level 7 this can be adjusted by pressing the RHYTHM VOLUME buttons The LCD display will show the volume as you are adjusting it The adjustment range is 1 10 indicated by the bars on the LCD ...

Page 13: ...d side of the keyboard keys 1 19 The finger patterns required are shown in Appendix V The played chord is displayed in the top left corner of the LCD display Press the START STOP button to start or stop the chord accompaniment Fingered Chords Press the FINGERED CHORD button to enter the fingered auto chord mode A flag is displayed on the LCD next to FINGER By pressing certain keys in the chord are...

Page 14: ...he keyboard will enter the recording mode again Before the memory becomes full press the PLAY button to play back the recorded notes Press the PROGRAM button to enter the rhythm editing mode The LCD display will show a flag next to REC PROG You can edit a section of rhythm by pressing any of the 8 kinds of panel percussion on the keyboard The maximum recording length is 16 percussion sounds Press ...

Page 15: ...he rhythm and tempo of the song The LCD display will show SONG XX where xx is the number of the demo song selected Select a different song using SELECT key The beat point will flash on the LCD display to indicate the tempo The keyboard will then play the main melody automatically The LCD will indicate which keys should be pressed LEARN 2 Press the LEARN 2 button to enter the Synchronised teaching ...

Page 16: ... Europe Swing 85 Jazz Polka 11 Bossa nova 36 Classic Samba 61 Classic Country 86 Jazz Bossa nova 12 Salsa 37 Europe Disco 62 Argentina Waltz 87 Latin Salsa 13 16 Beat 38 Blue Tango 63 Rock Beguine 88 Jazz 16 Beat 14 Leigui 39 Emotion Rock 64 Jazz Latin 89 Pop Leigui 15 Mambo 40 Classic Swing 65 South Africa Polka 90 Jazz Mambo 16 8 Beat 41 South Africa Country 66 Pattern Bossa nova 91 Classic 8 Be...

Page 17: ...zz Guitar 2 10 Harp 35 Vib Clarinet 60 Fx 4 85 Clean E Guitar 11 String Ensemble 1 36 Lead 2 61 Sustain E Piano 86 Acoustic Bass finger 12 Trumpet 37 Pad 2 62 Echo Celesta 87 Vib E Bass 13 Synth Brass 1 38 Sitar 63 Fx 5 88 Synth Bass 5 14 Alto Sax 39 Short Shanai 64 Fretless Bass 89 Short Ocarina 15 Clarinet 40 Echo Violin 65 Baritone E Guitar 90 Bright Harp 16 Lead 1 41 Vib E Piano 66 Acoustic Ba...

Page 18: ...board is not working properly Use of incorrect power adapter Use the power adapter supplied or the batteries may need replacing There is a slight difference in timbre of some notes This is normal and is caused by the many different voice sampling ranges of the keyboard When using the sustain function some tones have long sustain and some short sustain This is normal The best length of sustain for ...

Page 19: ...Page 17 Appendix V Chord Tables Single Finger Chords ...

Page 20: ...Page 18 Fingered Chords ...

Page 21: ...ote Record Memory Playback 16 Beat Rhythm Programming Percussion 8 Kinds of panel percussion instruments Accompaniment Control Start Stop Sync Fill in Tempo Intelligent Teaching 2 Teaching modes External Jacks DC 9V Power Input Headphone External Speaker Output Microphone Input Diapason Range of Keyboard C2 F6 Intonation 3cent Weight 3 9kg DC Input DC9V Power Adapter DC9V 500mA Output Power 3W x 2...

Page 22: ... encourage the recycling of products using best available recovery and recycling techniques to minimise the impact on the environment treat any hazardous substances and avoid the increase of landfill When you have no further use for this product please dispose of it using your local authority s recycling processes For more information please contact your local authority or the retailer where the p...

Page 23: ...Clavier multifonction 54 touches Guide utilisateur ...

Page 24: ...nce qualifié pour le faire réparer Utilisation du clavier électronique Afin d éviter d endommager l apparence du clavier électronique ou d endommager les pièces internes ne placez pas le clavier électronique dans un environnement poussiéreux à la lumière directe du soleil ou à un endroit où la température est très haute ou très basse Ne placez pas le clavier électronique sur une surface irrégulièr...

Page 25: ...matique 6 Jacks et accessoires 6 Utiliser un casque ou des haut parleurs externes 6 Connecter un microphone 6 Fonctionnement de base 7 Mise sous tension et volume 7 Contrôle de la tension 7 Ajustement du volume maître 7 Son 7 Sélection du son 7 Effets et contrôle 8 Résonance 8 Vibrato 8 Transposition 8 Instruments à percussion du panneau 9 Rythme 9 Sélectionner le rythme 9 Start Stop 10 Synchronis...

Page 26: ...démonstration 13 Modes d apprentissage 13 Apprentissage 1 13 Apprentissage 2 14 Annexe I Tableau des rythmes 15 Annexe II Tableau des sons 16 Annexe III Tableau des morceaux de démonstration 17 Annexe IV Dépannage 17 Annexe V Tableau des accords 18 Accords à un doigt 18 Accords à plusieurs doigts 19 Annexe VI Spécifications Techniques 20 Instructions pour la mise au rebut du produit 21 ...

Page 27: ...on 12 Fill In 13 Sélectionner 14 Démonstration Connexions externes 15 Start Stop 16 Accord à un doigt 17 Accords à plusieurs doigts 18 Désactiver les accords 19 Vibrato 20 Résonance 21 Apprentissage 2 22 Apprentissage 1 23 programme 24 Réécoute Playback 25 Enregistrement 26 Percussions 27 Zone d accord du clavier CD 9 V Entrée de la tension OUT Sortie casque du haut parleur externe OK Entrée du mi...

Page 28: ...liser l adaptateur d alimentation CA CD fourni avec le clavier numérique ou un adaptateur d alimentation avec une tension de sortie CD 9V et une intensité de sortie de 500 mA et une tension positive à la fiche centrale Connectez la fiche CD de l adaptateur d alimentation à la douille d alimentation CD9V à l arrière du clavier puis connectez l autre bout à la prise de courant et allumez le clavier ...

Page 29: ...icateur du clavier se met en mode veille économie d énergie si aucune touche n est appuyée pendant 3 minutes Appuyez sur n importe quelle touche pour quitter le mode économie d énergie Notez que le clavier ne se mettra pas en mode économie d énergie lors de la lecture d un morceau de démonstration ou d un rythme Jacks et accessoires Utiliser un casque ou des haut parleurs externes Connectez la fic...

Page 30: ... Afin de modifier le volume appuyez sur les boutons MASTER VOLUME Le niveau de volume est indiqué par les barres sur l écran LCD Si vous appuyez en même temps sur les boutons MASTER VOLUME le volume maître est réinitialisé au niveau par défaut Son Sélection du son Lors de l allumage du clavier le statut par défaut est TONE SON Afin de modifier le son vous pouvez soit appuyer sur les boutons ou sur...

Page 31: ...uton Vibrato pour activer le mode vibrato L écran LCD affiche alors un drapeau près de VIB Lorsque ce mode est sélectionné un effet de vibration est ajouté à la fin de chaque note jouée Si vous appuyez de nouveau sur le bouton Vibrato cela permet d arrêter le vibrato et de quitter ce mode Transposition En appuyant sur le bouton Transpose cela permet de modifier la gamme musicale de la note jouée V...

Page 32: ...iorer votre performance Rythme Sélectionner le rythme Vous pouvez choisir parmi 100 rythmes préinstallés Veuillez vous référer aux annexes pour le tableau détaillé des rythmes Appuyez sur le bouton RHYTHM pour entrer dans la fonction de sélection du rythme L écran LCD vous indique le numéro du rythme actuel Vous pouvez sélectionner le rythme que vous souhaitez en saisissant les numéros corresponda...

Page 33: ...hme et réinitialiser la fonction de synchronisation Appuyez de nouveau sur le bouton SYNC pour quitter le mode synchronisation Fill In Vous pouvez remplir la durée d un interlude en appuyant sur la touche FILL IN pendant que le rythme est joué Après le Fill in le rythme se remet à jouer normalement Réglage du volume du rythme Le volume par défaut du rythme est au niveau 7 il peut être réglé en app...

Page 34: ...st réinitialisé à 120 BPM Accompagnement par accords Accords à un doigt Appuyez sur le bouton SINGLE FINGER pour entrer dans le mode d accords automatiques à un doigt Un drapeau est affiché sur l écran LCD près de SINGLE Les accords sont joués en appuyant sur certaines touches dans la zone d accord du côté gauche du clavier touches 1 à 19 Les schémas des doigtés sont illustrés dans l annexe V Les ...

Page 35: ...accompagnement par accords Désactiver les accords Quel que soit le mode d accords activé appuyez sur le bouton CHORD OFF pour arrêter le son d accompagnement par accords et quitter le mode accords Le rythme continue de jouer Fonction d enregistrement Appuyez sur le bouton RECORD pour activer le mode enregistrement L écran LCD affiche alors un drapeau près de REC PROG Appuyez sur n importe quelle t...

Page 36: ...onstration En appuyant plusieurs fois sur le bouton SELECT vous pouvez sélectionner le morceau de démonstration que vous souhaitez Vous pouvez choisir parmi 8 morceaux au total Le clavier termine alors le morceau sélectionné puis se met à jouer le morceau suivant Appuyez de nouveau sur le bouton DEMO pour quitter le mode démonstration Modes d apprentissage Apprentissage 1 Appuyez sur le bouton LEA...

Page 37: ...rs plus avancés L écran LCD affiche SONG XX où xx est le numéro du morceau de démonstration sélectionné Sélectionnez un morceau différent en appuyant sur la touche SELECT Le point de battement clignote sur l écran LCD pour indiquer le tempo La bonne touche à appuyer en suivant est indiquée sur l écran LCD Jouez en rythme en vous assurant que vous appuyez sur les bonnes touches tel qu indiqué ...

Page 38: ...60 Europe Swing 85 Jazz Polka 11 Bossa nova 36 Classic Samba 61 Classic Country 86 Jazz Bossa nova 12 Salsa 37 Europe Disco 62 Argentina Waltz 87 Latin Salsa 13 16 Beat 38 Blue Tango 63 Rock Beguine 88 Jazz 16 Beat 14 Leigui 39 Emotion Rock 64 Jazz Latin 89 Pop Leigui 15 Mambo 40 Classic Swing 65 South Africa Polka 90 Jazz Mambo 16 8 Beat 41 South Africa Country 66 Pattern Bossa nova 91 Classic 8 ...

Page 39: ... Jazz Guitar 2 10 Harp 35 Vib Clarinet 60 Fx 4 85 Clean E Guitar 11 String Ensemble 1 36 Lead 2 61 Sustain E Piano 86 Acoustic Bass finger 12 Trumpet 37 Pad 2 62 Echo Celesta 87 Vib E Bass 13 Synth Brass 1 38 Sitar 63 Fx 5 88 Synth Bass 5 14 Alto Sax 39 Short Shanai 64 Fretless Bass 89 Short Ocarina 15 Clarinet 40 Echo Violin 65 Baritone E Guitar 90 Bright Harp 16 Lead 1 41 Vib E Piano 66 Acoustic...

Page 40: ... inadapté Utilisez l adaptateur d alimentation fourni ou bien remplacez les piles Il y a une légère différence dans le timbre de certaines notes Cela est normal et la cause est les nombreuses gammes de sons différents du clavier Lorsqu on utilise la fonction Sustain certains sons ont une résonance longue d autres une résonance courte Cela est normal La meilleure longueur de résonance pour les diff...

Page 41: ...Page 18 Annexe V Tableau des accords Accords à un doigt ...

Page 42: ...Page 19 Accords à plusieurs doigts ...

Page 43: ... 41 notes playback programmation de rythme à 16 battements Percussions 8 types d instruments à percussions sur le panneau Contrôle de l accompagnement Start Stop Sync Fill in Tempo Apprentissage intelligent 2 Modes d apprentissage Jacks externes Entrée de courant CD 9 V sortie pour casque haut parleur externe entrée microphone Diapason gamme de clavier C2 F6 Intonation 3 cent Poids 3 9 kg Entrée C...

Page 44: ... recyclage de produits en utilisant les meilleures techniques de traitement de valorisation et de recyclage disponibles afin de minimiser l impact sur l environnement traiter toutes substances dangereuses et éviter l augmentation des décharges Si vous n avez plus l utilité de ce produit veuillez le mettre au rebut en appliquant le processus de recyclage de vos autorités locales Pour plus d informa...

Page 45: ...54 Tasten Multifunktions Keyboard Bedienungsanleitung ...

Page 46: ...icht das Aussehen des elektronischen Keyboards zu beeinträchtigen oder die internen Teile zu beschädigen setzen Sie das elektronische Keyboard nicht einer staubigen Umgebung direkter Sonneneinstrahlung oder sehr hohen oder niedrigen Temperaturen aus Stellen Sie das elektronische Keyboard nicht auf eine unebene Oberfläche Um nicht die internen Teile zu beschädigen stellen Sie keine Behälter auf das...

Page 47: ...acks und Zubehör 6 Kopfhörer oder externe Lautsprecher verwenden 6 Anschließen eines Mikrofons 6 Grundlegende Bedienung 7 Einschalten und Lautstärke 7 Einschalten 7 Einstellen der Masterlautstärke 7 Ton 7 Ton Auswahl 7 Effekt Einstellung 8 Sustain 8 Vibrato 8 Transponieren 8 Panel Perkussionen Instrumente 9 Rhythmus 9 Rhythmus auswählen 9 Start Stopp 10 Synchronisierung 10 Fill In 10 Einstellung d...

Page 48: ... 12 Demo Song Playback 13 Unterricht Modus 13 UNTERRICHT 1 13 UNTERRICHT 2 14 Anhang I Rhythmen Tabelle 15 Anhang II Tontabelle 16 Anhang III Demo Songs Tabelle 17 Anhang IV Fehlerbehebung 17 Anhang V Akkordtabelle 18 Einzelnote Akkorde 18 Fingered Akkorde 19 Anhang VI Technische Spezifikationen 20 Hinweise zur Entsorgung 21 ...

Page 49: ...asten 10 LCD Anzeige 11 Synchronisierung 12 Fill In 13 Auswählen 14 Demo Externer Anschluss 15 Start Stopp 16 Einzelnote Akkord 17 Fingered Akkorde 18 Chord Off 19 Vibrato 20 Sustain 21 Unterricht 2 22 Unterricht 1 23 Programm 24 Playback 25 Aufzeichnung 26 Perkussion 27 Akkorde Tastenfeld DC 9V Stromeingang OUT Ausgang des externen Kopfhörers Lautsprechers OK Mikrofon Eingang ...

Page 50: ...nden Sie den speziellen AC DC Netzadapter der mit dem elektronischen Keyboard mitgeliefert ist oder ein Netzadapter mit DC 9 V Ausgangsspannung und 500 mA Ausgangsstrom mit einem Zentrum positiven Stecker Stecken Sie den DC Stecker des Netzadapters in die DC 9 V Buchse an der Hinterseite des Keyboards und stecken Sie das andere Ende in die Wandsteckdose ein und schalten Sie das Keyboard ein Achtun...

Page 51: ...romsparenden Standby Modus wenn 3 Minuten lang keine Taste gedrückt wird Drücken Sie eine Taste um den Stromsparenden Modus zu verlassen Hinweis das Keyboard geht nicht in den stromsparenden Modus während des Spielens eines Demo Stücks oder eines Rhythmus Jacks und Zubehör Kopfhörer oder externe Lautsprecher verwenden Stecken Sie den 3 5 mm externen Kopfhörer oder Lautsprecher Stecker in den OUT J...

Page 52: ...d einschalten ist 7 Um die Lautstärke zu ändern drücken Sie auf die MASTER VOLUME Tasten Die Streifen auf dem LCD Display zeigen die Lautstärke an Wenn Sie gleichzeitig auf beide MASTER VOLUME Tasten drücken stellt sich die Master Lautstärke auf die Standard Lautstärke zurück Ton Ton Auswahl Wenn Sie das Keyboard einschalten ist der Standard Status TONE Um den Ton zu ändern können Sie entweder auf...

Page 53: ...rato Taste um den Vibrato Modus einzuschalten Die LCD Anzeige zeigt dann einen Merker neben VIB an Sobald dieser Modus ausgewählt ist wird ein zitternder Effekt am Ende jeder gespielten Note hinzugefügt Wenn Sie nochmals auf die Vibrato Taste drücken schaltet dieses den Vibrato Modus aus Transponieren Wenn Sie auf die Transpose Taste drücken ändert dieses die Tonleiter der gespielten Note Sie könn...

Page 54: ...eigern Rhythmus Rhythmus auswählen Sie haben die Wahl zwischen 100 integrierten Rhythmen Wir verweisen auf unsere Ausführungen im Anhang für die ausführliche Rhythmen Tabelle Drücken Sie auf die RHYTHM Taste um die Rhythmus Auswahlfunktion anzuzeigen Die LCD Anzeige zeigt die aktuelle Rhythmusnummer an Sie können den gewünschten Rhythmus auswählen indem Sie auf die entsprechenden Stellen auf dem d...

Page 55: ...auf der linken Seite des Keyboards drücken beginnt der Rhythmus zu spielen Drücken Sie auf die SYNC Taste nochmals um den Rhythmus zu stoppen und die Sync Funktion zurückzusetzen Drücken Sie nochmals auf die SYNC Taste um die Sync Funktion auszuschalten Fill In Sie können eine Länge mit einem Zwischenspiel ausfüllen indem Sie während des Rhythmus Abspielens auf die FILL IN Taste drücken Nach dem Z...

Page 56: ...des Demo Songs einzustellen Der Einstellbereich ist 40 240 BPM in 15er Stufen Wenn Sie gleichzeitig auf beide TEMPO Tasten drücken stellt dieses den Takt auf 120 Bpm zurück Akkordbegleitung Einzelnoten Akkorde Drücken Sie auf die SINGLE FINGER Taste um den Single Finger auto Chord Modus einzustellen Die LCD Anzeige zeigt dann einen Merker neben SINGLE an Akkorde werden gespielt indem man manche Ta...

Page 57: ...ken Sie auf die START STOP Taste um die Akkordbegleitung zu starten oder zu stoppen Chord Off In jedem Akkord Modus drücken Sie auf die CHORD OFF Taste um den Akkordbegleitungston zu stoppen und den Akkordmodus auszuschalten Der Rhythmus spielt weiter Aufzeichnungsfunktion Drücken Sie auf die RECORD Taste um den Aufzeichnung Modus einzuschalten Die LCD Anzeige zeigt dann einen Merker neben REC PRO...

Page 58: ...e vorherige Aufzeichnung gelöscht und das Keyboard schaltet wieder in den Programmiermodus Demo Song Playback Drücken Sie die DEMO Taste um ein Demo Song zu spielen Die LCD Anzeige zeigt SONG XX an indem xx die Nummer des Demo Songs ist Indem Sie mehrmals die SELECT Taste drücken können Sie den Demo Song auswählen den Sie möchten Sie können insgesamt zwischen 8 Songs wählen Das Keyboard spielt das...

Page 59: ...die LEARN 2 Taste um den Synchronisierten Kurs zu starten Die LCD Anzeige zeigt dann einen Merker neben GUIDE 2 an Dieser Modus ist für fortgeschrittene Benutzer gedacht Die LCD Anzeige zeigt SONG XX an indem xx die Nummer des ausgewählten Demo Songs ist Wählen Sie anhand der SELECT Taste ein verschiedenes Lied aus Der Takt leuchtet auf der LCD Anzeige auf um das Tempo anzuzeigen Die Taste die Sie...

Page 60: ...0 Europe Swing 85 Jazz Polka 11 Bossa nova 36 Classic Samba 61 Classic Country 86 Jazz Bossa nova 12 Salsa 37 Europe Disco 62 Argentina Waltz 87 Latin Salsa 13 16 Beat 38 Blue Tango 63 Rock Beguine 88 Jazz 16 Beat 14 Leigui 39 Emotion Rock 64 Jazz Latin 89 Pop Leigui 15 Mambo 40 Classic Swing 65 South Africa Polka 90 Jazz Mambo 16 8 Beat 41 South Africa Country 66 Pattern Bossa nova 91 Classic 8 B...

Page 61: ...azz Guitar 2 10 Harp 35 Vib Clarinet 60 Fx 4 85 Clean E Guitar 11 String Ensemble 1 36 Lead 2 61 Sustain E Piano 86 Acoustic Bass finger 12 Trumpet 37 Pad 2 62 Echo Celesta 87 Vib E Bass 13 Synth Brass 1 38 Sitar 63 Fx 5 88 Synth Bass 5 14 Alto Sax 39 Short Shanai 64 Fretless Bass 89 Short Ocarina 15 Clarinet 40 Echo Violin 65 Baritone E Guitar 90 Bright Harp 16 Lead 1 41 Vib E Piano 66 Acoustic B...

Page 62: ...chen Netzadapters Verwenden Sie den mitgelieferten Netzadapter oder wechseln Sie die Batterien Manche Noten weisen ein leicht unterschiedliches Timbre auf Dies ist normal und kommt von den vielen verschiedenen Sampling Tonlagen des Keyboards Wenn die Sustain Funktion aktiviert ist haben manche töne ein langes Sustain und andere ein kurzes Sustain Das ist normal Die beste Sustain Länge ist für jede...

Page 63: ...Page 18 Anhang V Akkordtabelle Einzelnote Akkorde ...

Page 64: ...Page 19 Fingered Akkorde ...

Page 65: ...en Aufzeichnung Playback 16 Takt Rhythmen Programmierung Perkussion 8 Arten Panel Perkussionsinstrumente Begleitungseinstellung Start Stopp Sync Fill in Tempo Intelligentes Lernen 2 Unterricht Modi Externe Jacks DC 9 V Stromeingang externe Kopfhörer Lautsprecher Ausgang Mikrofon Eingang Diapason Keyboard Palette C2 F6 Intonation 3 cent Gewicht 3 9 kg DC Eingang DC 9 V Netzadapter DC 9 V 500 mA Aus...

Page 66: ...ern indem man die besten verfügbaren Recyclingtechniken einsetzt um die Belastungen auf die Umwelt zu minimieren jegliche gefährliche Substanzen zu behandeln und die Erhöhung von Mülldeponie zu vermeiden Falls Sie dieses Produkt nicht mehr verwenden können bitte entsorgen Sie es entsprechend des Recyclingverfahrens Ihrer örtlichen Behörden Für weitere Informationen wenden Sie sich bitte an Ihre Be...

Page 67: ...Tastiera multifunzione a 54 tasti Guida per l utente ...

Page 68: ...o della tastiera elettronica Per evitare di danneggiare l aspetto della tastiera elettronica o le parti interne non collocare la tastiera elettronica in un ambiente polveroso alla luce diretta del sole o in luoghi dove le temperature sono molto elevate o molto basse Non posizionare la tastiera elettronica su una superficie non uniforme Per evitare di danneggiare le parti interne non collocare alcu...

Page 69: ...atico 6 Cavi Jack e Accessori 6 Utilizzando cuffie o altoparlanti esterni 6 Collegamento di un microfono 6 Funzionamento di base 7 Alimentazione e volume 7 Controllo dell alimentazione 7 Regolazione del volume principale 7 Tono 7 Selezione del tono 7 Effetti e controllo 8 Sostegno 8 Vibrato 8 Transpose 8 Strumenti a percussione su pannello 9 Ritmo 9 Selezione del ritmo 9 Start Stop 9 Sincronizzazi...

Page 70: ...i 13 Metodi di insegnamento 13 APPRENDIMENTO 1 13 APPRENDIMENTO 2 13 Appendix I Rhythm Table 15 Appendix II Tone Table 16 Appendix III Demo Song Table 17 Allegato IV Risoluzione dei problemi 17 Allegato V Tabelle degli accordi 18 Accordi con diteggiatura singola 18 Accordi con diteggiatura 19 Allegato VI Specifiche tecniche 20 Istruzioni per lo smaltimento del prodotto 21 ...

Page 71: ...Sincronizzazione 12 Riempimento 13 Selezione 14 Dimostrativo Collegamenti esterni 15 Start Stop 16 Accordi con diteggiatura singola 17 Accordi con diteggiatura 18 Senza accordi 19 Vibrato 20 Sostegno 21 Apprendimento 2 22 Apprendimento 1 23 Programma 24 Riproduzione 25 Registrazione 26 Percussioni 27 Area tastiera accordi Ingresso alimentazione CC 9V OUT Uscita cuffie Altoparlante esterno OK Ingre...

Page 72: ... dell adattatore CA CC Utilizzare lo speciale adattatore CA CC fornito con la tastiera elettronica o un adattatore con tensione di uscita CC 9V e corrente di uscita 500 mA con una spina con centro positivo Collegare la spina CC dell adattatore alla presa di corrente CC 9V sul retro della tastiera poi collegare l altra estremità alla presa di corrente e accendere Attenzione Quando la tastiera non v...

Page 73: ...re della tastiera entra in modalità stand by a consumo ridotto se non si preme alcun tasto per 3 minuti Premere un tasto qualsiasi per uscire dalla modalità a consumo ridotto Si noti che la tastiera non entra in modalità consumo ridotto durante la riproduzione di un brano dimostrativo o di un ritmo Cavi Jack e Accessori Utilizzando cuffie o altoparlanti esterni Collegare il cavo delle cuffie da 3 ...

Page 74: ...care il volume premere i pulsanti MASTER VOLUME Il livello del volume è indicato dalle barre sul display LCD Premendo contemporaneamente i pulsanti MASTER VOLUME il volume principale torna al livello predefinito Tono Selezione del tono Quando la tastiera viene accesa per prima volta l impostazione predefinita è TONE Per modificare il tono si possono premere i pulsanti o sul tastierino numerico opp...

Page 75: ... pulsante Vibrato per entrare in modalità vibrato Sul display LCD compare una bandiera accanto a VIBRATO Una volta selezionata questa modalità ogni volta che si suona una nota si aggiunge un effetto tremolato alla fine della stessa Premere nuovamente il pulsante Vibrato per disattivare la funzione e uscire da questa modalità Transpose Premendo il pulsante Transpose si altera la scala musicale dell...

Page 76: ...cegliere uno qualsiasi dei 100 ritmi incorporati Si prega di riferirsi all allegato per la tabella dettagliata dei ritmi Premere il pulsante RHYTHM per accedere alla funzione di selezione del ritmo Sul display LCD compare il numero del ritmo attuale Si può selezionare il ritmo desiderato digitando le cifre corrispondenti sul tastierino numerico o premendo i pulsanti Start Stop Premere il pulsante ...

Page 77: ...r uscire dalla funzione di sincronizzazione Riempimento Si può inserire un interludio premendo il pulsante FILL IN durante la riproduzione del ritmo Dopodiché la riproduzione del ritmo prosegue normalmente Regolazione del volume del ritmo Il volume del ritmo predefinito è di livello 7 e si può regolare premendo i pulsanti RHYTHM VOLUME Il display LCD mostra il volume durante la regolazione La gamm...

Page 78: ...ti da 1 a 19 Le posizioni delle dita sono indicate nell Allegato V L accordo suonato è visualizzato nell angolo in alto a sinistra del display LCD Premere il pulsante START STOP per avviare o interrompere l accompagnamento con accordi Accordi con diteggiatura Premere il pulsante FINGERED CHORD per entrare nella modalità accordo automatico con diteggiatura Sul display LCD compare una bandiera accan...

Page 79: ...ni volta che si preme il pulsante RECORD la memoria precedente viene cancellata e la tastiera ritorna alla modalità di registrazione Prima che la memoria si esaurisca premere il pulsante PLAY per riprodurre le note registrate Premere il pulsante PROGRAM per entrare nella modalità di modificazione del ritmo Sul display LCD compare una bandiera accanto a REC PROG Si può modificare una sezione di rit...

Page 80: ...i insegnamento APPRENDIMENTO 1 Premere il pulsante LEARN 1 per accedere al metodo didattico a tasto singolo Sul display LCD compare una bandiera accanto a GUIDE 1 Questo metodo è adatto ai principianti per familiarizzare con il ritmo e il tempo del brano Sul display LCD compare SONG XX dove xx è il numero del brano dimostrativo selezionato Selezionare un brano diverso con il tasto SELECT Il punto ...

Page 81: ...onato Selezionare un brano diverso con il tasto SELECT Il punto di battuta lampeggia sul display LCD per indicare il tempo Il tasto corretto da premere compare sul display LCD Suonare a tempo assicurandosi di premere i tasti giusti ...

Page 82: ...0 Europe Swing 85 Jazz Polka 11 Bossa nova 36 Classic Samba 61 Classic Country 86 Jazz Bossa nova 12 Salsa 37 Europe Disco 62 Argentina Waltz 87 Latin Salsa 13 16 Beat 38 Blue Tango 63 Rock Beguine 88 Jazz 16 Beat 14 Leigui 39 Emotion Rock 64 Jazz Latin 89 Pop Leigui 15 Mambo 40 Classic Swing 65 South Africa Polka 90 Jazz Mambo 16 8 Beat 41 South Africa Country 66 Pattern Bossa nova 91 Classic 8 B...

Page 83: ...azz Guitar 2 10 Harp 35 Vib Clarinet 60 Fx 4 85 Clean E Guitar 11 String Ensemble 1 36 Lead 2 61 Sustain E Piano 86 Acoustic Bass finger 12 Trumpet 37 Pad 2 62 Echo Celesta 87 Vib E Bass 13 Synth Brass 1 38 Sitar 63 Fx 5 88 Synth Bass 5 14 Alto Sax 39 Short Shanai 64 Fretless Bass 89 Short Ocarina 15 Clarinet 40 Echo Violin 65 Baritone E Guitar 90 Bright Harp 16 Lead 1 41 Vib E Piano 66 Acoustic B...

Page 84: ...e Uso di un adattatore sbagliato Utilizzare l adattatore fornito o sostituire le batterie se necessario Vi è una leggera differenza di timbro tra alcune note È normale ed è dovuto alle molte e diverse gamme di campionamento vocale della tastiera Quando si utilizza la funzione di sostegno alcuni toni hanno sostegno lungo e alcuni breve È normale La migliore lunghezza di sostegno per toni differenti...

Page 85: ...Pagina 18 Allegato V Tabelle degli accordi Accordi con diteggiatura singola ...

Page 86: ...Pagina 19 Accordi con diteggiatura ...

Page 87: ... 41 note riproduzione programmazione ritmo 16 battute Percussioni 8 tipi di strumenti a percussione su pannello Controllo dell accompagnamento Start Stop Sync Fill in Tempo Insegnamento intelligente 2 metodi didattici Jack esterni Alimentatore DC 9V Uscita cuffie altoparlante esterno Ingresso microfono Diapason estensione della tastiera C2 F6 Intonazione 3cento Peso 3 9 kg Ingresso CC CC 9V Adatta...

Page 88: ...ta per incoraggiare il riciclo dei prodotti tramite le migliori tecniche di recupero e riciclaggio allo scopo di minimizzare l impatto sull ambiente trattare le sostanze pericolose ed evitare l aumento delle discariche Quando il prodotto non viene più utilizzato smaltirlo utilizzando i processi di riciclaggio dell ente locale Per maggiori informazioni si prega di contattare l ente locale o il rive...

Page 89: ...RJ654 Wielofunkcyjny instrument klawiszowy 54 klawisze Podręcznik użytkownika ...

Page 90: ...lawiszowego Aby uniknąć uszkodzenia powierzchni instrumentu lub jego wewnętrznych części prosimy nie trzymać instrumentu w miejscu narażonym na pył kurz bezpośrednie oddziaływanie promieni słonecznych ani w miejscach w których występują bardzo wysokie lub bardzo niskie temperatury Nie stawiaj instrumentu na nierównej powierzchni Aby uniknąć uszkodzenia części wewnętrznych wskutek zalania nie stawi...

Page 91: ...typu jack i akcesoria 6 Korzystanie ze słuchawek lub głośników zewnętrznych 6 Podłączenie mikrofonu 6 Podstawowe funkcje 7 Włączanie i poziom dźwięku 7 Włączanie i wyłączanie 7 Regulacja ogólnego poziomu dźwięku 7 Brzmienie 7 Wybór brzmienia 7 Sterowanie i efekty 8 Wybrzmiewanie 8 Vibrato 8 Transpozycja 8 Panel instrumentów perkusyjnych 9 Rytm 9 Wybór schematu rytmicznego 9 Start Stop 9 Synchronic...

Page 92: ...ów demonstracyjnych 13 Tryby lekcji 13 Tryb nauki 1 13 Tryb nauki 2 13 Załącznik I Tabela schematów rytmicznych 14 Załącznik II Tabela brzmień 15 Załącznik III Tabela utworów demonstracyjnych 16 Załącznik IV Rozwiązywanie problemów 17 Załącznik V Tabela akordów 18 Akordy grane jednym palcem 18 Akordy grane wieloma palcami 19 Załącznik VI Dane techniczne 20 Instrukcja utylizacji wyrobu 21 ...

Page 93: ...niczny start akompaniamentu 12 Przebitka 13 Wybór 14 Utwory demonstracyjne Gniazda zewnętrzne DC 9V Wejście zasilacza 9V OUT Wyjście słuchawkowe głośnika zewnętrznego OK Wejście mikrofonu elektretowego 15 Start Stop 16 Akompaniament jednym palcem 17 Akompaniament akordami 18 Wyłączenie funkcji akordu 19 Vibrato 20 Wybrzmiewanie 21 Tryb nauki 2 22 Tryb nauki 1 23 Programowanie 24 Odtwarzanie 25 Nag...

Page 94: ...wego zasilacza sieciowego Prosimy używać specjalnego transformatorowego zasilacza sieciowego dołączonego do instrumentu klawiszowego lub zasilacza sieciowego o napięciu wyjściowym 9V DC prądzie wyjściowym 500 mA z wtykiem z plusem w środku Podłącz wtyk prądu stałego DC do gniazda DC 9V na tylnej części obudowy instrumentu klawiszowego a następnie podłącz wtyczkę sieciową do gniazdka i włącz instru...

Page 95: ...ie w tryb oczekiwania o niskim zapotrzebowaniu na energię Aby wyjść z trybu oczekiwania wciśnij dowolny klawisz Zwracamy uwagę że instrument nie przechodzi w tryb oczekiwania podczas odtwarzania utworów demonstracyjnych lub rytmów Gniazda typu jack i akcesoria Korzystanie ze słuchawek lub głośników zewnętrznych Podłącz słuchawki z wtykiem 3 5 mm lub zewnętrzny głośnik do gniazda OUT w tylnej częśc...

Page 96: ...ść wciśnij odpowiedni przycisk MASTER VOLUME Poziom natężenia dźwięku wskazywany jest słupkami na wyświetlaczu LCD Wciśnięcie obydwu przycisków MASTER VOLUME jednocześnie przywraca natężenie dźwięku do poziomu domyślnego Brzmienie Wybór brzmienia Gdy instrument zostanie włączony po raz pierwszy domyślnym wskazaniem wyświetlacza jest TONE brzmienie Aby zmienić brzmienie instrumentu można użyć przyc...

Page 97: ... z tego trybu Vibrato Wciśnij przycisk Vibrato aby wejść w tryb Vibrato Na wyświetlaczu LCD pojawi się znacznik obok napisu VIB Gdy ten tryb jest wybrany każda zagrana nuta rozbrzmiewa z drżeniem na końcu Ponowne wciśnięcie przycisku Vibrato wyłącza funkcję wibracji i powoduje wyjście z tego trybu Transpozycja Wciśnięcie przycisku Transpose zmienia skalę muzyczną granej nuty Można zmieniać skalę t...

Page 98: ...cznego Można wybierać spośród 100 wbudowanych schematów rytmicznych Szczegółowa tabela rytmów znajduje się w załączniku Wciśnij przycisk RHYTHM aby włączyć funkcję wyboru rytmu Na wyświetlaczu LCD pojawi się numer aktualnie ustawionego rytmu Można wybrać żądany rytm wciskając odpowiednie cyfry na klawiaturze numerycznej lub za pomocą przycisków Start Stop Wciśnij przycisk START STOP aby włączyć po...

Page 99: ...ebitka Wciskając przycisk FILL IN możesz wstawić pewnej długości przejście podczas odtwarzania rytmu Po przebitce rytm będzie odtwarzany dalej normalnie Regulacja poziomu dźwięku rytmu Domyślny poziom natężenia dźwięku rytmu ustawiony jest na 7 Można go zmienić wciskając przyciski RHYTHM VOLUME Na wyświetlaczu LCD pojawi się poziom dźwięku podczas regulacji Zakres regulacji 1 10 wskazywany jest sł...

Page 100: ...mpaniamentu po lewej stronie klawiatury klawisze 1 19 Schematy palcowania zawiera Załącznik V Grany akord wyświetlany jest w lewym górnym rogu wyświetlacza LCD Wciśnij przycisk START STOP aby uruchomić lub zatrzymać akompaniament z użyciem akordów Akompaniament akordami Wciśnij przycisk FINGERED CHORD aby wejść w tryb automatycznego akompaniamentu granego za pomocą wielu palców Na wyświetlaczu LCD...

Page 101: ...ostanie usunięte a instrument przejdzie w tryb nagrywania ponownie Przed zapełnieniem pamięci wciśnij przycisk PLAY aby odtworzyć nagrane nuty Wciśnij przycisk PROGRAM aby wejść w tryb edycji schematu rytmicznego Na wyświetlaczu LCD pojawi się znacznik obok napisu REC PROG Możesz edytować sekcję rytmu wciskając przycisk dowolnego spośród 8 różnych dźwięków perkusyjnych na instrumencie Maksymalna d...

Page 102: ...ę z rytmem i tempem utworu Na wyświetlaczu LCD pojawi się napis SONG XX gdzie XX oznacza numer wybranego utworu demonstracyjnego Aby wybrać inny utwór wciśnij SELECT Na wyświetlaczu LCD będzie migać wskaźnik tempa Instrument będzie odtwarzać główną melodię automatycznie Na wyświetlaczu LCD wskazywane będą klawisze które należy naciskać Tryb nauki 2 Wciśnij przycisk LEARN 2 aby wejść w tryb nauki g...

Page 103: ... 60 Europe Swing 85 Jazz Polka 11 Bossa nova 36 Classic Samba 61 Classic Country 86 Jazz Bossa nova 12 Salsa 37 Europe Disco 62 Argentina Waltz 87 Latin Salsa 13 16 Beat 38 Blue Tango 63 Rock Beguine 88 Jazz 16 Beat 14 Leigui 39 Emotion Rock 64 Jazz Latin 89 Pop Leigui 15 Mambo 40 Classic Swing 65 South Africa Polka 90 Jazz Mambo 16 8 Beat 41 South Africa Country 66 Pattern Bossa nova 91 Classic 8...

Page 104: ...mba 84 Jazz Guitar 2 10 Harp 35 Vib Clarinet 60 Fx 4 85 Clean E Guitar 11 String Ensemble 1 36 Lead 2 61 Sustain E Piano 86 Acoustic Bass finger 12 Trumpet 37 Pad 2 62 Echo Celesta 87 Vib E Bass 13 Synth Brass 1 38 Sitar 63 Fx 5 88 Synth Bass 5 14 Alto Sax 39 Short Shanai 64 Fretless Bass 89 Short Ocarina 15 Clarinet 40 Echo Violin 65 Baritone E Guitar 90 Bright Harp 16 Lead 1 41 Vib E Piano 66 Ac...

Page 105: ...abela utworów demonstracyjnych Nr Tytuł utworu Nr Tytuł utworu 01 Horse Race 05 My Heart Must Go On 02 Flying Song on the Earth 06 Unchained Melody 03 The Girls from TianZhu 07 Roundabout Moon 04 Toasting Song 08 Hang with Hand ...

Page 106: ...stępują niewielkie różnice w barwie niektórych nut To normalne Wynika z zastosowania w instrumencie wielu różnych zakresów próbkowania brzmień Podczas korzystania z funkcji wybrzmiewania niektóre dźwięki są bardziej a inne mniej przedłużone To normalne Zaprogramowano najlepsze długości dźwięków dla poszczególnych brzmień Niewłaściwy ogólny poziom natężenia dźwięku lub akompaniamentu Sprawdź czy og...

Page 107: ...Strona 18 Załącznik V Tabela akordów Akordy grane jednym palcem ...

Page 108: ...Strona 19 Akordy grane wieloma palcami ...

Page 109: ...nie programowanie 16 rytmów Perkusja 8 rodzajów instrumentów perkusyjnych na panelu Sterowanie akompaniamentem Start stop start synchroniczny przebitka tempo Inteligentny system nauki 2 tryby lekcji Gniazda zewnętrzne Wejście zasilania 9V DC wyjście słuchawkowe głośnika zewnętrznego wejście mikrofonu Liczba oktaw zakres klawiatury C2 F6 Strojenie 3 centów Waga 3 9 kg Wejście zasilania prądem stały...

Page 110: ...do recyklingu wyrobów stosując najlepsze dostępne metody odzyskiwania i ponownego przetwarzania aby zminimalizować wpływ na środowisko unieszkodliwiać wszelkie substancje niebezpieczne i unikać zwiększania ilości składowanych odpadów Gdy wyrób nie znajduje już dalszego zastosowania prosimy zutylizować go zgodnie z lokalnie obowiązującymi zasadami recyklingu Aby uzyskać więcej informacji prosimy o ...

Page 111: ...Teclado Multifunción de 54 teclas Manual de instrucciones ...

Page 112: ...paración cualificado Manejo del teclado electrónico Para evitar dañar el exterior e interior del teclado electrónico no coloque el aparato en superficies con polvo en contacto directo con la luz solar o en lugares con temperaturas extremas No coloque el teclado electrónico sobre una superficie irregular Para evitar dañar las piezas internas mantenga el aparato alejado de líquidos ni coloque conten...

Page 113: ...Accesorios 6 Uso de Auriculares o Altavoces externos 6 Conexión del micrófono 6 Manejo básico 7 Encendido y volumen 7 Control de potencia 7 Ajuste del volumen principal 7 Tono 7 Selección de tonos 7 Efectos y control 8 Nota tenida 8 Vibrato 8 Transposición 8 Panel de instrumentos de percusión 9 Ritmo 9 Selección de ritmo 9 Encendido Apagado 9 Sincronizado 10 Relleno 10 Ajuste del volumen del ritmo...

Page 114: ...mostración 13 Modo estudio 13 ESTUDIO 1 13 ESTUDIO 2 13 Apéndice I Tabla de ritmos 14 Apéndice II Tabla de tonos 15 Apéndice III Tabla de canciones de demostración 16 Apéndice IV Solución de problemas 16 Apéndice V Tablas de acordes 17 Acordes de Single Finger 17 Acordes Fingered 18 Apéndice VI Especificaciones técnicas 19 Cómo deshacerse del aparato 20 ...

Page 115: ... 11 Sincronizado 12 Relleno 13 Selección 14 Canciones de demostración Conexiones externas 15 Encendido Apagado 16 Acordes Single Finger 17 Acordes Fingered 18 Apagado de acordes 19 Vibrato 20 Nota tenida 21 Estudio 2 22 Estudio 1 23 Programa 24 Reproducción 25 Grabación 26 Percusión 27 Zona de teclado de acordes Entrada de alimentación 9V CC OUT Auriculares Salida externa de altavoces OK Entrada d...

Page 116: ...tador CA CC Utilice el adaptador CA CC especial que viene con su teclado electrónico o un adaptador de corriente con salida de 9V CC y salida de 500mA con el positivo en la parte central Conecte el enchufe CC del adaptador de corriente a la toma de 9V CC de la parte trasera del teclado después conecte el otro extremo al enchufe de pared y encienda el aparato Atención Desenchufe el adaptador de cor...

Page 117: ...el amplificador del teclado entrará en el modo de ahorro de energía Para salir del modo de ahorro de energía presione cualquier tecla Tenga en cuenta que el teclado no entrará en el modo de ahorro de energía durante la reproducción de una canción de demostración o un ritmo Cables y Accesorios Uso de Auriculares o Altavoces externos Conecte el cable de 3 5mm de los auriculares o los altavoces exter...

Page 118: ... cambiar el volumen presione los botones de MASTER VOLUME El nivel del volumen viene indicado por las barras que aparecen en la pantalla LCD Si presionamos a la vez ambos botones del MASTER VOLUME el nivel de volumen volverá al fijado por defecto Tono Selección de tonos Cuando el teclado se enciende por primera vez el modo por defecto es TONE Para cambiar el tono puede presionar los botones de o e...

Page 119: ...to para entrar en el modo de notas vibradas La pantalla LCD mostrará una bandera junto a VIB Una vez seleccionado este modo se añadirá un efecto de vibración a cada nota que toque Si presiona de nuevo el botón Vibrato saldrá del modo nota vibrada Transposición Presionando el botón Transpose se alterará y transportará la escala musical de la nota que se esté tocando en ese momento Puede ajustar la ...

Page 120: ...ue vienen integrados en su teclado Por favor consulte el apéndice para la ver la tabla detallada de ritmos Presione el botón RHYTHM para entrar en la función de selección de ritmo La pantalla LCD mostrará el número del ritmo que está sonando en ese momento Puede seleccionar el ritmo que desee presionando los respectivos dígitos en el teclado numérico o presionando los botones Encendido Apagado Pre...

Page 121: ...cronizado Relleno Usted puede rellenar la música con un pequeño interludio si presiona la tecla FILL IN durante la reproducción del ritmo Después del relleno el ritmo continuará reproduciéndose normalmente Ajuste del volumen del ritmo El volumen del ritmo por defecto es 7 Puede ajustarlo presionando los botones RHYTHM VOLUME La pantalla LCD mostrará el nivel del volumen según lo vaya usted ajustan...

Page 122: ...r cada acorde en el Apéndice V El acorde que se está tocando en cada momento se mostrará en la esquina superior izquierda de la pantalla LCD Presione el botón START STOP para comenzar o detener la reproducción del acompañamiento de acordes Acordes Fingered Presione el botón FINGERED CHORD para entrar en el modo que le permitirá tocar acordes de manera automática Una bandera se mostrará en la panta...

Page 123: ...clado entrará de nuevo en el modo programación Antes de que se llene la memoria presione el botón PLAY para volver a reproducir las notas grabadas Presione el botón PROGRAM para entrar en el modo de edición del ritmo La pantalla LCD mostrará una bandera al lado de REC PROG Es posible editar una sección del ritmo presionando cualquiera de los 8 tipos de ritmo del panel de percusión del teclado La d...

Page 124: ...La pantalla LCD mostrará el texto SONG XX del que xx es el número de la canción de demostración seleccionada Utilice el botón SELECT para seleccionar una canción diferente El indicador de pulsación parpadeará en la pantalla LCD para indicar el tempo A partir de ese momento el teclado reproducirá automáticamente la melodía principal La pantalla LCD le mostrará las teclas que debería usted tocar EST...

Page 125: ...umba 60 Europe Swing 85 Jazz Polka 11 Bossa nova 36 Classic Samba 61 Classic Country 86 Jazz Bossa nova 12 Salsa 37 Europe Disco 62 Argentina Waltz 87 Latin Salsa 13 16 Beat 38 Blue Tango 63 Rock Beguine 88 Jazz 16 Beat 14 Leigui 39 Emotion Rock 64 Jazz Latin 89 Pop Leigui 15 Mambo 40 Classic Swing 65 South Africa Polka 90 Jazz Mambo 16 8 Beat 41 South Africa Country 66 Pattern Bossa nova 91 Class...

Page 126: ...Kalimba 84 Jazz Guitar 2 10 Harp 35 Vib Clarinet 60 Fx 4 85 Clean E Guitar 11 String Ensemble 1 36 Lead 2 61 Sustain E Piano 86 Acoustic Bass finger 12 Trumpet 37 Pad 2 62 Echo Celesta 87 Vib E Bass 13 Synth Brass 1 38 Sitar 63 Fx 5 88 Synth Bass 5 14 Alto Sax 39 Short Shanai 64 Fretless Bass 89 Short Ocarina 15 Clarinet 40 Echo Violin 65 Baritone E Guitar 90 Bright Harp 16 Lead 1 41 Vib E Piano 6...

Page 127: ...e deberse a un uso incorrecto del adaptador de corriente Utilice el adaptador de corriente que viene con el equipo o pruebe a cambiar las pilas Hay una pequeña diferencia en el timbre de algunas notas Esto es normal y puede deberse a la gran cantidad de muestras de voz del teclado Al utilizar la función de nota tenida algunos tonos se mantienen durante más tiempo que otros Esto es algo normal La d...

Page 128: ...Page 17 Apéndice V Tablas de acordes Acordes de Single Finger ...

Page 129: ...Page 18 Acordes Fingered ...

Page 130: ...notas reproducción programación de ritmos de hasta 16 tiempos Percusión 8 tipos diferentes de instrumentos de percusión Control del acompañamiento Inicio Parada Sincronizado Relleno Tempo Aprendizaje inteligente 2 Modos de estudio Jacks externos DC 9V Entrada de corriente Auricular Salida de Altavoz externo entrada de Micrófono Diapasón rango del teclado C2 F6 Entonación 3cent Peso 3 9kg Entrada C...

Page 131: ... a través de la mejor recuperación posible y técnicas de reciclado que reducen al mínimo el impacto sobre el medio ambiente tratan sustancias peligrosas y frenan el aumento de vertederos Cuando ya no sea posible el uso del aparato haga uso del sistema de reciclado que su autoridad local pone a su disposición para deshacerse del aparato Si desea más información póngase en contacto con su autoridad ...

Reviews: