h
FR
PL
RU
SE
1. Für einen ergonomischeren Stand klappe die Füße an der
Unterseite der Tastatur aus.
2. Schließe die beiden ROCCAT™ Ryos MK Pro USB Stecker
an zwei freien USB Ports an.
3. Stecke die ROCCAT™ Ryos MK Pro Aaudio In/Out Stecker
in die entsprechenden Buchsen an deinem Computer.
4. Starte den Computer und stelle eine Internetverbindung her.
5. Rufe die Webseite http://www.roccat.org/support über
deinen Browser auf.
6. Klicke in der Navigationsleiste links auf “ROCCAT™ MK Pro”
und lade die neueste Treiberversion herunter.
7. Starte den Installationsprozess und befolge die
Anweisungen auf deinem Bildschirm.
1. Klap støtterne ud på tastaturets bund for forbedret
ergonomisk position.
2. Sæt ROCCAT™ Ryos MK Pro’s to USB-forbindere i en af
de to ledige USB-porte.
3. Sæt ROCCAT™ Ryos MK Pro’s audio in/out-kabler i de
tilhørende porte på computeren.
4. Start computeren op, og slut den til internettet.
5. Navigér til http://www.roccat.org/support i din browser.
6. Gå til “ROCCAT™ MK Pro” i navigeringsbjælken til
venstre, og download den nyeste driver.
7. Start driverinstallationen, og følg anvisningerne på
skærmen.
1. For a more ergonomic position, fold out the stands on the
base of the keyboard.
2. Plug the ROCCAT™ Ryos MK Pro’s two USB connectors
into any two free USB ports.
3. Plug the ROCCAT™ Ryos MK Pro’s audio in/out cables
into the corresponding ports on your computer.
4. Boot your computer and connect to the internet.
5. Navigate to http://www.roccat.org/support in your
browser.
6. In the navigation bar on the left, go to
“ROCCAT™ MK Pro” and download the latest driver.
7. Start the driver installation process and follow
the on-screen instructions.
1. Para una posición más ergonómica, despliega las patas
en la base del teclado.
2. Conecta los dos conectores USB de ROCCAT™ Ryos MK
Pro a cualquiera de los dos puertos USB libres.
3. Conecta los cables de entrada/salida de audio de ROCCAT™
Ryos MK Pro a los puertos correspondientes de tu ordenador.
4. Enciende tu ordenador y conéctate a internet.
5. Visita la página web http://www.roccat.org/support en
tu navegador.
6. En la barra de navegación de la izquierda, dirígete
a “ROCCAT™ MK Pro” y descarga el último controlador.
7. Inicia el proceso de instalación del controlador y sigue
las instrucciones que aparecen en la pantalla.
1. Ergonomisemman asennon saat aikaiseksi kääntämällä
esiin näppäimistön pohjassa olevat tuet.
2. Liitä ROCCAT™ Ryos MK Pro:n kaksi USB-liitintä vapaisiin
USB-portteihin.
3. Liitä ROCCAT™ Ryos MK Pro:n audio in/out -johdot
tietokoneesi vastaaviin portteihin.
4. Aja tietokoneesi ylös ja avaa Internet.
5. Navigoi osoitteeseen http://www.roccat.org/support
selaimessasi.
6. Valitse vasemmalla olevasta navigointipalkista
“ROCCAT™ MK Pro“ ja lataa uusin ajuri.
7. Käynnistä ajurin asennusprosessi ja noudata näytöllä
näkyviä ohjeita.
DE
DK
EN
ES
FI
TR
1. Pour une position plus ergonomique, activez les cales en
dessous du clavier.
2. Branchez les 2 ports USB du ROCCAT™ Ryos MK Pro à
2 ports USB du PC.
3. Branchez les connecteurs audio du ROCCAT™ Ryos MK
Pro aux connecteurs correspondants sur votre PC.
4. Allumez votre PC et connectez-vous à Internet.
5. Allez sur http://www.roccat.org/support via votre navigateur.
6. Dans la barre de navigation gauche, cliquez sur
« ROCCAT™ Ryos MK Pro » et téléchargez le pilote
le plus récent.
7. Démarrez l’installation du pilote et suivez les instructions
à l’écran.
1.
Dla bardziej ergonomicznej pozycji, odchyl podpórki po
spodniej stronie klawiatury.
2.
Podłącz dwa złącza USB ROCCAT™ Ryos MK Pro do dwóch
wolnych gniazd USB.
3.
Podłącz kable audio we/wy ROCCAT™ Ryos MK Pro
do odpowiednich gniazd komputera.
4.
Włącz komputer i połącz się z Internetem.
5.
W przeglądarce wybierz adres http://www.roccat.org/support.
6.
Na pasku nawigacji po lewej stronie przejdź
do “ROCCAT™ MK Pro” i pobierz najnowszy sterownik.
7.
Rozpocznij instalację sterownika i postępuj zgodnie z instruk-
cjami na ekranie.
1.
Для более эргономичного положения выдвиньте ножки
на задней стороне клавиатуры.
2.
Вставьте два USB-коннектора ROCCAT™ Ryos MK Pro в
два любых свободных USB-порта.
3.
Вставьте кабели audio in/out ROCCAT™ Ryos MK Pro в
соответствующие гнезда компьютера.
4.
Включите компьютер и подсоединитесь к Интернету.
5.
Перейдите на сайт http://www.roccat.org/support в
браузере.
6.
В панели навигации слева перейдите
к “ROCCAT™ MK Pro” и загрузите самый свежий драйвер.
7.
Запустите процесс установки драйвера и следуйте
указаниям на экране.
1. Fäll ut stativet på tangentbordets underdel för att få en
mer ergonomisk position.
2. Koppla ROCCAT™ Ryos MK Pros två USB-kontakter till
två lediga USB-portar.
3. Koppla ROCCAT™ Ryos MK Pros audio in/out-kablar till
motsvarande portar på din dator.
4. Boota datorn och koppla upp dig på Internet.
5. Gå till http://www.roccat.org/support i din webbläsare.
6. I navigationsrutan till vänster går du till
“ROCCAT™ MK Pro” och laddar ner den senaste drivrutinen.
7. Starta installationsprocessen och följ anvisningarna på
bildskärmen.
1.
Daha rahat bir pozisyon almak için klavyenin altındaki
ayakları açın.
2.
ROCCAT™ Ryos MK Pro’nun iki USB bağlantısını boş olan
herhangi iki USB yuvasına takın.
3.
ROCCAT™ Ryos MK Pro’nun ses girişi/çıkışı kablolarını
bilgisayarınızdaki ilgili girişlere takın.
4.
Bilgisayarınıza yükleme yapın ve İnternet'e bağlanın.
5.
Tarayıcınızın arama çubuğuna http://www.roccat.org/support
adresini girin.
6.
Sol taraftaki navigasyon çubuğundan “ROCCAT™ MK Pro”
alanına gidin ve en güncel sürücüyü indirin.
7.
Sürücü kurulumu işlemini başlatın ve ekrandaki talimatları
uygulayın.
ANLEITUNG
INSTRUKTIONER
INSTRUCTIONS
INSTRUCCIONES
OHJEET
INSTRUCTIONS
INSTRUKCJA
ИНСТРУКЦИИ
INSTRUKTIONER
TALIMATLAR
ROCCAT™ EASY-SHIFT
[
+
]™
ADD LIGHT TO YOUR ARSENAL
FOR ENDLESS CONFIGURATION OPTIONS
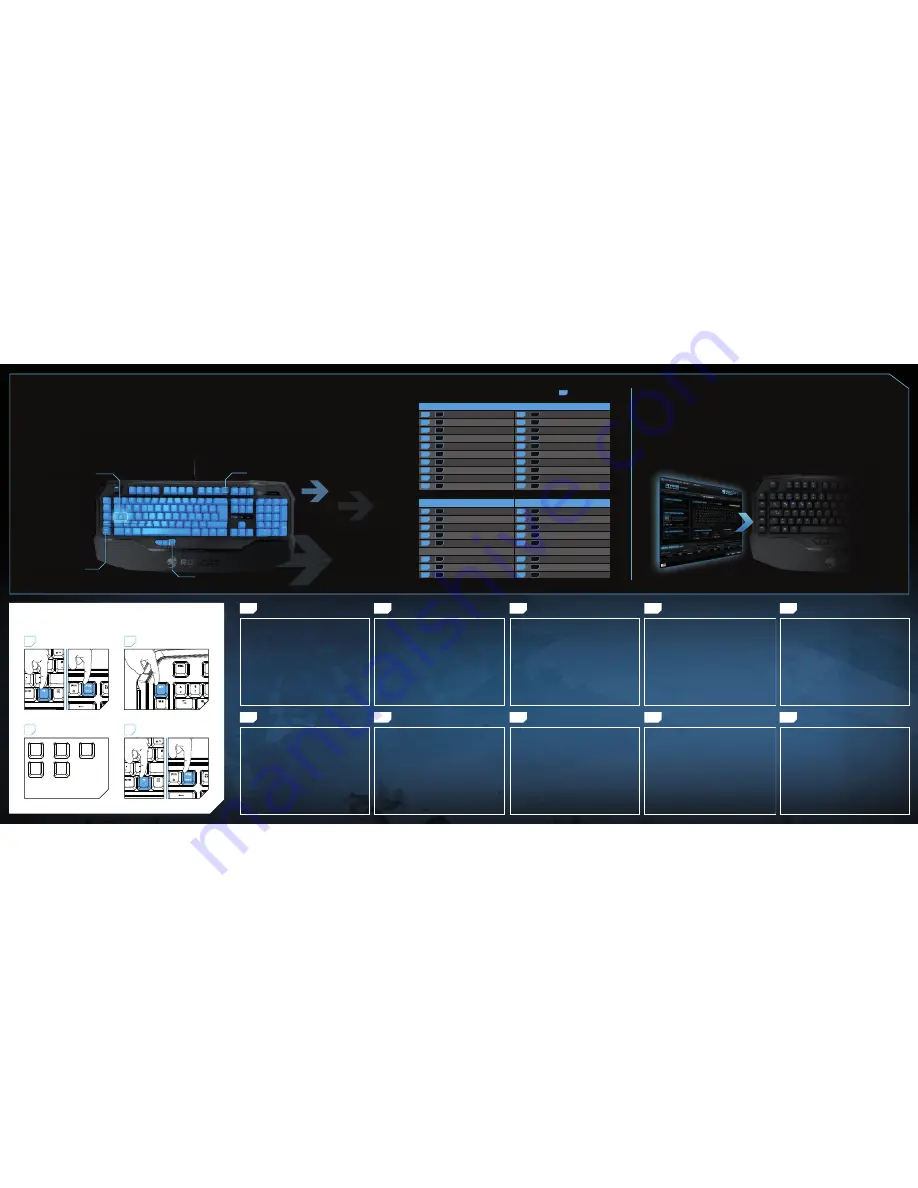
The Ryos MK Pro offers totally customizable, ROCCAT™-enginereed per-key
illumination in two convenient modes: smart and manual. This means you can add
awesome special effects to your keystrokes, confi gure your keyboard to highlight
your in-game and application key bindings, your modifi er keys, your macro
sequences and cool downs, your system controls, and much, much more. The
included software development kit ensures that only your imagination is the limit.
EASY-SHIFT[
+
]™
KEY
THUMBSTER KEYS (T1-T3)
ADDITIONAL
MACRO KEYS (M1-M5)
DUPLICATE YOUR KEYS WITH EASY-SHIFT[
+
]™
The innovative ROCCAT™ driver software allows you to quickly and easily re-map
the primary key functions of virtually every key on the keyboard. Enabled by the
Easy-Shift[+]™ key, you can also assign a secondary key function to those keys –
effectively doubling the number of keys you have at your disposal. Factor in the
fact that you can record and store on board over 500 macros, and you’ve got an
insanely customizable keyboard on your hands.
MASTERFUL MACRO CONTROLS
New enhanced Macro Live! technology makes in-game macro recording a joy.
Simply hold down the function key, hit the Macro Live! recording button, and let the
handy sound feedback tool talk you through the quick and easy recording process,
step by step. Thanks to the powerful 2 MB of fl ash memory, all of your macros are
saved onto the keyboard itself, not the driver – giving you the freedom to lay down
any orders without delay. And you won’t have to leave your game to do it.
EASY-SHIFT[
+
]™ EXAMPLES:
HOW TO USE MACRO LIVE! RECORDING
START LIVE! RECORDING
ASSIGN A MACRO KEY
STOP LIVE! RECORDING
O
L
L
H
E
+
+
+
+
O
L
L
H
E
+
+
+
+
1
2
4
TYPE YOUR OWN MACRO
3
EXAMPLE: “HELLO”
EXAMPLE: M1
HOLD DOWN “FN” KEY AND PRESS “F 12”
HOLD DOWN “FN” KEY AND PRESS “F 12”
PLEASE NOTE:
DELAYS WILL ALSO BE RECORDED.
Easy-Shift[+]
TM
WoW:
[+] +
1
= Mount up
[+] +
A
= Use hearthstone
[+] +
2
= Dismount
[+] +
S
= Autorun
[+] +
3
= Pet attack
[+] +
D
= Hotbar slot #1
[+] +
4
= Pet passive
[+] +
F
= Hotbar slot #2
[+] +
5
= Pet follow
[+] +
G
= Start timer
[+] +
Q
= Yell chat
[+] +
Z
= Your macro #1
[+] +
W
= World map
[+] +
X
= Your macro #2
[+] +
E
= Trade chat
[+] +
C
= Your macro #3
[+] +
R
= Raid chat
[+] +
V
= Your macro #4
[+] +
T
= Party chat
[+] +
B
= Your macro #5
Easy-Shift[+]
TM
Multimedia:
Easy-Shift[+]
TM
Browser:
[+] +
M1
= Play or pause
[+] +
M1
= New tab
[+] +
M2
= Stop playback
[+] +
M2
= New window
[+] +
M3
= Play the previous item
[+] +
M3
= Switch to previous tab
[+] +
M4
= Play the next item
[+] +
M4
= Switch to next tab
[+] +
M5
= Rewind
[+] +
M5
= Switch to full screen & back
[+] +
T1
= Volume up
[+] +
T1
= Page back
[+] +
T2
= Volume down
[+] +
T2
= Page forward
[+] +
T3
= Mute volume
[+] +
T3
= Minimize window
[+] = Easy-Shift[+]
TM
key
MACRO LIVE! KEY
Double up your keys: program
a secondary key function
in the ROCCAT™ driver and
then enable it by holding
down the strategically-placed
Easy-Shift[
+
]™
key.


