background image

ROBOT USER MANUAL

8

Part Two How to Operate the Robot

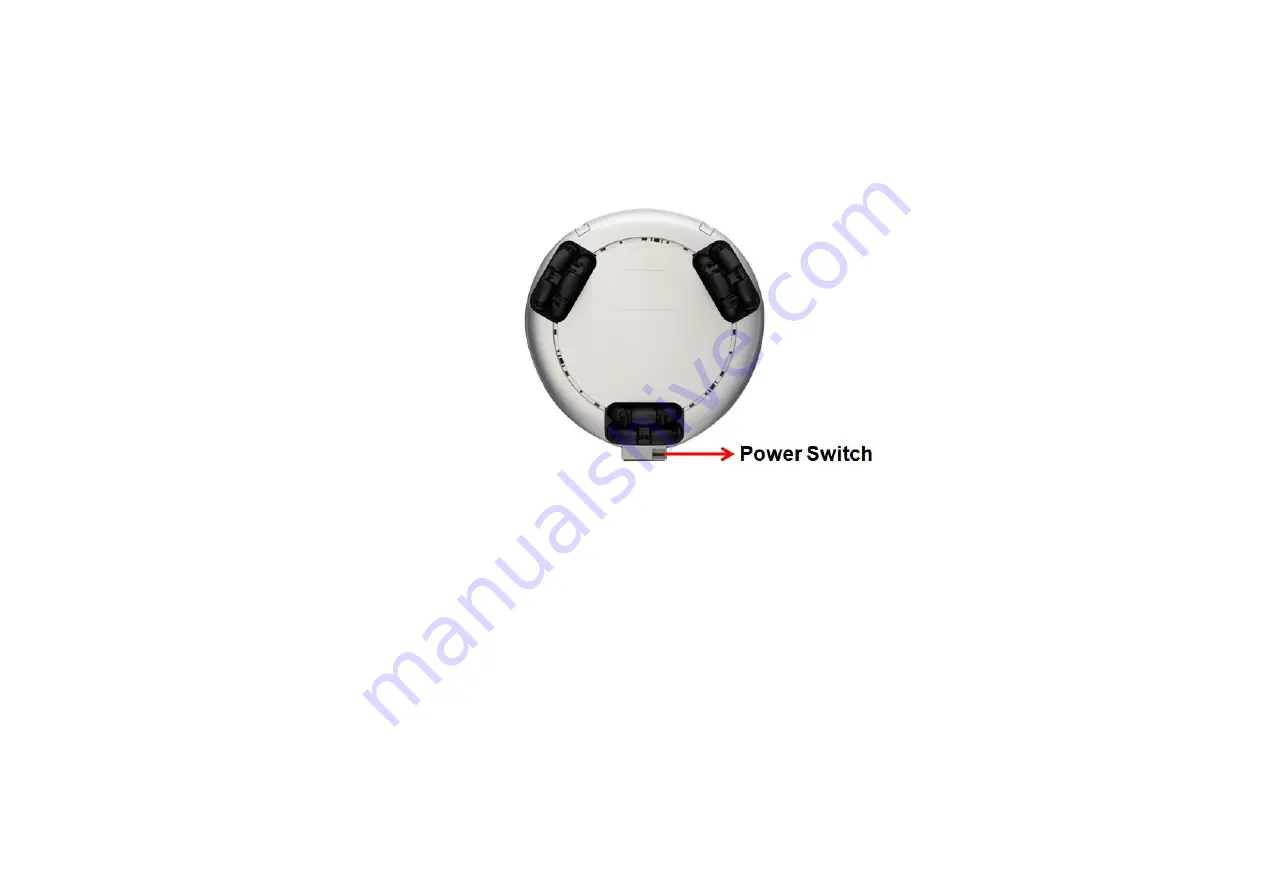
1. Turn On\Off

Press the power switch at the bottom of the robot to turn on or turn off the power.

It is easy to move the robot in the state of power-on

.

But

when you need to move the robot in the state of power-off, please push its front body forward, i.e. push it

go backwards, or push its back slowly at constant speed.

2. Start-up Guide

When starting the robot for the first time or after restoring the local factory settings, touch the screen to start the wizard, then go through all proposed steps, i.e. Start-up

loading, Choose menu language, Robot self-introduction (you can choose to skip the cartoon), Agree terms for usage, Choose your WIFI and input the password, Choose

screensaver role, Show the password of administrator (the default password for administrator is

admin

), Scan OR code by mobile App “Q-Link” to add the robot as admin (you

can skip this step), Other settings, Finish.

The above settings will not show in the following start-up.

Summary of Contents for sanbot

Page 1: ...ROBOT USER MANUAL ...

Page 2: ...een the robot s head and its body to avoid being jammed while the robot moves Our company will regularly improve and update the manual Updated contents will be added into the new edition of this manual without further notice This manual may have some inaccurate technical contents or operational contents not conforming to the product If you confront with problems that you can t handle according to ...

Page 3: ...2 Part One To Know Your Robot 1 Packing List Robot Charging pile contains adaptor Power line Quick guide manual We will arrange the consignment according to your choice of purchase the above picture is for reference only ...

Page 4: ...ROBOT USER MANUAL 3 2 Robot Appearance Front ...

Page 5: ...ROBOT USER MANUAL 4 2 Robot Appearance Back ...

Page 6: ...ROBOT USER MANUAL 5 2 Robot Appearance Lateral ...

Page 7: ...ROBOT USER MANUAL 6 2 Robot Appearance Top Bottom ...

Page 8: ...ROBOT USER MANUAL 7 3 Charging Pile Appearance Front Back ...

Page 9: ...n starting the robot for the first time or after restoring the local factory settings touch the screen to start the wizard then go through all proposed steps i e Start up loading Choose menu language Robot self introduction you can choose to skip the cartoon Agree terms for usage Choose your WIFI and input the password Choose screensaver role Show the password of administrator the default password...

Page 10: ...an account please input the correct user name and password and click Login Note When you create a new account the user name should be 6 to 18 letters or a combination of letters and numbers and the password should be a combination of 6 to 18 letters and numbers 3 Add Robot Friends 1 Add friends Click the button on the top right corner of the Q Link APP and select scan QR code of you r relatives an...

Page 11: ...e she can decide whether or not to agree to the application and divide them into groups for easier management 4 Control Robot Remotely After you finish add the robot you can use Q Link to control your robot remotely Click on the bottom side to access the robot eye Click button to browse videos in the high definition color camera of the robot Click to record the current video Click again to stop re...

Page 12: ...urrent video will all saved in your phone you can click Me choose Photos to view it 5 Remote Voice Click on the bottom of the Q Link APP and choose Remote voice Click and when it become it is means the speech recognition state you can chat with the robot remotely or speak your voice command for example click and talk to smart phone like Sing a song then the robot will automatically recognize your ...

Page 13: ...e to your contacts include words voice picture voice call video call etc Recommend some useful and interesting applications and intelligent devices etc and discover applications everybody likes and new developments and so on 8 Devices On the Devices interface you can You can scan the QR code on the robot to add the robot if you haven t added it After you have added the robot you can select certain...

Page 14: ...d videos that you take and record when you use the Q Link APP to browse videos of the robot Manage the added friends and chats message quick contact your friends Change the login password of each group and edit their operating authorization only for administrator Login the community share some technical question about the robot View the robot voice command words Set video 3G 4G reminder remind no ...

Page 15: ...l lead charging failure or avoid the robot be tripped by it 2 Placing on the ground flat and wall mounted Place the charging pile on the ground Choose a position with appropriate height on the wall and drive two nails into the wall Make sure that the distance between the two nails should be in accord with the distance between the two wall mounted holes in the charging pile Raise the charging pile ...

Page 16: ...harging pile blinks this moment you can release the button Attention If you release the button before or after the state of the indicator light of the charging pile blinks you will lead to the reset failure Refresh the device list touch hold and pull down the device list or re access the Intelligent Circle interface or restart the robot After several seconds if the charging pile displays Connected...

Page 17: ...arging pile the robot can move freely Charging will stop if the robot disconnect with the charging pile 3 Battery Indication For the robot Power on status When it isn t charging the wing indicator light flashes red which means the residual battery capacity is equal to or less than 40 The touch screen also displays current residual battery capacity When it is charging if the wing indicator light fl...

Page 18: ...y charged charging pile will be auto closed and the indicator light will be turned off Touch and hold the emergency charging button for 2 seconds to turn on or turn off LED indicator light 4 Electrical Safety Infrared signals from the charging pile can be opened and projected only when the robot is searching for the charging pile When the robot finds the charging pile away from it about 50cm the c...

Page 19: ...ead Please do not immerse the product or the charging pile into any liquid Please pay attention to those places where the product may fall or tumble to the ground Please use the configured charging pile to charge up the product Be sure not to use other types of power adapters Please do not throw or kick the product and the charging pile which may result in mechanical failure abnormal function as w...

Page 20: ...lt setting is that everyone is allowed to use all functions of the robot We suggest not activating administration authority if there is no special reason If you do activate the authority change the admin password and can not log in since you don t remember it please click the button Forgot Your Password on the log in window and send the ID number and date in the form of texts or photos to the afte...

Page 21: ...not added the charging pile for the robot If so please refer to the charging mode in Part Four See if there are barriers blocking the robot or the induction area of the charging pile from transmitting and receiving infrared rays If so please move those barriers Check if the robot and the charging pile are in the different rooms If so it takes the robot more time to find the charging pile Please mo...

Page 22: ...robot Make sure that you do not speak from a distance too far away from the robot Make sure that you do not speak too fast or unclearly since Sanbot can only recognize clear words See if you set a relatively low sensitivity for the robot If so you can access the settings to adjust the sensitivity of wake on voice Q What if the robot can t be wakened A See if the silent mode is enabled Touch and ho...

Page 23: ...ke the robot to answer questions on the basis of your settings Directions for custom semantics under the English Information Processing System are as follows The rules for editing semantic questions and answers symbols other than are not allowed in the semantic questions Include punctuation and abbreviation such as what s is not allowed we should use what is The symbol expresses any statement in t...

Page 24: ...nd the pictures are still not good enough after using the above mentioned means you can dim the indoor light and then control phase and optic axis through Definition Settings According to screen prompts click the or button and make the lines projected on the wall or the roof coincide Q How to upgrade locally if there is badly in need of upgrade under the poor network condition A Please contact wit...

Page 25: ...reen when the robot is wakened You can control the robot via voice and chat with the robot The ear light turns red when someone is browsing videos via mobile APP The ear light turns blue when you press the silent button Then the robot will not be wakened by environmental sounds Q What formats does the robot support for video and audio files A Video formats that the robot supports MP4 WMV RMVB AVI ...

Page 26: ...do if something abnormal about the robot appears A You can use the following methods reboot the robot reset the local factory settings access Hardware test to find related items for trouble shooting If the problem is not solved yet please send related information such as pictures videos robot software version number ID number etc to the after sales service They will solve the problem for you Or yo...

Page 27: ...lectronic compass sensor x 1 Hand IR evading obstacle sensor x 4 Touch sensor x 2 Leg IR evading obstacle sensor x 10 Omni Wheel x 3 Moving parts Head 2 x DOF 180 degree at horizontal direction 30 degree at vertical direction Hand 1x2 L R DOF 270 degree swing back and forth Leg 3 x DOF Free angle Video 8 0MP HD camera 1 0MP HD color camera with 140 degree aspheric surface angle Display 10 1 inch 1...

Page 28: ...OT USER MANUAL 39 Items Specifications Wireless network ZigBee Atmosphere lamp 250 kinds customized colors 2 cycles for ears 2 pcs for hands and 1 cycle for chassis Moving speed 0 8m s max Grade 1 5cm max ...

Page 29: ...ight x 110mm Depth x 248 5mm Width Weight 1 35kg with adaptor Input AC 100 240V 50 60Hz Output DC 19V 4 75A Display LEDs 1pcs for Respiration display Working Temperature 0 C 35 C Working Humidity 10 90 Auto recharging IR distance 0 5 meters 180 degree signal covering Installation Indoor floor type or wall mounted ...

Page 30: ...ROBOT USER MANUAL 41 ...

Reviews: