background image

7

GB

Thank you for buying a Roblin product which has been manufactured to the highest quality standards 

to meet your requirements.

We recommend you carefully read this booklet in which you will find instructions for installation, hints for 

use and maintenance.

The Instructions for Use apply to several versions of this appliance. Accordingly, you may find descrip-

tions of individual features that do not apply to your specific appliance.

ELECTRICAL

•  This cooker hood is fitted with a 3-core mains cable with a standard 10/16A earthed plug.

•  Alternatively the hood can be connected to the mains supply via a double-pole switch having 3mm 

minimum contact gap on each pole.

•  Before connecting to the mains supply ensure that the mains voltage corresponds to the voltage on 

the rating plate inside the cooker hood.

•  Technical Specification: Voltage 220-240 V, single phase ~ 50 Hz / 220 V - 60Hz.

 INSTALLATION ADVICE

•  Ensure the cooker hood is fitted in compliance with the recommended fixing heights.
•  To ensure the safe operation of this cooker hood, we recommend that the hood should not be fitted 

below 65cm (for electric) or (70cm for gas) the measurements taken from the surface of the cooking 

appliance to the underside of the cooker hood.
•  It is a possible fire risk if the hood is not sited as recommended.
•  To ensure the best results, the cooking fumes should be able to rise naturally towards the inlet grilles 

on the underside of the cooker hood and the cooker hood should be positioned away from doors and 

windows, which will create turbulence.
•  Ducting
•  If the room where the hood is to be used contains a fuel-burning appliance such as a central heating 

boiler then its flue must be of the room sealed or balanced flue type.
•  If other types of flue or appliances are fitted ensure that there is an adequate supply of fresh air to 

the room. Ensure the kitchen is fitted with an airbrick, which should have a cross-sectional measurement 

equivalent to the diameter of the ducting being fitted, if not larger.
•  The ducting system for this cooker hood must not be connected to any existing ventilation system, 

which is being used for any other purposes or to a mechanically controlled ventilation ducting.
•  The ducting used must be made from fire retardant materials and the correct diameter must be used, 

as incorrect sized ducting will affect the performance of this cooker hood.
•  When the cooker hood is used in conjunction with other appliances supplied with energy other than 

electricity, the negative pressure in the room must not exceed 0.04 mbar to prevent the fumes from 

combustion being drawn back into the room.
•  The appliance is for domestic use only and should not be operated by children or people who are 

infirm without supervision. 
•  This appliance must be positioned so that the wall socket is accessible.
•  This appliance is not intended for use by persons (including children) with reduced physical, sensory 

or mental capabilities, or lack of experience and knowledge, unless they have been given supervision or 

instruction concerning use of the appliance by a person responsible for their safety.
Children should be supervised to ensure that they do not play with the appliance.

3   

FITTING

Any permanent electrical installation must comply with the latest regulations concerning this type of instal-

lation and a qualified electrician must carry out the work. Non-compliance could cause serious accidents 

or injury and would deem the manufacturers guarantee null and void. 

IMPORTANT - 

The wires in this mains lead are coloured in accordance with the following code :

Summary of Contents for CRYSTAL ELECTRO

Page 1: ...ION ET D UTILISATION INSTRUCTIONS FOR INSTALLATION AND DIRECTIONS FOR USE MONTAGE UND GEBRAUCHSANWEISUNG LIBRETTO DI ISTRUZIONI INSTRUCCIONES DE INSTALACION E UTILIZACION MONTAGE EN GEBRUIKSHANDLEIDIN...

Page 2: ...TALACION DEL APARATO FUNCIONAMIENTO CONSEJOS DE UTILIZACION MANTENIMIENTO GARANTIA Y ASSISTENCIA TECNICA NOTA GB CONTENTS ELECTRICAL WIRING INSTALLATION ADVICE FITTING THE APPLIANCE OPERATION USEFUL H...

Page 3: ...toute hotte ou groupe d aspiration une distance inf rieure 0 65 m du plan de travail risque d inflammation des filtres La fum e doit monter naturellement vers la zone de captation Respecter le diam tr...

Page 4: ...on La hauteur de la hotte par rapport au plan de cuisson est d termin e dans ce cas par la hauteur de la cr dence Rep B et par l ventuel dosseret du plan de travail La cr dence doit tre mont e avant l...

Page 5: ...e Raccordement Electrique et v rifier le bon fonctionnement de l clairage du moteur et du changement des vitesses d aspiration d Enlever les filtres m talliques et placer la cartouches charbon actif d...

Page 6: ...u d teindre le moteur La vitesse intensive ne peut pas tre actionn e si la fonction Delay est active La vitesse in tensive est temporis e sur 10 minutes sur l afficheur est vi sualis e l inscription H...

Page 7: ...jamais d ponges ou de chiffons tremp s N introduisez aucun objet ni les mains dans l ouverture servant l vacuation de l air Conduit d vacuation V rifier tous les 6 mois le bon coulement de l air vici...

Page 8: ...C Votre produit est con u et fabriqu avec des mat riaux et des composants de haute qualit qui peuvent tre recycl s et utilis s de nouveau Veuillez vous informer du syst me local de s paration des d ch...

Page 9: ...of the room sealed or balanced flue type If other types of flue or appliances are fitted ensure that there is an adequate supply of fresh air to the room Ensure the kitchen is fitted with an airbrick...

Page 10: ...ut splashback The distance H is the minimum height in mm from the cooking appliances to the bottom edge item 3 of the front panel of the hood At the point marked draw a horizontal line parallel to the...

Page 11: ...ation spigot bracket item 4 onto the upper chimney wall bracket using the same fixing screws Fig 7 item 2 Put the spigot item R into the spigot bracket item 4 Insert the connection extension pieces la...

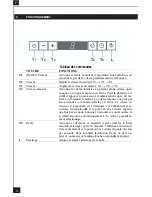
Page 12: ...g off the motor this function can be deacti vated Intensive speed cannot be activated when the delay function is on Intensive speed has been timed at 10 minutes H appears on the display and a spot dow...

Page 13: ...ore frequently if the hood is used for more than 3 hours per day To remove and replace the metal grease filters Remove the metal grease filters one at a time by releasing the catches on the filters th...

Page 14: ...proper use or neglect the replacement of any light bulbs or filters or removable parts of glass or plastic These items are considered to be consumable under the terms of this guarantee 8 REMARKS This...

Page 15: ...DerAu endurchmesser am Gebl seabgang des Ger tes ist f r die Wahl desAbluft Rohrsystems zu ber cksichtigen Die Dunstesse darf keinesfalls an eine Entl ftungsleitung mit Unterdruck angeschlossen werde...

Page 16: ...age des Haubenk rpers erfolgen Die maxi male Haubenweg betr gt 16 mm R ckwand Optional Der Abstand der Haube von der Kochmulde wird in diesem Fall von der H he der R ckwand B und des eventuell anzubri...

Page 17: ...teckdosedes Gebl ses einwandfrei eingesteckt wird Abb 4 Den Netzanschluss der Haube vollziehen siehe Abschnitt Netzanschluss und den guten Betrieb der Beleuchtung des Motors sowie als die Ver nderung...

Page 18: ...den Motor ausschalten Bei aktivier ter Delay Funktion l sst sich die Intensivstufe nicht aktivieren Die Intensivstufe dauert 10 Minuten Auf dem Display wird H ange zeigt und der Punkt unten rechts bli...

Page 19: ...t Waschmittel und Sp len oder in der Geschirrsp lmaschine zu REINIGEN Diese Ma nahmen vermindern die Brandgefahr starke Fettr ckst nde sind leicht brennbar Geh use Keine nassen T cher f r die Reinigun...

Page 20: ...op ischen Richtlinien 2004 108 EWG zur elektromagnetischen Vertr glichkeit und den Richtlinien 93 68 EWG zur CE Kennzeichnung Das Symbol auf dem Produkt oder seiner Verpackung weist darauf hin dass di...

Page 21: ...io la cappa non deve in alcun caso essere collegata ad un condotto di ventilazione meccanica controllata V M C Qualora l aria viziata fosse scaricata in un condotto d evacuazione verificare che quest...

Page 22: ...e dimensioni finali dei mobili 4 Montaggio del corpo cappa Prima di iniziare l installazione necessario regolare le staffe di sup porto Vr ruotando in senso orario le viti di regolazione fino a fine c...

Page 23: ...nte le due falde laterali del camino Fig 7 Rif 7a aggan ciarle dietro le Staffe 2 e richiuderle fino a battuta Fissare lateralmente alle Staffe con 4 Viti 12c 2 9 x 9 5 in dotazione Assicurarsi che l...

Page 24: ...lo stesso tasto o spegnere il motore L intensiva non attivabile se attiva la funzione Delay La velocit intensiva temporizzata a 10 minuti sul display viene visualizzato H e il punto in basso a destra...

Page 25: ...vacuazione Verificare ogni 6 mesi la buona evacuazione dell aria viziata Rispettare le norme nazionali vigenti relative all evacuazione dell aria viziata Illuminazione Prima di effettuare qualsiasi in...

Page 26: ...li e componenti di alta qualit che posssono esere riciclati e riutilizzati Si prega di informarsi in merito al sistema locale di raccolta differenziata per i prodotti elettrici ed elettronici Rispetta...

Page 27: ...rmalmente prohibida la instalaci n de cualquier campana o grupo de aspiraci n a una distancia inferior a 0 65 m del plano de cocci n entonces existir a riesgo de incendio del filtro Los humos deben sa...

Page 28: ...soportes suministrados 3 Realizaci n agujeros de sujeci n Fig 1 2 Rep 1 Marcar un punto en la l nea vertical a una distancia del plano de cocci n de d 964 min sin panel La medida H corresponde a la a...

Page 29: ...salida redonda del difusor apretando hacia abajo y colocar de la misma manera el empalme R asegurarse de que en el empalme R est n colocadas las dos prolungaciones filtrantes G Asegurarse de que la a...

Page 30: ...la basta con apoyar de nuevo en la misma tecla que se utiliz o de apagar el motor La velocidad intensiva no puede impulsarse si la funci n Delay es activa La velocidad intensiva se temporiza sobre 10...

Page 31: ...a mano con un detergente l quido con agua templada y aclarado o en el lavavajillas cada dos meses m s o menos para una utilizaci n normal Carcasa Limpiar regularmente la carcasa utilizando detergente...

Page 32: ...as normas europeas 2004 108 CE en relati n con la compatibilad electroma gnetica y C E E 93 68 en relaci n con la marcaci n CE Cuando vea este s mbolo de una papelera con ruedas tachada junto a un pro...

Page 33: ...is van groot belang dat de afvoerdiameter in acht wordt genomen Een apparaat met motor mag nooit worden aangesloten op een centraal ventilatiesysteem De kookdampen mogen niet door een afvoerbuis gelei...

Page 34: ...ellingen zijn mogelijk met de stels chroeven van de wasemkap zie Montage van de wasemkap De wasemkap mag een maximale uitslag hebben van 16 mm Spatscherm optie De hoogte van de wasemkap boven de kookp...

Page 35: ...er de vetfilters zie par Onderhoud en verzeker u ervan dat de stekker van de voedings kabel goed in de contactdoos van de afzuigkap is gestoken Fig 4 Voordat de schachten op de afzuigkap worden bevest...

Page 36: ...Deze i ntensieve snelheid kan niet geactiveerd worden terwijl de Delay functie actief is Ze duurt 10 minu ten op de display verschijnt er de letter H en het puntje on deraan rechts knippert n maal per...

Page 37: ...de afwasmachine Deze maatregel voorkomt het gevaar van brand Behuizing Gebruik geen natte doeken om de behuizing te reinigen Het gebruik van een milde zeep in combinatie met een vochtige doek wordt a...

Page 38: ...t product conform is de Europese Richtlijn 2002 96 EC Uw apparaat werd ontworpen met en vervaardigd uit onderdelen en materialen van superieure kwaliteit die gerecycleerd en opnieuw gebruikt kunnen wo...

Page 39: ......

Page 40: ...2 2 8 8 2 8 6 0 0 7 45 6406016 Cr dence Splaschback R ckwand Fondale Credencia Rugwandpaneel OPTION OPTIONAL OPTIONAL OPZIONALE OPCIONAL OPTIE B ACCESSOIRES ACCESSORI ACCESSORIES ACCESORIA ZUBEH RE A...

Page 41: ...Composants Components Bauelemente Componenti Componentes Onderdelen 9 7a 7b 8 5 9 4 4 2 2...

Page 42: ...B BLUE BLEU BLAU Br BROWN BRUN BRAUN G Y GREEN YELLOW VERT JAUNE GR N GELB Gr GREY GRIS GRAU L B LIGHT BLUE BLEU CLAIR HELL BLAU P PINK ROSE ROSA V PURPLE MAUVE MALVER FARBIG R RED ROUGE ROT W WHITE B...

Page 43: ...nection Unit to BS 1363 Part 4 fitted with a 3 Amp fuse is a recommendedmains supply connectionaccessoryto ensure compliance with the Safety Requirements applicable to fixed wiring instructions The wi...

Page 44: ...1 min 724 max 1036 350 291 80 126 63 41 396 898 65 500 150 0 5 6 n i m 248 30 108...

Page 45: ...m 0 5 6 i n i m H 2 1 1 1 7a 7b 1 6 2 3 5 2 1 232 m m 0 5 6 i n i m H 1 1 1 7a 7b 1 6 2 3 5 2 1 13 232 m m 0 5 6 i n i m H 1 1 1 7a 7b 1 6 2 3 5 2 1 9 2 9 2 9 2 9 2 9 2 9 2 9 2 9 2 964 2 1 1 1 1 1 1...

Page 46: ...14 3 3a 3b Vr Vr 12a...

Page 47: ...45 6 4 5 7a 8 7b 9 E14 40 W 230 V Code 12 EC009...

Page 48: ...46 7 8 A 7b 9 2 964 7a R G 4...

Page 49: ...tique de la hotte Rating plate of the cookerhood Typenschild im Inneren der Dunstesse Etichetta all interno della cappa Etiqueta de la campana Typeplaatje van de afzuigkap Num ro de s rie Serial numbe...

Page 50: ......

Page 51: ......

Page 52: ...ue des Rosiers Sainte C cile B P 56 50800 VILLEDIEU LES PO LES France T l 02 33 91 26 50 Fax 02 33 51 54 79 e mail com france roblin fr For outside France Tel 33 0 2 33 91 26 57 Fax 33 0 2 33 51 54 79...

Reviews: