


5
Installation
Mounting to a stud is recommended. However, if fitted to other wall linings (plasterboard, concrete etc) suitable
fixings will be required. Before drilling any holes check that the wall and ceiling are clear of any electrical cables,
pipes etc.
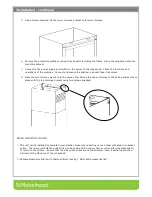
1.
Pre drill pilot holes in the positions given (Pg 4 - Installation position). Fix the mounting bracket using the
screws supplied or appropriate wall fixings, check with a spirit level to ensure bracket is level. Tighten screws.
2.
Mark the position of the decorative chimney at the ceiling and wall. Cut the cornice moulding away if
required, to enable the chimney to sit flush against the wall and ceiling. If a chimney extension kit is
required, see page 8, Chimney extensions.
3.
Only if ducting
- Mark and check, then cut out the hole in the ceiling / wall to fit the ducting (160mm
dia max).
4.
Using the screws supplied, fix the top chimney bracket to the wall, checking that is central about the
canopy.
Wall stud
Fixing screw
Rear wall
Fixing plate


